On the Communications page, you can see that emails are assigned to different customers.
Outbound emails from YayPay are automatically assigned to the customer associated with the outgoing email. Similarly, once inbound emails are read into the platform, they are also assigned to a customer. In addition to this automatic assignment, you can manually manage these assignments or use custom fields to refine the process.
Once these emails are assigned in YayPay, you can see them in the following places:
- The EMAILS tab located at the bottom of the customer's Statement page:

- The Communications page, with the appropriate labels associated with the email:

How does Email Assignment work
YayPay automatically assigns outbound emails to corresponding customer records.
The automatic email assignment for inbound emails works in the following way:
- If a customer level custom field is specified in the Customer level custom field field on the Settings | Emailpage, the following applies:
YayPay retrieves all custom field values from the Customer level custom field field and filters out any values consisting of 4 characters or less. This is done to prevent matching with common vocabulary words.
-
YayPay checks the email's subject line.
If it contains a value from a customer level custom field, a match is found. For example, the subject line 90+ Past Due Notice Axe Capital REF:993731 will match a customer called Axe Capital with a custom field value 993731.
-
YayPay checks the email content.
For example, if the content contains a value from a customer’s custom field, a match is found.
You should ensure that the custom field values are unique to avoid confusion with common words or invoice numbers. For example, E-Cord, please pay invoice Ref:993731 will match a customer Axe Capital with a custom field value 993731.
For newly received emails, YayPay checks the sender's email address and tries to match it with a customer who has the same email listed as a contact.
If the email was sent from YayPay to a customer, all replies are automatically assigned to the same customer.
If multiple customers use the same email address as a contact, the email will only be assigned to the first customer YayPay finds with that email address.
If no email contacts are found, and the Email - Look at email body to associate emails to customers is enabled in Settings | Business, YayPay will search the email's body for a contact and assign the email to the first customer it finds with the same email address.
- If no matches are found, the email will remain unassigned. This will be indicated on the Communications page where no customer name will appear and a not assigned message will be displayed.

Manual Email Assignment
You can also manually assign, unassign, or reassign emails to a specific customer in YayPay.
To do so:
-
Select an email on the Communications page.
In the message detail panel on the right, click on the three vertical dots and select the Manage Customer option.
- In the Manage Customer dialog that opens, either select the Unassignedoption to unassign a customer, or select a customer from the list to assign the email to.

-
Click CONFIRM to save your changes.
As a result, the information about the currently assigned or unassigned customer will be displayed in the email list on the Communications page.
Assign Customer to Email with Customer Level Custom Field
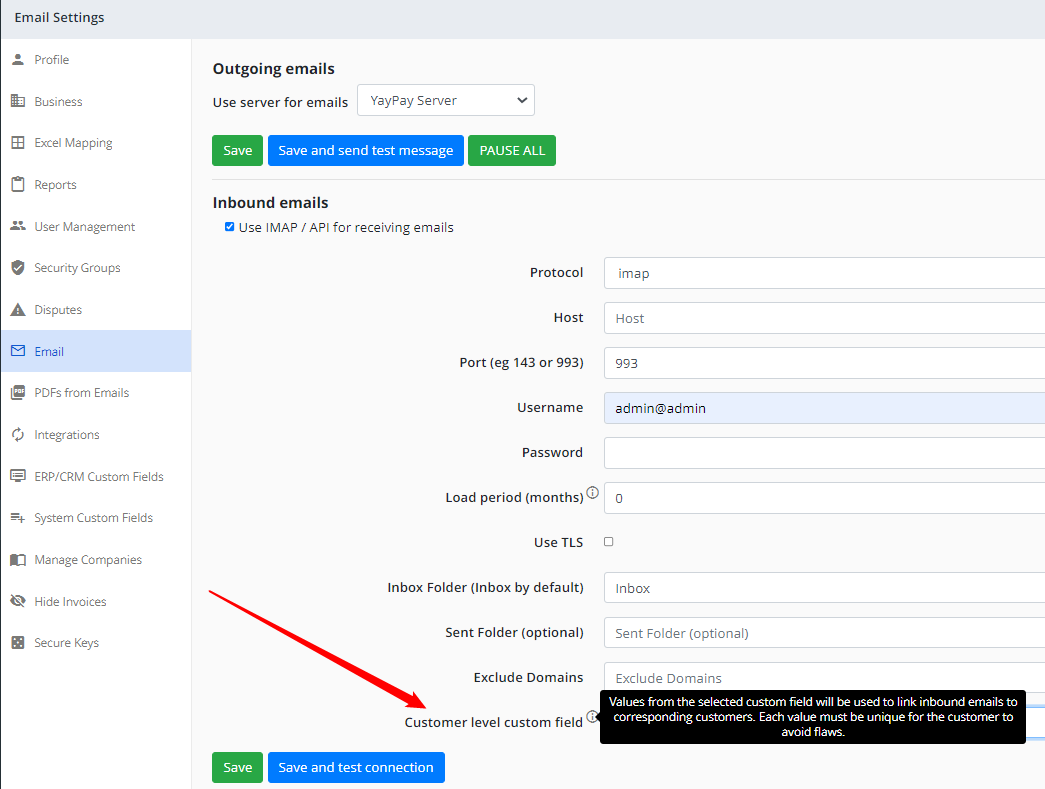
You can also assign a customer to an email with the help of a customer level custom field in the Settings > Email section. Configure using IMAP/API for receiving emails:

Values from the custom field (selected from the available dropdown list) will be used to link inbound emails to corresponding customers. Each value must be unique for the customer to avoid flaws.
