The Tasks page is a central place that displays all open, overdue, current, and completed tasks on their respective tabs. These tasks can be created manually or automatically through the events and actions configured within a workflow and global rules.
Use the filter located in the top left corner of the page to refine the list by the tasks' Assignee, Type, or Priorities. You can also sort and/or filter content of specific columns by clicking on their names.
In addition, you can export the task list as an Excel file by clicking the Excel icon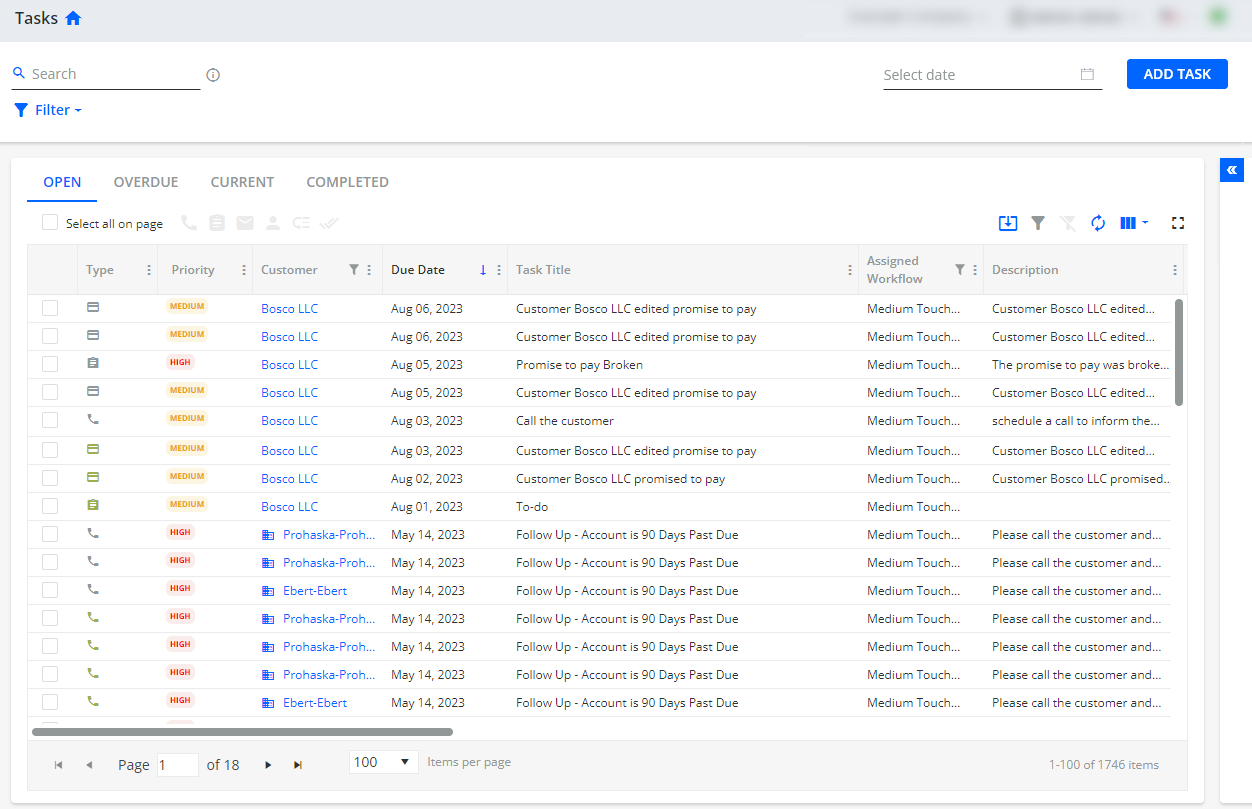
In the following sections, you will learn how each action on the Tasks page works.
Search for Tasks
There is a Search bar at the top of the page that enables you to search and look up
- the Company name
- the Tasks title
so as to retrieve all items related to your search attempt:
Alternatively, use the Filter option (choose from the dropdown list) to refine the list of tasks (see Working with Tasks filters below)
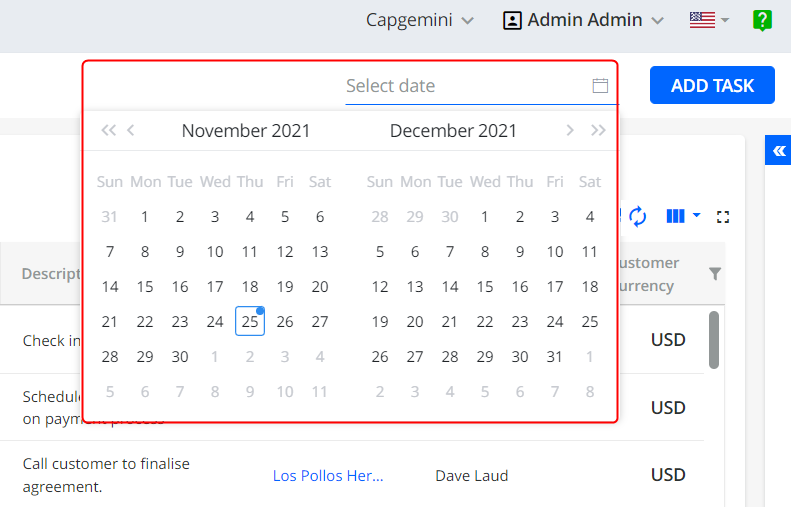
Use the Date Range / Picker to view the Tasks within that specific Date Range (From/To), i.e. the list will display all Tasks where the Due date falls within the Date Range:
Create a new Task
Navigate to the main Tasks menu, and then click on the "Add Task" button to create a new Task.
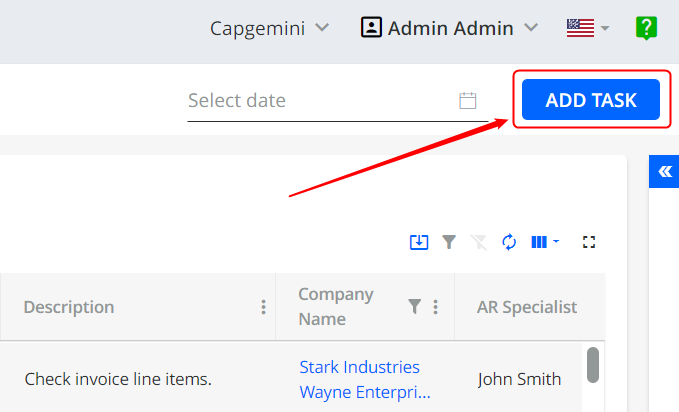
This opens the Add Task dialog where you can configure a task.

To configure a task, specify the following:
- Title - This is the title of the task
- To - This is the Customer that the Task is associated with
-
Assignee- Assignee- Set an assignee of the task.
When creating a task manually, the following applies:- If an AR specialist is assigned on the Statement page, tasks will automatically be assigned to this person.
- If an AR specialist is not set on the Statement page, tasks created by yourself will automatically be assigned to you.
- If there is no need to assign a task, select Unassigned from the Assignee drop down list.
- Due Date - This is the due date that the Task should be completed. Once the Task is past this Due Date, it will be displayed in the OVERDUE tab
- Priority - Choose from Low, Medium, High, aligned to your internal cadence and priority setting
-
Description - Instructions and/or Text or Comments related to the Task
There are several other ways to Add/Create a new Task:
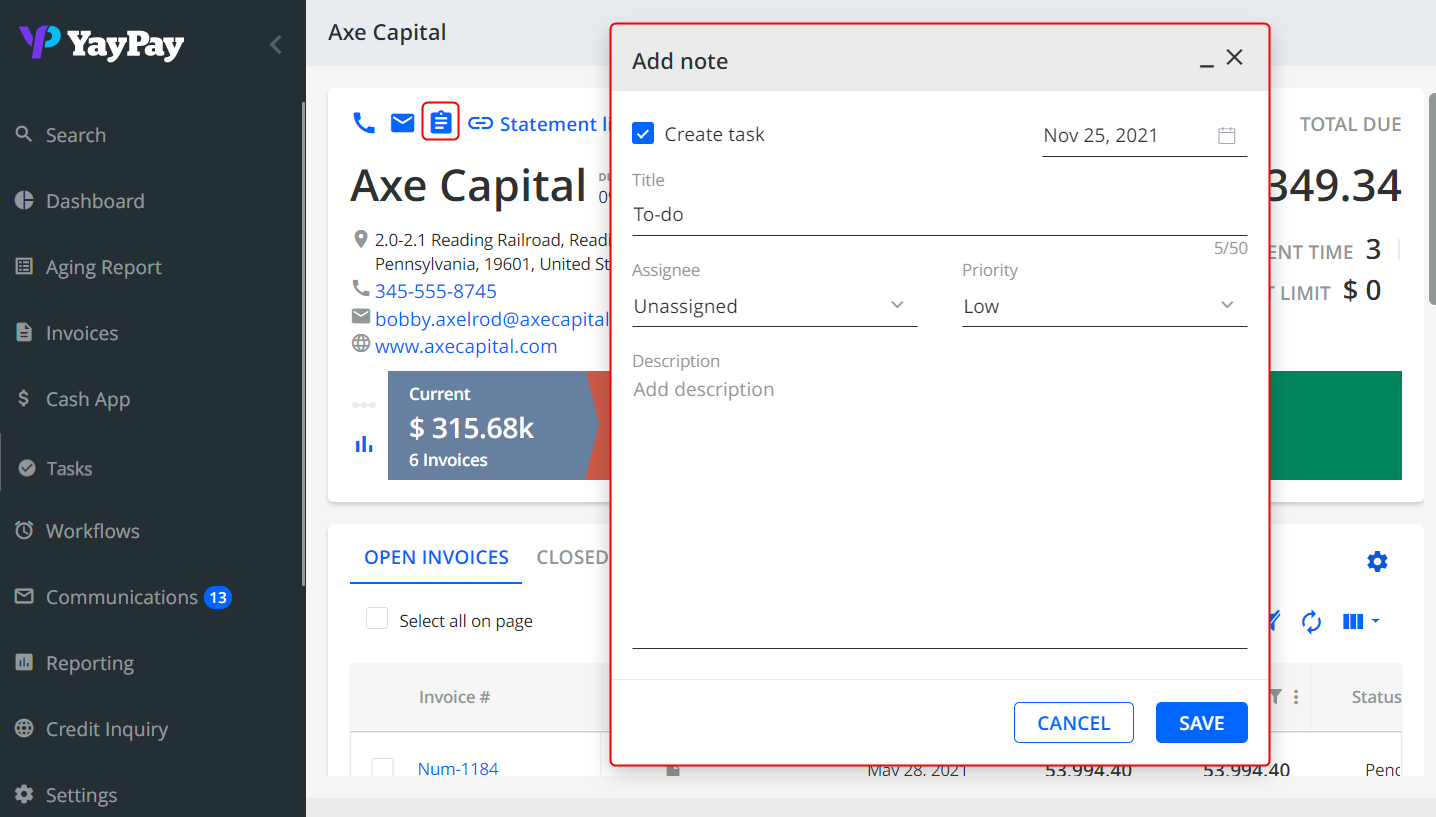
Use the Statement Page
- While adding/capturing a new Customer note, enable the “Create task” checkbox at the same time if you want to create a task. Save this when you are completed
- The task associated with this customer will be displayed in the TASKS tab located at the bottom of the Statement page, as well as the Tasks menu
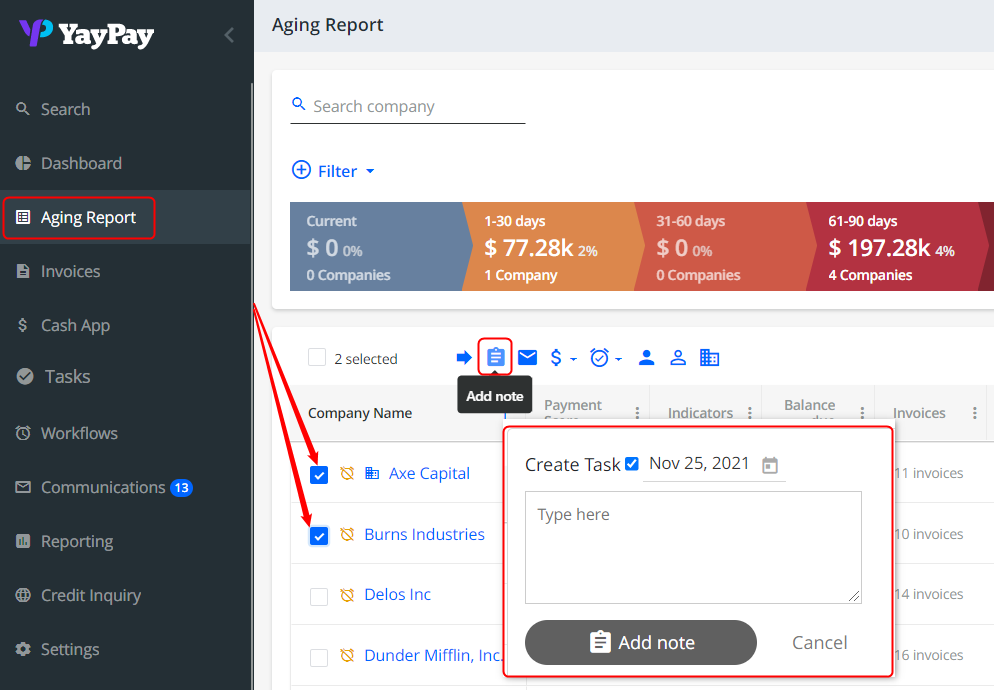
Use the Aging Report
- To create a Task for several Customers at the same time while adding a note, use a group action via the Aging Report. Select the Customers and click on the "Add Note" icon. A pop-up prompt will appear
- Enable the "Create Task" checkbox and complete the required fields - Due Date and Description.
- Click the Add Note button to record and save the Note. The task will also be created
These are situations in which YayPay will automatically create a Task, along with a Type to help you differentiate and filter
- If a Collection Workflow is configured with an action such as Create Task or Schedule a call, a task is automatically created after the action executes. The task will be assigned to a customer's AR specialist set on the Statement page. If an AR specialist is not set, the task will be left unassigned.
Once a task is created, you can check its assignee in the Assignee and AR Specialist columns on the Tasks page. - A task is automatically created after logging a Call outcome
- A task is automatically created when a new Dispute and Promise to Pay is opened by the AR Rep or the Customer through the Customer Portal page
- When a Customer is allowed to edit the Contact(s) via the Customer Portal, a task is automatically created as a Contact Change Request
- If there is no Contact in the Customer profile, an automatic Task (of Type "Missing Contacts") will be created
- If the Email Reminder was not opened by the customer, a Task is automatically created to send a repeated e-mail reminder from the Customer Workflow
Review Open/Overdue/Current/Completed Tasks
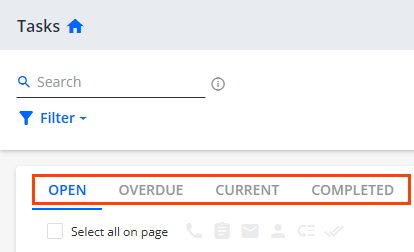
- Open tab - shows all tasks currently Open, i.e. both Current and Overdue items
- Overdue tab - shows all tasks which are past their Due Date and not yet completed
- Current tab - shows current tasks not yet passed their due date
- Completed tab - shows all tasks marked completed
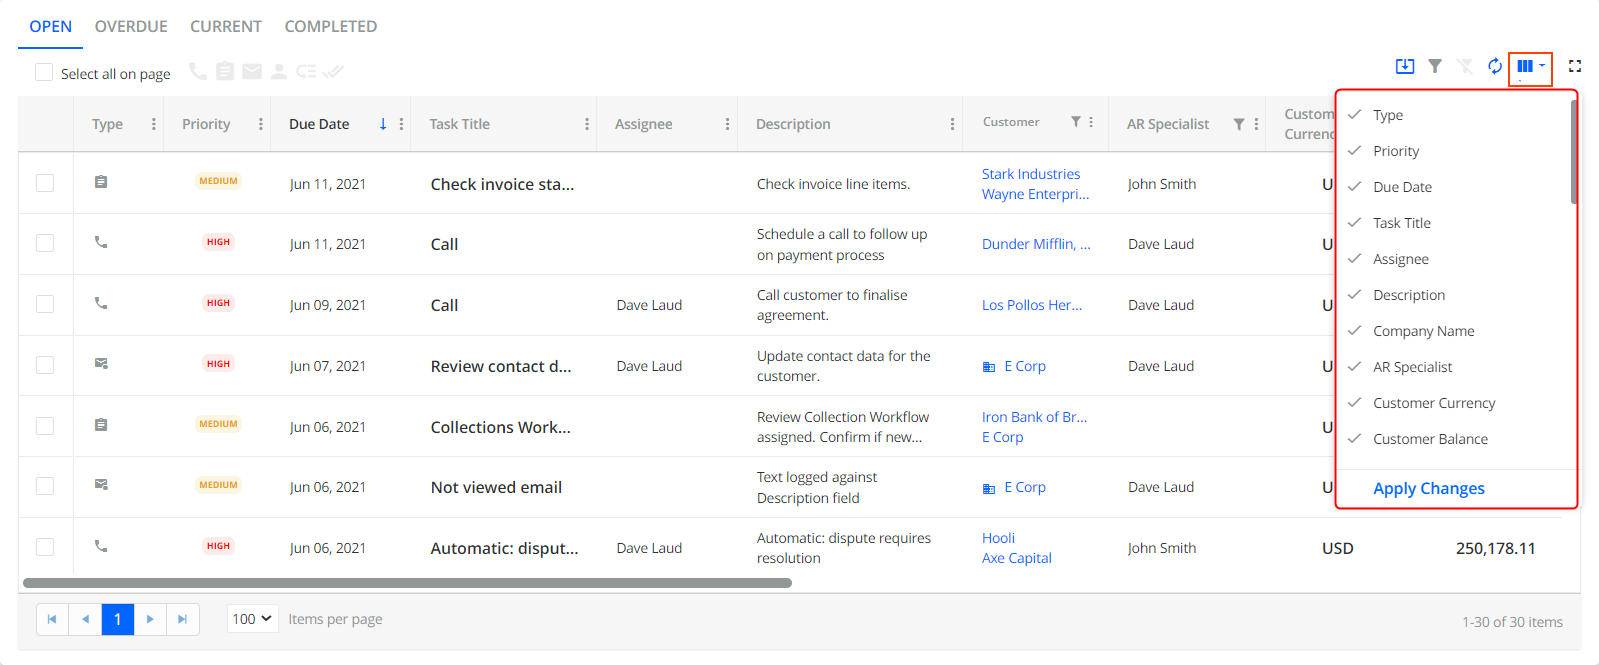
Working with the Task Grid
Similar to the way you use the Aging Report, you can also Add/Remove additional columns on the Tasks page by clicking on "Select Columns" to reveal other available columns in the dropdown list.
You can also select your ERP Custom Fields as additional columns to include if you have set them up as Customer-Level or Invoice-Level Custom Fields under the Settings > ERP Custom Fields page of YayPay.
You can hide columns by clicking on the three vertical dots next to a column name and selecting Hide Column.
Recent enhancements also enable you to export the grid to Excel.
Click "Apply Changes" to insert the column(s):
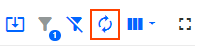
Use the "Clear filters" icon to remove all filters applied and return to a normal view before you selected the filter(s).

Use the "Reset columns to Default" to restore the view to the default state.
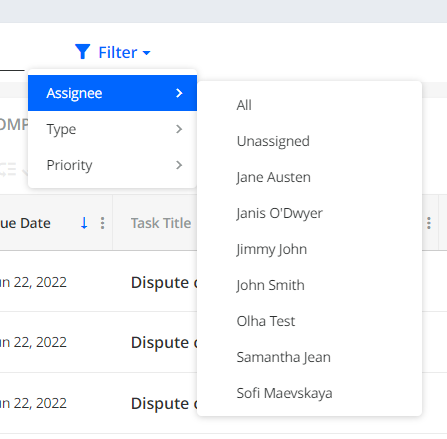
Working with Tasks Filters
Filter by Assignee
Sort out the tasks assigned to a particular AR Specialist (user) by clicking his name. Also, All, and Unassigned options are available.
Filter by Type
Sort out the tasks by their types:
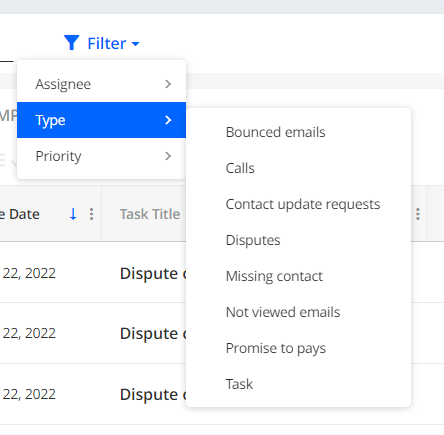
- Bounced emails
The task of this type is created automatically when an email to a customer is bounced (due to e.g. wrong email address)
- Calls
The task of this type is created when a call is scheduled manually from e.g. Statement page, Communications page or automatically (using Workflows/Global Rules)
- Contact update requests
When a Customer is allowed to edit the Contact(s) via the Customer Portal, a task is automatically created with a Contact Change Request type.

- Disputes
The task of this type is created when a dispute is opened
- Missing contact
If there is no contact data in the Customer profile, an automatic task of this type is created
- Not viewed emails
If the Email Reminder was not opened by the customer, a task is automatically created to send a repeated e-mail reminder from the Customer Workflow
- Promise to pays
The task of this type is created when a Promise to Pay is created/edited on the Statement page or Customer Portal
- Task
This type designates a task created within YayPay either manually (e.g. when adding a note, or creating a task on the Tasks page) or automatically (within Workflows/Global Rules)
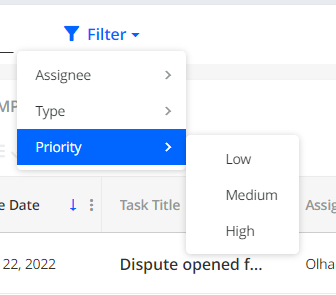
Filter by Priority
Sort out the tasks by the priority level assigned: Low, Medium, High
If you chose to include some filters, press the "Clear filters" icon to remove them, which will return you to a normal view before you selected the filter(s).
Clearing Filters
You can clear the applied filters individually or all at once by clicking on the icons highlighted below: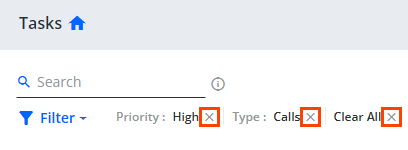
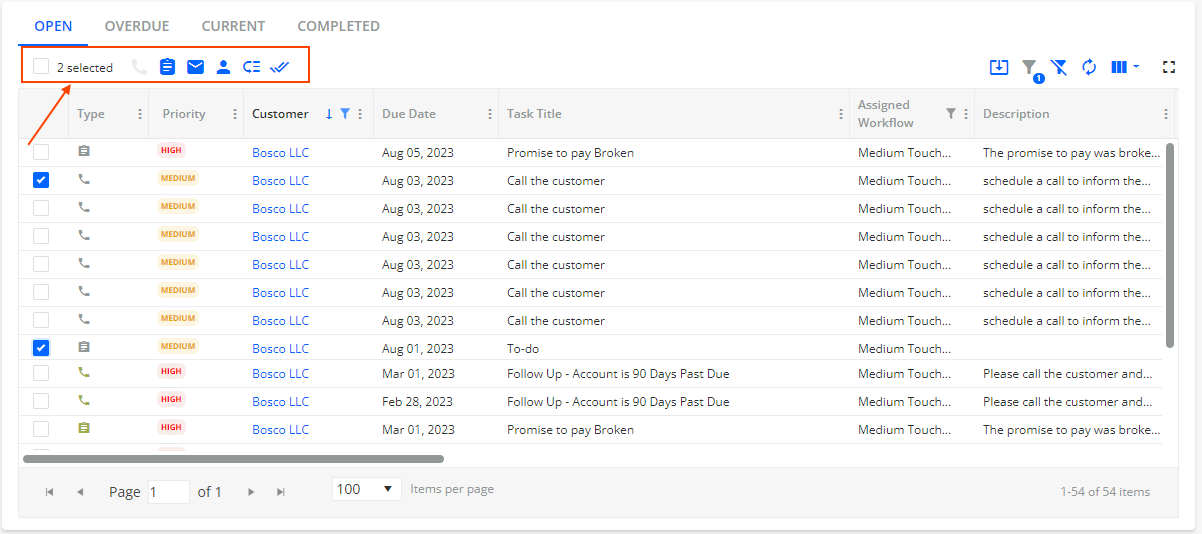
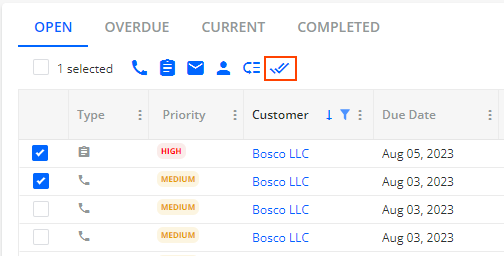
Performing Actions with single/multiple Tasks
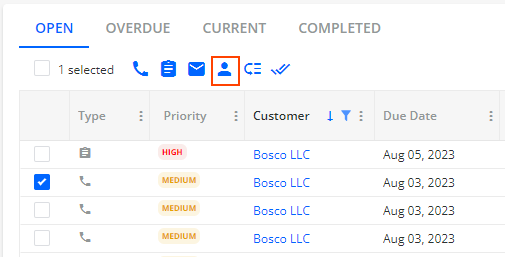
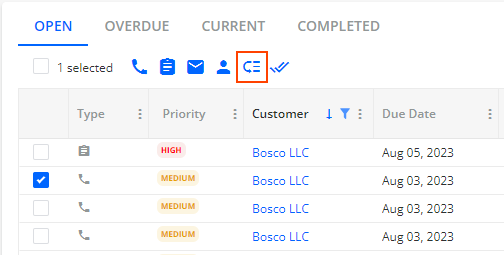
When you select one, a few, or all tasks by clicking on the checkbox for each item, some additional functionality in blue appears and the Action panel becomes active:
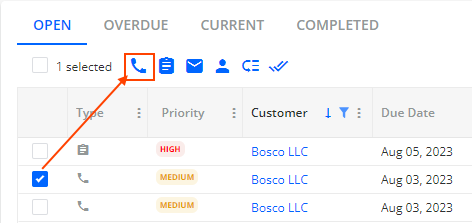
1. Click on the Log Call action button to schedule a call with the customer:
2. Click on the Add Note action button to add a note to the selected Customers where the task is associated with: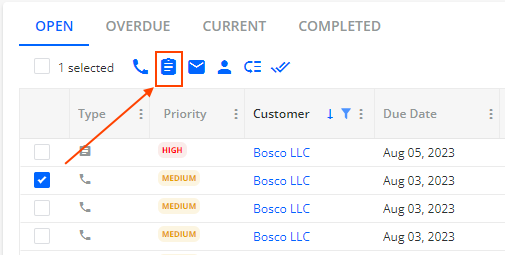
3. Click on the Send E-mail action button to send an e-mail to the Customer :
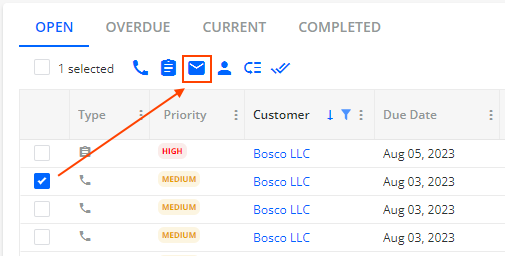
- By default, an email reminder is sent on a Customer level (means that e-mail templates with invoice level dynamic tags shouldn't be used). It can be sent to all kinds of recipients.
- If a task is attached to an invoice, an e-mail reminder is sent on the Invoice level (means that Invoice level dynamic tags can be used). It can be sent to all kinds of recipients.
- For a combination of Invoice level and Customer level tasks, the Customer Level email reminder is sent.
Additionally, you can set whether the email reminder will automatically include an invoice PDF by default or not.
4. Click on the Set Assignee action button to assign the YayPay user to the task:
5. Click on the Set Priority action button to select the priority level for the task:
6. The selected tasks can be marked as "Completed" altogether, instead of doing one at a time:
Note: When you do so, you will be prompted with a confirmation pop-up panel, such as “Are you sure?”
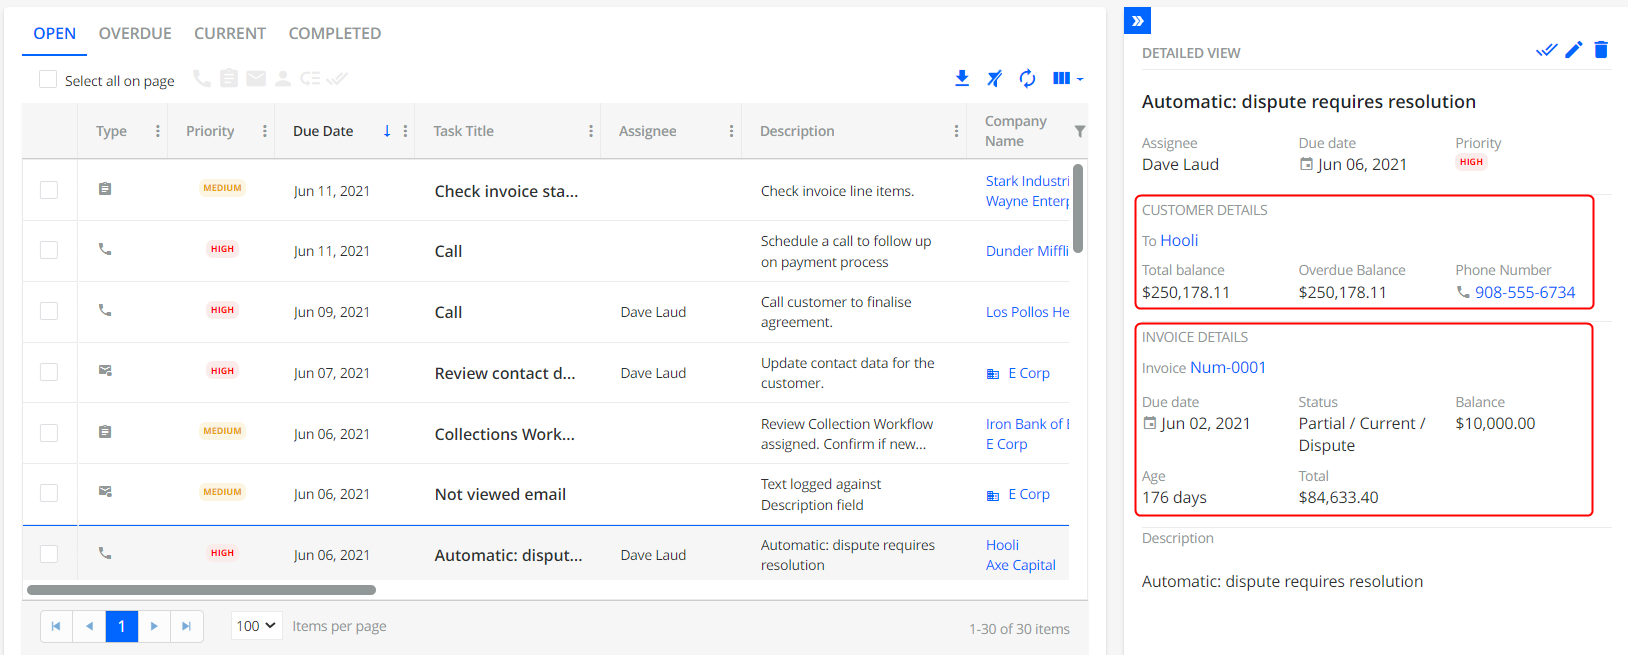
Review Details of the Tasks
To open a detailed view of the task, select the task by clicking into the row.
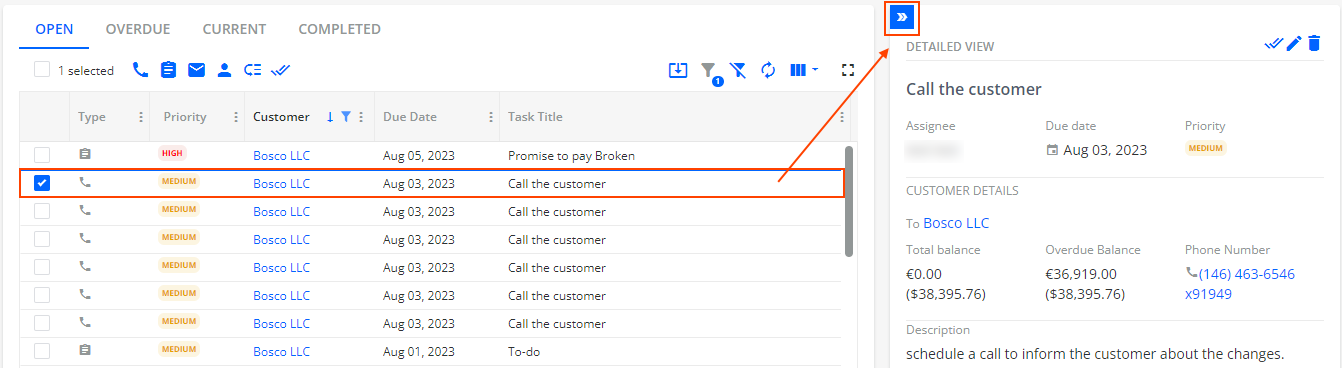
If you have collapsed the view to see the entire Task grid, click the Collapse button again located on the top right corner to reveal/show a side-bar panel.
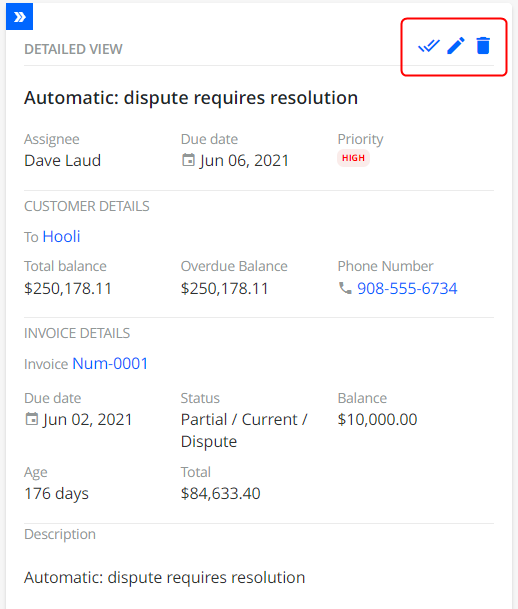
- Customer Details - shows the Customer Name if the task was associated with a Customer
-
Invoice Details - shows the Invoice # and details if the task created on associated with the Invoice
 You can also mark a single task as Completed from the Detailed View, as well as to edit or delete the task:
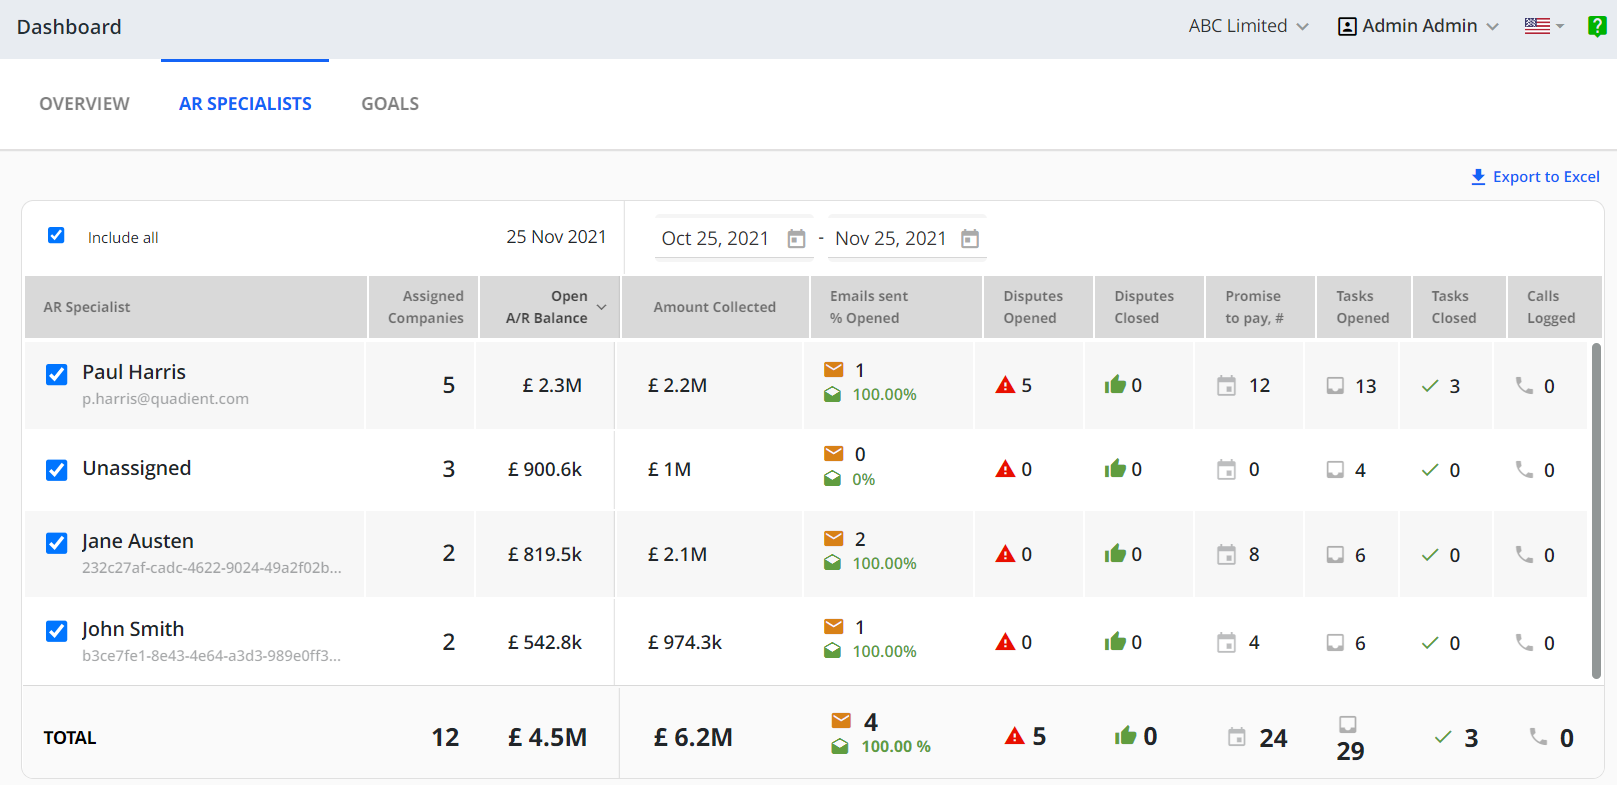
Dashboard - AR Statistics
With the Business Setting "Dashboard - Enable AR specialist statistics report" enabled in your Settings > Business page, you can also use the AR Statistics tab to review key measures and the team's workload distribution and performance behind the Collection effort across the AR team (See Article link).
The Open/Closed tasks are aggregated in this tab within the Dashboard:
Tasks page: System-wide Settings
Additional Tasks page settings to be configured in Settings > Business include:
- Email - Create task when email from a customer is received

When enabled, task creation is triggered after an email from a customer is received.
- Tasks page - Mark items with due date "today" as overdue

When enabled, the items with the due date being equal to the current date fall within the overdue status.
- Tasks page - Show Time in Reports in browser timezone

Tasks page: Security Settings
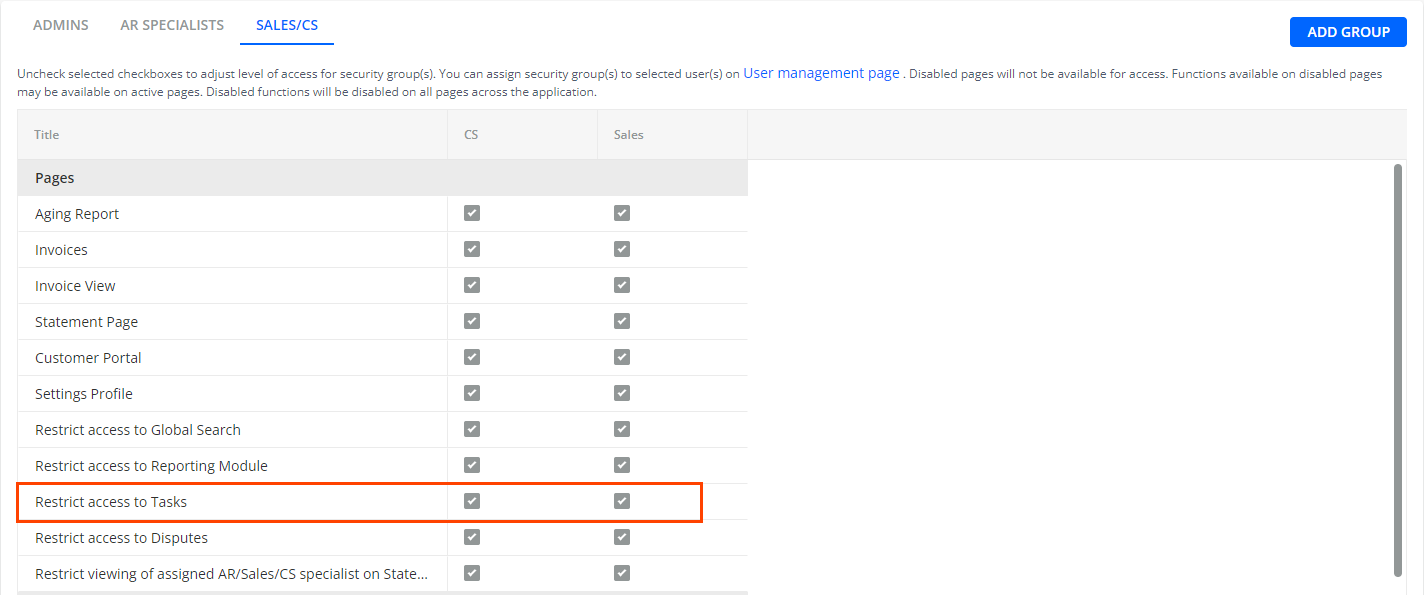
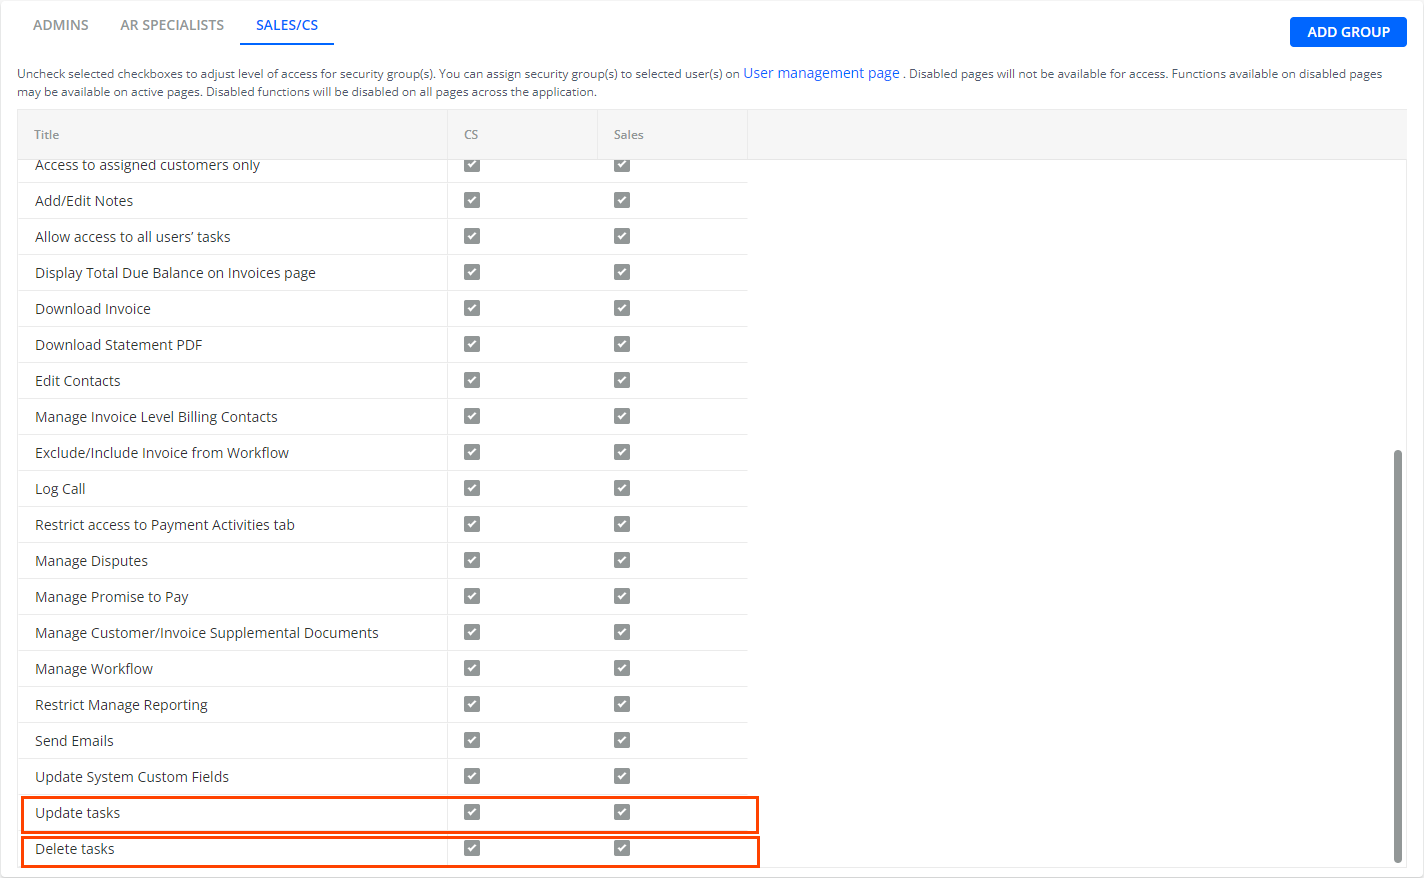
Manage access of certain user groups to the Tasks page and its functionality in Settings > Security Groups by enabling/disabling the checkboxes Restrict access to Tasks (Pages section), Update Tasks, and Delete Tasks (Functions section)