In addition to the standard ERP connectors and CSV file import options (see the Integrations and ERP Custom Fields Reference Guide), YayPay also provides APIs that allow you to seamlessly manage data flow between your ERP system and YayPay.
The information summarized in this article is mainly intended for developers who will be creating the API integration into YayPay.
Glossary
- Batch is a collection of records sent in one request
- Transaction is a collection of batches
- Transaction id is a unique transaction identifier. Receive after starting transaction call (/batch/start)
- Client id or Client key is an identifier of a user used in OAuth authorization
Swagger UI for API Documentation
A field-by-field API documentation set can be found on YayPay's Swagger UI. Depending on your stage of development, the Development and Production Swagger UI sites are:
https://developer.yaypay.com/api/v1/swagger-ui.html
https://app.yaypay.com/api/v1/swagger-ui.html
YayPay Environments
As you start to develop your data push and integration to YayPay, you will initially work in YayPay's Developer Environment to allow you to review your data and change your data uploads in an iterative manner.
When your Integration build and test are completed, and you are ready to send actual production/live data to YayPay, we will work with you to provision a new instance in YayPay's Production Environment.
The platform has 2 different application URLs (and 2 different API keys, etc):
YayPay Production is at: https://app.yaypay.com
YayPay Development is at: https://developer.yaypay.com
Each of the mentioned applications requires separate credentials.
To get the security keys for YayPay Production or YayPay Development, log into the respective environment.
Note: if you do not have credentials for a particular environment, contact your YayPay Onboarding Specialist.
Security Transport Channel
All API requests must be made via HTTPS.
OAuth authorization
Create an application client
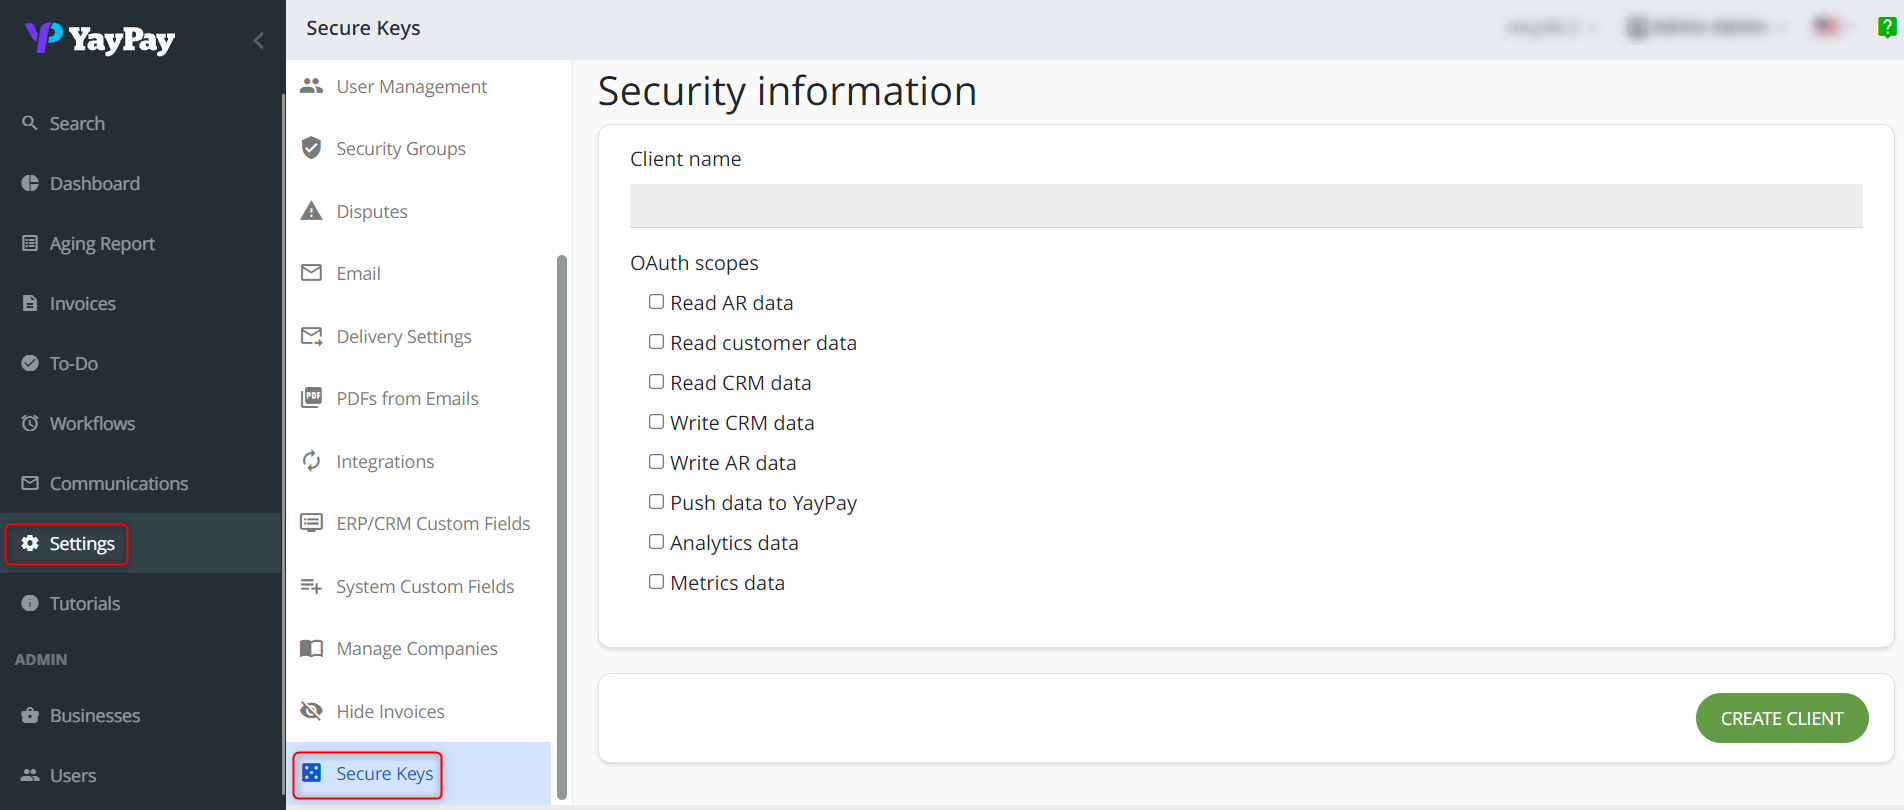
1. Navigate to Settings > Secure Keys

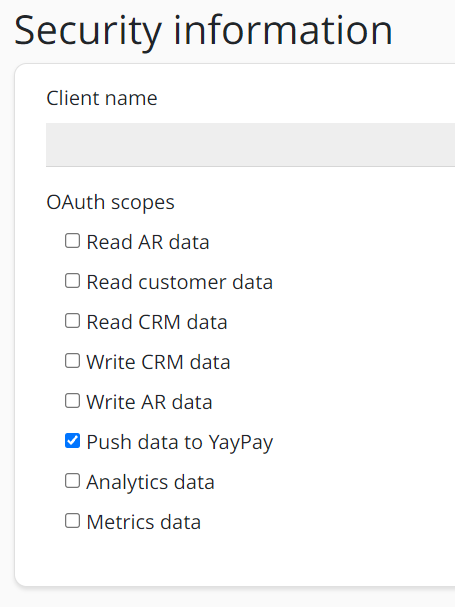
2. From OAuth scopes select “Push data to YayPay”

3. Click on “Create Client”

4. Copy and save “Client secret“ because it will be hidden after page refresh.

5. Obtaining access token:
- For Developer instance: https://developer.yaypay.com/api/v1/token
- For Production instance: https://app.yaypay.com/api/v1/token
Make a POST call to /token endpoint:
Sample request:
curl  -X POST -F "scope=invoice.api.write" "https://developer.yaypay.com/api/v1/token" -H  "Authorization: Basic bGRra2wxdTRxcnNoMm82NzM5cTUxNnFsMTpvN2Q2dWM4YzBkNmpiNzNmM3VjdXI4dWg4MzRvMnIzZHE2aGxuY2RpdWRlb2xrZGJmMjg="
-H  "Content-Type: application/x-www-form-urlencoded
Request parameters/headers:
scope - mandatory, must be set to invoice.api.write otherwise 400 code will be returned by the server
Authorization - you must pass client_id and client_secret in the authorization header through Basic HTTP authorization. The secret is Basic Base64Encode(client_id:client_secret).
Content-Type - must always be 'application/x-www-form-urlencoded'
Sample response:
{
    "access_token": "eyJraWQiOiJ5K0ZZbTBZZnoyb0ZLSmN1SzFHbmlSclBmTWlSZGF1VjdlMkw2RDQyeVZRPSIsImFsZyI6IlJTMjU2In0.eyJzdWIiOiJsZGtrbDF1NHFyc2gybzY3MzlxNTE2cWwxIiwidG9rZW5fdXNlIjoiYWNjZXNzIiwic2NvcGUiOiJ5YXlwYXkuYXBpLnYxXC9pbnZvaWNlLmFwaS53cml0ZSIsImF1dGhfdGltZSI6MTYwODA3MTAzMCwiaXNzIjoiaHR0cHM6XC9cL2NvZ25pdG8taWRwLnVzLWVhc3QtMS5hbWF6b25hd3MuY29tXC91cy1lYXN0LTFfMUF5NzVmUG5kIiwiZXhwIjoxNjA4MDc0NjMwLCJpYXQiOjE2MDgwNzEwMzAsInZlcnNpb24iOjIsImp0aSI6IjQwZDE3NDA4LWZiMTMtNGNhNC1iMDc5LTEzMzU2NzAyNTc1ZiIsImNsaWVudF9pZCI6Imxka2tsMXU0cXJzaDJvNjczOXE1MTZxbDEifQ.U0RV7dSD7ZjeQOjPT6YRT4dV6aDPzXV8QaBwdSLRSVHqco2FRC8YVqiXPV7H5fU1F-HKwTGpIoUt4VhC9VbgeWCSNVqx_1XqQT1qigAT74NYu2v7fUsnFQXnwUdQYOAdqHrbq3AcNkBP128xxagXKV5LDLtThVZu8xEVvfwk5q7w08-rM1hZz9lqgZbvXIlEz3oSBuEeoZFrqdfFCa8aAghueTk6J9QFWrt8N-cLUTbc4bcwSegWA7ymYRR64sKuN2A7SbV_HkoNboEK5jIQavw7vOPA6t-RAC3EfOSbZdXliPpfZldaW1xTwUUIRHklKlYGTpz3PIX-SS7mv4h9jg",
    "expires_in": 3600,
    "token_type": "Bearer"
}
Response parameters:
access_token - will be used in API call
expires_in - access token validity time. It is always 60 minutes. You will have to obtain a new token after that time.
token_type - always Bearer
6. Make API call with credentials:
Sample request:
curl -X POST "https://developer.yaypay.com/api/v1/batch/start?end_period=2020-11-17T12%3A00%3A00&source_system=OTHER&start_period=2020-11-17T10%3A00%3A00&sync_id=8b65bc11-b776-42e3-83f0-d5ec47a161b9" -H "Accept: application/json" -H "Authorization: Bearer eyJraWQiOiJ5K0ZZbTBZZnoyb0ZLSmN1SzFHbmlSclBmTWlSZGF1VjdlMkw2RDQyeVZRPSIsImFsZyI6IlJTMjU2In0.eyJzdWIiOiJsZGtrbDF1NHFyc2gybzY3MzlxNTE2cWwxIiwidG9rZW5fdXNlIjoiYWNjZXNzIiwic2NvcGUiOiJ5YXlwYXkuYXBpLnYxXC9pbnZvaWNlLmFwaS53cml0ZSIsImF1dGhfdGltZSI6MTYwODA3Mjg1OCwiaXNzIjoiaHR0cHM6XC9cL2NvZ25pdG8taWRwLnVzLWVhc3QtMS5hbWF6b25hd3MuY29tXC91cy1lYXN0LTFfMUF5NzVmUG5kIiwiZXhwIjoxNjA4MDc2NDU4LCJpYXQiOjE2MDgwNzI4NTgsInZlcnNpb24iOjIsImp0aSI6ImE0NGEzYzI2LWUxZDItNDU2MC04ZWUxLTM4NTM4NWRhMDJjNSIsImNsaWVudF9pZCI6Imxka2tsMXU0cXJzaDJvNjczOXE1MTZxbDEifQ.FwSQP_3RuIlkI_yb7z26iBmwXfkvqlTUZeCfubJu0bt8rutJmlZcTMs6S7nthmD85hAwrMjYNGsXWl56kLwhZKNGmzWPej9etbkObXF9z9phTJ5JhT87GjxYzoBQeQidSKhGgy83HKt5kGQVkNKumUpNqYmZqL0QLOE1ThVFmNeuFzZP-c0qc8Wolsv6mcfFHM5oEtLkQuj8SRoDCqs9n7qsdoszpBXnDcV0aepD8cRm53jcNvu3FAdHpLvWhk71soK94T_D-gFoEsEFsSSatS8Y4a31JVNiSfdTA5aUlXv-Skq_phSgeBUFDdkCVT9LUk7UFUAZL9MzHHxCaU4YmQ"
To access API endpoints you should use access token in authorization header in the format:
Authorization: Bearer ZZnoyb0ZLSmN1SzFHbmlSclBmTWlSZGF1VjdlMkw2RDQyeVZRPSIsImFsZyI6IlJTMjU2In0.eyJzd…
7. Token endpoint quota limits
- 50 requests per hour
Video example for uploading with OAuth
example for uploading customer and invoices with OAuth
JSON files from video
Customer
{
  "items": [
    {
      "customer": {
        "address": {
          "city": "Cupertino",
          "country": "United States",
          "email": "example@email.com",
          "line1": "1 Park Way",
          "line2": "address line2",
          "mobile": "123-456-789",
          "phone": "1800-900-3454",
          "state": "CA",
          "www": "https://www.site.com/",
          "zip": 10001
        },
        "balance": 999999.99,
        "company_name": "My Inc.",
        "credit_limit": 10000000,
        "currency": "USD",
        "custom_fields": {
          "TERMS": "NET 30",
          "SF_ID": 3214234
        },
        "duns_number": "duns_number",
        "invoice_delivery_method": "NONE",
        "parent_id": "parent_id",
        "payment_terms": "NET30",
        "tax_id": 3425543
      },
      "integration": {
        "internal_id": "customer_internal_id_in_your_ERP_1"
      }
    }
  ]
}
Invoices
{
  "items": [
    {
      "integration": {
        "internal_id": "invoice_internal_id_in_your_ERP_1"
      },
      "invoice": {
        "close_date": "2030-01-01T00:00:00Z",
        "contact": {
          "internal_id": "contact_internal_id_in_your_ERP_1"
        },
        "contact_email": "cfo@example.com",
        "currency": "CAD",
        "custom_fields": {
          "SomeCustomField1": "some_custom_field1_value",
          "SomeCustomField2": "some_custom_field2_value"
        },
        "customer": {
          "internal_id": "customer_internal_id_in_your_ERP_1"
        },
        "distribution_channel": "OTHER",
        "due_date": "2020-12-17T00:00:00Z",
        "exchange_rate": 1,
        "invoice_date": "2020-11-17T00:00:00Z",
        "invoice_number": "invoice_number_in_your_ERP_1",
        "items": [
          {
            "amount": 523,
            "custom_fields": {
              "COLOR": "black"
            },
            "description": "better edition",
            "integration": {
              "internal_id": "item_internal_id_in_your_ERP_1"
            },
            "name": "T-801",
            "quantity": 1,
            "rate": 523
          }
        ],
        "notes": "Some important information",
        "paid": 0,
        "status": "UNPAID",
        "sub_total": 523,
        "tax_amount": 5,
        "terms": "Net 30",
        "total": 571.12
      }
    },
    {
      "integration": {
        "internal_id": "invoice_internal_id_in_your_ERP_2"
      },
      "invoice": {
        "close_date": "2029-01-01T00:00:00Z",
        "contact": {
          "internal_id": "contact_internal_id_in_your_ERP_2"
        },
        "contact_email": "ufo@example.com",
        "currency": "USD",
        "custom_fields": {
          "SomeCustomField": "some_custom_field_value"
        },
        "customer": {
          "internal_id": "customer_internal_id_in_your_ERP_1"
        },
        "distribution_channel": "EINV",
        "due_date": "2020-12-17T00:00:00Z",
        "exchange_rate": 1,
        "invoice_date": "2020-11-17T00:00:00Z",
        "invoice_number": "invoice_internal_id_in_your_ERP_2",
        "items": [
          {
            "amount": 3.4,
            "description": "good with 3cpo",
            "integration": {
              "internal_id": "item_internal_id_in_your_ERP_2"
            },
            "name": "2r2d",
            "quantity": 1,
            "rate": 3.4
          },
          {
            "amount": 2.96,
            "description": "description: the small robot",
            "integration": {
              "internal_id": "item_internal_id_in_your_ERP_3"
            },
            "name": "wall-f",
            "quantity": 1,
            "rate": 2.96
          }
        ],
        "notes": "Some important information",
        "paid": 7.12,
        "status": "PAID",
        "sub_total": 6.36,
        "tax_amount": 12,
        "terms": "C.O.D.",
        "total": 7.12
      }
    }
  ]
}
Recommended Limits
The following recommended limits ensure a better and more stable performance for your API connection.
Rate Limits
To prevent API abuse, we set the following limits on the number of requests allowed within a certain time period.
Rates vary by endpoint and each call increases the request counter. For example, calls /test, /contacts and /batch/finish, count as 3.
| Endpoint | Request Limit | Interval |
| /token | 50 | 60 minutes |
| /batch/start | 10 | 60 seconds |
| /contacts, /invoices/, /payments, /test etc. | 100 | 60 seconds |
Batch Size
We recommend limiting the batch size or the number of records per request. The optimal number is between 200 - 600 records per request. The ideal value is 500.
Additionally, we recommend not to exceed 5000-8000 records in all batches within one transaction.
PDF Upload
You can upload or update a single PDF file using the POST/contents service. There are no restriction on file size using this service.
Alternatively, you can upload PDF files with no restrictions on file size using the following REST API services. These endpoints are typically used when you need to upload a file in multiple parts. It uses the multipart/form-data encoding to send the file in chunks. This allows for the efficient transfer of larger files and provides the ability to resume interrupted uploads.
Error Handling
All API responses include a valid HTTP status code. If you get an error, the response body will contain a brief response code & error description and a unique identifier of the error (UID).
If the description is still insufficient to diagnose and fix the issue on your side, reach out to YayPay Support with the UID to troubleshoot further.
Versioning
API versions are deployed to our Developer environment simultaneously with the Production release, so the versions are always up-to-date as you work on your integration/connection.
The major version of an API is specified in the URL, so you will always know which version you're using.
Any changes that we make within a major version will also be backward compatible, but a major version change signifies backward compatibility breaking changes.
Please note that 1 year after a new major version has been released, the older version will be deprecated.
Commit transaction and apply updates
All data operations must be performed in the context of a transaction.
To update data:
- Start a new transaction
- Perform data operations (e.g. upload invoices, delete adjustments, etc.)
- Finish the transaction
While the transaction is open, all of your data will be stored temporarily until you finish the transaction.
Once the transaction finishes successfully, all of the data in the transaction is saved into YayPay.
If the transaction fails, the data in that transaction will not be added to YayPay.
Your operations do not need to be in any particular order within the transaction and will not affect the overall data integrity.
Refer to: https://yaypay.helpjuice.com/44477-api-developer-docs/getting-started-api for an example.
Request Structures (Upsert and Delete)
With the exception of starting a transaction, finishing a transaction, and testing connectivity, there are 2 types of requests - Upsert and Delete.
Integration Object
All requests to the Yaypay API rely on an Object termed the Integration Object.
This object consists of the internal_id which is the unique ERP ID/identifier for the object.
When you send data from several ERP systems into one consolidated YP account, you should guarantee the uniqueness of ERP IDs across different entity types. The easiest way to do that is to concatenate the ERP id with the ERP system name.
For example, the customer's internal (ERP id) id is 099876 and ERP system is Intacct and the customer's internal (ERP id) id is 099876, and the ERP system is NetSuite then ERP ids should look like this: 099876_intacct & 099876_netsuite.
Note: ERP IDs are case-sensitive.
Upsert
POST requests to the endpoints are upserts (either to insert a new row or on the basis of the row already existing, update that existing row).
YayPay will create a new record, or update an existing record if the internal_id provided already exists in the system.
Upsert requests support lists of objects to be added/updated in YayPay. Each object in the list consists of an Integration object and object properties for the entity type.
Delete
POST requests to the endpoints that follow with a '/delete' suffix will delete the object.
Delete requests are structured the same. They consist of a list named deleted_entities. The list contains objects which contain an Integration object (see above) and an entity_type which is a string descriptor.
Please use the Developer API reference to review the details for each API.


