Here we explain how to import data from Sage Intacct into YayPay.
Data imported from Sage Intacct to YayPay includes: custom and native fields; billing contacts; AR Invoices; Sales Invoices; as well as DUNS Number. In YayPay, this data is typically imported as customer or invoice level custom fields.
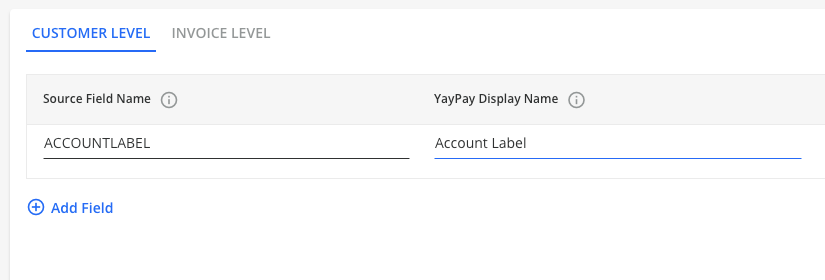
Customer Level Custom Fields
In order to set up your integration, please use the names from the Integration name column to populate Source Field Name in YayPay Settings > Integration > Sage Intacct Customer Level
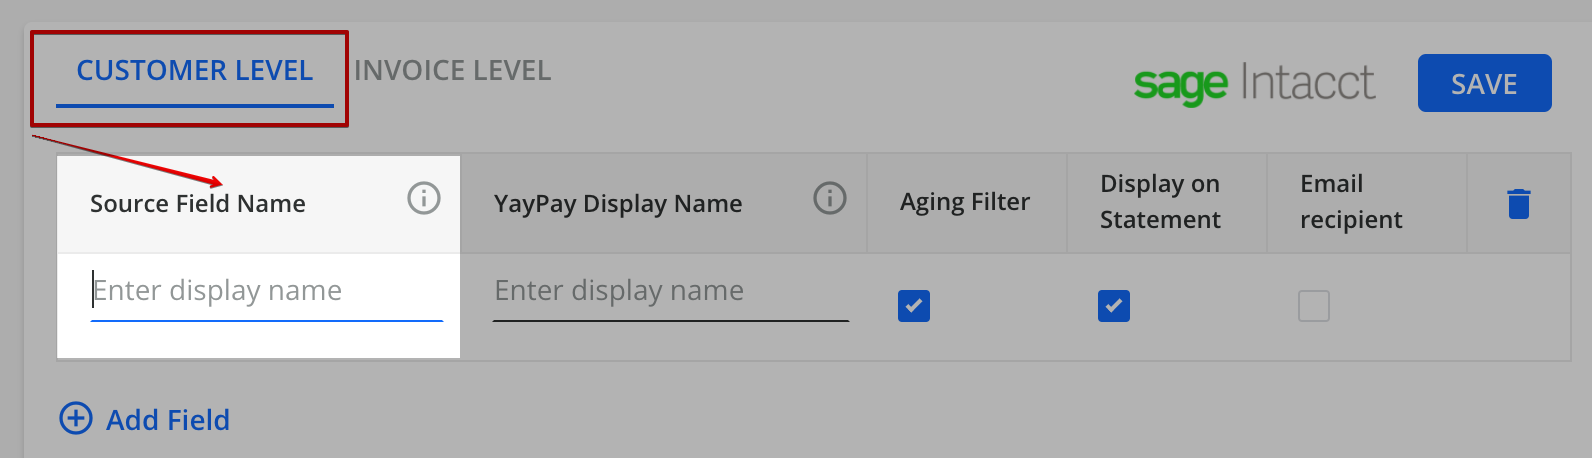
- Enter the Source Field Name of the Custom Field from your Intacct system that you intend to sync with YayPay. Consult your Intacct Administrator on this.
- Enter the name as you would like it to be displayed in YayPay (for the YayPay Display Name column).
- If you want to use this field/value as an Aging filter, check the 'Aging filter' checkbox.
- If you want this field/value to appear in the Invoices/Statement page of YayPay, check the 'Display on Statement' checkbox.
- Click Add Field to add more or Save.
- Approach YayPay Support or your Account Rep to request a re-sync.
Intacct Customer Native Field > YayPay Customer Custom Field
You can configure YayPay to bring over Native Fields/values from your Intacct system
For example, a summary of frequently seen native fields at the Customer level, which you can consider configuring YayPay may include:
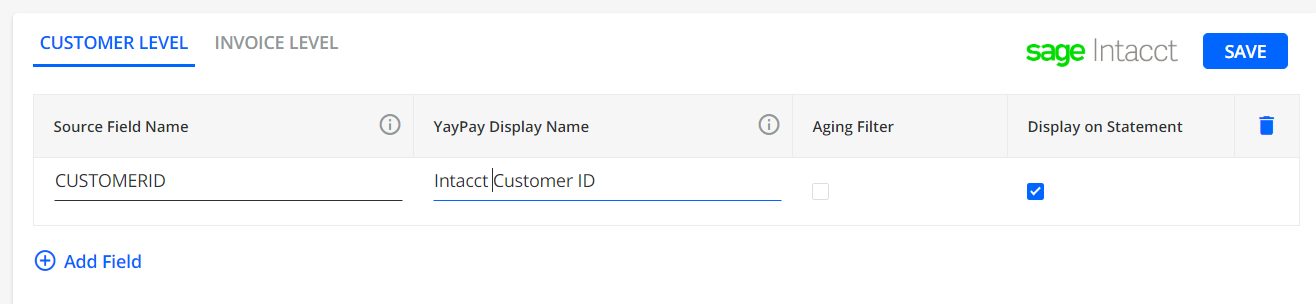
- CUSTOMERID (this refers to the Intacct Customer ID)
- STATUS (this refers to the Account Status in Intacct)
- TERMNANE (this refers to the Payment Terms in Intacct)
- CUSTREPID (this refers to the Sales Rep Employee ID in Intacct)
The full list is represented below.
Refer to the Intacct Developer Reference link for more context.
Enter the native field name in the Source Field Name column, and a display name for YayPay. Click Add Field to add more or Save.
List of Intacct native fields (Customer Level)
Field Label |
Integration Name |
|---|---|
| Accepts emailed invoices | EMAILOPTIN |
| Account label | ACCOUNTLABEL |
| Account label record number | ACCOUNTLABELKEY |
| Address line 1 | DISPLAYCONTACT.MAILADDRESS.ADDRESS1 |
| Address line 2 | DISPLAYCONTACT.MAILADDRESS.ADDRESS2 |
| AR account | OFFSETGLACCOUNTNO |
| AR account title | ARACCOUNTTITLE |
| AR invoice printing template | ARINVOICEPRINTTEMPLATEID |
| Attachment | SUPDOCID |
| before contract start date | ADVBILLBYTYPE |
| BILL ADDRESSW | BILL_ADDRESSW |
| Bill in advance | ADVBILLBY |
| Bill-to contact | BILLTO.CONTACTNAME |
| Bill-to contact - company name | BILLTO.COMPANYNAME |
| Bill-to contact - email 1 | BILLTO.EMAIL1 |
| Bill-to contact - email 2 | BILLTO.EMAIL2 |
| Bill-to contact - fax | BILLTO.FAX |
| Bill-to contact - first name | BILLTO.FIRSTNAME |
| Bill-to contact - last name | BILLTO.LASTNAME |
| Bill-to contact - MI | BILLTO.INITIAL |
| Bill-to contact - mobile | BILLTO.CELLPHONE |
| Bill-to contact - pager | BILLTO.PAGER |
| Bill-to contact - phone 1 | BILLTO.PHONE1 |
| Bill-to contact - phone 2 | BILLTO.PHONE2 |
| Bill-to contact - prefix | BILLTO.PREFIX |
| Bill-to contact - print as | BILLTO.PRINTAS |
| Bill-to contact - URL 1 | BILLTO.URL1 |
| Bill-to contact - URL 2 | BILLTO.URL2 |
| Bill-to contact - visible | BILLTO.VISIBLE |
| Bill-to contact address - address 1 | BILLTO.MAILADDRESS.ADDRESS1 |
| Bill-to contact address - address 2 | BILLTO.MAILADDRESS.ADDRESS2 |
| Bill-to contact address - city | BILLTO.MAILADDRESS.CITY |
| Bill-to contact address - country | BILLTO.MAILADDRESS.COUNTRY |
| Bill-to contact address - country code | BILLTO.MAILADDRESS.COUNTRYCODE |
| Bill-to contact address - State/Territory | BILLTO.MAILADDRESS.STATE |
| Bill-to contact address - Zip code/Post code | BILLTO.MAILADDRESS.ZIP |
| Bill-to contact record number | BILLTOKEY |
| Billing contact taxable | BILLTO.TAXABLE |
| Billing tax group | BILLTO.TAXGROUP |
| City | DISPLAYCONTACT.MAILADDRESS.CITY |
| Comments | COMMENTS |
| Company name | DISPLAYCONTACT.COMPANYNAME |
| Contact - company name | CONTACTINFO.COMPANYNAME |
| Contact - email 1 | CONTACTINFO.EMAIL1 |
| Contact - email 2 | CONTACTINFO.EMAIL2 |
| Contact - fax | CONTACTINFO.FAX |
| Contact - first name | CONTACTINFO.FIRSTNAME |
| Contact - last name | CONTACTINFO.LASTNAME |
| Contact - MI | CONTACTINFO.INITIAL |
| Contact - mobile | CONTACTINFO.CELLPHONE |
| Contact - pager | CONTACTINFO.PAGER |
| Contact - phone 1 | CONTACTINFO.PHONE1 |
| Contact - phone 2 | CONTACTINFO.PHONE2 |
| Contact - prefix | CONTACTINFO.PREFIX |
| Contact - print as | CONTACTINFO.PRINTAS |
| Contact - URL 1 | CONTACTINFO.URL1 |
| Contact - URL 2 | CONTACTINFO.URL2 |
| Contact address - address 1 | CONTACTINFO.MAILADDRESS.ADDRESS1 |
| Contact address - address 2 | CONTACTINFO.MAILADDRESS.ADDRESS2 |
| Contact address - city | CONTACTINFO.MAILADDRESS.CITY |
| Contact address - country | CONTACTINFO.MAILADDRESS.COUNTRY |
| Contact address - country code | CONTACTINFO.MAILADDRESS.COUNTRYCODE |
| Contact address - State/Territory | CONTACTINFO.MAILADDRESS.STATE |
| Contact address - Zip code/Post code | CONTACTINFO.MAILADDRESS.ZIP |
| Country | DISPLAYCONTACT.MAILADDRESS.COUNTRY |
| Country code | DISPLAYCONTACT.MAILADDRESS.COUNTRYCODE |
| Created at - Entity ID | MEGAENTITYID |
| Created at - Entity key | MEGAENTITYKEY |
| Created at - Entity name | MEGAENTITYNAME |
| Created by | CREATEDBY |
| Credit limit | CREDITLIMIT |
| Customer ID | CUSTOMERID |
| Customer name | DISPLAYCONTACT.CONTACTNAME |
| Customer name | NAME |
| Customer price list | PRICELIST |
| Customer rep | CUSTREPID |
| Customer rep name | CUSTREPNAME |
| Customer representative employee record number | CUSTREPKEY |
| Customer Type | CUSTOMER_TYPE |
| Customer type ID | CUSTTYPE |
| Customer type record number | CUSTTYPEKEY |
| Default AR account | OFFSETGLACCOUNTNOTITLE |
| Default currency | CURRENCY |
| Default customer message | CUSTMESSAGEID |
| Default retainage percentage | RETAINAGEPERCENTAGE |
| Default revenue account | ARACCOUNT |
| Delivery options | DELIVERY_OPTIONS |
| Discount % | DISCOUNT |
| Display contact record number | DISPLAYCONTACTKEY |
| Display contact record number | DISPLAYCONTACT.TAXADDRESS |
| Display contact record number | DISPLAYCONTACT.TAXCOMPANYNAME |
| Display contact record number | DISPLAYCONTACT.TAXIDVALIDATIONDATE |
| Email address | DISPLAYCONTACT.EMAIL1 |
| email.Customer | EMAILCUSTOMER |
| Enable online ACH debit | ENABLEONLINEACHPAYMENT |
| Enable online credit card | ENABLEONLINECARDPAYMENT |
| Entity | ENTITY |
| Fair value price list | VSOEPRICELIST |
| Fair value price list key | VSOEPRCLSTKEY |
| Fax | DISPLAYCONTACT.FAX |
| First name | DISPLAYCONTACT.FIRSTNAME |
| GL account record number | ACCOUNTKEY |
| GL group | GLGROUP |
| Gl Group record number | GLGRPKEY |
| GST registered | DISPLAYCONTACT.GSTREGISTERED |
| Last invoice date | LAST_INVOICEDATE |
| Last name | DISPLAYCONTACT.LASTNAME |
| Last statement date | LAST_STATEMENTDATE |
| Latitude | DISPLAYCONTACT.MAILADDRESS.LATITUDE |
| Longitude | DISPLAYCONTACT.MAILADDRESS.LONGITUDE |
| Middle name | DISPLAYCONTACT.INITIAL |
| Mobile phone | DISPLAYCONTACT.CELLPHONE |
| Modified by | MODIFIEDBY |
| OBJECTRESTRICTION | OBJECTRESTRICTION |
| OE price list key | OEPRCLSTKEY |
| OE price schedule key | OEPRICESCHEDKEY |
| On hold | ONHOLD |
| One-time use | ONETIME |
| Order entry - Adjustment printing template | OEADJPRINTTEMPLATEID |
| Order entry - Invoice printing template | OEINVOICEPRINTTEMPLATEID |
| Order entry - List printing template | OELISTPRINTTEMPLATEID |
| Order entry - Order printing template | OEORDERPRINTTEMPLATEID |
| Order entry - Other printing template | OEOTHERPRINTTEMPLATEID |
| Order entry - Quote printing template | OEQUOTEPRINTTEMPLATEID |
| Pager | DISPLAYCONTACT.PAGER |
| Parent customer | PARENTID |
| Parent key | PARENTKEY |
| Parent name | PARENTNAME |
| Phone 2 | DISPLAYCONTACT.PHONE2 |
| Phone number | DISPLAYCONTACT.PHONE1 |
| Prefix | DISPLAYCONTACT.PREFIX |
| Price list override | PRCLST_OVERRIDE |
| Price schedule | PRICESCHEDULE |
| Price schedule record number | PRICESCHEDULEKEY |
| Primary - contact visible | CONTACTINFO.VISIBLE |
| Primary contact | CONTACTINFO.CONTACTNAME |
| Primary contact record number | CONTACTKEY |
| Print as | DISPLAYCONTACT.PRINTAS |
| Record number | RECORDNO |
| Record URL | RECORD_URL |
| Resale number | RESALENO |
| Secondary email address | DISPLAYCONTACT.EMAIL2 |
| Ship-to contact | SHIPTO.CONTACTNAME |
| Ship-to contact - company name | SHIPTO.COMPANYNAME |
| Ship-to contact - email 1 | SHIPTO.EMAIL1 |
| Ship-to contact - email 2 | SHIPTO.EMAIL2 |
| Ship-to contact - fax | SHIPTO.FAX |
| Ship-to contact - first name | SHIPTO.FIRSTNAME |
| Ship-to contact - last name | SHIPTO.LASTNAME |
| Ship-to contact - MI | SHIPTO.INITIAL |
| Ship-to contact - mobile | SHIPTO.CELLPHONE |
| Ship-to contact - pager | SHIPTO.PAGER |
| Ship-to contact - phone 1 | SHIPTO.PHONE1 |
| Ship-to contact - phone 2 | SHIPTO.PHONE2 |
| Ship-to contact - prefix | SHIPTO.PREFIX |
| Ship-to contact - print as | SHIPTO.PRINTAS |
| Ship-to contact - URL 1 | SHIPTO.URL1 |
| Ship-to contact - URL 2 | SHIPTO.URL2 |
| Ship-to contact address - address 1 | SHIPTO.MAILADDRESS.ADDRESS1 |
| Ship-to contact address - address 2 | SHIPTO.MAILADDRESS.ADDRESS2 |
| Ship-to contact address - city | SHIPTO.MAILADDRESS.CITY |
| Ship-to contact address - country | SHIPTO.MAILADDRESS.COUNTRY |
| Ship-to contact address - country code | SHIPTO.MAILADDRESS.COUNTRYCODE |
| Ship-to contact address - State/Territory | SHIPTO.MAILADDRESS.STATE |
| Ship-to contact address - Zip code/Post code | SHIPTO.MAILADDRESS.ZIP |
| Ship-to contact record number | SHIPTOKEY |
| Ship-toprimary - contact visible | SHIPTO.VISIBLE |
| Ship-via record number | SHIPVIAKEY |
| Shipping contact taxable | SHIPTO.TAXABLE |
| Shipping method | SHIPPINGMETHOD |
| Shipping tax group | SHIPTO.TAXGROUP |
| State/Territory | DISPLAYCONTACT.MAILADDRESS.STATE |
| Status | DISPLAYCONTACT.STATUS |
| Status | STATUS |
| Tax group | DISPLAYCONTACT.TAXGROUP |
| Tax ID | TAXID |
| Tax id | DISPLAYCONTACT.TAXID |
| Tax id | SHIPTO.TAXID |
| Taxable | DISPLAYCONTACT.TAXABLE |
| Term | TERMNAME |
| Term record number | TERMSKEY |
| Term value | TERMVALUE |
| Territory ID | TERRITORYID |
| Territory record number | TERRITORYKEY |
| Total due | TOTALDUE |
| URL | DISPLAYCONTACT.URL1 |
| URL 2 | DISPLAYCONTACT.URL2 |
| Visible | DISPLAYCONTACT.VISIBLE |
| When created | WHENCREATED |
| When modified | WHENMODIFIED |
| Zip code/Post code | DISPLAYCONTACT.MAILADDRESS.ZIP |
Intacct Customer Custom Field > YayPay Customer Custom Field
1. Navigate to Account Receivable > Customers:
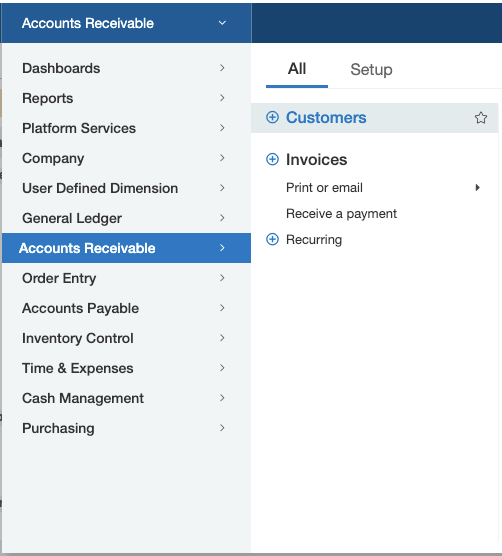
2. Open any customer in view or edit mode.
3. In the top right corner click on “More actions” and select Object Definition

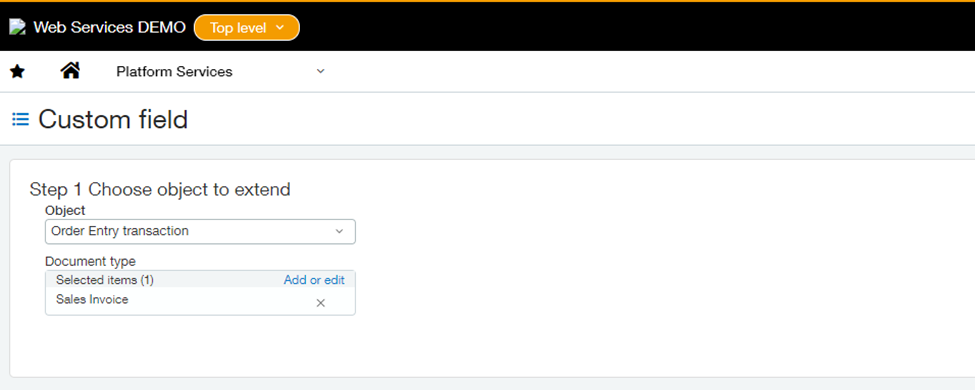
4. New screen will appear:
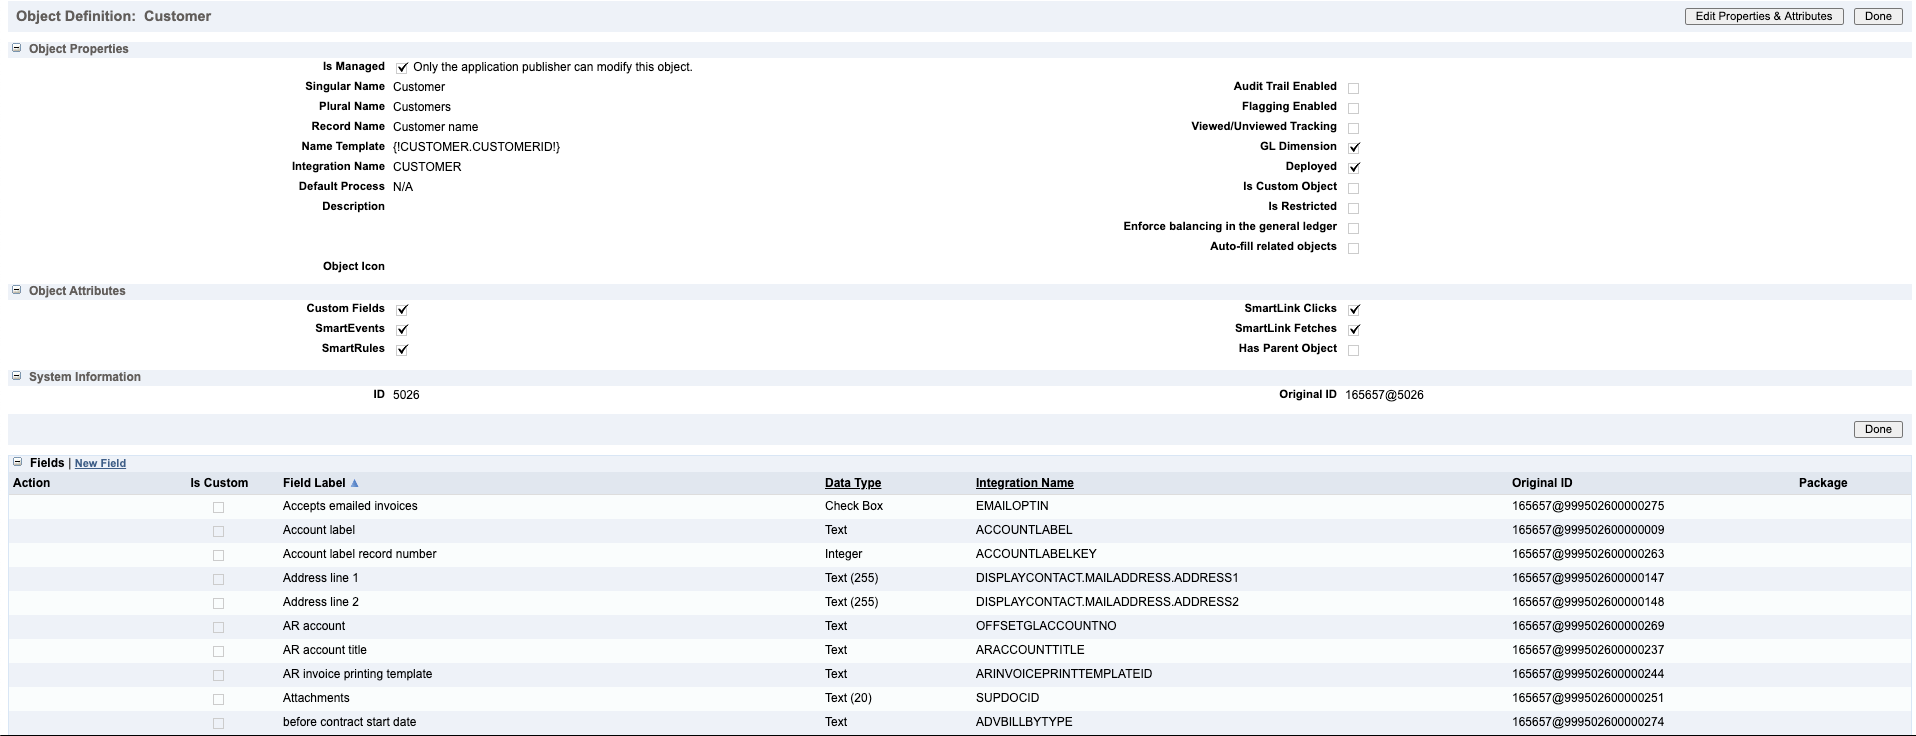
In the screenshot above Integration Name represents a custom field name, for example:
If you need ACCOUNTLABEL name to be pulled to YayPay the custom field configuration in YayPay will be:
Pulling the Customer Level Billing Contact from Intacct
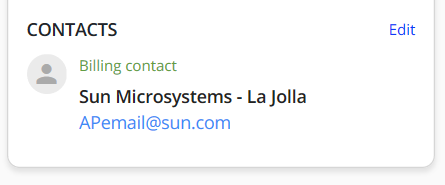
To bring over the standard, the primary email address is maintained for the customer in Intacct as the customer billing contact in YayPay, check the "Auto create billing contact" checkbox.
This is found in the Sage Intacct panel, under the Settings > Integrations page in YayPay:
The primary email address of the Customer will be synced from Intacct into YayPay.

This is how the Customer Contact will be created in YayPay:
- The Company name will be used as the 'First Name' of the contact, the Last Name will be left blank
- The Email field of the Customer Contact in YayPay will contain the email address maintained in Intacct
- This contact will also be marked as the "Billing Contact" (for the Customer) in YayPay
- If you also use the Secondary Email address field in Intacct stored against the customer, this email address will also be brought over under the same Billing Contact. The Email field of the Customer Contact in YayPay will contain 2 email addresses separated by a comma
Invoice Level Custom Fields
The Source Field Name is the technical Integration name of the Native/Custom field from your Intacct system.
In order to set up your integration, please use the names from the Integration name column to populate Source Field Name in YayPay Settings > Integration > Sage Intacct Invoice Level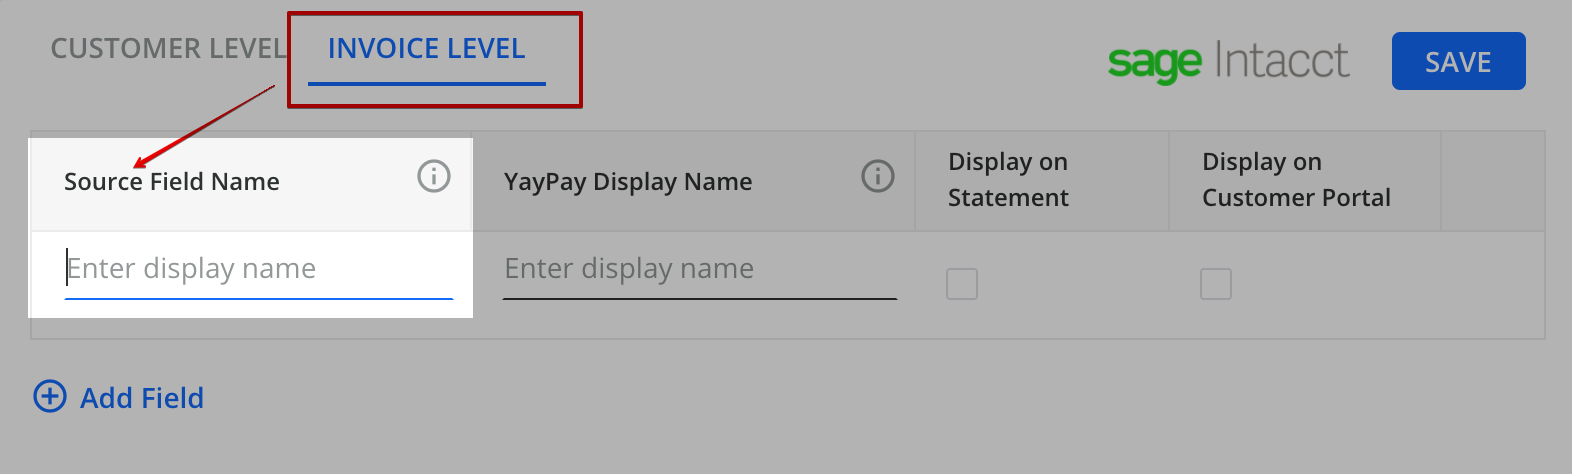
- Configure your Intacct field name and YayPay Display Name:

- The checkbox for 'Display on Statement' works the same way as the one found also in the Customer Level custom field.
- If you want to make this field appear on the Customer Portal page, check the 'Display on Customer Portal' checkbox.
- Add more rows and Save when completed. Approach YayPay Support or your Account Rep to request a re-sync if you are adding these fields after the AR sync has been occurring for some time.
Below please find instructions on how to find Native and Custom Field IDs in Intacct.
Intacct Invoice Native Field > YayPay Invoice Custom Field
A summary of frequently seen native fields at the Invoice level, which you can consider configuring YayPay may include:
- MEGAENTITYID (this refers to the Intacct Entity ID)
- PONUMBER (this refers to the PO / Reference # in Intacct)
Refer to the Intacct Developer Reference link for more context
List of Intacct native fields for invoices
|
Field Label |
Integration Name (Source Field Name) |
|---|---|
Accepts emailed invoices |
CUSTEMAILOPTIN |
Attachment |
SUPDOCID |
Audit when created |
AUWHENCREATED |
Base currency |
BASECURR |
Bill back template key |
BILLBACKTEMPLATEKEY |
Bill to |
BILLTOPAYTOCONTACTNAME |
Bill-to contact - company name |
BILLTO.COMPANYNAME |
Bill-to contact - email 1 |
BILLTO.EMAIL1 |
Bill-to contact - email 2 |
BILLTO.EMAIL2 |
Bill-to contact - fax |
BILLTO.FAX |
Bill-to contact - first name |
BILLTO.FIRSTNAME |
Bill-to contact - last name |
BILLTO.LASTNAME |
Bill-to contact - MI |
BILLTO.INITIAL |
Bill-to contact - mobile |
BILLTO.CELLPHONE |
Bill-to contact - pager |
BILLTO.PAGER |
Bill-to contact - phone 1 |
BILLTO.PHONE1 |
Bill-to contact - phone 2 |
BILLTO.PHONE2 |
Bill-to contact - prefix |
BILLTO.PREFIX |
Bill-to contact - print as |
BILLTO.PRINTAS |
Bill-to contact - URL 1 |
BILLTO.URL1 |
Bill-to contact - URL 2 |
BILLTO.URL2 |
Bill-to contact address - addr1 |
BILLTO.MAILADDRESS.ADDRESS1 |
Bill-to contact address - addr2 |
BILLTO.MAILADDRESS.ADDRESS2 |
Bill-to contact address - city |
BILLTO.MAILADDRESS.CITY |
Bill-to contact address - country |
BILLTO.MAILADDRESS.COUNTRY |
Bill-to contact address - country |
BILLTO.MAILADDRESS.COUNTRYCODE |
Bill-to contact address - State/Territory |
BILLTO.MAILADDRESS.STATE |
Bill-to contact address - Zip code/Post code |
BILLTO.MAILADDRESS.ZIP |
Billing_Adress_1 |
BILLING_ADRESS_1 |
Contact - company name |
CONTACT.COMPANYNAME |
Contact - email 1 |
CONTACT.EMAIL1 |
Contact - email 2 |
CONTACT.EMAIL2 |
Contact - fax |
CONTACT.FAX |
Contact - first name |
CONTACT.FIRSTNAME |
Contact - last name |
CONTACT.LASTNAME |
Contact - MI |
CONTACT.INITIAL |
Contact - mobile |
CONTACT.CELLPHONE |
Contact - pager |
CONTACT.PAGER |
Contact - phone 1 |
CONTACT.PHONE1 |
Contact - phone 2 |
CONTACT.PHONE2 |
Contact - prefix |
CONTACT.PREFIX |
Contact - print as |
CONTACT.PRINTAS |
Contact - URL 1 |
CONTACT.URL1 |
Contact - URL 2 |
CONTACT.URL2 |
Contact address - addr1 |
CONTACT.MAILADDRESS.ADDRESS1 |
Contact address - addr2 |
CONTACT.MAILADDRESS.ADDRESS2 |
Contact address - city |
CONTACT.MAILADDRESS.CITY |
Contact address - country |
CONTACT.MAILADDRESS.COUNTRY |
Contact address - country |
CONTACT.MAILADDRESS.COUNTRYCODE |
Contact address - State/Territory |
CONTACT.MAILADDRESS.STATE |
Contact address - Zip code/Post code |
CONTACT.MAILADDRESS.ZIP |
Contact name |
BILLTO.CONTACTNAME |
Contact name |
CONTACT.CONTACTNAME |
Contact name |
SHIPTO.CONTACTNAME |
Created at - Entity ID |
MEGAENTITYID |
Created at - Entity key |
MEGAENTITYKEY |
Created at - Entity name |
MEGAENTITYNAME |
Created by |
CREATEDBY |
Customer delivery options |
DELIVERY_OPTIONS |
Customer due |
TRX_ENTITYDUE |
Customer entity |
CUSTENTITY |
Customer entity |
ENTITY |
Customer ID |
CUSTOMERID |
Customer name |
CUSTOMERNAME |
Date |
WHENCREATED |
Date fully paid |
WHENPAID |
Default retainage percentage |
RETAINAGEPERCENTAGE |
Description |
DESCRIPTION |
Discount date |
WHENDISCOUNT |
Document ID |
DESCRIPTION2 |
Due date |
WHENDUE |
Due in |
DUE_IN_DAYS |
Exchange rate |
EXCHANGE_RATE |
Exchange rate date |
EXCH_RATE_DATE |
Exchange rate type |
EXCH_RATE_TYPE_ID |
GL posting date |
WHENPOSTED |
Has posted rev rec |
HASPOSTEDREVREC |
Invoice number |
RECORDID |
Message |
CUSTMESSAGEID |
Modified by |
MODIFIEDBY |
Module key |
MODULEKEY |
Pay-to contact key |
BILLTOPAYTOKEY |
Raw state |
RAWSTATE |
Record number |
RECORDNO |
Record number |
SHIPTO.TAXGROUP.RECORDNO |
Record type |
RECORDTYPE |
Record URL |
RECORD_URL |
Recurrung schedule key |
SCHOPKEY |
Reference number |
DOCNUMBER |
Return-to contact key |
SHIPTORETURNTOKEY |
Sales Type |
SALES_TYPE |
Ship to |
SHIPTORETURNTOCONTACTNAME |
Ship-to contact - company name |
SHIPTO.COMPANYNAME |
Ship-to contact - email 1 |
SHIPTO.EMAIL1 |
Ship-to contact - email 2 |
SHIPTO.EMAIL2 |
Ship-to contact - fax |
SHIPTO.FAX |
Ship-to contact - first name |
SHIPTO.FIRSTNAME |
Ship-to contact - last name |
SHIPTO.LASTNAME |
Ship-to contact - MI |
SHIPTO.INITIAL |
Ship-to contact - mobile |
SHIPTO.CELLPHONE |
Ship-to contact - pager |
SHIPTO.PAGER |
Ship-to contact - phone 1 |
SHIPTO.PHONE1 |
Ship-to contact - phone 2 |
SHIPTO.PHONE2 |
Ship-to contact - prefix |
SHIPTO.PREFIX |
Ship-to contact - print as |
SHIPTO.PRINTAS |
Ship-to contact - URL 1 |
SHIPTO.URL1 |
Ship-to contact - URL 2 |
SHIPTO.URL2 |
Ship-to contact address - addr1 |
SHIPTO.MAILADDRESS.ADDRESS1 |
Ship-to contact address - addr2 |
SHIPTO.MAILADDRESS.ADDRESS2 |
Ship-to contact address - city |
SHIPTO.MAILADDRESS.CITY |
Ship-to contact address - country |
SHIPTO.MAILADDRESS.COUNTRY |
Ship-to contact address - country |
SHIPTO.MAILADDRESS.COUNTRYCODE |
Ship-to contact address - State/Territory |
SHIPTO.MAILADDRESS.COUNTRYCODE |
Ship-to contact address - Zip code/Post code |
SHIPTO.MAILADDRESS.ZIP |
State |
STATE |
Summary |
PRBATCH |
Summary key |
PRBATCHKEY |
System generated |
SYSTEMGENERATED |
Tax solution |
TAXSOLUTIONID |
Term |
TERMNAME |
Term key |
TERMKEY |
Term value |
TERMVALUE |
text.onInvoice |
TEXTONINVOICE |
Total amount |
TOTALENTERED |
Total due |
TOTALDUE |
Total paid |
TOTALPAID |
Total retained amount |
TOTALRETAINED |
Total selected |
TOTALSELECTED |
Total transaction amount |
TRX_TOTALENTERED |
Total transaction amount due |
TRX_TOTALDUE |
Total transaction amount paid |
TRX_TOTALPAID |
Total transaction amount selected |
TRX_TOTALSELECTED |
Total txn amount released |
TRX_TOTALRELEASED |
Total txn amount retained |
TRX_TOTALRETAINED |
Transaction currency |
CURRENCY |
Visible |
CONTACT.VISIBLE |
Visible |
SHIPTO.VISIBLE |
When modified |
WHENMODIFIED |
Intacct Invoice Custom Field > YayPay Invoice Custom Field
How to find Integration Name:
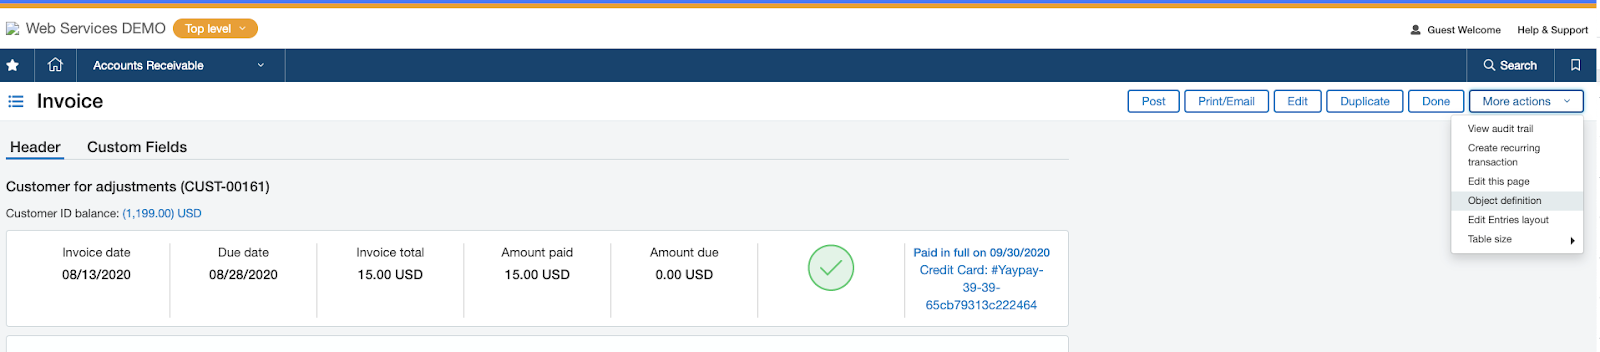
1. Navigate to Account Receivable > Invoices:
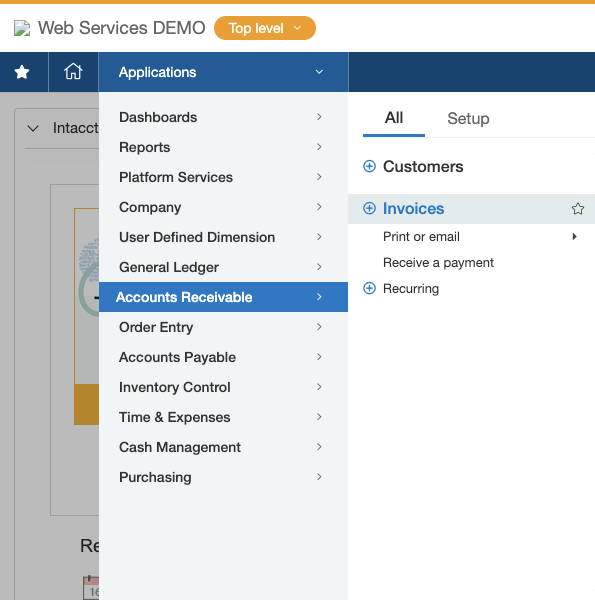
2. Open any invoice in view or edit mode.
3. In the top right corner click on “More actions” and select Object Definition
4. New screen will appear:
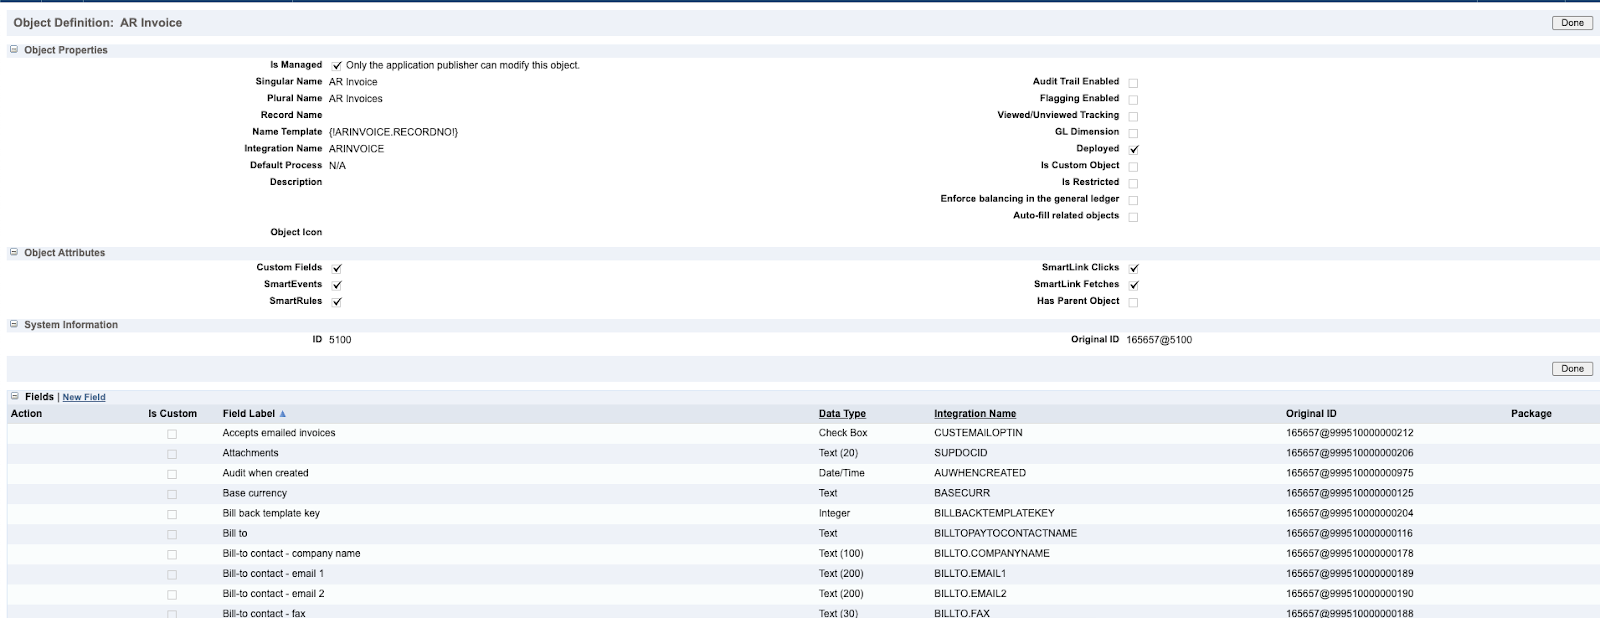
In the example above Integration Name represents a custom field name, for example:
If you need BILLTO.COMPANYNAME name to be pulled to YayPay the custom field configuration in YayPay will be:

Note: To sync custom fields from Order Entry type in Intacct, YayPay requires access to sodocument record type. The permissions are granted inside Intacct.
Pulling the Invoice level Billing Contacts from Intacct
The configuration involved to bring the email address of the Billing Contact at the invoice transaction in Intacct is outlined as follows:
Scenario #1 - Invoice Contact from the Bill To section
In Intacct:
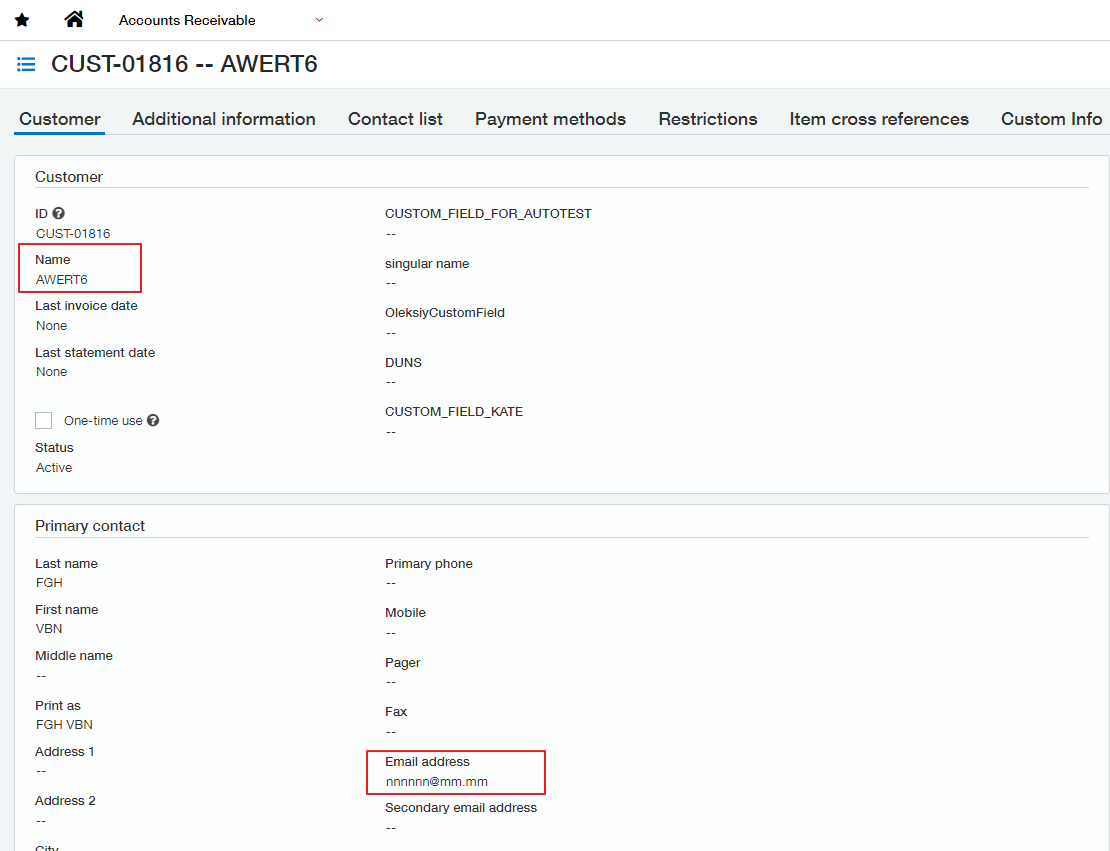
To receive the Invoice billing contact and the Invoice billing contact name, it is necessary to add the BILL TO contact to the Customer.
Example:
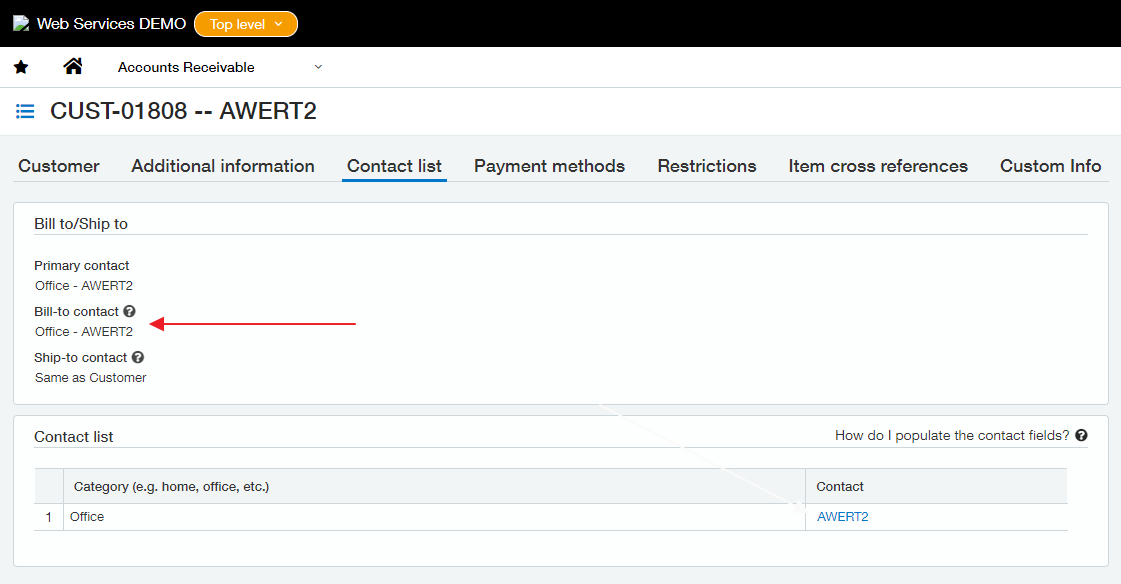
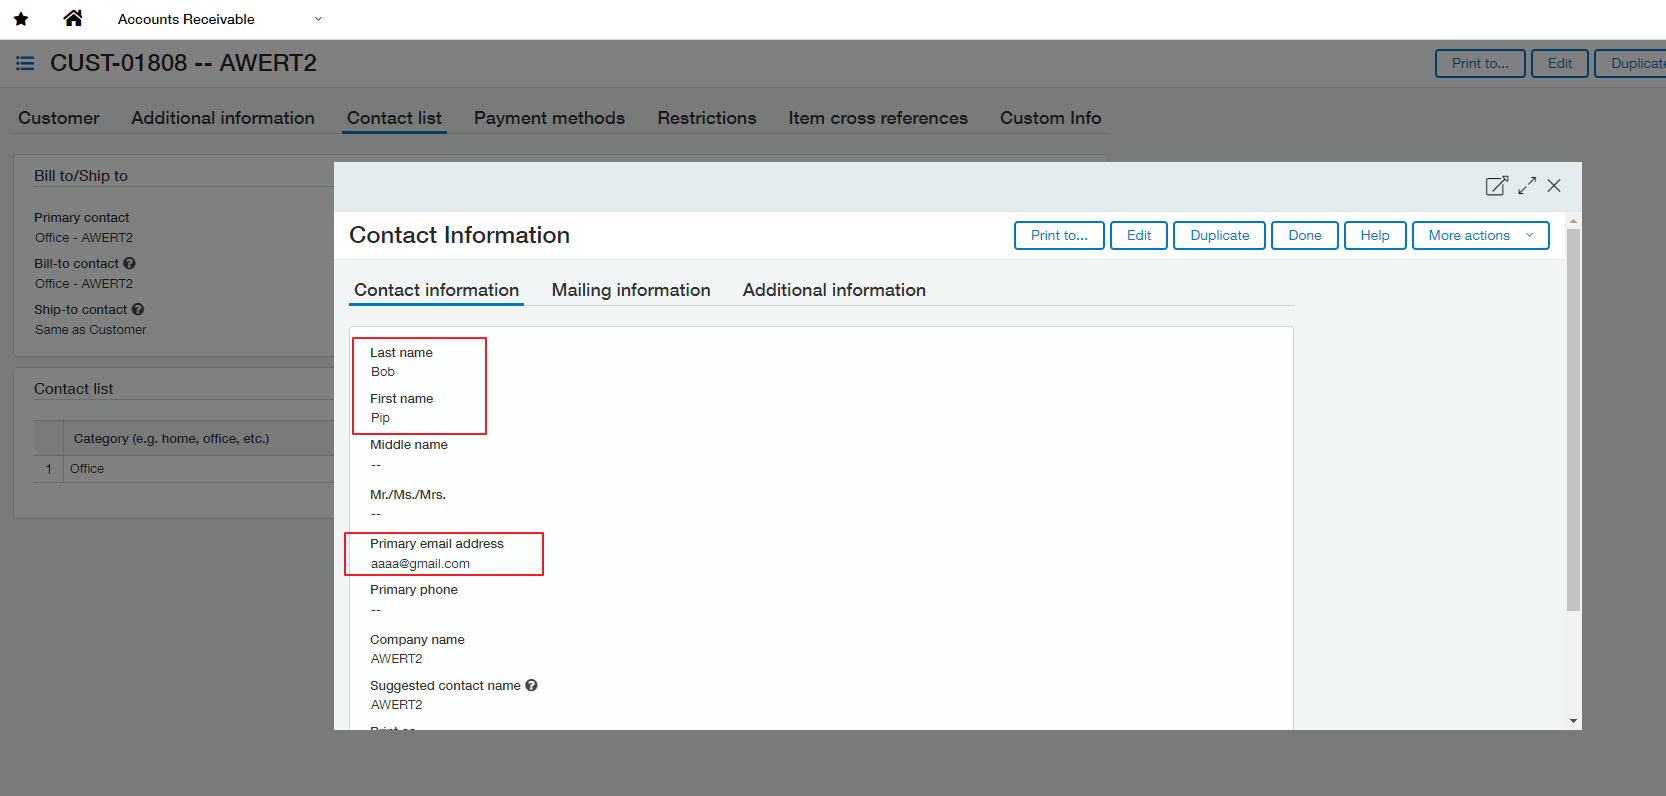
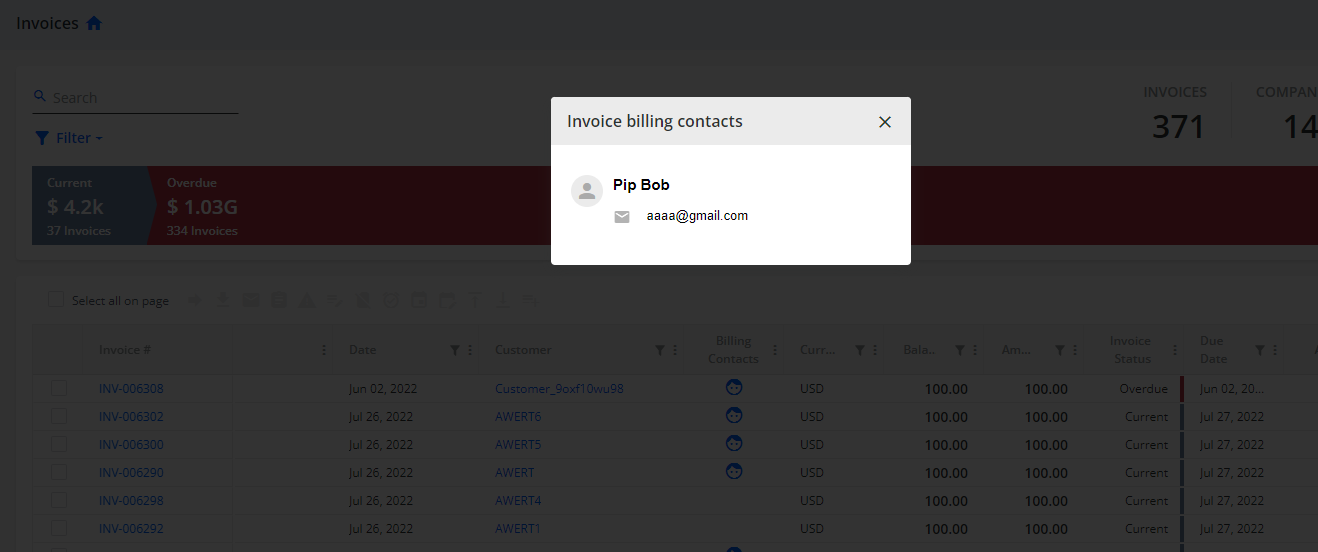
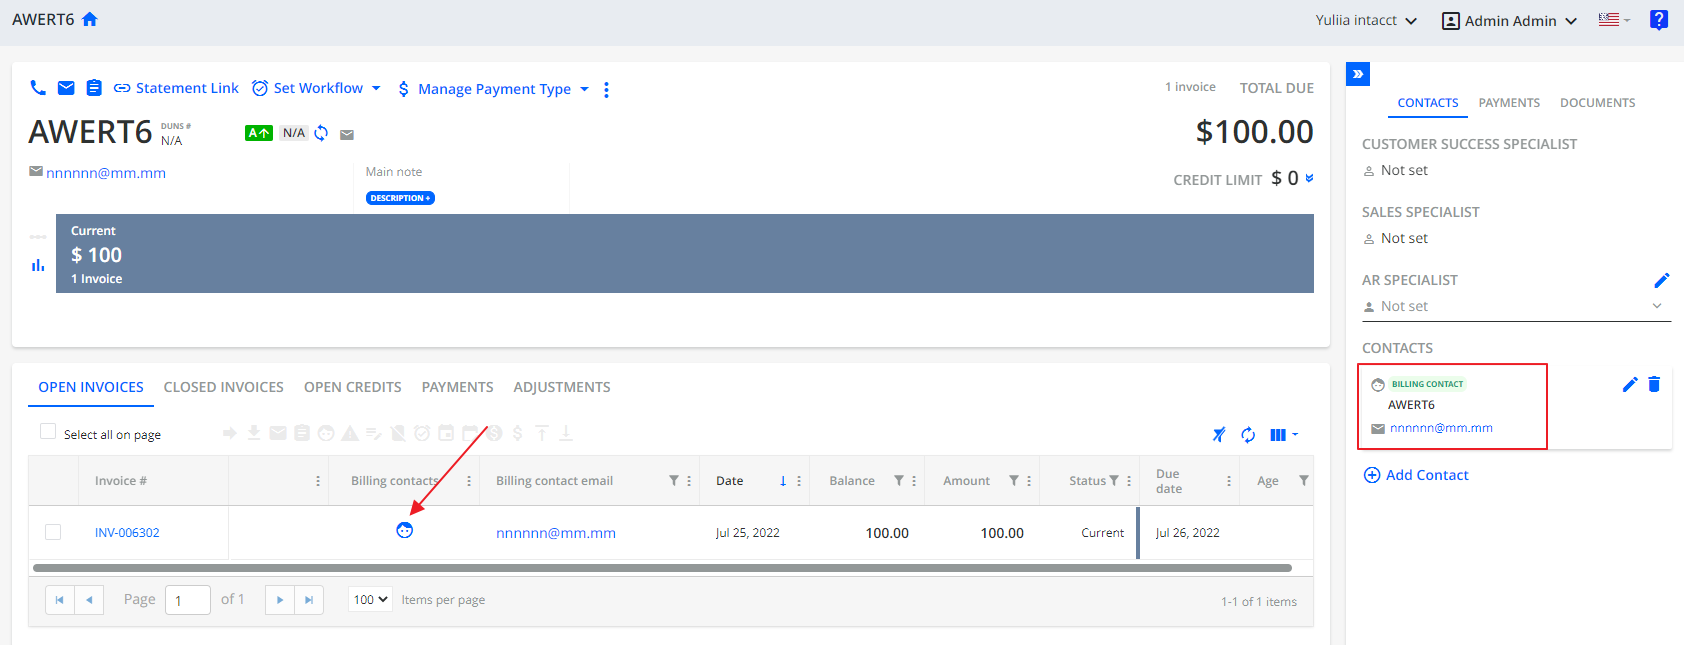
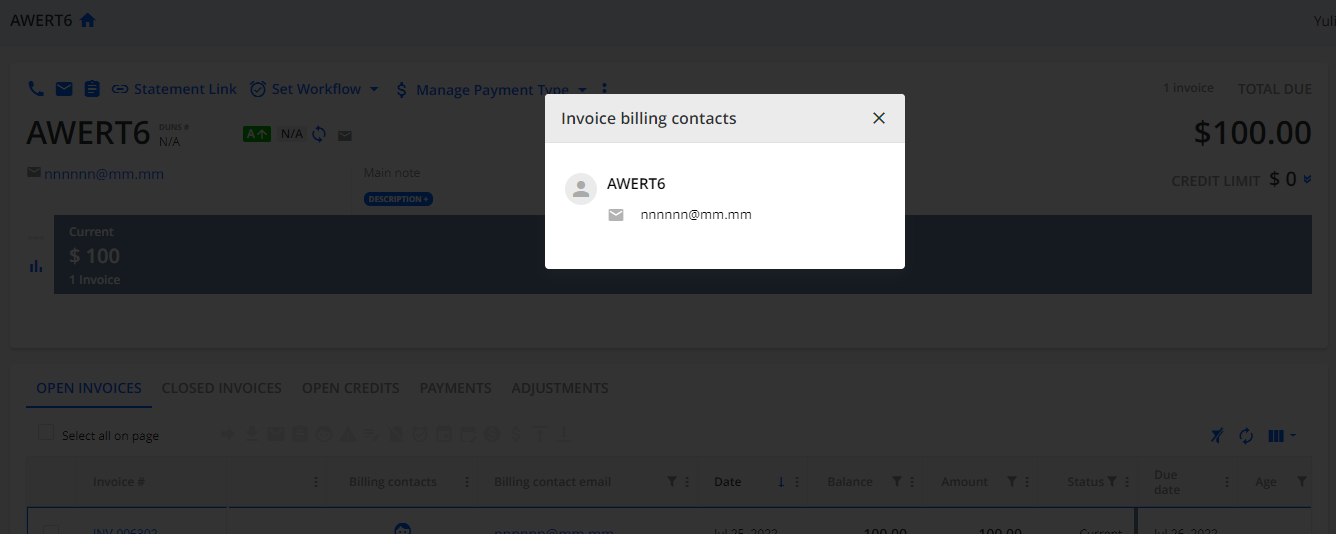
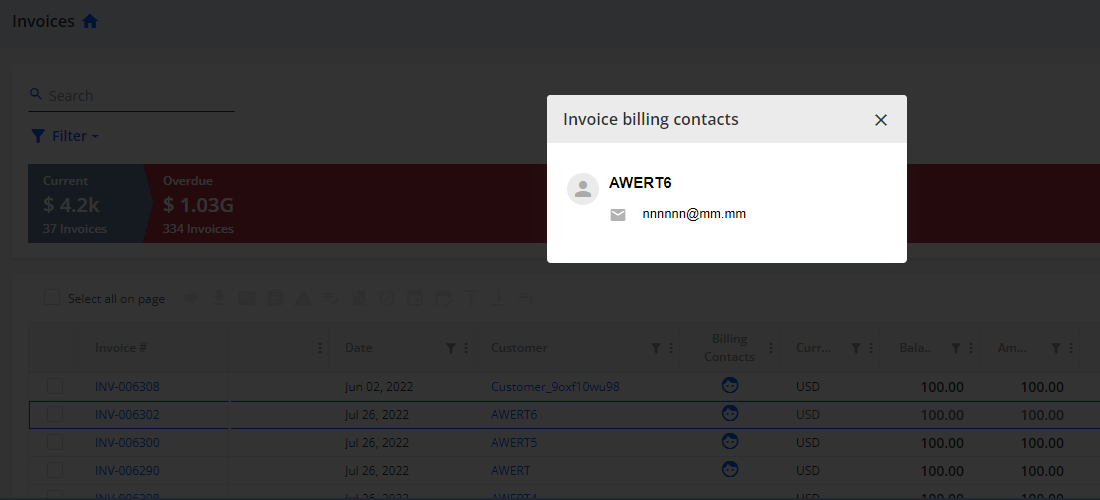
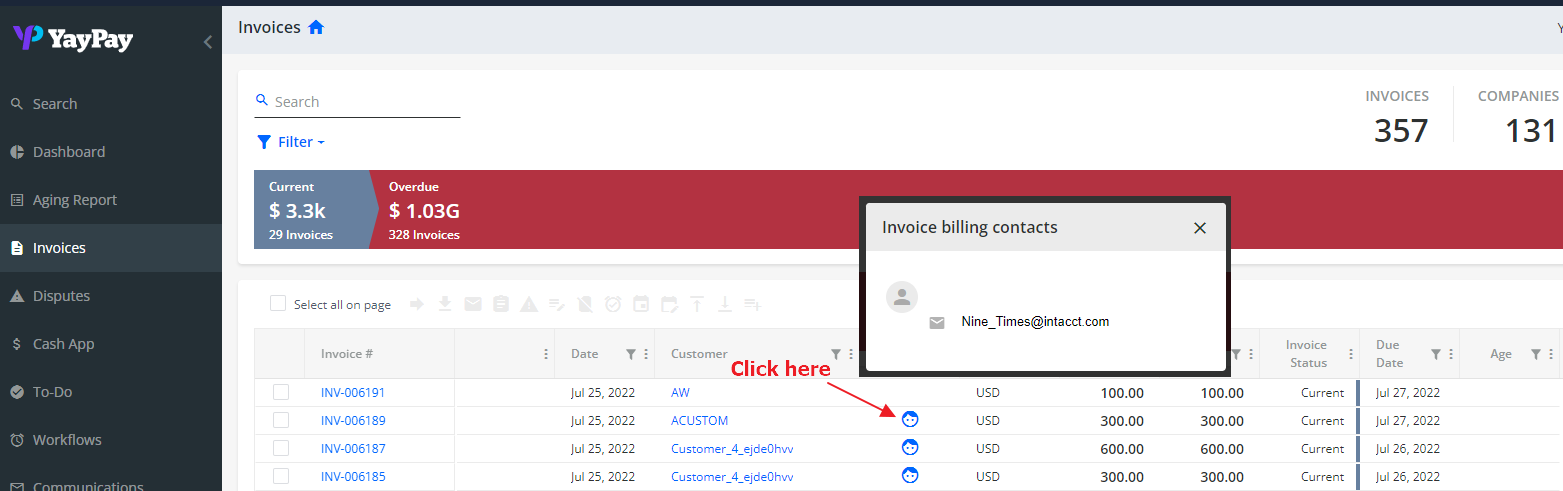
By default, Invoice billing contacts from Intacct are always pulled over and created to YayPay. This Invoice-level billing contact in YayPay will be the contact/email address from the Bill-to section of the invoice transaction in Intacct:
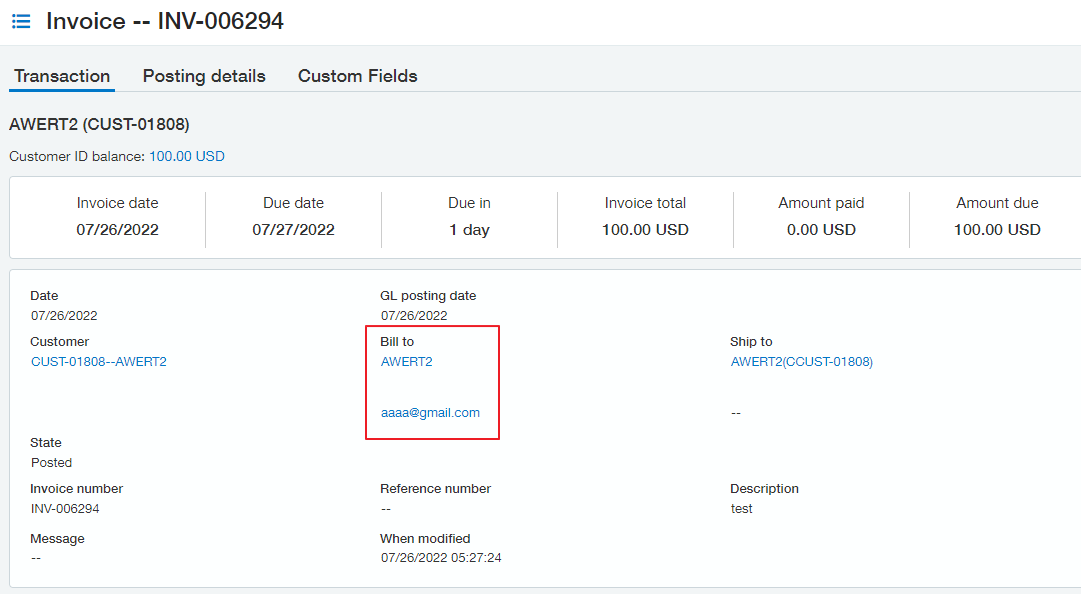
In YayPay:
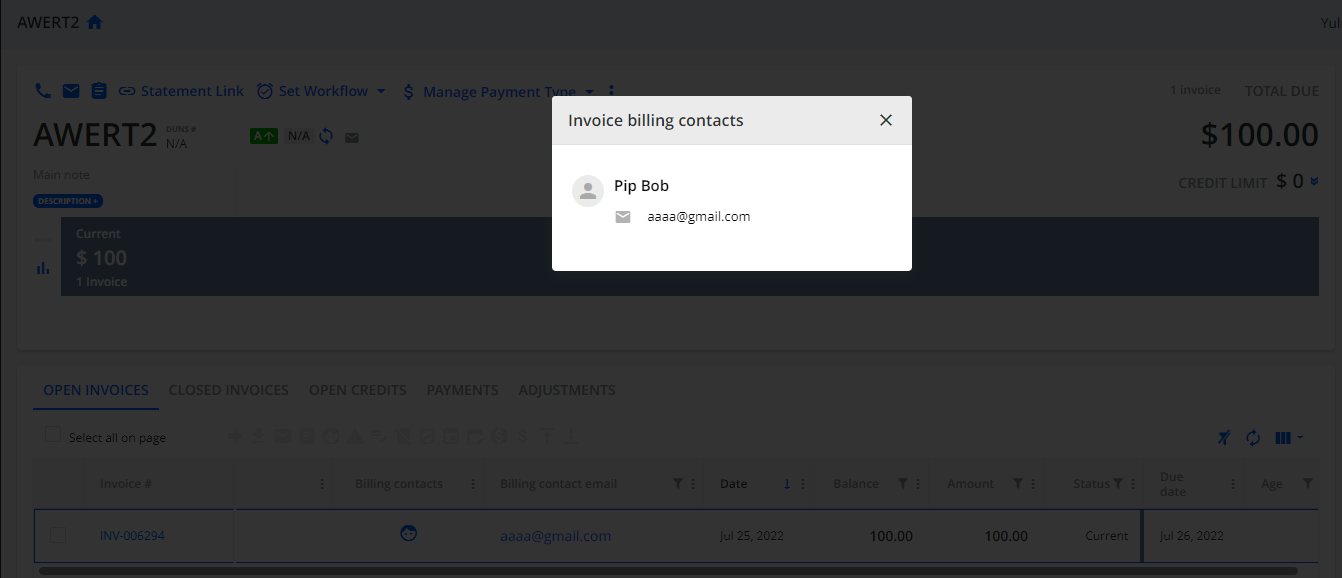
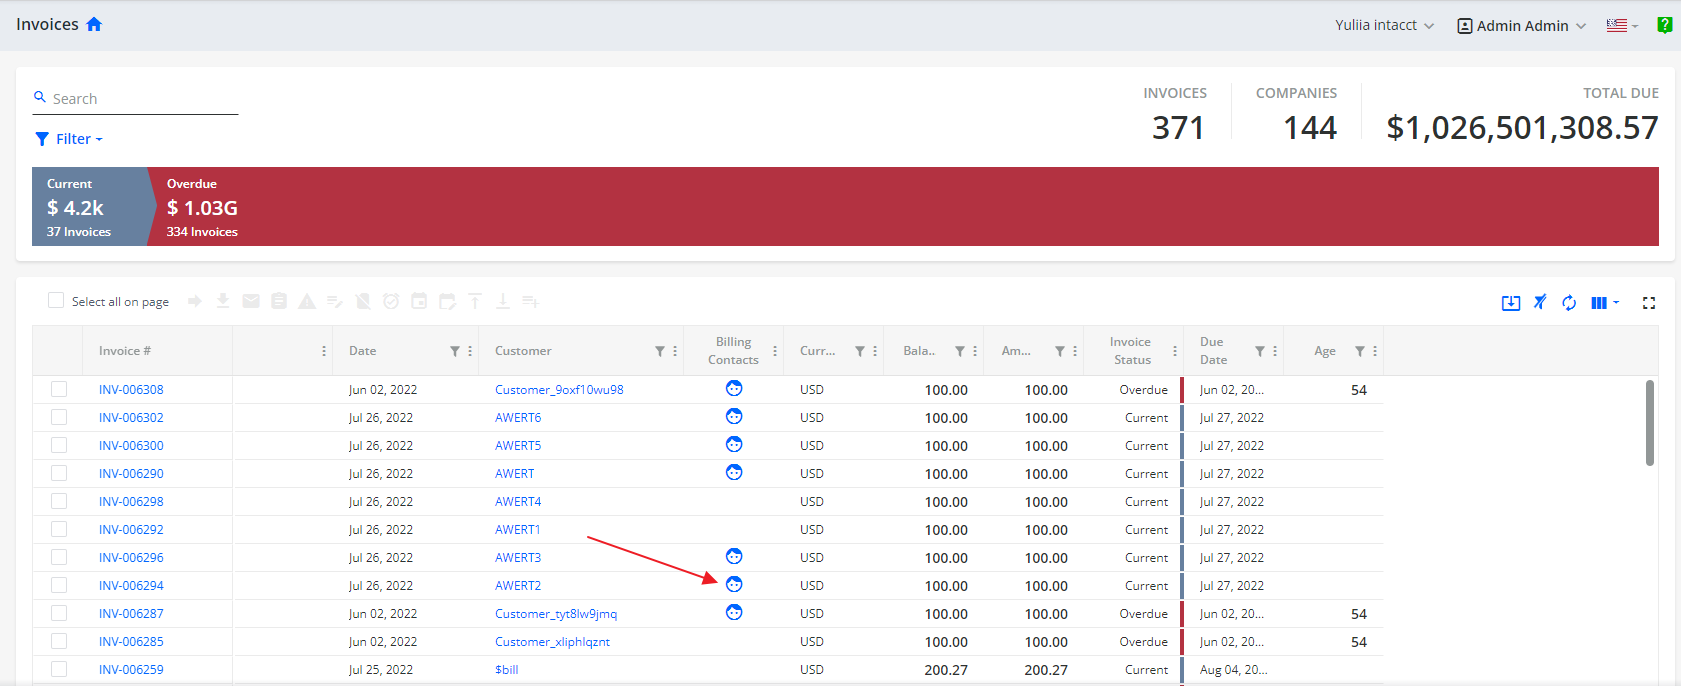
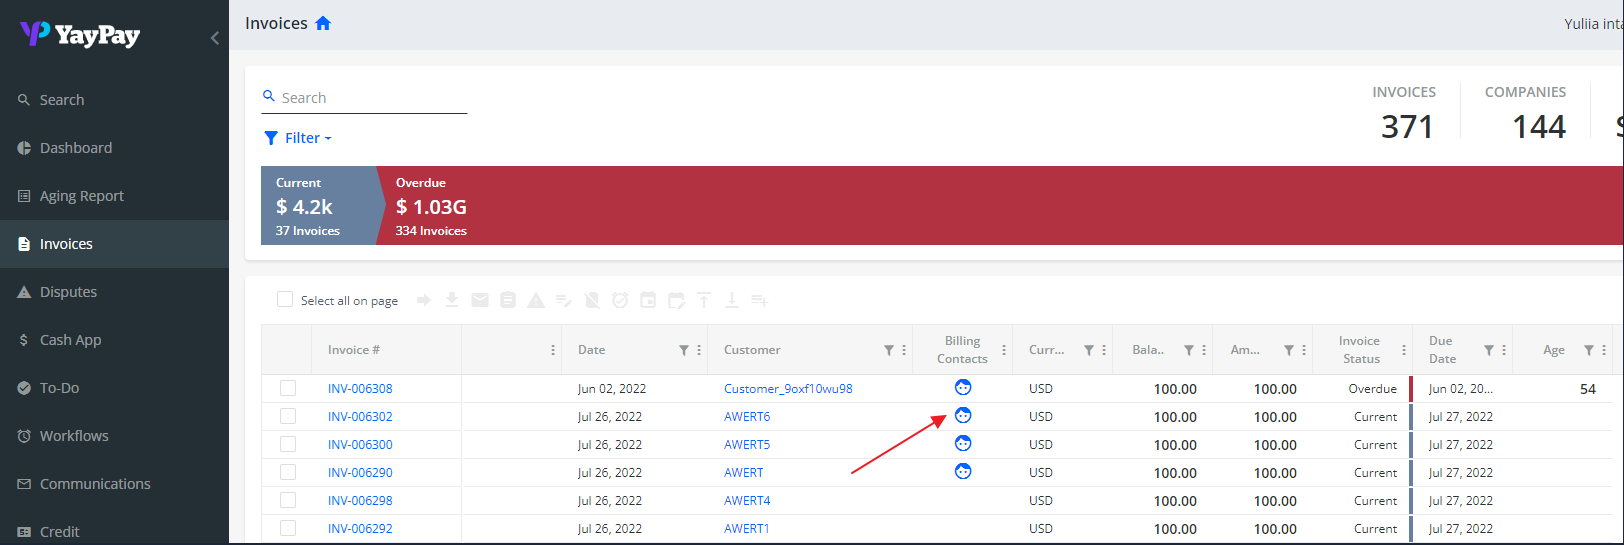
Invoice level billing contacts are displayed next to the Invoice Number. You can view this info either using the INVOICES menu in YayPay or within a particular customer using the Statement page (look under the Open/Closed Invoices tab), e.g.
The Statement Page
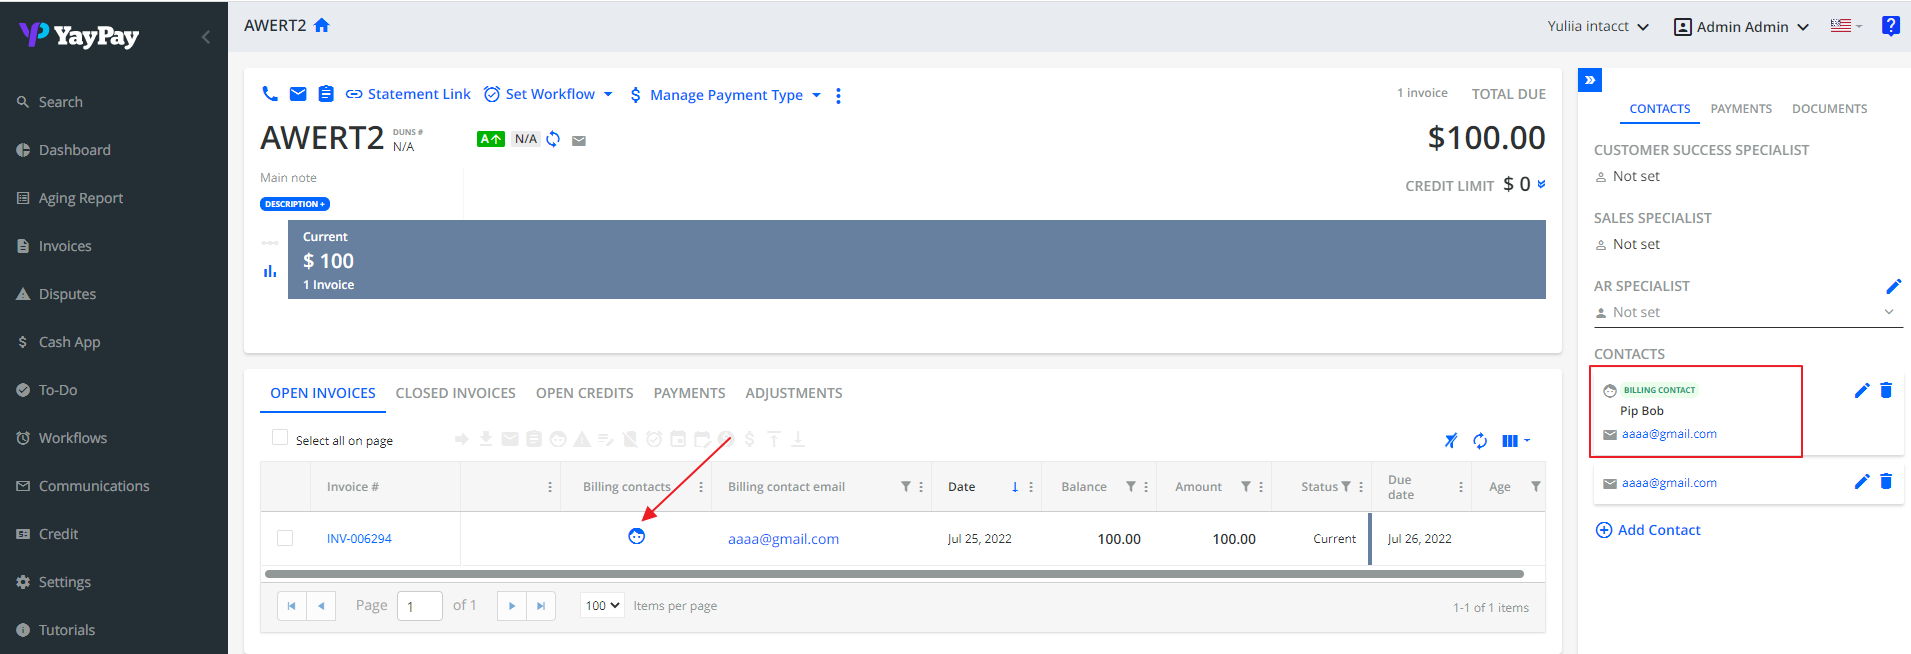
The Invoices Journal
Scenario #2 - Invoice Contact from the Primary Contact
In Intacct:
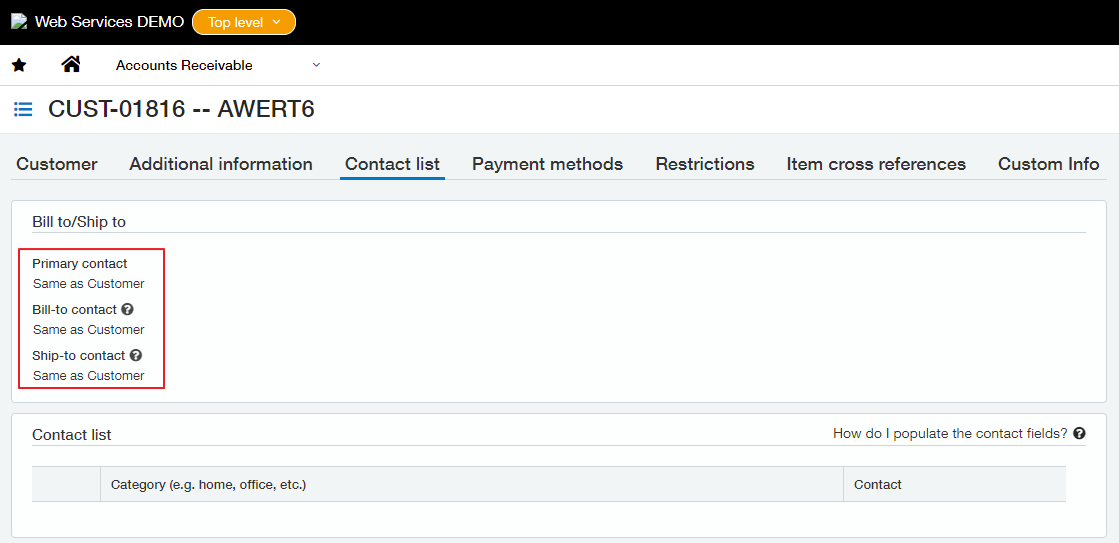
To receive the Invoice billing contact and the Invoice billing contact name, it is necessary to fill in the Primary Contact to the Customer.
Example:
In YayPay:
Invoice level billing contacts are displayed next to the Invoice Number. You can view this info either using the INVOICES menu in YayPay or within a particular customer using the Statement page (look under the Open/Closed Invoices tab), e.g.
The Statement Page
The Invoices Journal
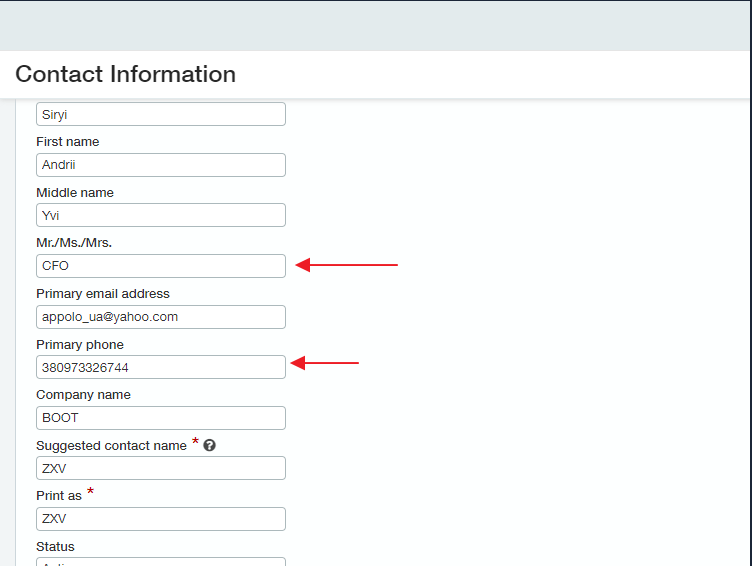
Note: Pay attention, that the Connector doesn’t sync the Primary Phone number and JOB Title.
Scenario #3 - Invoice Contact from a Custom field in Intacct
In Intacct:
If you keep the billing contact's email address associated with the Invoice using a custom field in Intacct, it is also possible to bring that into YayPay (See: April 2020 Release Notes)
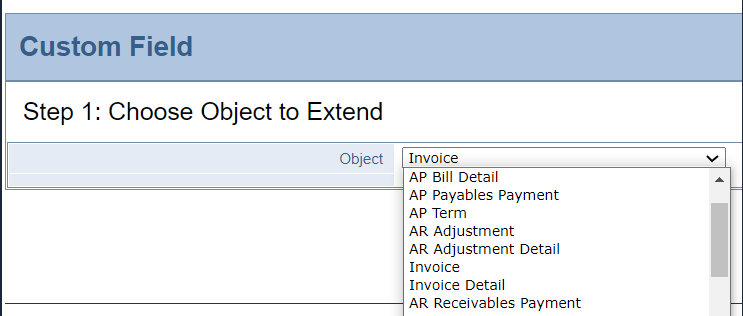
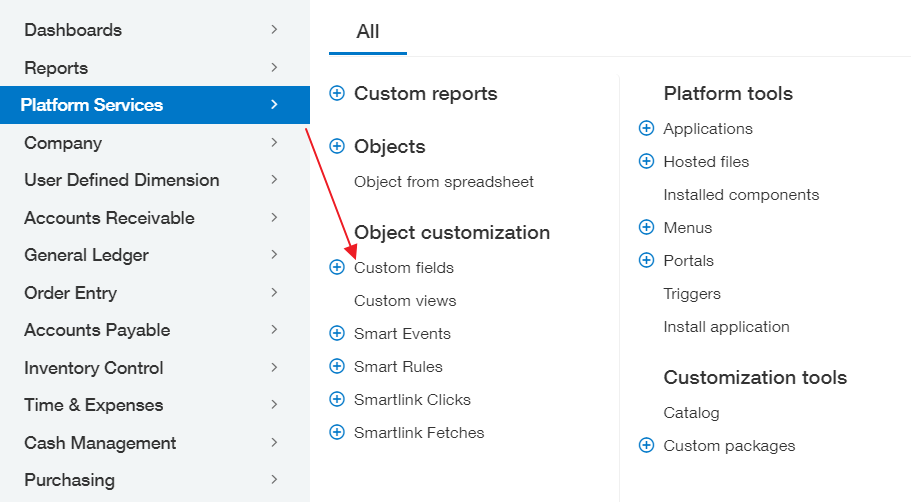
Review your Intacct setup, under Platform Services > Object Customization > Custom Fields and check that the custom field is associated with the "Invoice" Object.
For example, this could be the custom field ("BILLING_CONTACT") that you created in Intacct to hold an email address (per Invoice):

In YayPay:
Enter the Intacct Field ID name (i.e. "BILLING_CONTACT") in the "Invoice billing contact custom field name" field:
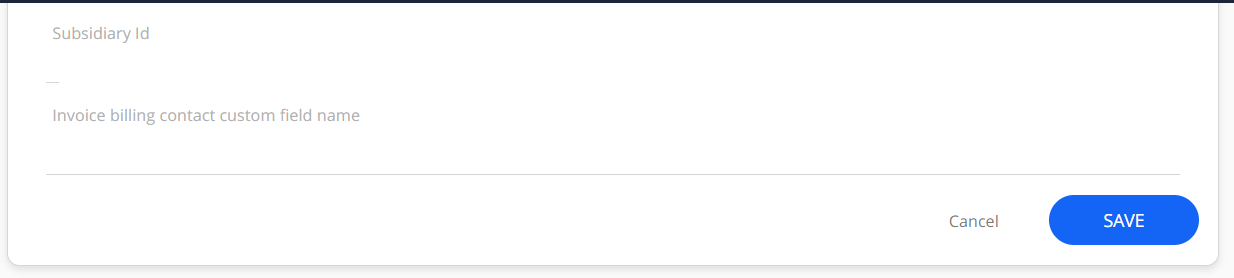
The above field is found in the Settings > Integrations page of YayPay, where you configure YayPay with the Intacct Web Services User Credentials to initiate the AR Sync from Intacct and YayPay:
Click on "SAVE" to save your changes and press "Sync".
Note: You will need to re-enter the password of the Web Services User before Saving.
After the sync, the information brought into YayPay will look like this, e.g.:
Removing Invoice Level Billing Contacts from YayPay
If removing invoice level billing contacts imported from Sage Intacct, the following applies:If you remove an invoice billing contact from the custom field in Sage Intacct® and initiate a resynchronization, this contact will be removed from YayPay as well.
- If you remove an invoice billing contact in YayPay, the data and relationships in the database will not be changed. The contact record will only be marked as removed in the database.
As a result, future sync iterations related to the modified invoice will not display the removed invoice billing contact in YayPay. However, all of the data and mappings still exist.
Thus, if you subsequently update the invoice billing contact on the ERP side and perform a sync, the contact will become active again and YayPay will display the invoice billing contact once again.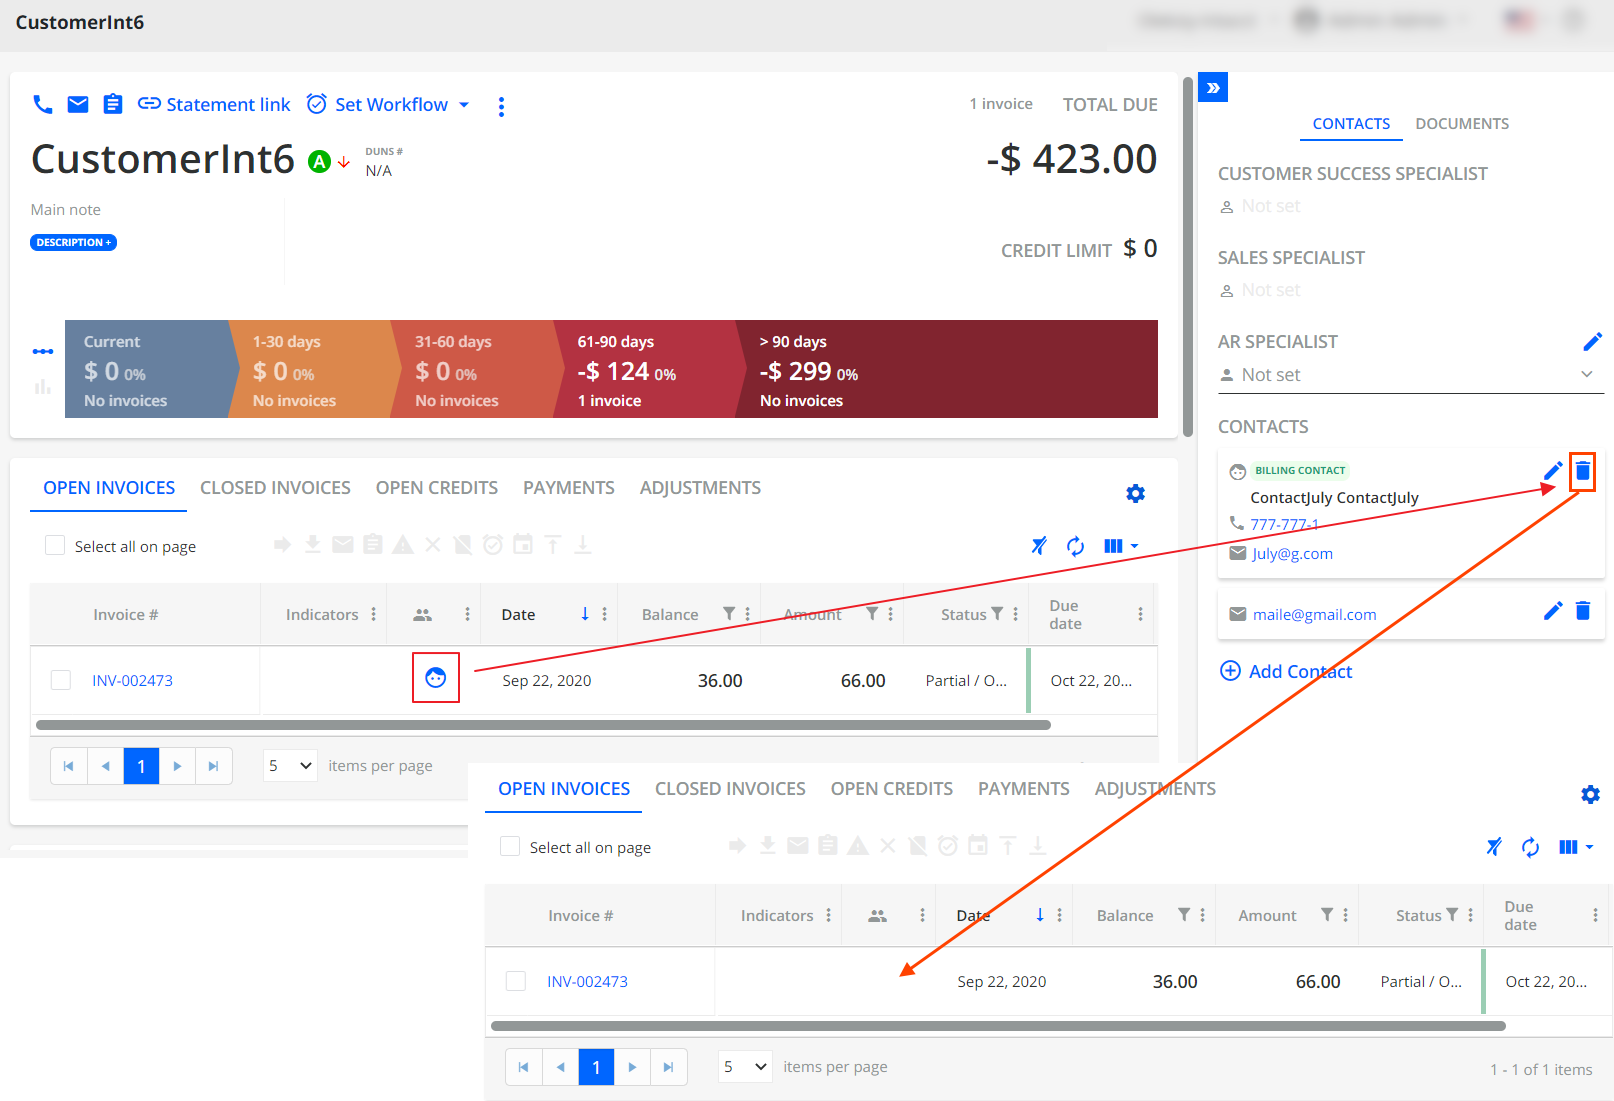

AR Invoice
This section describes AR Invoices in Sage Intacct.
In Sage Intacct, an AR invoice object represents an invoice sent to a customer for goods or services provided.
Certain types of transaction definitions in the Order Entry section ( Sales Invoice, AR Invoice) are configured to create corresponding invoices in the Accounts Receivable application. If you need to look up an AR transaction related to an AR Invoice, you can do so using the >ARINVOICE< request.
The >ARINVOICE< request will return a list with all the fields and relationships for the invoice object that are available in Sage Intacct.
<lookup>

    <object>ARINVOICE</object>

</lookup>
To review your document type in Sage Intacct, go to Application| Account Receivable| Invoices.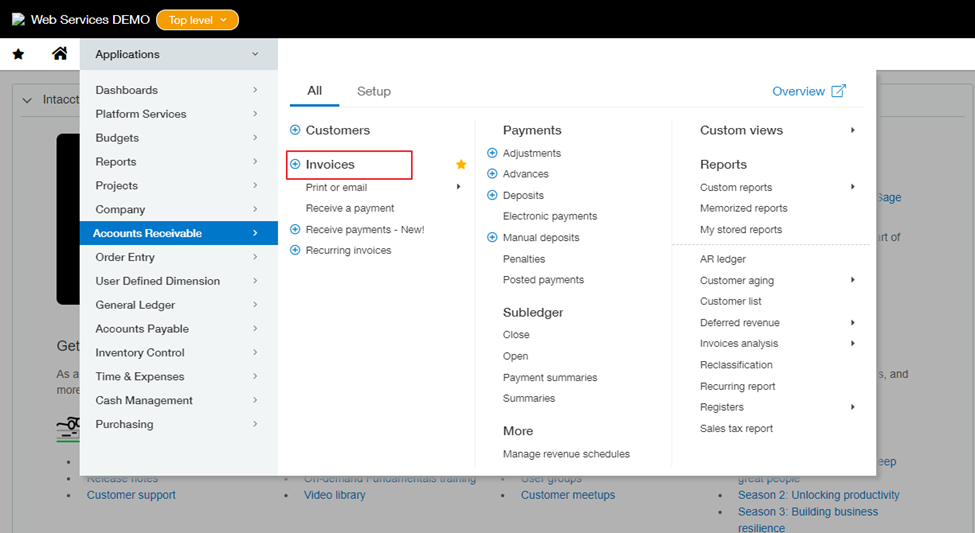
To find where the custom field is located in Sage Intacct, go to Application | Platform Services| Custom fields.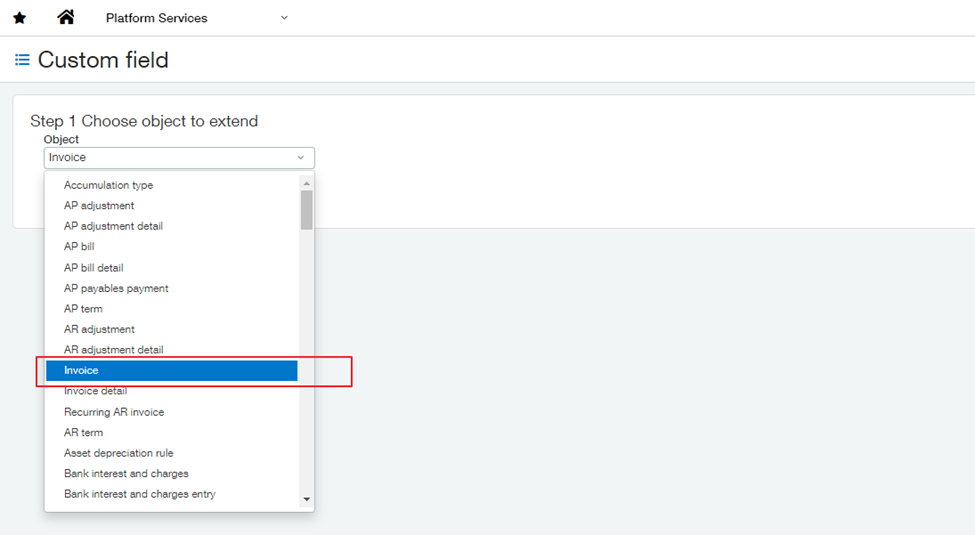
If you want to add a new custom field, go to Platform Services| Custom fields| Add| Invoice: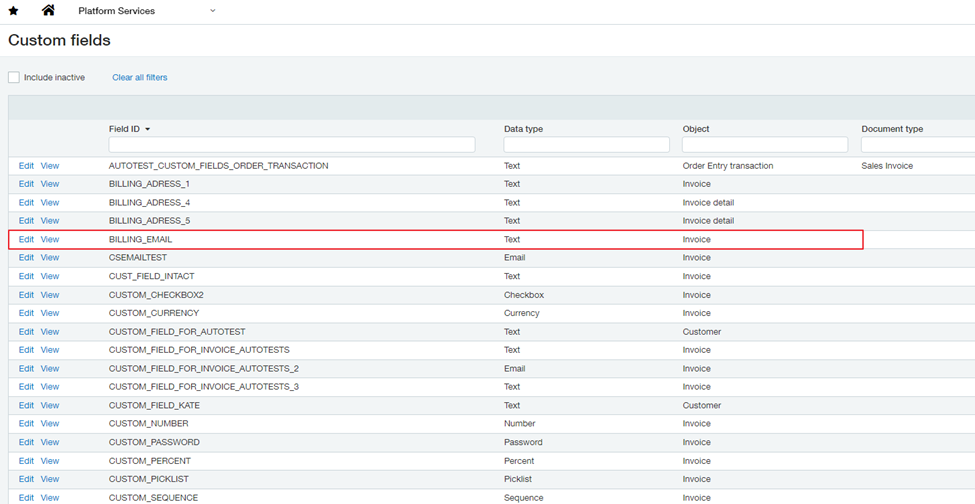
For more details about AR Invoice objects, see the Sage Intacct website.
Sales Invoice
This section describes Sales Invoices in Sage Intacct.
In Sage Intacct, order entry transactions are the records of customer orders, including quotes, orders, invoices, and more.
Certain types of transaction definitions in Order Entry ( Sales Invoice, AR Invoice) are configured to create corresponding invoices in the Accounts Receivable application. If you need to look up an AR transaction related to a Sales Invoice, you can do so using the >SODOCUMENT< request.
The >SODOCUMENT< request will return a list with all the fields and relationships for the Order Entry transaction object that are available in Sage Intacct.
<lookup>

    <object>SODOCUMENT</object>

</lookup>
To review your document type in Sage Intacct, go to Order Entry| Invoice| Sales Invoice:
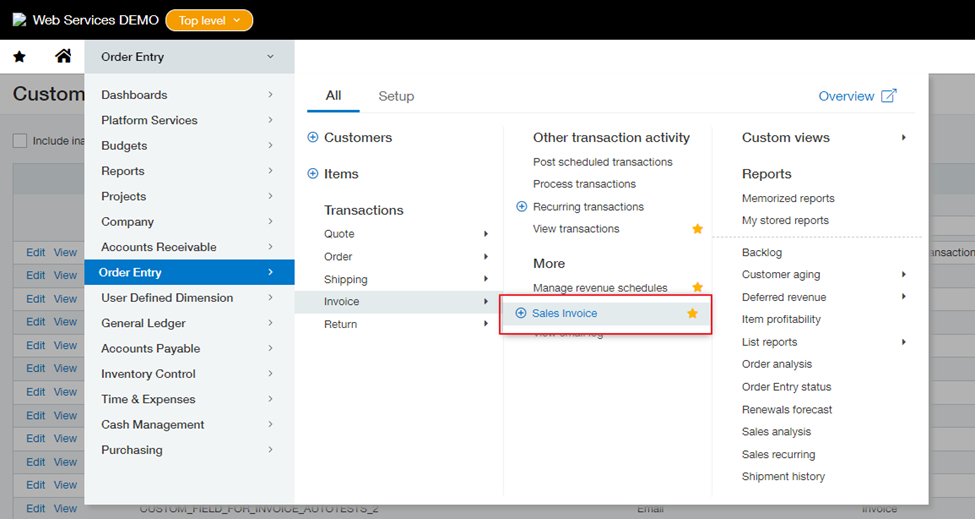
The Document type can be different than on the screenshot below but must be under the Sales Invoice item.
For more details about order entry transactions, see the Sage Intacct website.
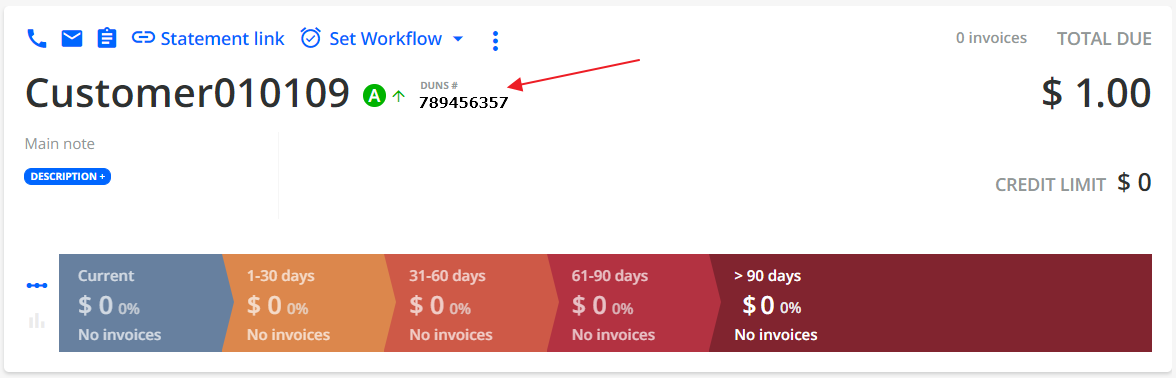
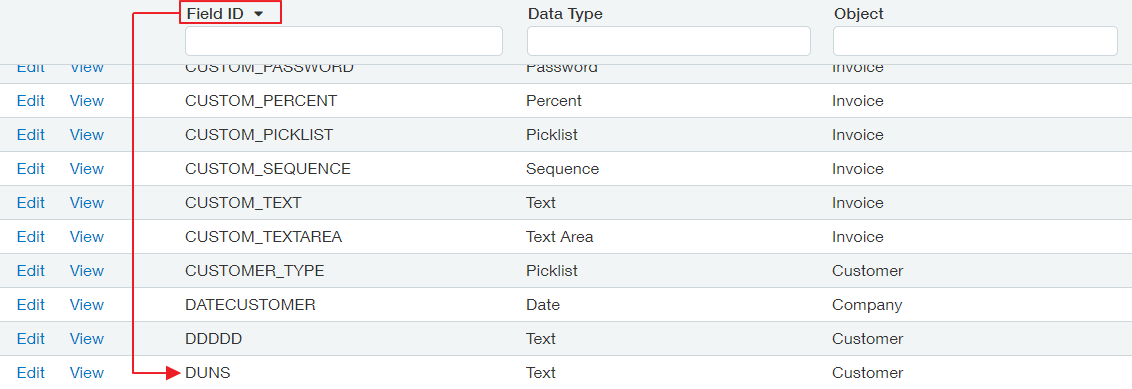
Bringing DUNS Number from Intacct
To transmit the DUNS (Data Universal Numbering System) Number within the Customer from Intacct to YayPay the user should perform the following steps:
1. In YayPay, open Settings > Integrations and fill in the Custom field for DUNS number field with an Intacct Field ID value.
2. The Custom field for DUNS number field should include the Filed ID that corresponds to the Custom Field name in Intacct.
3. Once you fill in the Custom field for DUNS number field in YayPay, click Save.
4. After the sync process, YayPay depicts the DUNS Number within the Customer.