On the Statement Page, there is an indication of a Credit Limit. By default, Credit Limit is pulled from ERP or CSV file, but there is an option to enable editing and saving the Credit Limit inside the YayPay system.

Enable Credit Limit inside YayPay
1. Go to Settings > Business Settings
2. Enable the "Use YayPay as the system of record for Credit Limits" checkbox

When the checkbox is enabled, all the changes made inside YayPay are saved and records are not pulled from ERP with any new sync. If necessary you can enable pushing the updated credit limit to ERP(NetSuite, Acumatica, Intacct)
When the checkbox is disabled, there is no ability to edit the Credit limit inside YayPay, and all the records are pulled from ERP.
3. Save changes
4. After enabling the feature, the Credit limit can be edited on a customer's Statement Page.
- Click on Edit

- Enter the Credit Limit amount (max number of characters is 12 and 2 decimals)
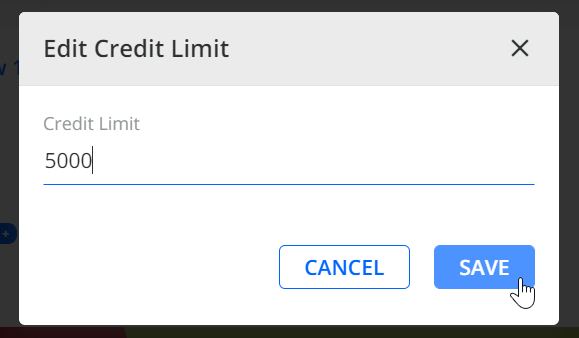
- Click Save
Push updated Credit Limit to ERP
This section describes how to push updates of credit limit to your ERP system.
Push updated Credit Limit to Acumatica
1. Go to Settings > Integrations
2. Enable the "Push Credit Limits to Acumatica" checkbox in the connector settings

3. Save changes
DeletePush updated Credit Limit to Intacct
1. Go to Settings > Integrations
2. Enable the "Push Credit Limits to Intacct" checkbox in the connector settings

3. Save changes
DeletePush updated Credit Limit to NetSuite
1. Go to Settings > Integrations
2. Enable the "Push Credit Limits to NetSuite" checkbox

3. Save changes
NOTE: No resync is required.
In NetSuite settings make sure there are the following Lists and Permissions set:
Lists: Customer Profile, Customers, Items
Permissions: AccessToken Management, Deleted Records, Enable Features, Log in using Access Tokens, Online Customer Form, SOAP Web Services, User Access Tokens

NOTE: After you make the changes in NetSuite, there is a 20-minute time gap before changes impact YayPay<>NetSuite integration.
DeleteSecurity Groups for Credit Limit
There is an option to restrict the ability to update Credit Limit for the particular groups in Admin and AR Specialist Roles:
- Go to Settings > Security groups
- Enable/disable the Update Credit Limit checkbox for the group you want to adjust the setting for
- Click Apply changes

FAQ - Credit Limit
Q: What happens if I enable "Push Credit Limit to ERP*" after updating the Credit Limit inside YayPay?
A: The latest update of the Credit limit is pushed to ERP
Q: When the business setting "Use YayPay as a system of records for Credit Limit" is enabled, is Credit Limit info from ERP pulled to YayPay?
A: No
Q: I use Credit limit update inside the YayPay system feature and update some credit limits for customers, what happens when I disable the "Use YayPay as a system of records for Credit Limit" checkbox?
A: All the Credit limits from ERP are pulled to YayPay with the closest sync and previously done updates are overwritten with ERP info.
