1. In the NetSuite connector, you can select the Custom Customer Name radio button.
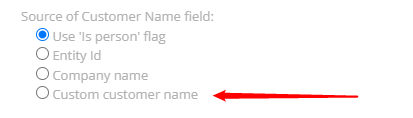

2. Once the Custom Customer Name radio button is selected, a new block becomes visible with four drop-downs to specify native fields that the ERP Connector uses to display the Customer Name in YayPay.


3. By default, the drop-down fields display the field names that the ERP Connector retrieves according to the flags: Use ‘Is person’ flag or Company Name. If the user wants to use other fields, the user clicks the drop-down list and selects a field from the list.
Each drop-down includes the following NetSuite native fields:
- altName
- ParentId
- companyName
- entityId
- entityNumber
- firstName
- middleName
- lastName
- internalId
Mapping field:
Field ID in NetSuite |
Label |
Description |
NetSuite UI |
|---|---|---|---|
|
companyName |
Company Name |
Enter the legal name of the customer. If you use Auto-Generated Numbering, it is important that you enter the customer's name here, as the Customer Name field fills with the number or code for this record. |
 |
|
internalId |
The internal identifier of the Customer in NetSuite |
 |
|
|
ParentId |
Child Of |
If this customer is sub customer of another customer or a smaller entity of another customer, select the larger parent customer. If you select a parent customer in this field, this record shows indented under the parent customer in the Customers list. |
 |
|
entityId |
Customer ID |
Enter the name of this customer, prospect or lead the way it should appear in all lists and on the Pay to the Order of line of checks. If you use Auto-Generated Numbering, the customer number or code fills here. Enter the customer name in the Company Name field. |
 |
|
entityNumber |
entityNumber |
Number |
 |
firstname |
Name |
Enter this customer's name. |
 |
middleName |
Optionally enter a last name here. |
||
|
lastName | |||
|
altName |
Customer |
This is the name of this person or company. |
 |
4. If the user doesn’t want to select the field from one of the drop-down fields, the user should have the ability to select none. The none should be placed on the top of the list.
5. The user should select a minimum of one of the drop-down fields for INDIVIDUAL and COMPANY. If the user doesn’t select a minimum of one of the drop-down fields for INDIVIDUAL and COMPANY, the Save button is unavailable.
6. Once the user switches to another radio button, and then selects the Custom Customer Name radio button once again, the drop-down fields display the field names that the ERP Connector retrieves according to the flags: Use ‘Is person’ flag or Company Name.
7. Depicting the Customer Name in YayPay:
a) If in the NetSuite account the user selects the COMPANY type, the ERP Connector uses fields from drop-down fields via COMPANY to depict the company name in YayPay:


b) If in the NetSuite account the user selects the INDIVIDUAL type, the ERP Connector should use fields from drop-down fields via INDIVIDUAL to depict the company name in YayPay:


с) After the sync process, YayPay uses selected fields from drop-down fields to depict the company name on the statement page.
For example, the user specifies two fields for INDIVIDUAL:
firstName = Apple
middleName = Corporation
After the sync process, YayPay depicts the following company name: Apple Corporation.
