Your NetSuite Invoice Templates/PDFs can also be brought over to YayPay. This requires installing and setting up scripts in your NetSuite system.
This illustration shows the overall sync processes involved to bring your AR record data, and also the NetSuite Invoice Template/PDFs from the File Cabinet in NetSuite.
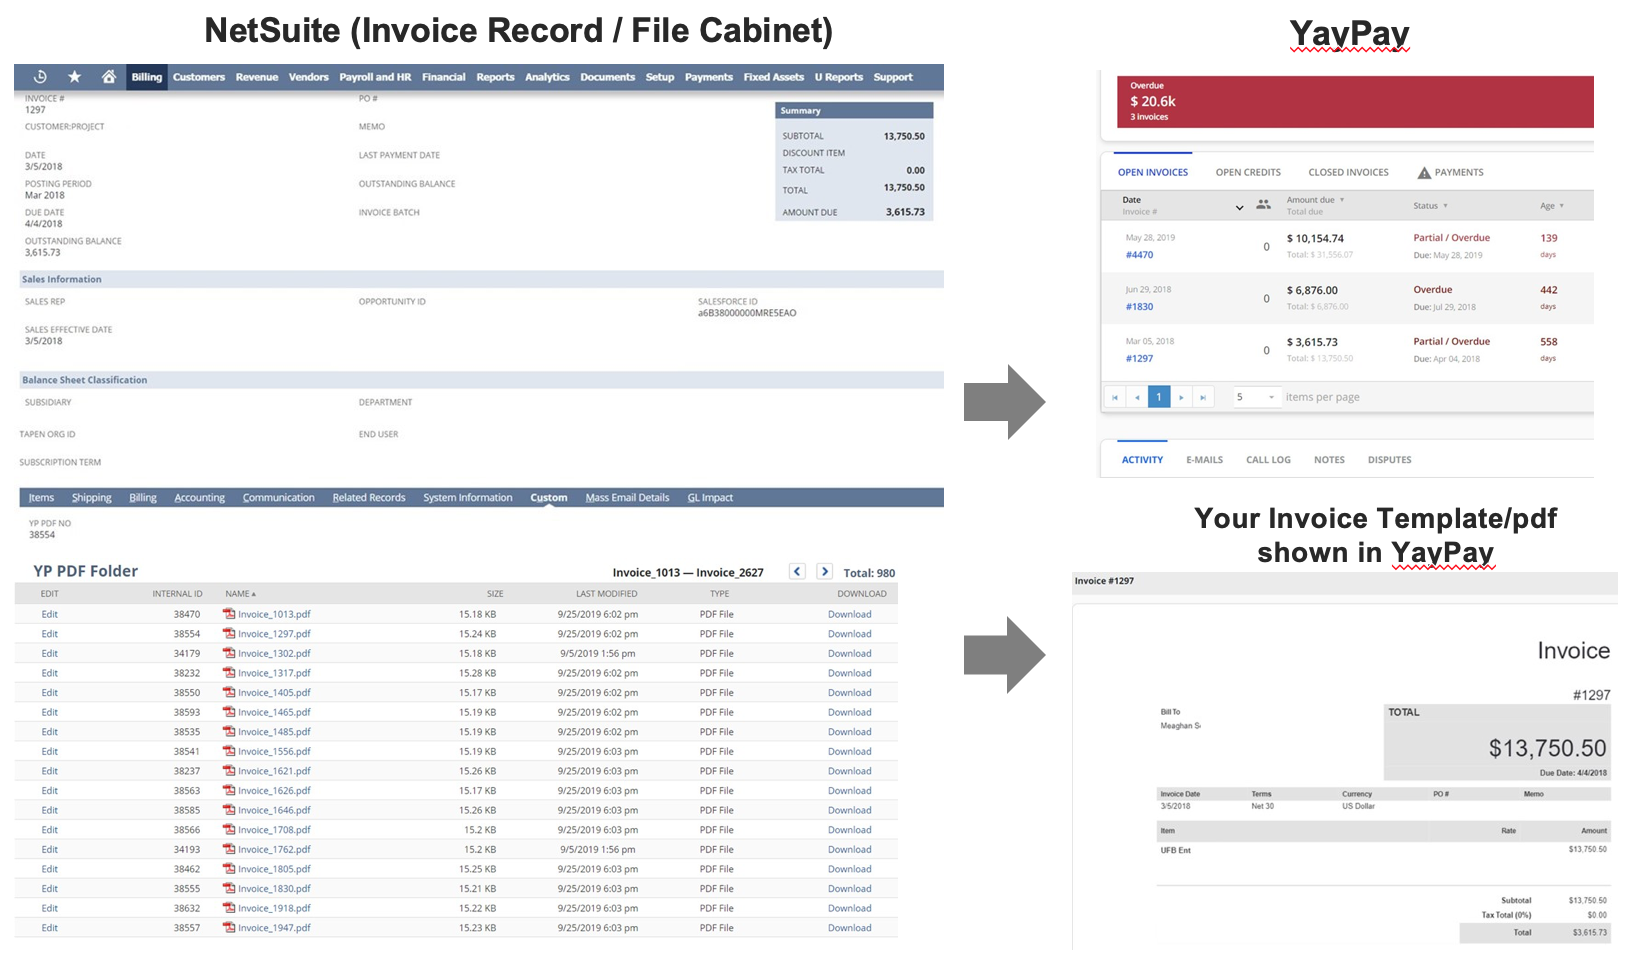
The following is a summary of how to install and set up a series of javascript files that work in your NetSuite system to facilitate YayPay to bring over your Invoice Template/PDF and display it in YayPay.
All scripts can be downloaded here (also see the Update Log):
YP_MR_UpdateInvoicePdfs.js
YP_MR_InitCreateInvoicePdfs.js
YP_MR_DeleteOldPdfs.js
YP_CSV_UE_Pdf.js
For NetSuite Administrators, there are 3 scripts where the Type = Map/Reduce, and 1 script where the Type = "User Event" is prescribed in this guide.

1. Create a new custom body field in NetSuite
Log into NetSuite and go to Customization > Lists, Records & Fields > Transaction Body Fields > New
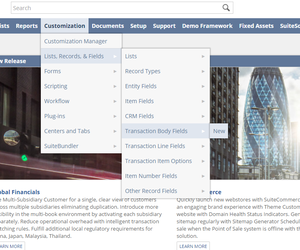
(1) Fill in the following information for the custom field:
- Use "YayPay_PDF_ID" as the Field Label Name (this will be the field label shown when you view an invoice record)
- For ID, use "_yp_pdf" (Note: this needs to be exact in order for the scripts to work)
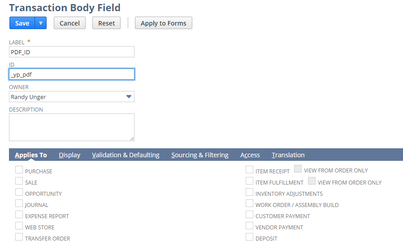
- Under the "Applies To" tab, click "SALE" in order for this field to be applied to Invoices
- Click Save to save the new custom body field.
- Search for an open invoice record. Check for the new custom field - it should be shown under the "Custom" tab (it will be blank initially)


2. Create the File Cabinet folder
- Go to Documents > File > File cabinet. Press "New Folder"

- Fill in the "Folder Name" field (e.g. "Yaypay_PDF" or "PDF Folder")

- Press the "Save" button
- Check the new folder created in your NetSuite File Cabinet and take note of the Internal ID (of the folder) which will be used later

- If you do not see any Internal IDs, go to "Set Preferences" and check the box called "Show Internal IDs" to enable this

3. Install and Create the Script for Upload Invoice PDF
- YP_CSV_UE_Pdf.js - This user event script will run when a NetSuite user creates a new Invoice record or edits & saves an Open Invoice in NetSuite. Note: You will also need to know the Internal ID of the YayPay PDF Folder created in the File Cabinet previously
Go to Customization > Scripting > Scripts > New
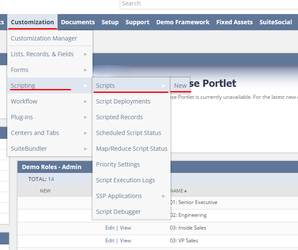
- Choose the + (add new) button. Choose and upload the script file (in .js format) from your computer or the location where you saved the .js file
- After the script file is selected, press "Create Script Record"
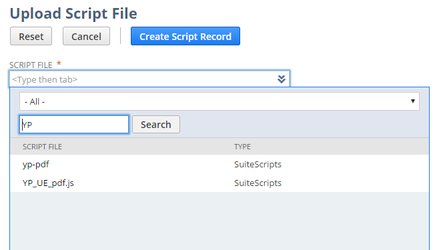
- Fill in the “Name” field as "YP_CSV_UE_Pdf.js"
- Then choose the Deployment tab and select Invoice, Credit Memo, and Customer Payments in the APPLIES TO dropdown list, and press the `OK` button.

- Ensure Column "STATUS" above is set to "Released"
- Ensure Column "LOG LEVEL" above is set to "Audit"
- Go back to the Scripts sub-tab, click "Edit" next to 'download'

- Look for the text “var PDF_FOLDER”, and replace the default Folder ID (695) with the specific NetSuite Internal ID of the Document Folder created previously

- After replacing the value, press "Save"
- Go back to the Deployment sub-tab, and click on the “Invoice” row

- Under the Audience sub-tab, ensure the script is applicable for All Roles. Mark/select the checkbox “ALL ROLES”

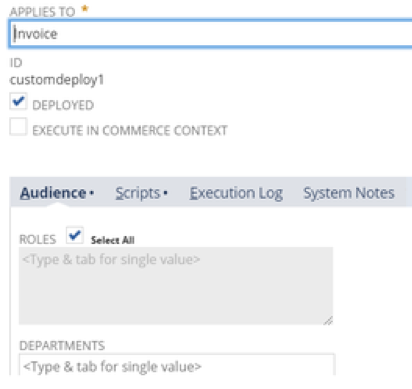
- Check also that the “EXECUTE AS ROLE” field is set to “Administrator”. Click the “Save” button
- Return to the Script Record and Deployments sub-tab
- Repeat the same steps to ensure the Deployment for “Credit Memo” and “Customer Payments” records are set to "ALL ROLES" Roles and the “EXECUTE AS ROLE” is also set to "Administrator". Click on Save for each record
To test this, go to section 8 "Test the outcome of the Upload Script (YP_CSV_UE_Pdf.js)" to try out/test the YP_CSV_UE_Pdf script.
4. Installing the Delete Invoices Script
- YP_MR_DeleteOldPdfs.js - This script is to clear old PDF files from the NetSuite Document Folder. It will remove invoice PDF files created ten days ago or more
- Go to Customization –> Scripting –> Scripts –> New and follow the previous steps to create a new Script Record for the YP_MR_DeleteOldPdfs.js
- Fill in the "Name" field as "YP_MR_DeleteOldPDFs.js"
- Click on "Save and Deploy"
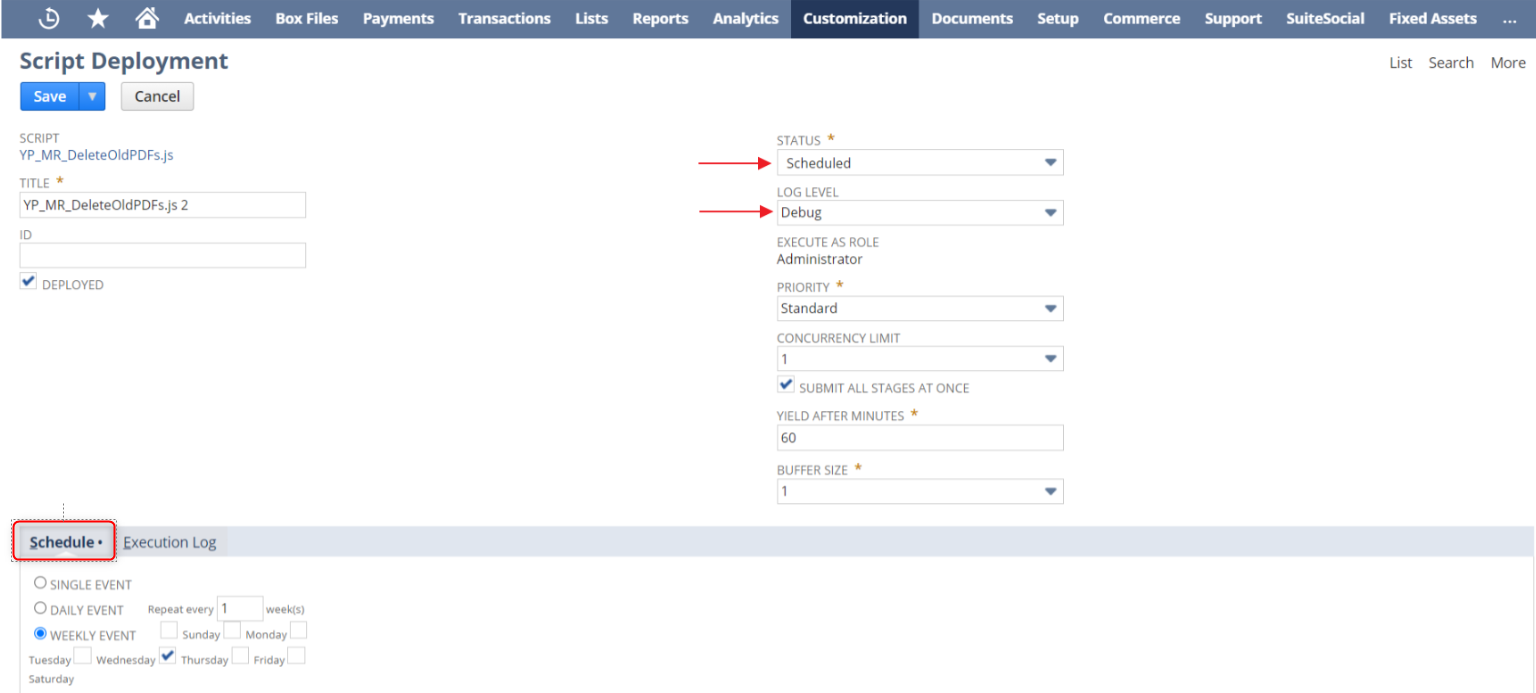
- In the Script Deployment page, ensure the “EXECUTE AS ROLE” is set as Administrator and "LOG LEVEL" is set to "Debug”
- Go to the Deployments sub-tab to deploy this Script as a Weekly Event (to remove the PDF files from the File Cabinet Folder)
- The Status (Scheduled/Not scheduled) displayed depends on the event selected in the Schedule tab:
- SINGLE EVENT (Not scheduled)
- DAILY EVENT (Scheduled)
- WEEKLY EVENT (Scheduled)
5. Installing the Initialize all open invoices script
This section describes how to install and initialize the all open invoices script.
- In NetSuite, create a new saved search that will be utilized by the open invoices script later:
Navigate to Lists | Search| Saved Searches.
Click New Saved Search and select Transaction.
Name the new search YayPay Invoice Search.
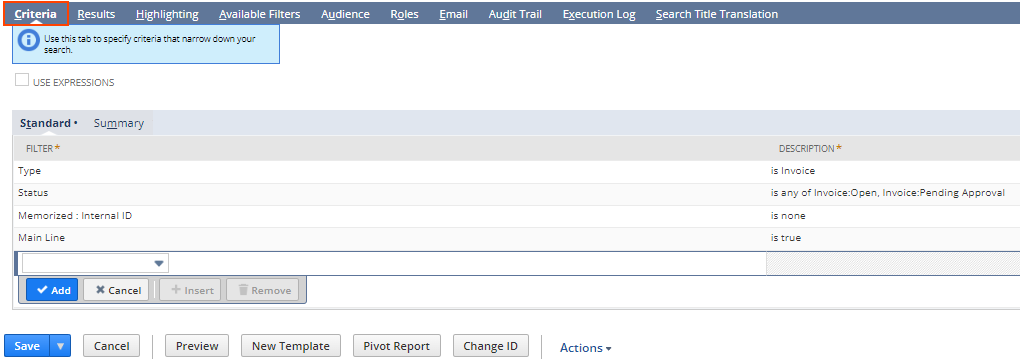
- On the Criteria tab, set the following fields:
Type – is invoice.
Status – is any of invoice: Open, Invoice:Pending Approval.
Memorized:Internal ID – is none.
Main Line – is true.
- On the Results tab, select the following fields from the combo box and add them:
Internal ID
YayPay_PDF_ID (Custom Body)
Name
Date
Item: Internal ID
Item: Name
Amount
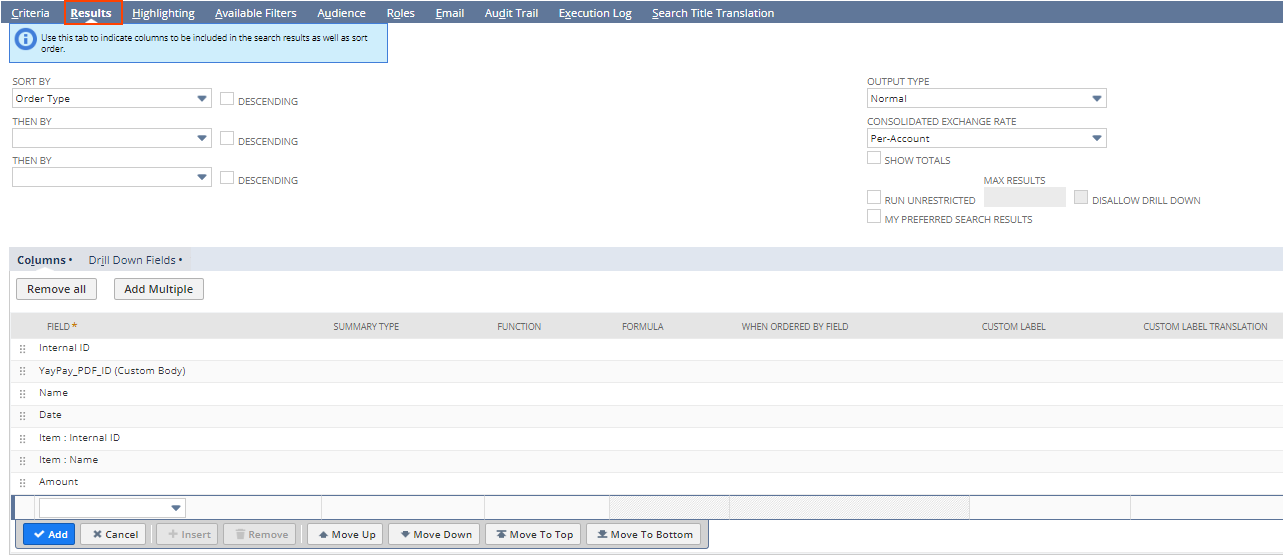
Click Save to confirm the settings.
- Install the script:
Open the YP_MR_InitCreateInvoicePdfs.js file which contains the PDF upload script.
In this script, change the default value of the PDF_FOLDER variable to the NetSuite INTERNAL_ID value of the document folder that you previously created.
Save your changes.
-
Go to Customization | Scripting | Scripts | New and create a new script record for the modified script from the YP_MR_InitCreateInvoicePdfs.js file.
Name the script YP_MR_InitCreateInvoicePdfs.js.
Click Save to confirm your changes.
- Navigate to the Scripts tab and click Editto view the YP_MR_InitCreateInvoicePdfs.js file.

In this file, ensure that the var PDF_FOLDER variable is not set to its default folder ID (695). Instead, set it to the unique NetSuite INTERNAL_ID value of the previously created document folder.
Click Save to confirm your changes.
- Navigate to the Parameters tab and click on the New Parameter button to add a new item. This allows you to utilize the previously created and saved search.
On this tab, set the following fields: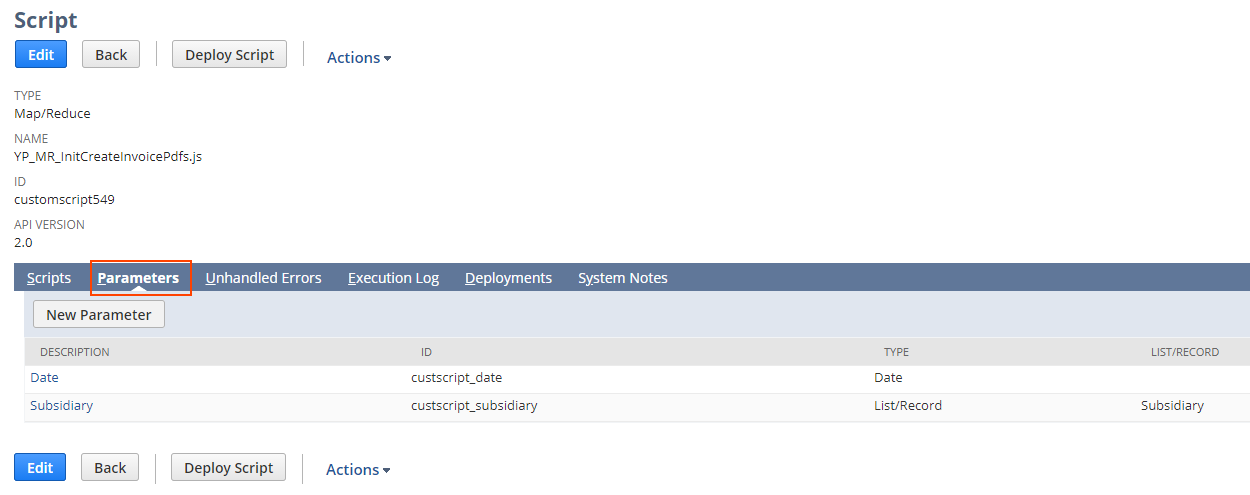
Parameter Name – YayPay Search.
ID – _yp_ssearch.
Type – List/Record.
List/Record – Saved Search.
- Click Save to confirm the settings.
Click Deploy Script or Save and Deploy.
On the Customization, ensure EXECUTE AS ROLE is set to Administrator and LOG LEVEL to Debug.
- Go to the Schedule tab and select SINGLE EVENT.
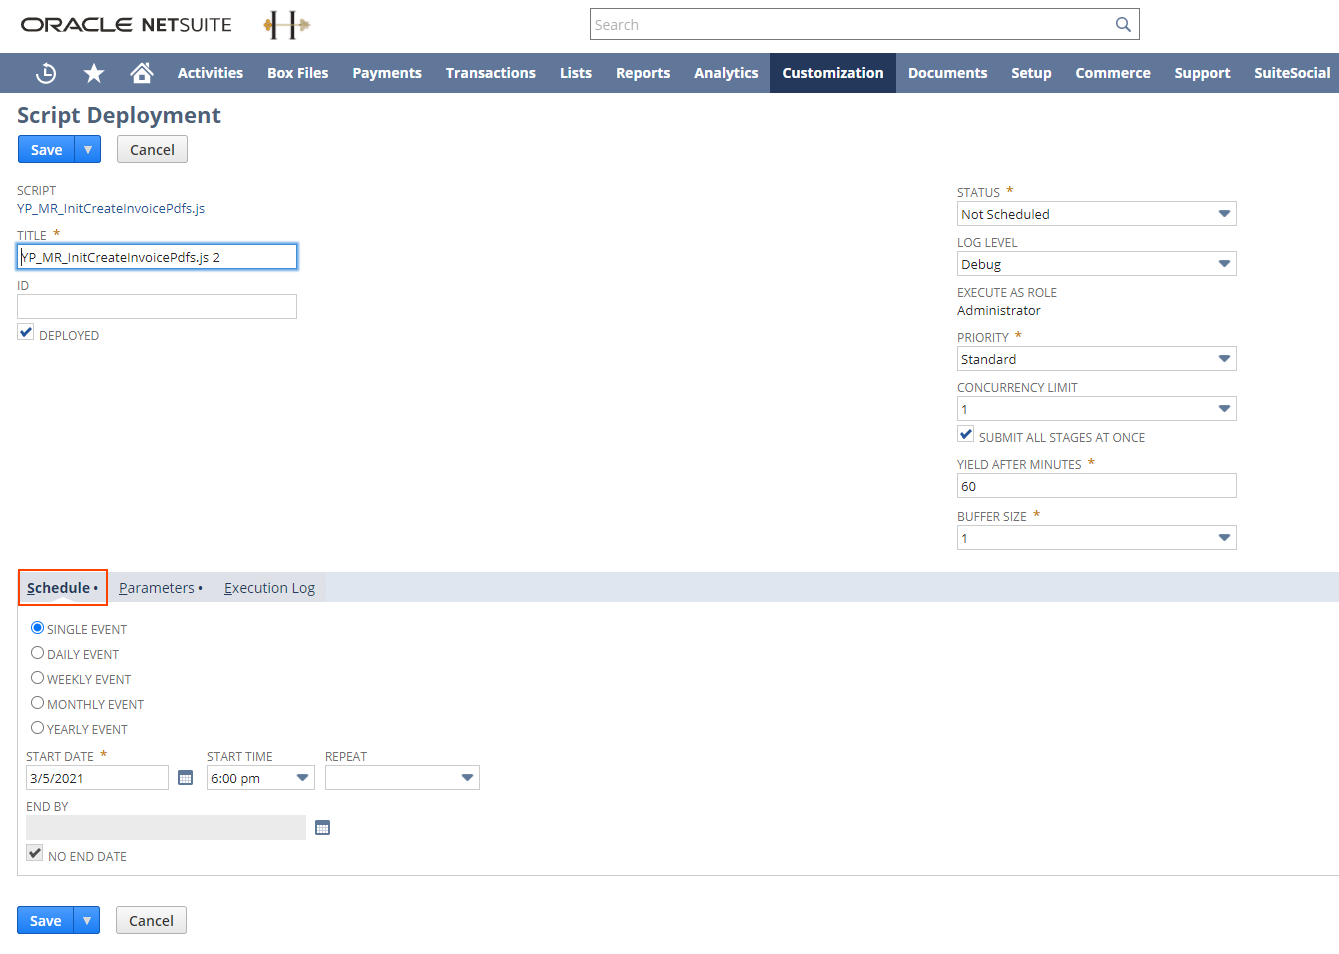
Go to the Parameters tab, set the YAYPAY SEARCH field to the saved search name that you previously created and click Save.
Save the script deployment information and click on the Back button.
- Click on the drop down menu next to the Save button and select Save and Execute.
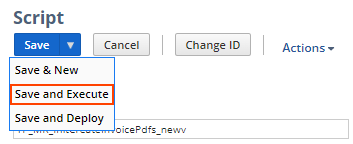
This deployment process can take a while to complete, depending on the volume of open invoices in your NetSuite environment.
Go to your File Cabinet section in NetSuite and you should see the folder being populated with the invoice templates PDFs.
6. Installing the script to update PDFs for Partial Payments / Credit Memos
- YP_MR_UpdateInvoicePDfs.js – This script will delete current invoice PDFs and reset the custom field "_yp_pdf" value to 0, so as to trigger the User Event Script (YP_CSV_UE_PDF.js) to create the new invoice PDF
- Follow the previous steps to create a new Script Record for the YP_MR_UpdateInvoicePdfs.js script
- Fill in the “Name” field as "YP_MR_UpdateInvoicePdfs.js" and press the "Save" button
- On the script record, create a parameter under the "Parameters" tab"

- Click on the "New Parameter" button to add each item
- A new page will open for you to create and save a Script Field for the row Invoice Array (Type = Text Area)

- Click “Save and Deploy”

- In the Script Deployment page, ensure the “EXECUTE AS ROLE” is set as Administrator and "LOG LEVEL" is set to "Debug”
- Scroll down the Script Deployment page to deploy this script as a One Time Event
- This does not need to be scheduled because this script will be called from the user event script


7. Create the Invoice Name Search to detect updated invoices
- Click Lists > Search > Saved Searches > New

- Click New Saved Search

- Fill in necessary fields according to the example:

Once you click Save, check that the record is saved.

8. Test the outcome of the Upload Script (YP_CSV_UE_Pdf.js)
When you have successfully installed the above script for the first time, search and open one of your Open/Current Invoices in NetSuite
- Look at the YayPay_PDF_ID field under the Custom tab - it is very likely to be blank
- Edit the Invoice record and re-save without making any changes
- Look at the field again to find a new value populated in the custom field from the edit/save user action you performed
- Check the NetSuite File Cabinet Folder also. The corresponding NetSuite Invoice Template/PDF File for the invoice record should also be in the Folder

- The combination of having a value in the YayPay_PDF_ID field AND the Invoice PDF File in the File Cabinet Folder are pre-requisites to enable YayPay to bring over the Invoice Template/PDF
Note: In subsequent occasions, you can also reuse this user event approach to re-trigger a new value in the YayPay_PDF_ID field for an Invoice record, and also refresh the Invoice Template/PDF File in the Document Folder. This will in turn update YayPay.
- Check the YayPay_PDF_ID field after you have resaved. Look at the Custom tab or the System Information > System Notes tab of the Invoice page in NetSuite, and you should see a new value:

- Check the File Cabinet Folder and look for the Invoice # and PDF file. The PDF file should reflect the most recent Date & Time Stamp of the re-triggered action that took place:

- Wait a while and you should see this most recent Invoice Template/PDF file also in YayPay.
9. Customise NetSuite invoice PDF
The NetSuite instructions can be found on the following link: http://bestirtech.com/blog/2020/09/how-to-customize-netsuite-pdf-and-html-templates/
FAQ: A NetSuite invoice doesn't contain the Amount Due field
Frequently Asked Questions (FAQ)
Q: Now with the scripts installed, how does the NetSuite Invoice PDF for Open Invoices get pushed into Yaypay? Is a Full Account resync required?
The recurring sync that YayPay runs multiple times a day fetches PDFs for invoices that were modified within the last 18 days. In other words, whenever an invoice record is edited and saved in NetSuite, the corresponding invoice PDF file is brought over to YayPay by the next sync.
You can request YayPay Support or your Account Rep for a full resync if you re-populated your NetSuite File Cabinet with more recent Invoice Template/PDF files (e.g. after running the YP_MR_InitCreateInvoicePdfs.js script)
Q: Do we need to turn off the invoice template we previously created?
No
Q: Is the Invoice Template/PDF file the same as the "PDF attachment" configured as part of a Workflow Action in YayPay?
Yes, the NetSuite Invoice Template/PDF brought over into YayPay is the PDF attachment. The same file can also be downloaded by your Customer through their Customer Portal page
Q: What triggers an Invoice Template/PDF file to be updated?
Every Open Invoice record change performed in NetSuite

