This section explains how to configure YayPay to retrieve your invoice PDF files from Sage Intacct®.
When a PDF is sent as an email attachment to a designated PDF mailbox, YayPay will connect to it to extract the data from the email. As a result, the same Sage Intacct® invoice PDF is displayed when you click on the invoice number in YayPay and it can be sent as part of workflow actions/reminders.
This is illustrated by the schema below:

To achieve this, you need to configure both Sage Intacct® and YayPay. Here we describe the process:
Set up the integration between Sage Intacct® and YayPay.
Create a Smart Event in Sage Intacct® that will send your invoice PDF files received from Sage Intacct® to the designated PDF mailbox.
Configure the PDFs from Emails setting in YayPay.
Review the sync results.
Alternatively, if you cannot use Smart Events, consider Using Alternative Methods for Generating Your Invoice PDFs, such as syncing PDFs via API. Once synced, the invoice PDF in YayPay will be the same as the one in Sage Intacct.

1. Creating the Intacct Sage Smart Event
Sage Intacct® Smart Events trigger actions when specific conditions are met. These actions can occur when adding, setting, or deleting records in Sage Intacct®. In this section, you will learn how to create a Smart Event that sends an email with a PDF attachment to the designated PDF mailbox when a new invoice is created.
To set up the Sage Intacct® Smart Event email recipient, ask your IT department to create a new mailbox that you can access. Use a name like yaypayPDF@domain.com. This mailbox will receive emails with your invoice PDF as attachments.
To create a Smart Event that sends an email with an Intacct Template/PDF attachment when a new invoice is created:
Log into Intacct Sage as an admin user.
Go to Home| Platform Services| Smart Events and click Add to configure a new Smart Event.
-
For Step 1 of the configuration, select Order Entry Transaction for Owner Object (for types of documents synced from the Order Entry module) and Sales Invoice for Document Type.
If you see other Document Types that are relevant in your operating context/need, select them so they appear in the right-hand panel. For example, Contract Invoice: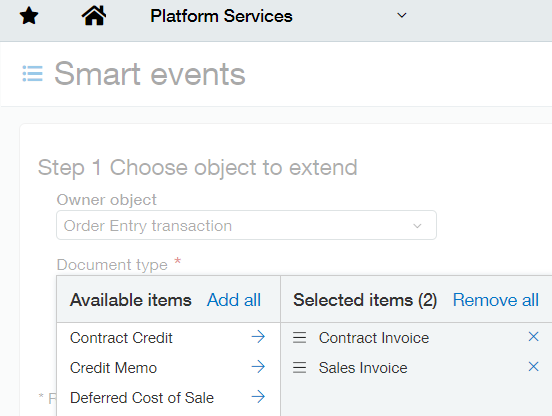
Click Next.
-
For Step 2, select Email for Action, and Add as well as Set for Events.
The Set option refers to modifying an already existing Invoice record in Intacct.
You can leave the Condition empty.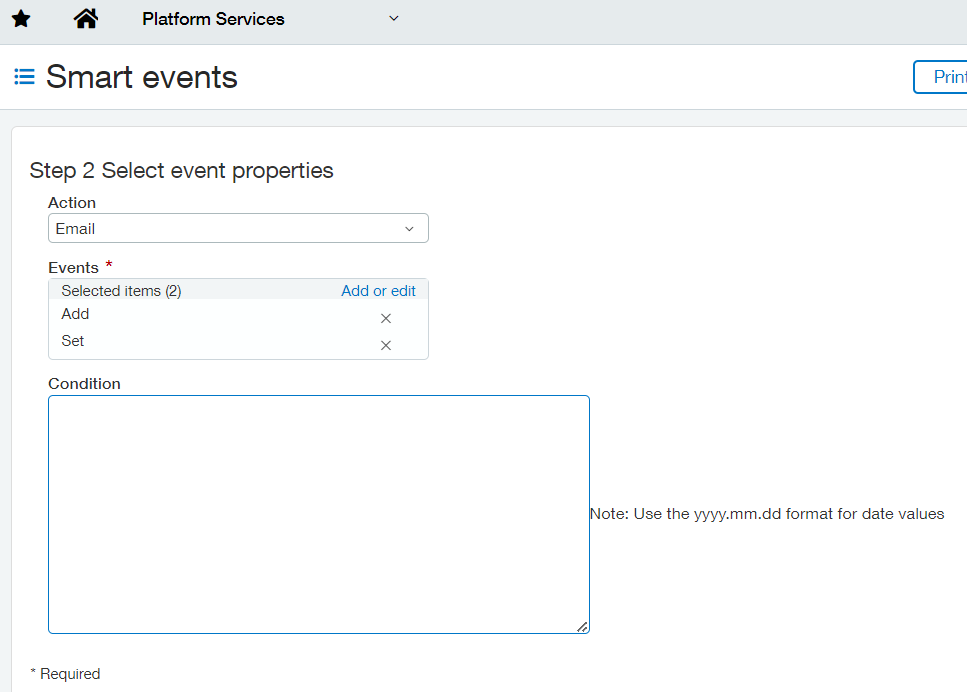
Alternatively, you can ask your Intacct Admin for help with changing or adding conditions to meet your requirements. Make sure to use the following operators if you have multiple Intacct definitions in your Condition:&& is And
|| is Or
!= is Unequal
== is Equal
Click Next.
- For Step 3, enter the following information in each field:
Email Enter the designated mailbox email address given to you by your internal IT, for example yaypayPDF@domain.com. The same mailbox will also be configured in YayPay later, as described in parts 2 and 3 of this guide.
Subject Enter the following text: Customer id:'{!SODOCUMENT.CUSTVENDID!}', Invoice id:'{!SODOCUMENT.DOCNO!}'.
Attach PDF Check the check box.
Body Enter the following text: Here is the PDF of Invoice {!SODOCUMENT.DOCNO!}.
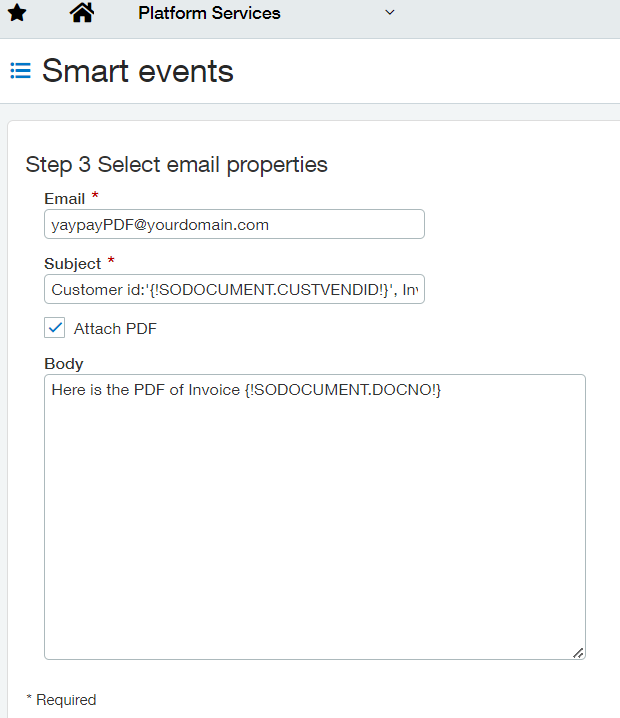 Click Next.
 -
For Step 4, fill in the Smart link ID, for example OEINVOICE_PDF and ensure the Status is set to Active.
You can also enter a Description to help you remember why you created this Smart Event in your Intacct Sage system. -
Save the Smart Event.
As a result, you will only receive PDF invoices via email:For documents created in the Order Entry module (not for AR invoices created in the Accounts Receivable module).
Upon invoice creation
Upon invoice update – only if the invoice is updated in the Order Entry module (this does not apply to cases when Order Entry invoices are updated in the Accounts Receivable module).
PDF with the document template configured per each doc transaction definition, which can be applied per each unique doc type in the Order Entry module.
To check the Smart Events job status in Intacct Sage, go to Company | Admin tab | Offline jobs| Smart event jobs and click Smart event job history.
Mail distribution with PDFs for any type of invoices, regardless of whether they are from the Accounts Receivable or Order Entry module.
You can trigger sending of emails using actions such as invoice creation or invoice update (not payment), no matter in what module the update takes place.
PDF will use a generic invoice document layout for all types of invoices, including those from the Accounts Receivable and Order Entry modules.
2. Results of the Smart Event Creation
Once the Smart Event is created, it will start sending emails with the subject line that you configured in Sage Intacct®. These emails will contain the invoice PDF as an attachment and will be sent when new invoice records are created in Sage Intacct®.
To verify this, log into your designated PDF mailbox and look for some of these emails. You can take a screenshot of the inbox or emails for comparison. It will look something like this, for example:
- If you use Gmail:

- If you use Outlook:

YayPay will then connect to this mailbox to extract the invoice PDF attachment.
To embed and display the invoice PDF in YayPay, check Invoice Page – Embed Invoice PDF in Settings | Business. For more details, see the Invoice View article.
As a result, YayPay will display the extracted invoice PDF when you click on the invoice number on the Invoice page.

3. Configure the "PDFs from Email" Settings in YayPay
This section describes how to configure YayPay to connect to the designated PDF mailbox so that it can retrieve the invoice PDF attachments/Credit Memo PDFs from emails triggered by the Sage Intacct® Smart Events.
We recommend using a separate PDF mailbox that is different than your common AR mailbox so that you can separate your end-customers emails and the emails containing the invoice PDFs as attachments.
Once configured, YayPay checks the PDF mailbox every 10 minutes and extracts all emails with PDFs received today or within the last 3 days if the PDF Scrape - Scrape PDFs for last 3 days setting is enabled. Subsequently, these PDFs are linked to any existing invoices in the system.
To configure YayPay to connect to your PDF mailbox:
Log into YayPay.
Go to Settings | PDFs from Emails.
Check the Scrape Invoice and Credit Memo PDFs from Emails check box.
- Enter the required details. Obtain them from your internal IT department or infrastructure team.
To connect to your mailbox, configure the following fields:
-
Protocol – Choose one: IMAP or IMAPS.
IMAPS is the recommended option, especially for Gmail.
Host – For example, imap.gmail.com or outlook.office365.com.
Port – For example, 143 or 993.
Username/Password – Obtain the credentials from your internal IT department (this is the same user credentials to log into the mailbox directly).
Load period (months) – Enter 12.
-
Sender email – Filter received emails and pull files received only from a particular email address.
Enter support@intacct.com.
Use TLS – Optionally, set this as specified by your IT department, infrastructure team, or e-mail service provider.
Inbox Folder (Inbox by Default) – See the Using Subfolders (in your designated PDF email Inbox) section.
Do not use customer ID – Optionally, enable this if invoice PDF files are sent in an email to this inbox where the subject line is not expected to contain the customer ID.
-
-
Click SAVE AND TEST CONNECTION test and validate that YayPay has an established connection with this email inbox. A successful message will appear when a connection is made.
Check with your IT team regarding your whitelisting policy for external connections. Request them to whitelist the YayPay server with the IP address 34.195.225.244.
Using Subfolders (in your designated PDF email inbox)
This section is only relevant if you want to use a subfolder within the mailbox configured in the PDFs from Emails setting in YayPay.
These are the two additional steps required if you use a subfolder instead of Inbox as the default folder:
Create a subfolder, e.g. YayPay Invoice PDF within the main Inbox folder.
Set up a new email rule/filter in Outlook or Gmail to move emails from support@intacct.com into the subfolder.
-
Enter the subfolder name into the Inbox Folder (Inbox by Default) field.
This must be entered in the following format. For example:- For a subfolder in Outlook:

- For Gmail users using labels (e.g. Accounting is the first label followed by YayPay Invoice PDF), configure the Inbox Folder (Inbox by Default)field like this:

- For a subfolder in Outlook:
4. Outcome after the Smart Event Script Installation and PDFs from Emails setup
To review the outcome of the configuration, navigate to your Invoices page in YayPay and select one of the recently created open invoice records. This page displays the results of the sync of AR data between Sage Intacct® and YayPay, which includes customers, invoice records, etc.
On the Invoices page, click on an invoice number, for example#INA-17003.

As a result, your version of the invoice PDF should open up in a new page, instead of YayPay's generic layout.
If it doesn't, ensure that the Invoice Page – Embed Invoice PDF check box is checked in Settings | Business. For more details, see the Invoice view section.
If you can view your invoice PDF in YayPay, it indicates that YayPay is successfully connected to the PDF mailbox and has been able to extract the corresponding invoice PDF received as an email attachment.
5. Using Alternative Methods for Generating Your Invoice PDFs
Instead of using Sage Intacct® Smart Events to generate your invoice PDFs, you can also use other alternative methods:
- Generate invoice PDFs from your in-house system.
- Sync invoice PDFs via API.
Generating Invoice PDFs from Your In-house System
Instead of using Sage Intacct® Smart Events, your internal IT team can develop a script or a process to generate these PDFs from your in-house system.
Similarly to the Smart Event approach, this method also sends an email with the attached invoice PDF. This can be achieved by having your in-house system send the invoice PDFs to Yaypay's designated mailbox. The email's subject line should be similar to the one used in the Smart Event approach and should contain the phrase Customer id:'X', followed by the Invoice Id:'X'.
Sync Invoice PDF via API
This section explains how to sync Sage Intacct® invoice PDF files to YayPay via API.
Once synced, clicking on an invoice number on YayPay's Invoice page will open the PDF file synced from Sage Intacct®. The connector syncs PDF files for unpaid, partially paid, and paid invoices.
To sync invoice PDF files from Sage Intacct®:
Log in to YayPay as an admin user.
- Go to Settings | Integrations and in the Connector Settings section, check the Sync Invoice PDFs via API checkbox. By default, it is unchecked.

- For the sync to work, make sure that the API user has the Print or email invoices permission set to Run for Accounts Receivable.

In the Connector Settings section, click SAVE CHANGES.
-
During the sync process that happens every hour, the connector syncs PDF files for invoices that were created or modified in Sage Intacct®.
Different types of invoice PDFs from Sage Intacct® are synced in the following way:Account Receivable invoices – the Connector syncs the invoice PDF from the Account Receivable journal in Sage Intacct®.
Sales Invoice invoices – the Connector syncs the invoice PDF from the Order Entry journal in Sage Intacct®.
-
Sales Credit Memo – If sales credit memos are created in Intacct and synced as an invoice with YayPay,the connector syncs the invoice PDF file from the Order Entry journal in Sage Intacct®.
However, if the API user doesn’t have permissions for the Order Entry journal, the connector will not sync Sales Invoice and Sales Credit Memo PDFs.
- After syncing, PDF files from Sage Intacct® are available on the Invoice page in YayPay. By clicking on the Download Invoice button, you can download and see the invoice PDF file.

6. Troubleshooting Tips
If you experience issues, contact YayPay Support and provide screenshots of the PDF mailbox inbox that show the email generated by the Smart Event that triggered sending of the emails. This will help establish that the Smart Event is functioning correctly. A screenshot of the inbox displaying the subject line of the customer/invoice will also help confirm that the email and invoice attachment are found in the designated PDF mailbox. If they are not in the PDF mailbox, it means that YayPay cannot extract the invoice PDF.
The outline below summarizes how to analyze the problem and correct it:
-
Run a report to find out how many open invoice records are missing their invoice PDFs since you created your Smart Event in Sage Intacct®.
To do so, go to Settings| Business page and search for the Download Missed PDFs Reportpanel.
On this panel, click Download Report to generate an Excel list of all open invoice records without their corresponding Invoice PDFs in YayPay. Note that the Created At column refers to the invoice date.
Identify a few invoice records in the Excel file and log into your PDF mailbox, i.e. the one configured on the Settings | PDFs from Emails page.
Search for the email with the invoice number in the subject line. If the email exists, YayPay will extract the Intacct invoice PDF attachment when it connects to the PDF mailbox.
Verify that the subject line contains the customer ID and invoice number and that these identifiers match with the same customer ID and invoice number in your Sage Intacct® (or source system).
Verify that the email has an invoice PDF attachment (you can open the attachment to check).
If you find this to be correct and it looks as expected, contact YayPay Support for further assistance.
If the email for the invoice is not in your PDF mailbox or the subject line does not contain the customer ID and invoice number, verify that your Smart Event is correctly set up in Sage Intacct®.
If the email is not there at all, check that the Smart Event is functioning on the Sage Intacct® side and is correctly set up.
