In order to connect YayPay to your Zuora instance, follow the instructions below.
Reach out to YayPay Support or your YayPay Rep to also enable a back-end setting to support the Zuora integration in your YayPay instance.
1. Create a new API role in Zuora
See this article in Zuora knowledge base
Click your username at the top right and navigate to Administration > Manage User Roles > Add new Role.
-
Fill New Role form:
Role name: "API user role"
Description: empty
ZPlatform: check API Write Access
Click Save button.
2. Create a new User
See this article
- Click your username at the top right and navigate to Administration > Manage Users > Add single User.
- Fill New User form:
- Work Email: any
- Login Name: any
- Zuora Platform Role: "API user role"
- Click Save button.
3. Create OAuth client for a user
See this article
Click your username at the top right and navigate to Administration > Manage Users.
Click the previous created user's First Name, Last Name, or User Name.
In the OAuth Clients section, enter a name for the OAuth client.
If you have the Multi-entity feature enabled, select which entities the OAuth client will be permitted to access.
Click create.
Zuora displays the Client ID and Client Secret for the OAuth client. This is the only time you can see the Client Secret.
Copy Client ID and Client Secret to YayPay settings.
Click OK.
4. Connect YayPay to Zuora
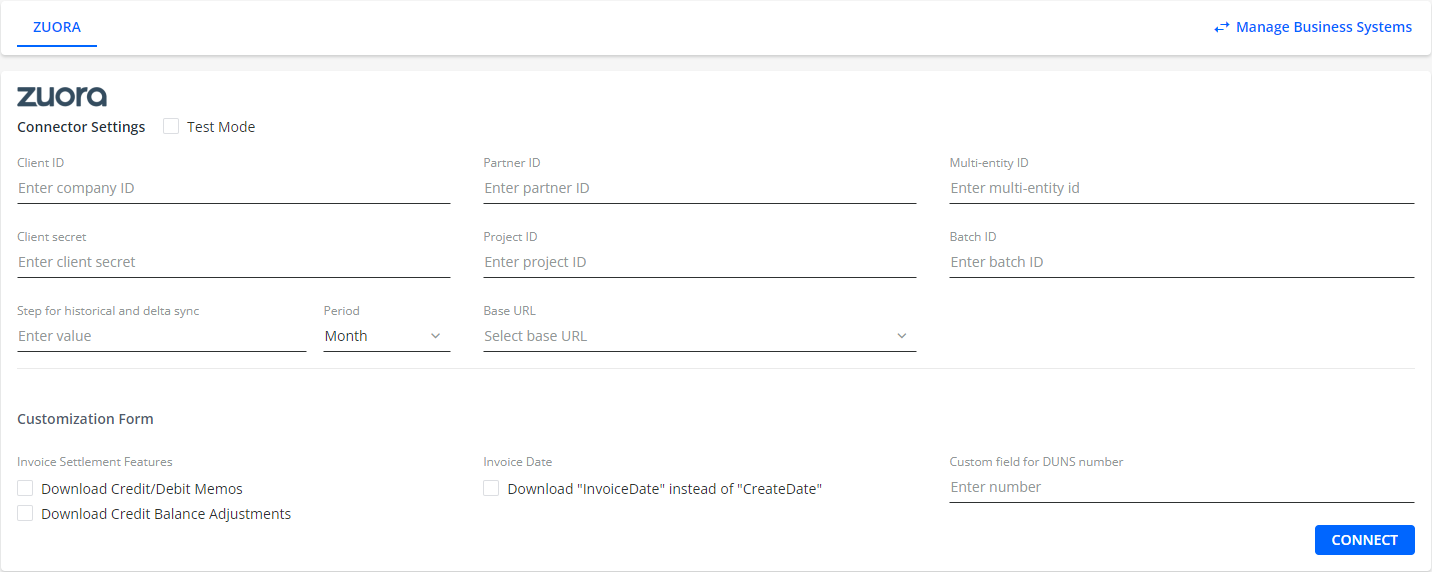
To integrate YayPay with Zuora, fill in the following fields on the Zuora integration panel in YayPay:
To learn about the individual options on this tab, see the following sections.
4.1 Client ID
The Client ID of the OAuth client.
4.2 Client Secret
The Client Secret that was displayed when the OAuth client was created.
4.3 Multi-Entity ID
Zuora Multi-entity provides the capability to create and manage multiple entities within a single Zuora tenant. An entity represents a legal entity or an independently operated business unit. Each entity can manage its own business objects (such as subscription, invoice, and payment), settings, transactions, and features (such as Orders and Invoice Settlement).
You may have several entities but in YayPay you may use only one per YayPay account. For example: if you have three entities in Zuora you should have three different instances in YayPay.
How to get entity id:
1. Make a POST request using previously generated client id and secret:
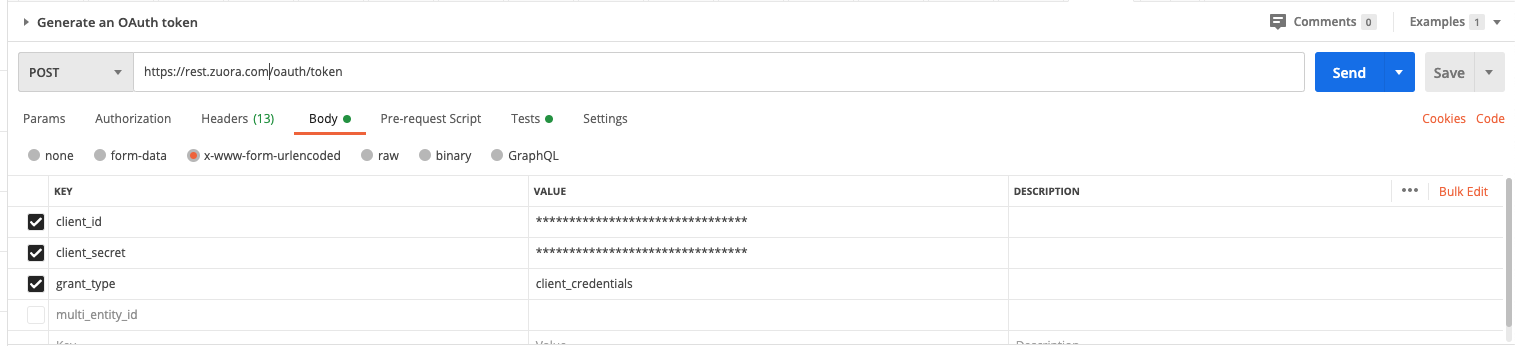
In response, in scope section you will see:
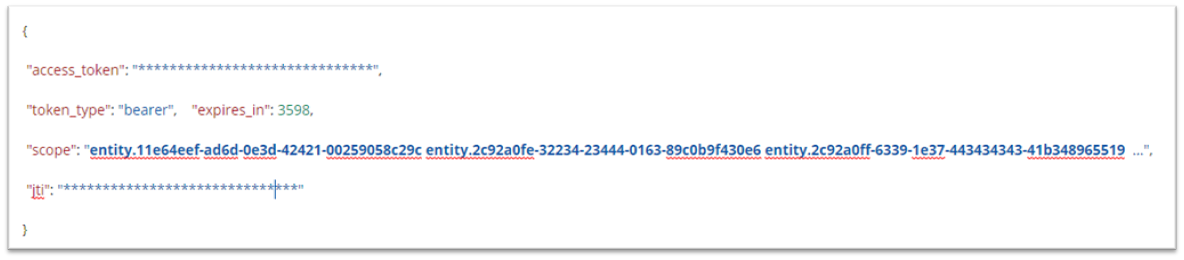
Thus your entity IDs are:
- 11e64eef-ad6d-0e3d-42421-00259058c29c
- 2c92a0fe-32234-23444-0163-89c0b9f430e6
- 2c92a0ff-6339-1e37-443434343-41b348965519
Please note: entity id must have the hyphen (-) format when entered into YayPay. i.e 11e64eef-ad6d-0e3d-42421-00259058c29c
2. Please reach out to Zuora support for any questions.
4.4 Partner ID
The partner field indicates the unique ID of a data integration partner.
This field is required.
4.5 Project ID
The project field contains the unique ID of a data integration project for a particular partner.
This field is required.
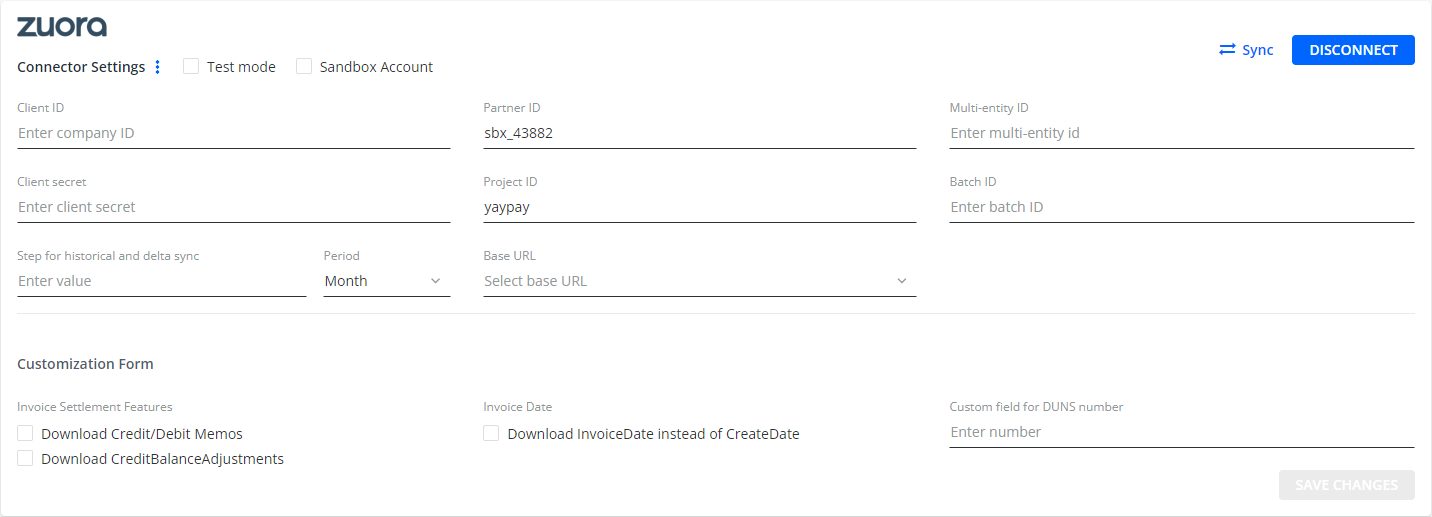
4.6 Base URL
The Base URL drop down menu lists Zuora's production and testing endpoints.
You need to select an endpoint which the connector will use to establish a connection with Zuora. The endpoint depends on the type of your account. For more details, see the Zuora API documentation.
5. Pull Invoice Date from Zuora
The Zuora ERP system depicts two dates for invoices:
- Invoice Create Date
- Invoice Date
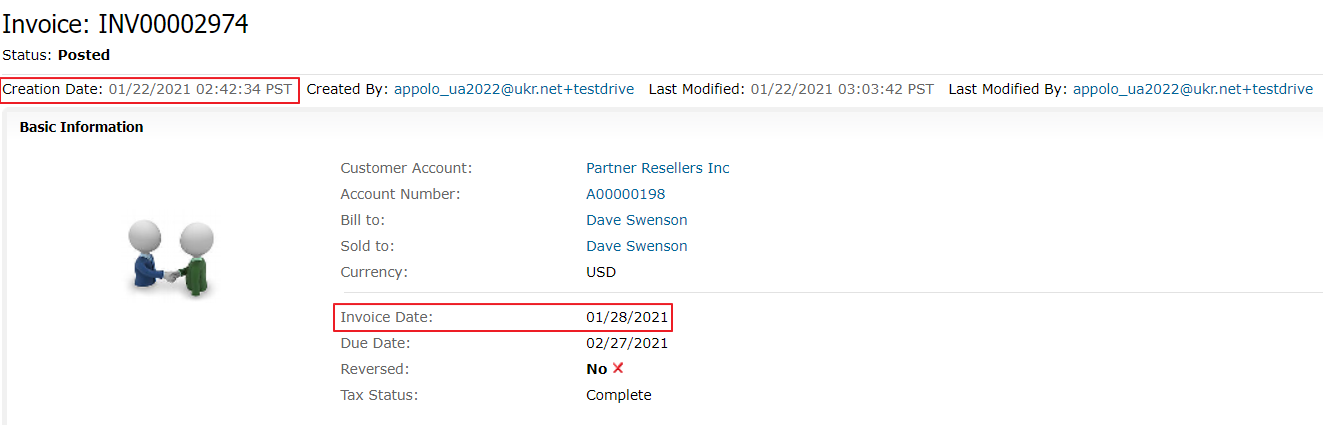
By default, YayPay receives the Invoice Create Date from Zuora and depicts the date in the invoice.
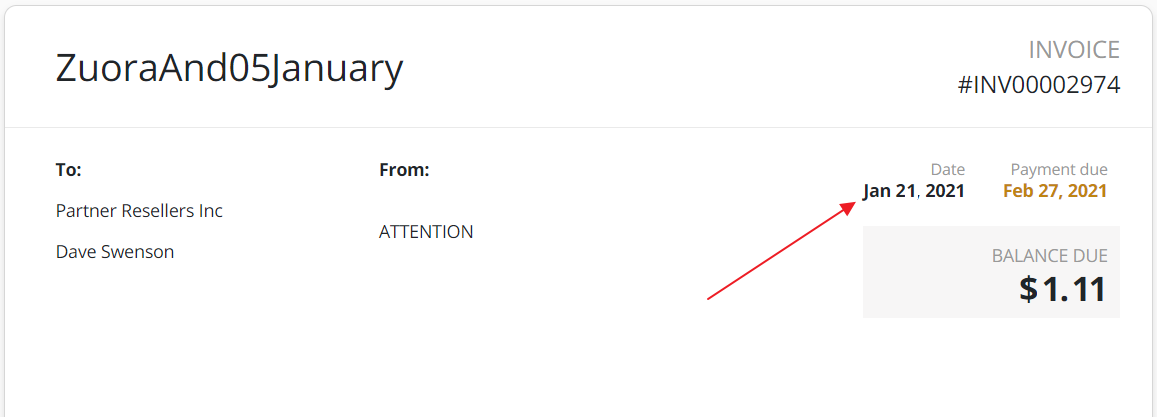
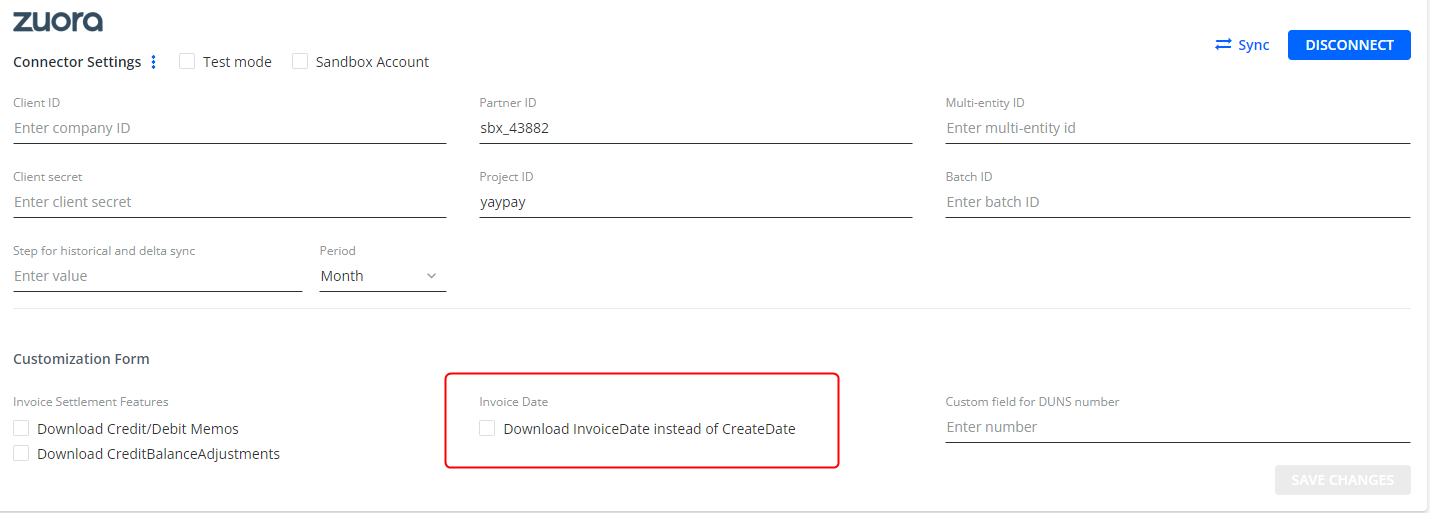
To receive the Invoice Date instead of Invoice Create Date, the user, in YayPay, should open Settings > Integrations > Zuora Connector and check the Download InvoiceDate instead of CreateDate checkbox.
Once the user checks the Download InvoiceDate instead of CreateDate checkbox, he/she should click Save and YayPay starts the resync process.
After the resync process is finished, YayPay depicts the Invoice Date in the invoice.
6. Downloading Credit Balance Adjustments
Zuora has two options that impact the account balance:
- The presence of the Invoice Settlement feature
- The absence of the Invoice Settlement feature
With the Invoice Settlement feature, you can manage advanced payments, credit and debit memos, and transactions at the item-level in Zuora.
Depending on your Zuora account's settings, YayPay will either receive Credit/Debit Memos or Credit Balance Adjustments.
Credit/Debit Memos
If your Zuora account has the Invoice Settlement feature enabled, you can use credit/debit memos in Zuora. However, the user in Zuora cannot use credit balance adjustments.
For example:
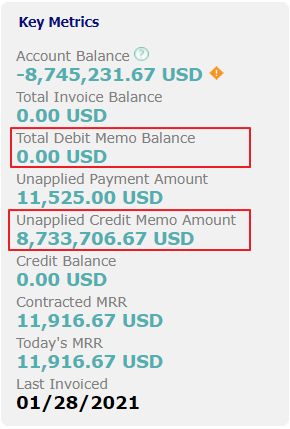
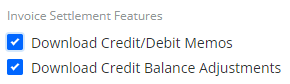
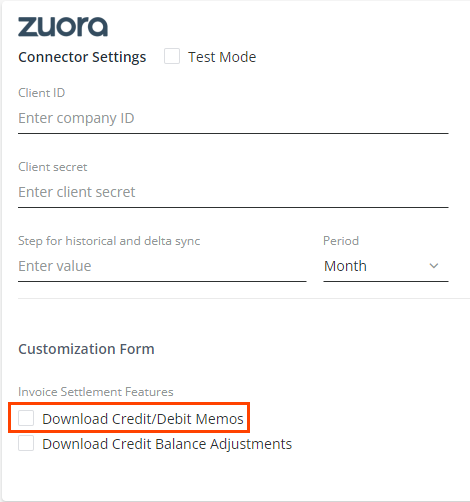
To receive credit/debit memos in YayPay, go to Settings | Integrations and on the Zuora Connector Settings page, check the Download Credit/Debit Memos check box.
When a refund is applied to your credit memo, the connector calculates the amount applied for credit memos based on the values of the following fields in Zuora:
If the Refund Amount is 0, the connector uses the Applied Amount field to calculate the unused balance (Total Amount - Applied Amount).
If the Refund Amount is greater than 0 and the Balance is 0, the Applied Amount equals to the Total Amount, indicating that the credit memo is fully utilized or closed.
If the Refund Amount is greater than 0 and the Balance is greater than 0, the Applied Amount equals to Applied Amount + Refund Amount.
If no amount has been applied to the credit memo, the Applied Amount equals to the Refund Amount.
When a credit memo is refunded, an adjustment of Refund type is created and marked as already paid. The connector synchronizes this as well, with the Applied Amount matching the Refund Amount.
In summary, if the Credit Memo Refund Amount field is greater than 0, then the CreditMemo Applied Amount field will be equal to CreditMemo Applied Amount + CreditMemo Refund Amount.
If no amount has been applied to the credit memo, then the applied amount will be equal to the refund amount.
Credit Balance Adjustments
If your Zuora account does not have the Invoice Settlement feature enabled, you can use credit balance adjustments in Zuora. However, the user in Zuora cannot use credit/debit memos.
For example:
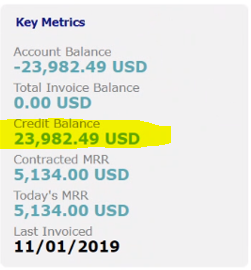
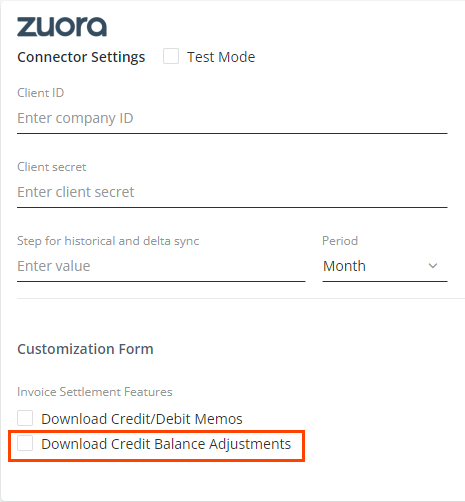
To receive credit balance adjustment in YayPay, go to Settings | Integrations and on the Zuora Connector Settings page, check the Download Credit Balance Adjustments check box.
However, data synchronization will be completed with errors in the following cases:
- If Zuora includes credit/debit memos, but you have checked the Download Credit Balance Adjustments check box in YayPay.
- If Zuora includes credit balance adjustments, but you have checked the Download Credit/Debit Memos check box in YayPay.
- If you have checked both check boxes.