Sage 300cloud web screens are installed with Sage 300cloud when you select the Web Screens option during installation. The installation of Sage 300cloud web screens allows you to use a modernized version of Sage 300 screens in a web browser, in parallel to Sage 300 desktop screens.
The lists below provide a quick overview of the additional steps required to install and start using Sage 300cloud web screens.
Before installing Sage 300cloud:
Verify that your system meets all hardware and software requirements listed in the Compatibility Guide.
Install Microsoft Internet Information Services (IIS) if you have not already done so. (see Configure Sage 300 Web Screens).
In Microsoft SQL Server Management Studio, create a Portal database if you have not already done so. This database is used by both the Sage 300 Portal and Sage 300cloud web screens. (see Database Setup).
Sage 300 Installation and Administration Guide
A comprehensive guide for Sage 300 Installation and Administration is provided below in a form of a PDF file:
When you install Sage 300cloud:
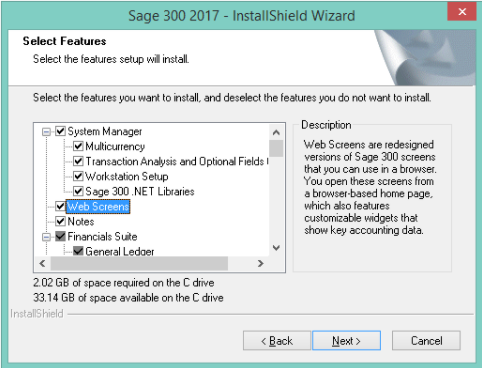
On the Select Features screen, select the Web Screens option.
If any users will use web screens in a language other than English, select the relevant language pack.
After installing Sage 300cloud:
Configure the Portal database, which is used by both the Sage 300 Portal and Sage 300cloud web screens. (see Configure Sage 300 Web Screens).
Ensure that users have security authorization to access all modules and screens they need to use. (see Performing Administrative Tasks).
Activate all modules for which you want to use Sage 300cloud web screens.
When installation and setup are complete, you are ready to sign in and start using Sage 300cloud web screens.
Troubleshooting the errors during the Web Screens installation process
| Error | Solutions |
|---|---|
| Sage 300 Portal Error: Failed to create landlord database tables |
Cause The error occurs when the TCP/IP protocol is not properly set up in the SQL Network configuration of the SQL Server. In SQL Server Express, the default TCP/IP connections settings are disabled. Resolution
|
A problem occurred when signing in to Web Screens" error may appear when signing into Web Screens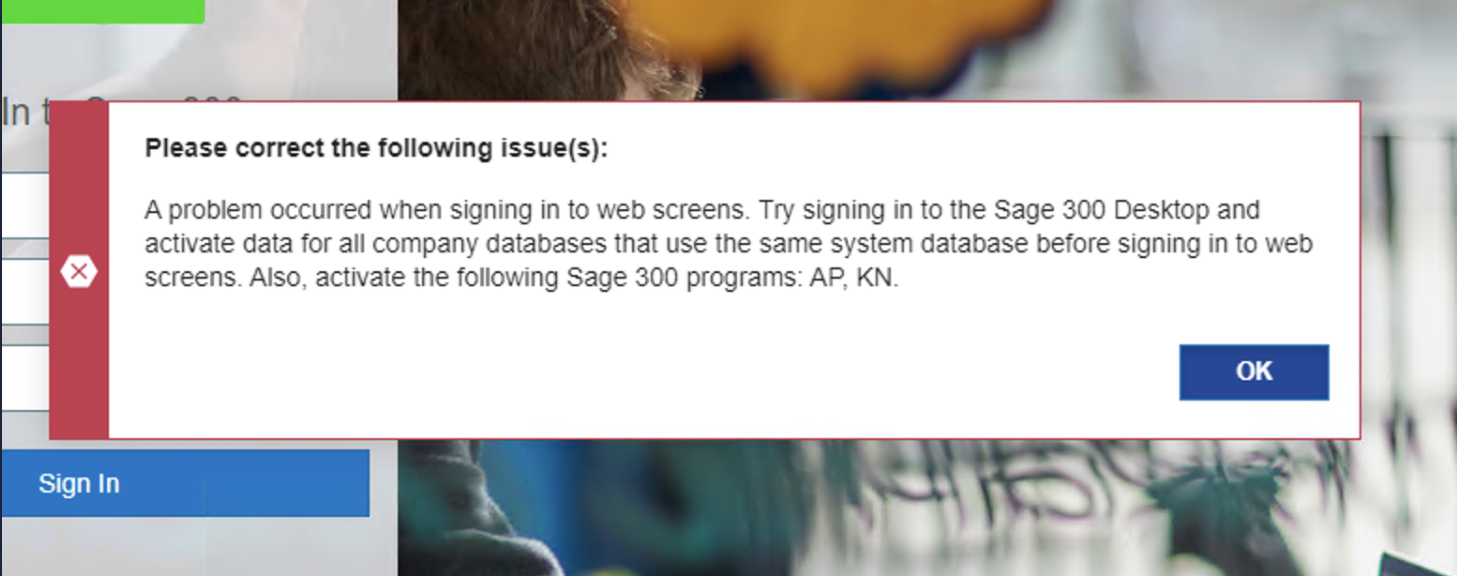
|
Cause This error can come due to the following two reasons mentioned.
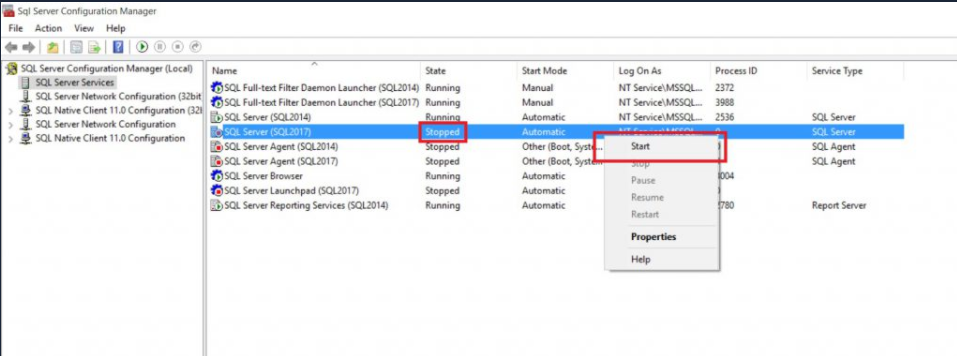
Resolution Open windows and search for SQL Server configuration>> Click on SQL service >>Start the service if not started. Refer to the below screenshot for a clear understanding.
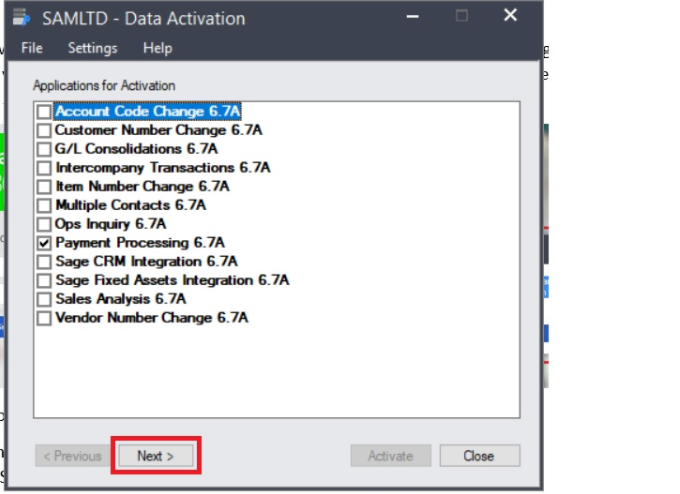
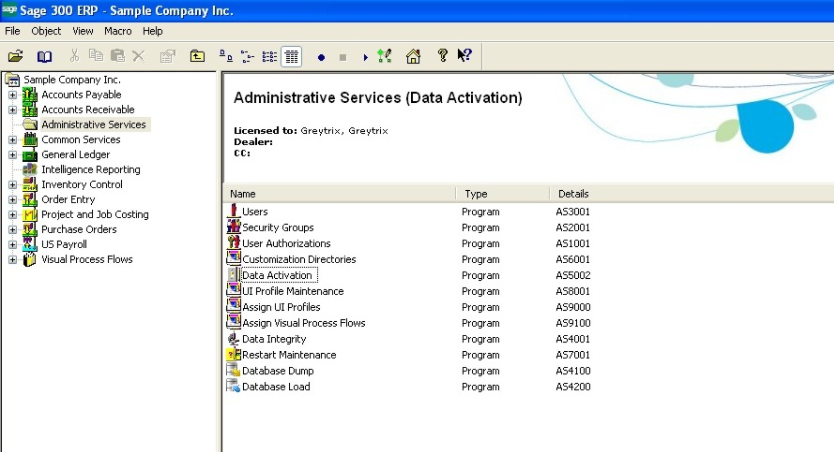
After starting SQL Server, the user needs to restart IIS so that the changes take effect on the web screen. The error should get resolved after starting the SQL server and if not follow the below steps for a second reason. 2. To check if all the modules are activated or not, open the Sage 300 desktop version and follow the below steps. Sage300 >>Administrative Services >>Data Activation. Check if all the required modules are activated or not and if not activated then tick those modules and click next, please refer to the below screenshot.
After activating all the modules restart IIS and check if you can sign in to Sage web screens or not. The above steps should resolve the error. |
Sage 300 has detected module update inconsistencies that require activation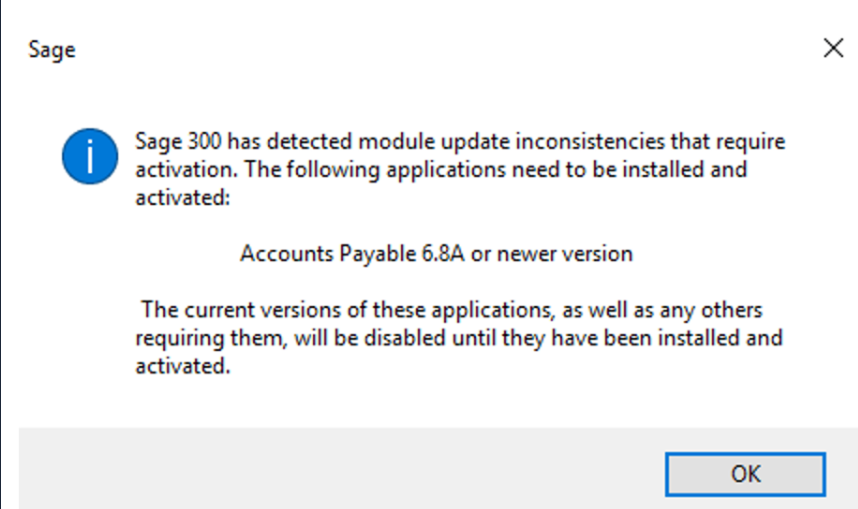
|
Cause The reason for this error message is due to the difference between the data level (product update) in the present installation of Sage 300 and the product updates mentioned in the recently restored database. Resolution
|
Configure Sage for Web Screens
Sage 300 web screens are modernized versions of the classic Sage 300 desktop screens, which you use in a web browser. Web screens and desktop screens run in parallel.
This chapter provides an overview of installing and configuring the Sage 300 web screens. It also provides steps for:
• Configuring the portal database, which is required for web screens.
• Adjusting certain settings configured during installation.
Configuring Security for Web Screens
This section outlines some security precautions you should take if you are setting up web screens to be accessible from the Internet.
This section is not a comprehensive discussion of security. Make sure you also consult any documentation you have regarding security for your specific system (in particular, the documentation for your version of IIS). If you have any concerns about security, contact your Sage business
partner or IT professional.
At a minimum, you should take the following security precautions:
IIS:
Configure the web screens to use HTTPS:
a. Purchase an SSL certificate from a reputable supplier.
b. Turn on HTTPS by adding an HTTPS binding (in the binding you will specify your SSL certificate).
c. Turn off HTTP by selecting the Require SSL option.
Disable or remove the default IIS file from the webserver.
Remove sensitive information from HTTP Response Headers. At a minimum, install the URL Rewrite module and add a rule to remove server information from all responses.
Disable any encryption algorithms with a symmetric key shorter than 128 bits.
Disable weak SSL Cipher Suites from publishing on the internet for all external systems.
Disable insecure HTTP methods (at minimum, TRACE).
Disable Directory Browsing for all virtual directories.
Passwords:
Use Advanced Security Settings in Sage 300 to enforce a strong password policy:
Require complex passwords (passwords that must include letters
and digits).Specify a length of time after which users must change their passwords.
Require a minimum password length of at least 8 characters.
Lockout users after multiple failed login attempts.
Configuring the Portal Database
Before you can configure the web screens, you must create and then configure a portal database.
To configure the portal database:
From the Windows Start menu, select All Programs > Sage 300 >Database Setup.
On the Sign-On form that appears, enter the ADMIN password.
On the Database Setup form that appears, click Portal.
On the Configure Portal form that appears, enter the following
information:
• Database Format. Microsoft SQL Server is the only database engine you can use to create your portal database.
• Server Name. By default, this is set to “localhost” to use the current machine. If you created your portal database on a different (remote) machine, enter the name of that machine.
Server Port. Enter the TCP/IP port number specified in your database software for your portal database. The default port number is 1433.
Database ID. Enter the name specified for the portal database in your database software.
Login ID and Password. Enter the ID and password specified for your database administrator in your database software. (They are not the credentials for the Sage 300 ADMIN User.)
5. Click OK, and then click Exit to close the Database Setup form.
If you set up the portal database using SQL Server Express, follow the steps in the next section, “Configuring a Microsoft SQL Server Express Database.”
Configuring a Microsoft SQL Server Express Database
The following instructions apply only to Microsoft SQL Server Express.
In SQL Server Express, the default TCP/IP connections settings are disabled. Because the portal database requires a TCP/IP connection, you must set one up manually, as follows:
Launch the SQL Server Configuration Manager.
Under the SQL Server Network Configuration tree, click Protocols For SQLEXPRESS.
Enable the TCP/IP protocol. (The default setting is Disabled.)
Right-click the TCP/IP protocol, and then click Properties.
On the IP Addresses tab, in the IPAll Section:
a. Clear the TCP Dynamic Ports field.
b. Set the TCP Port to 1433.Restart the SQL Server.
Testing the TCP/IP Connection
To test that TCP/IP works, from the command line, type: telnet localhost 1433.
If the TCP/IP connection is set up correctly, the screen will clear, and you will be in a Telnet session with the SQL Server.
Setting Up a User Account for IIS and Windows Services
By default, the Sage 300 application pool in IIS and the Sage.CNA.WindowsService Windows service run under the Local System account. To simplify service management, improve security, and support
consistent handling of regional settings and content in Sage 300 web screens, we recommend you set up a Windows user account and modify the application pool and Windows service to run under that user account.
The user account must have access to the Sage 300 shared data folder and customization directory. Also, note that the account’s regional settings determine the language in which some content appears in Sage 300.
Signing in to Sage 300cloud in a Browser
To use Sage 300cloud web screens, you sign in to Sage 300cloud in your web browser, using the same credentials you use to sign in to the Sage 300 Desktop.
The computer or device you use to sign in does not need to have Sage 300 installed, but it does need to be connected to the network on which the Sage 300 server is running.
Sage 300cloud web screens support current versions of the most popular web browsers.
To sign in to Sage 300cloud in a browser:
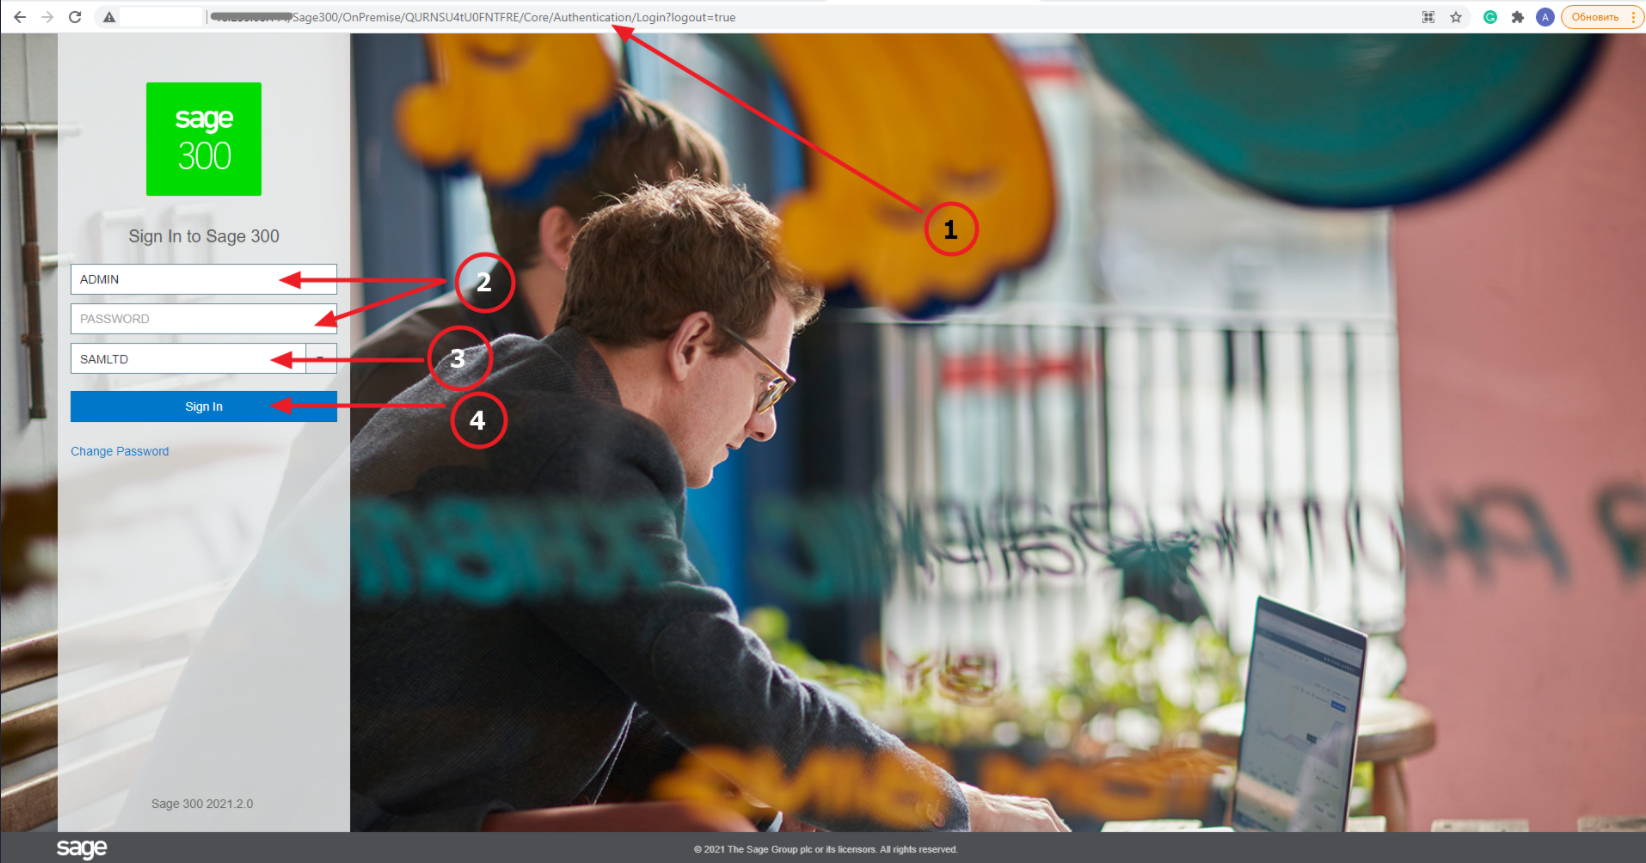
Visit http://servername/sage300/OnPremise/QURNSU4tU0FNTFRE/Core/Authentication/Login?logout=true
where servername is the server name or IP address of the webserver where Sage 300 is installed.Enter your username and password.
Select a company.
-
Click Sign In.
Performing Administrative Tasks
Add Users
For each user, assign an ID and set up individual security options.
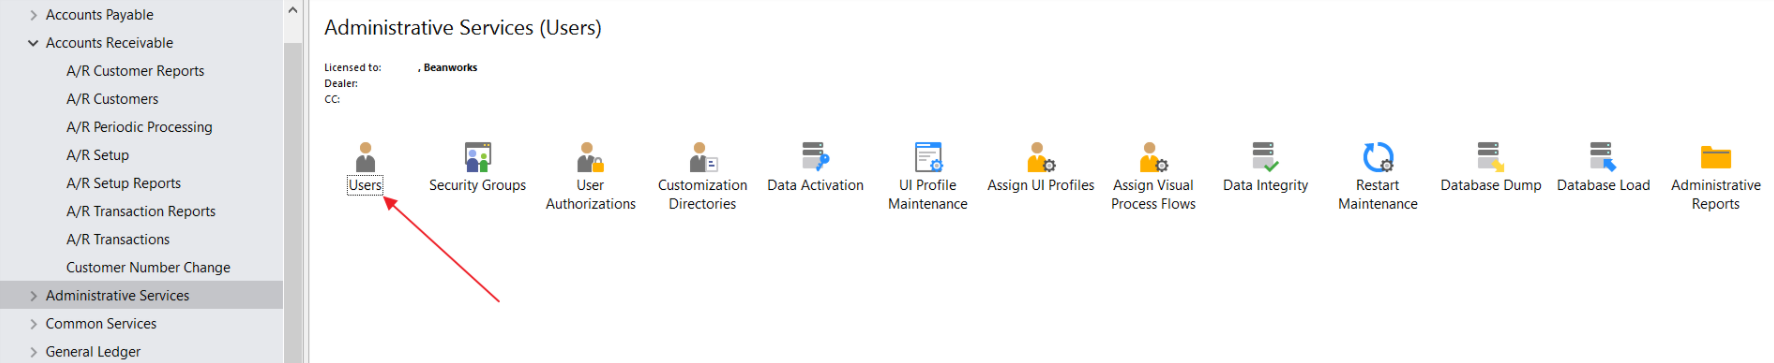
1. In the Administrative Services folder, double-click the Users icon.
2. In the User ID field, use up to eight characters to type a unique code to identify this user (letters from A to Z and digits from 0 to 9). The ID must start with a letter, not a number. If the ID field is not blank, click the New button to start a new record.
When security is turned on for the system database, the User ID determines the user’s access rights in Sage 300.
3. In the User Name field, type a name for this user.
4. In the Account Type field, select User or Timecard.
5. Select the language in which to display and print this user’s messages, Help, reports, and forms.
6. In the Authentication Method field, select one of the following options that determine how this user will sign on to Sage 300:
* Sage 300 — allows the user to sign on using only their Sage 300 User ID.
* Windows — allows the user to sign on using their Windows User ID.
* Both — allows the user to sign on using either their Windows User ID or their Sage 300 User ID.
7. In the Job Role field, select the role that most resembles this user’s job role. If you leave this field blank, the user is prompted to select a role when they sign in to Sage 300.
8. If you chose Windows or Both as the authentication method, enter a Windows Domain name and the Windows User Name for this user in the fields provided.
You can click the Browse button to select from a list of Windows users and domains. If you selected Sage 300 as the authentication method, these fields are not available.
9. If you chose Sage 300 or Both as the authentication method, type a password in the Password field, and then type it again in the Verify field.
The password can use between 4 and 64 characters (letters from A to Z and digits from 0 to 9), but it must start with a letter.
When you type a password, Sage 300 displays asterisks. You must enter a password in each user record. However, if security is not turned on for the system database that the company uses, users are not asked for the password when they start Sage 300.
10. Assign additional security to the password, selecting from the following options:
User Must Change Password At Next Logon — forces the user to change their password the next time they sign on to Sage 300. This option is not available if you selected Windows as the authentication
method.
User Cannot Change Password — prevents a user from changing their password. This option is not available if you selected Windows as the authentication method.
Password Never Expires — allows the same password to be used without requiring a change. This option is not available if you selected Windows as the authentication method.
Account Is Disabled — prevents a user from signing on.
Account Is Restricted — restricts the user to sign on to Sage 300 only during the valid times that you specify.
Account Is Locked Out — locks out the user after they exceed the maximum number of attempts specified in the advanced security settings for the system database. The system assigns this status, and,
depending on the security settings, can clear this status after a certain period. The ADMIN user can also clear this status.
This option is not available if you selected Windows as the authentication method.
11. If you selected the option to restrict the user’s account, in the Valid Times section, specify the days of the week and the hours that the user can sign on to Sage 300.
Using Windows as the Authentication Method
If you select Windows as the authentication method for a user, the user must sign on to Sage 300 with a valid Windows user ID.
Normally, when a user signs on to Windows with their user name, domain, and password, the server uses this information to authenticate the user. If the user then signs on to Sage 300 with the same ID and domain, they do not need to provide a password.
The following fields are not available in the User record when you select Windows as the authentication method:
• Password and Verify
• User Must Change Password At Next Logon
• Password Never Expires
• User Cannot Change Password
If you are changing the authentication method for an existing user, any previously assigned passwords are cleared, and therefore no longer valid.
Signing On to Sage 300 with Windows Authentication
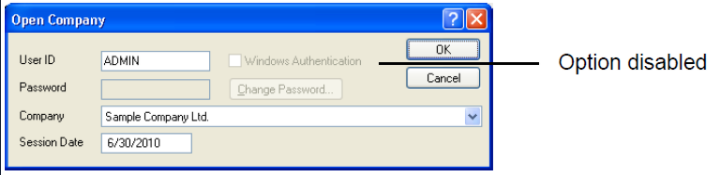
To allow Windows authentication, the Open Company dialog box includes:
• A Windows Authentication check box.
• A field for the Windows Domain name. (This field appears only if the particular user’s record specifies Windows authentication.)
If the Sage 300 authentication method is assigned to all users, the Open Company dialog box displays the Windows Authentication check box, but it is not available to any users, including the ADMIN user, from the
Sage 300 desktop.
When a user selects the Windows Authentication option, the Domain field appears, as follows:
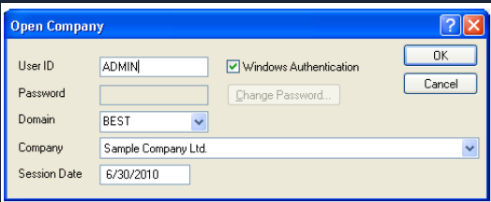
By default, the Domain and User ID fields display the domain and user ID for the currently logged-in Windows user, if their Sage 300 User ID has been mapped to a Windows user account.
The Password field and the Change Password button are always disabled for Windows Authentication.
Signing On to Sage 300 if “Both” is the Authentication Method
The Both authentication setting allows a user to sign on to Sage 300 using either their Sage 300 ID and password or their Windows User ID.
Set Up Security Groups and Assign User Authorizations
If the Security option is selected for a system database, access to Sage 300 is restricted by a password for all companies that share the system database.
If security is turned on, or if some users have a Timecard account, users require authorization to perform tasks in each Sage 300 program. You provide this authorization by assigning users to security groups.
When you create security groups, you specify the tasks that each group can perform. All companies using the same system database share security groups.
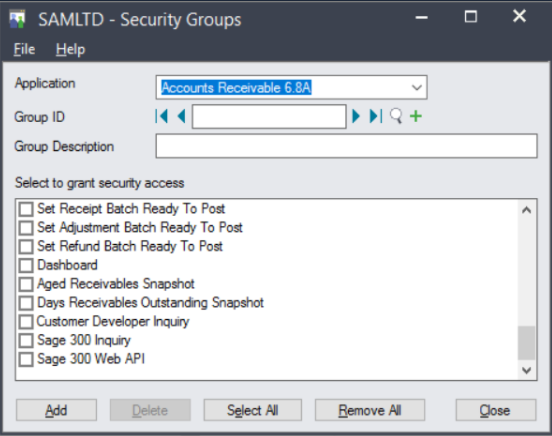
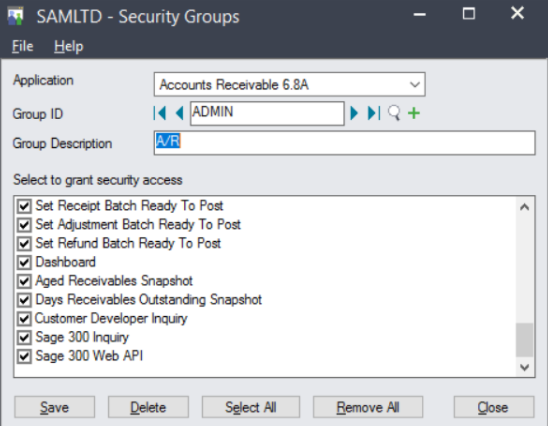
Create Security Groups
You create security groups, as follows:
In the Administrative Services folder, double-click the Security Groups icon.

2. Select an application from the Application list.
3. Enter a unique group ID and a description. The group ID can be up to eight characters (letters from A to Z and digits from 0 to 9).
4. Select the tasks the security group can perform.
• To select every task in the list, click Select All.
• To remove a task that has already been selected, click the check box to clear it.
• To remove all tasks, click the Remove All button.
5. Click Add.
6. Repeat these steps for each application.
Now, you can assign users to these security groups, as described in the
next section.
Authorizing Users
You assign each user to one security group for each application. All users in the same group can perform the tasks defined for the group. The same user can be assigned to different groups within the same company.
To assign user authorizations:
In the Administrative Services folder, double-click the User Authorizations icon.
The User Authorizations dialog box appears:

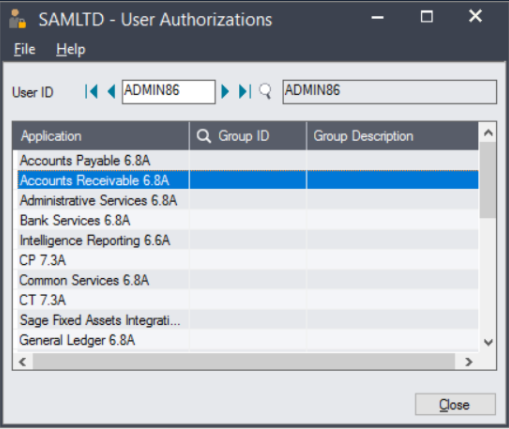
2. Select the User ID.
If a security group has been assigned to this user, it appears next to the Application name, in the Group ID column.
3. For each application to which you want to allow access for this user:
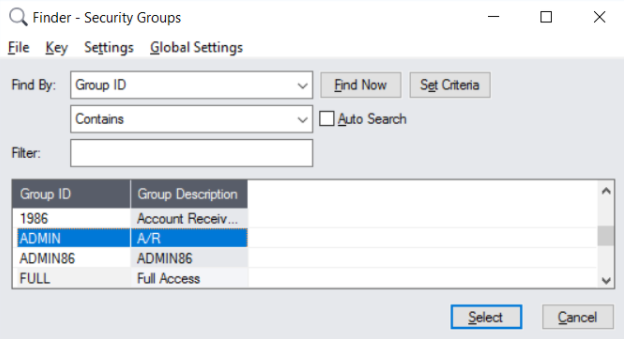
a. Double-click the Group ID field to display a Finder button.
b. Click the button to display security groups defined for the application.
c. Select a security group from the list.
4. Repeat steps 2 and 3 for each user.
5. When you have finished assigning security groups to all users, click Close.


