This article outlines how to integrate YayPay with Sage X3 to support your Collections process.
The scope of the integration covers the following sources of data relationships maintained in Sage X3:
- Customers - Maps to your Customer Master in Sage X3 with the balance. Every other data object that is synced (e.g. contacts, invoices, payments, credits, etc.) is associated with the Customer.
- Contacts - Covers customer-level contacts or invoice-level billing contacts.
- Invoices - Covers sales invoices and customer BP invoices which can either be open or paid (closed). Only posted documents are synced to YayPay.
- Credit Memos - Covers open/closed credits which can be used to offset a payment to be made through YayPay (if the Payments module is used in YayPay).
- Payments - Covers payments recorded / captured in Sage X3.
- Adjustments - Covers other changes that affect the AR (e.g. journal entry adjustments).
- Currencies - Covers currencies and exchange rates based on the rate type associated with invoices under the customer in Sage X3.
- Bank Accounts - Covers the bank accounts maintained in Sage X3 which are then used by YayPay during the reverse integration/payment creation process in Sage X3 (if the Payments module is used in YayPay).
1. Install Patch in X3
Please follow the hyperlink below for more details on how to install the patch in the Sage X3 portal:
How to apply X3 Patch to install YayPay Integration
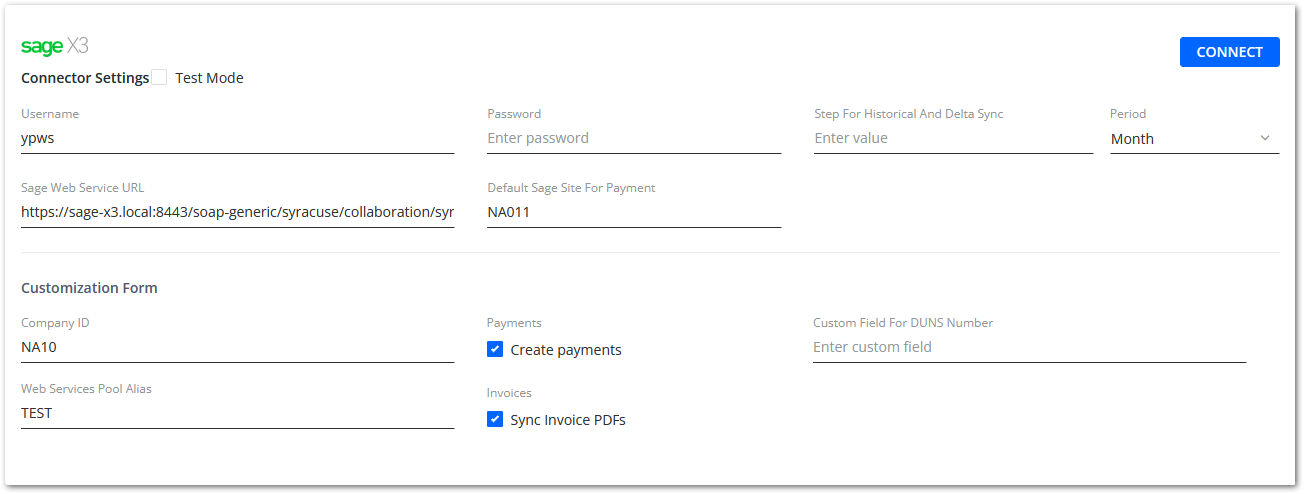
2. Set up Configuration in YayPay
To enable the token-based authentication feature:
- Go to Settings | Integrations | Sage X3.
- Click on the CONNECT button.
- Configure the required fields:
- User Name: Enter the user name assigned to the specified Sage X3 Web Services pool alias.
- Password
-
Sage web service URL: Enter the URL of the X3 account. Please, add the URL (https://{{Host}}/soap-generic/syracuse/collaboration/syracuse/CAdxWebServiceXmlCC) to the web service endpoint field.
- Web Services pool alias: Enter the name of the Sage X3 Web Services pool alias to be used for synchronization.
-
Configure the optional fields:
- Default Sage site for payment: Enter a short site code (e.g. PL011). The value will be used while pushing the payments to Sage X3.
-
Company ID: Enter the ID of the company whose documents will be received.
Specifying a company ID is optional, depending on the Sage X3 configuration. -
Create Payments: Enable this check box if you want to automatically:
- Add records of all the payments made via YayPay (e.g. via the Aging Report) into Cash App.
- Send such payments to the ERP without having to click on the Push to ERP button in Cash App.
- Custom field for DUNS number: Enter the ID of the custom field (that exists in Sage X3) that contains the DUNS number.
- Sync Invoice PDFs: Enable this check box if you want the connector to sync invoice PDFs.
- Default Sage site for payment: Enter a short site code (e.g. PL011). The value will be used while pushing the payments to Sage X3.
3. Sync Customer or Invoice-Level Contacts
YayPay automatically syncs the contact detail and email address maintained under the customer in Sage X3, turning them into customer-level contacts in YayPay.
Additionally, if the contact in Sage X3 is marked as Default contact, the sync turns the contact into an invoice-level billing contact in YayPay.

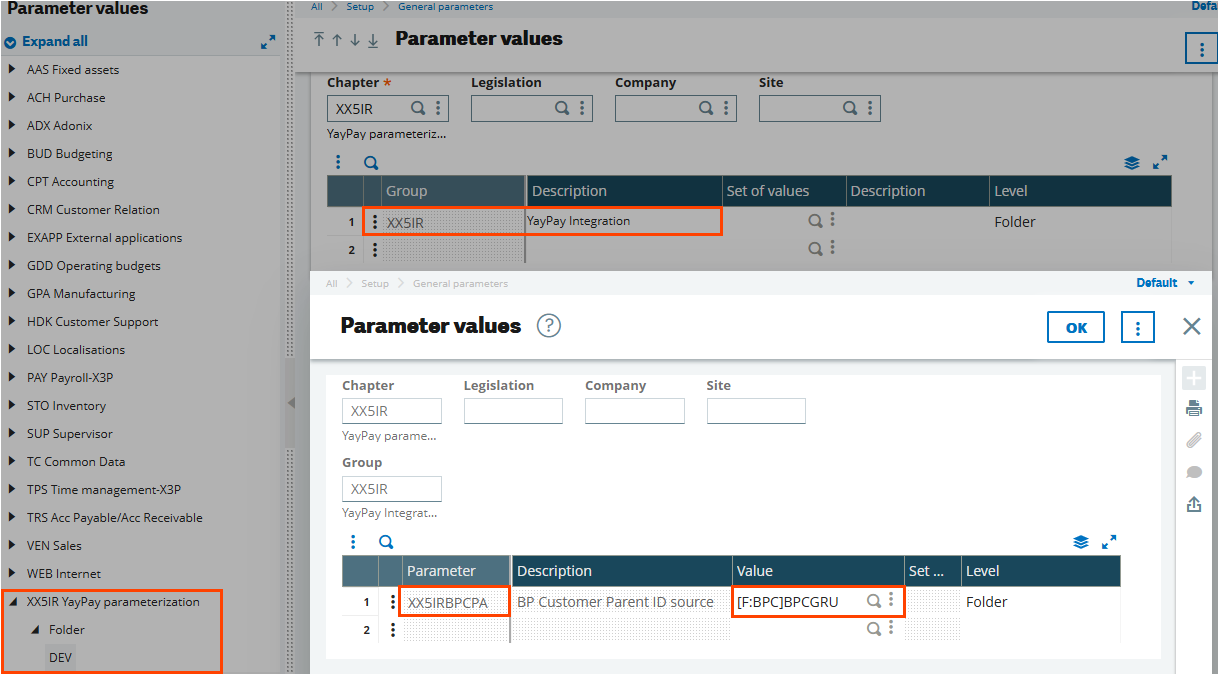
4. Sync Parent/Child Customer Relationships
To sync the parent/child relationships into YayPay, you must set up the appropriate parameter and value after installing the Sage X3/YayPay patch. The chosen parameter is used to transmit the Parent ID to YayPay.
For example:
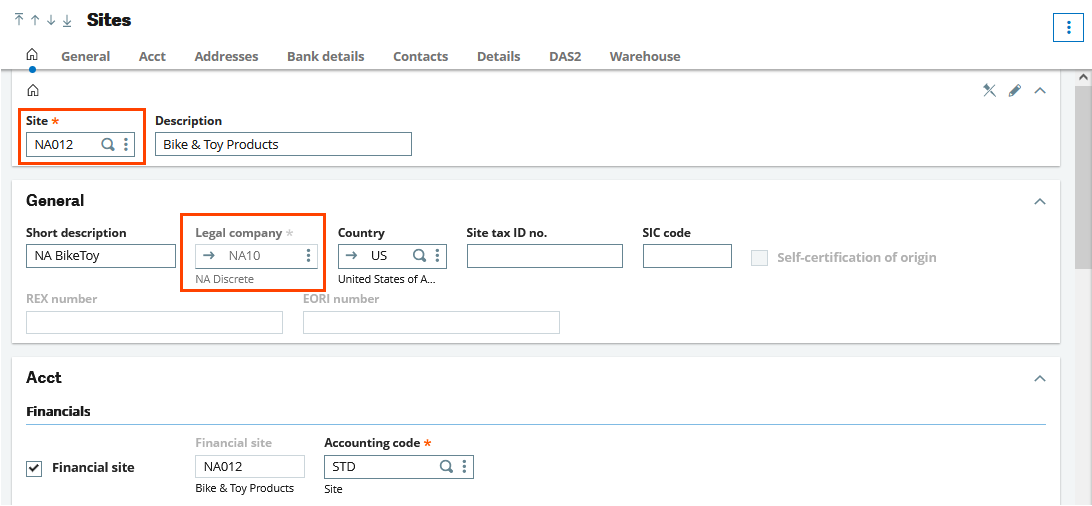
5. Sync Multiple YayPay Instances to Mirror Sage X3 Sites / Legal Companies
If you want to sync your AR data from each Sage X3 Site / Legal Company separately, do the following:
- Go to Settings | Integrations | Sage X3 Connector in YayPay.
- Configure the Company ID field using the Site info in Sage X3, assuming the Site and Legal Company in Sage X3 are 1-1.
- Repeat steps 1 and 2 for each Site / Legal Company in their own YayPay instance.
To switch between YayPay instances, use the drop down menu next to your user profile.
If you want to sync your AR data for your entire Company, while only having one YayPay instance, leave the Company ID field in YayPay empty.
6. Set Up Business-Level Currency
YayPay can automatically configure the business-level currency which you can check in the Currency field located in the Settings | Business | General information section.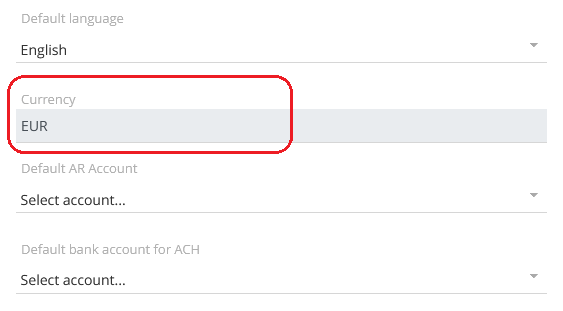
YayPay pulls the currency from the configuration of Sage X3 during each ERP sync.
The configuration of the Company ID field affects that process:
- If the Company ID field is configured - YayPay sets that company's currency as the business-level currency.
-
If the Company ID field is not configured- You must do the following to ensure YayPay can set the business-level currency:
- Ensure one of the following conditions is true:
- Only one company exists in Sage X3.
- Multiple companies exist in Sage X3, sharing the same currency.
- Ensure the Folder Currency in X3 is identical to the company's/companies' currency.
- Ensure one of the following conditions is true:
Frequently Asked Questions
How do I disconnect and restart the sync process?
(e.g. if you forgot to mark a checkbox, change a setting, etc)
Press the DISCONNECT button in the Settings → Integrations
Do a page refresh to be sure (e.g. the Sage X3 displayed will no longer be shown)
Check the “Auto Create Billing Contact” checkbox again
Re-enter your Sage X3 credentials and mark the appropriate checkboxes
Click Save
How will I know which instance of YayPay has synced with Sage X3?
(e.g. without referring to the Integrations page)
Check the drop-down list beside your profile name, located in the top right corner
The other name YayPay instances aligned to your subsidiary name will be shown in the list if your YayPay user account is assigned to them also (access to the subsidiaries/instances is maintained in each User in Settings > User Management)

