The need to add or provision for more YayPay instances beyond your current use may be due to the following reasons:
- To start a new sync between YayPay and your ERP to include the AR data from additional Subsidiaries into new YayPay Instance or (s) that will be provisioned and named after your Subsidiaries
- You have switched from your current ERP to a new one, which will require a new YayPay instance for the sync also. You can continue to keep your current YayPay instance for the history on Notes, Emails, To-Do's, etc
- The need for a new YayPay instance to represent your consolidated AR (to be used for reporting/viewing purpose, etc)
Approach YayPay Support or your YayPay Account Rep to review your requirements as well as to provide the Name of the additional instance(s) to be provisioned.
After the new Instance is provisioned, you can change the Business Name of the YayPay Instance. Go to Settings > Business page to do this:
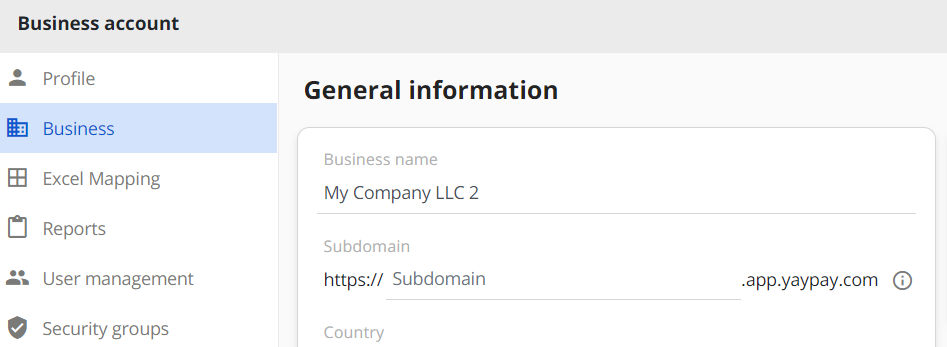
Refer to this Article link for more information.
As how it was done in your initial Onboarding, you can move on next to commence the sync with your ERP .
Ensure the Subsidiary ID is configured in YayPay, which is entered under the Settings > Integrations page of each YayPay instance. This is to ensure the sync looks at the AR data within that NetSuite Subsidiary, Intacct Entity, or QuickBooks Location.
Prior to starting the sync, review the following with your ERP Admin:
- In NetSuite, ensure that the YayPay Web Services User has access to the subsidiaries (refer to: https://yaypay.helpjuice.com/88167-netsuite)
- In Intacct, ensure that the YayPay Web Services role has access to the Intacct Entities (refer to: https://yaypay.helpjuice.com/88168-sage-intacct)
- For CSV imports, a new set of csv data files should be prepared and data extracted from that subsidiary of your ERP, and then imported into the new instance of YayPay (refer to: https://yaypay.helpjuice.com/88169-csv-ftp)
Other ERP integration setup can be found here: https://yaypay.helpjuice.com/integrations
Key Considerations after provisioning of new Instance(s)
Many of these points would already be in place from your current usage of YayPay. This is a summary / recap to ensure the new instance is functional for your purpose:
- Configure the new instance(s) with the appropriate Integration Settings outlined above. Each has its own settings so you will have to repeat the configuration/setup.
In each new instance/Subsidiary, insert the same or a different Company logo for the instance. This logo will appear in the Customer Portal, Customer Statement PDF, Email Reminders, Payment Confirmation pages, etc.
Identify all ADMINS, AR, Sales, or CS users who should have access to the additional Instance(s) provisioned. This is done by adding the Instance/Subsidiary to each User - this is found under User Management and outlined below. If you also have Security Groups for users, the Groups will need to be configured in the instance(s).
- Identify if you have to configure relevant custom fields or native fields for you to work with the data in this additional Instance
Configure the same or different AR Mailbox settings to be used in each of the Instance(s)/Subsidiaries provisioned - this is for customer communications
Configure the same or different PDF Mailbox settings to be used in each of the Instance(s)/Subsidiaries provisioned - this is applicable only if you are already using this approach to integrate Invoice PDFs or Credit Memo PDFs via emails that you send to the PDF Mailbox
Identify and Copy the Workflows (& Email Templates) from your current instance/usage of YayPay to the new instance(s) that you intend to reuse (you can modify after the WFs are copied). To take effect, the Automated WFs copied will need to be “Active” and assigned also to the end-customers integrated into each of the additional instance(s)/Subsidiaries provisioned
- Determine if this YayPay instance is to be used for Payments. You can configure/add the subdomain value in the YayPay instance (refer to this Article link)
- Other related conversations with the Payment Processor may also be needed for the Merchant Profile/password, e.g. if there is a need to apply for a new one
- If the invoices in this additional Subsidiary is billed in their own currencies, ensure the home currency (of this instance) is the same as your settling currency that is agreed with the Payment Processor
- Most of the considerations are further elaborated in this article on how to structure your new instance. Refer to: https://yaypay.helpjuice.com/admin/questions/subsidiaries-in-yaypay-how-to-structure
The planning considerations summarized above can be translated into the following table showing 2 additional instances, where each named instance has a combination of different Settings:

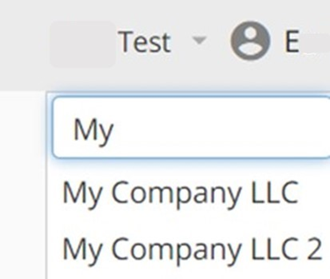
Switch between YayPay instances (i.e. toggle between your Subsidiaries)
As a YayPay user, you can switch between subsidiaries by selecting the appropriate subsidiary name beside your profile. For example, "My Company LLC" and "My Company LLC 2" represent 2 Subsidiaries that you have access to in YayPay:
Users with YayPay Administrator privileges can add new Users to access the Subsidiary and/or update the access of current Users to include the additional Subsidiary.
This is done under Settings > User Management, and there is a Subsidiary(s) field where you can make changes:
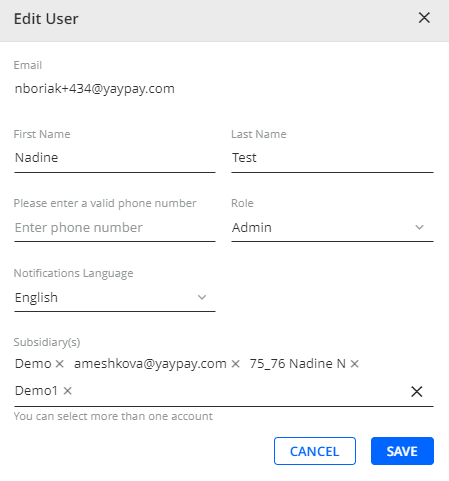
Refer to the User Management Article for modifying or creating new User Accounts and adding/including the Subsidiary.
Set a default Subsidiary in your Profile
If you find yourself working more in one Subsidiary over others, you can set a default Subsidiary which becomes the main YayPay instance / Subsidiary that opens up each time, after you log into the platform.
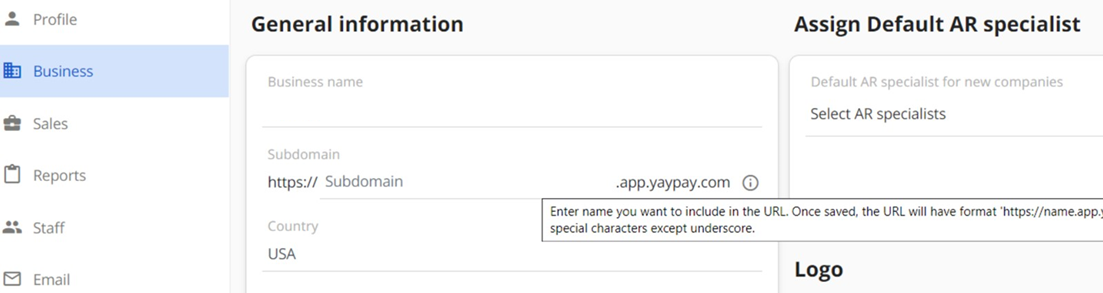
Go to your Business Settings page (Settings > Business) to add or change the Default subsidiary upon login:
The drop-down list contains the Subsidiaries that you have access to in YayPay (approach your YayPay Admin if you don't see the Subsidiary in the list).
Add a Subdomain in each YayPay instance
To change the standard YayPay url to a new url that can reflect your Subsidiary name, use the 'Subdomain' parameter found in your Business Settings page (Settings > Business):
Follow the steps in this Article link to complete the configuration and for the change to take effect.
