Assemble, Validate and Test the Import of the CSV files
Assemble the 6 CSV files within a zip file
When you have extracted and prepared your data in the 6 CSV files explained in the article "CSV zip file requirements", the 6 CSV files should be compressed into 1 zip file to test the manual import process.
As a practical suggestion, name the zip file with a date suffix to help you during the Onboarding and Operational phases also, e.g. YayPay20190512_0800.zip could be your naming convention where it denotes the zip file was prepared on 5 Dec, so that you can keep track of multiple versions.
If you are working with multiple YayPay instances, where each instance represents one of your Business Subsidiaries, include the name of the Subsidiary as part of naming your zip file also to help.
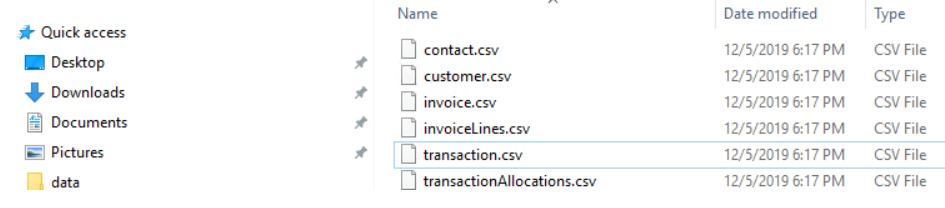
Each zip file that you attempt to do an Import must contain 6 CSV files, although some of the CSV files can be empty during that import (i.e. leave the column header row as is and do not delete the column headers of the empty files).
For example, if you are attempting to import customers, contacts, and Invoices, your zip file should contain 6 CSV files in which:
- The first 4 CSV files - customer.csv, contact.csv, invoice.csv, and invoiceLines.csv files, should contain the appropriate data
- The remaining 2 CSV files - transaction.csv and the transactionAllocation.csv files can be empty
As a general rule, we recommend that you also keep the zip file to less than 10MB in size.
Validate the content of the zip file
Before you manually import the zip file containing your AR data, you can use YayPay to validate your data so as to help you identify and check on possible data incompatibility issues in each of the CSV files found within the zip file.
This will be useful to identify and eliminate initial data format and/or source data issues, so that you can correct them at source and/or identify an exception handling approach in scripting your data extract, etc.
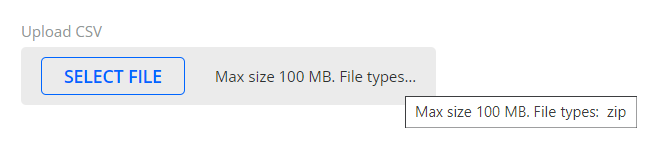
To validate the zip file, log into YayPay and go to the Settings > Integrations page.
In the section where you see the label "CSV Import (.zip)", press "Select files" to choose your zip file.
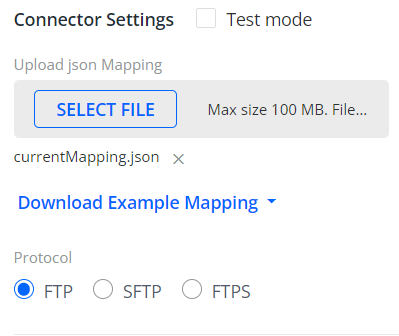
After selecting and uploading the zip file, you may also upload a JSON mapping file (see the panel and look for the label that says "upload your *.json").
Use a JSON file if your data formats are different than the default of YayPay. You can click on "Download Example Mapping" to download and edit the JSON mapping file using a Text Editor.
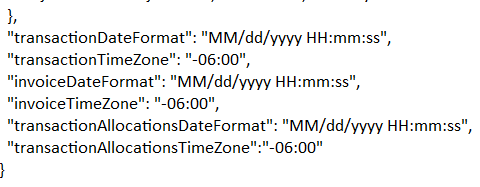
The JSON mapping file will ensure YayPay's Import process interprets your date format in the CSV files instead of YayPay's default. For example, replace the default in the mapping file with "MM/dd/yy HH:mm:ss" for InvoiceDateFormat if this is how you represent your date formats after extracting at source into the CSV files.
Stay with this format consistently and do not change. Upload your *.json file after you have uploaded your zip file"
If you do not have a JSON mapping file, go ahead and press the “Validate Uploaded CSV” link to start the Validation process:
- An output file (excel file) will be produced after the validation completes. Check the output
- Click Save to proceed with the Upload or Cancel to exit
The validation output file could have a few worksheets/tabs:
-
Worksheet #1 - Zip Content Issues
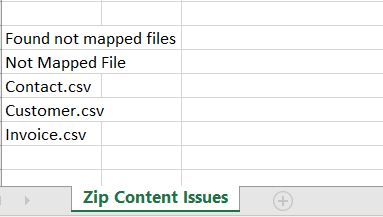
- This example shows CSV filename issues, i.e. the contact.csv, customer.csv, and invoice.csv file names are not mapped to lowercase
- This example shows that there are missing CSV files within the zip file, i.e. the transaction.csv and transactionAllocation.csv files are missing:

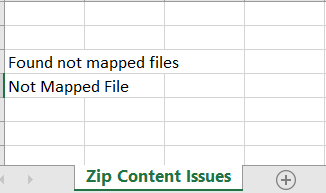
- A successful validation outcome with no filename or data errors in the 6 CSV files is indicated by the statement message "Found not mapped files" in the Zip Content Issue worksheet (there are also no other worksheets)
- This example shows CSV filename issues, i.e. the contact.csv, customer.csv, and invoice.csv file names are not mapped to lowercase
-
Other Worksheets named after the CSV file (if any)
- If there are additional worksheets present, it is likely to indicate possible data format errors encountered in the CSV files
- Each subsequent worksheet after the "Zip Content Issues" worksheet will be named after the CSV filename in which there could be data issues
- This sample validation file output has an INVOICE.CSV worksheet which shows a data format issue in the invoice.csv file. The reference "Can not read CSV file due to an invalid char" on or near line 15 may indicate the presence of double quotes " or an invalid character in the text string that needs to be removed prior to import

Use the "escape" approach by having the backslash symbol '\' placed before the double quotes (") to resolve the issue, e.g. \". This approach to "escape" a character will treat the double quotes character as a literal text.
- This sample validation file output has the CONTACT.CSV and CUSTOMER.CSV worksheets, indicating possible data issues in the contact.csv and customer.csv files. Refer to the 2 worksheets to review the data issues

Manual zip file import
Select and Save the zip file to Import (without validation)
Log into YayPay and go to the Settings > Integrations page.
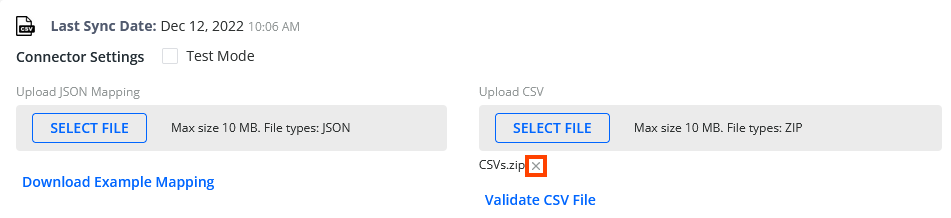
- As you did previously when you attempted to validate the zip file, press "Select files" to choose the zip file and press "Save"
- The filename will appear in the import queue. If you find an error and want to cancel the import, click on the button "Cancel". This will stop the Import from proceeding
- Otherwise, press "SYNC" to start the import in the background. If you do not click the "SYNC" button, YayPay will import the zip file at 8 pm EST (GMT/UTC - 4, subtract 4 hours from Greenwich Mean Time)
- It may take a while to process and complete depending on the volume you have prepared in the 6 CSV files within the zip file
- When completed, the Last sync time will be displayed to indicate the ZIP file processed
If you accidentally select the wrong ZIP file, you can delete it as long as it has not been imported into YayPay yet:
Review your Data Import Outcome
Review #1 - Check your Aging Report
After completing the data import process, you can use the Aging Report page to review your Total AR. You can also export the data to Excel to compare individual customer balances.
Review #2 - Check Billing Contacts
To check that your customer Billing Contacts were imported correctly, click on any customer in the Aging Report page to access the Statement page for that customer. On the right side of the Statement page, review the contacts on the CONTACTS tab.
This example shows a customer Billing Contact created in YayPay, with the contact data imported from the contact.csv file:

Prepare to Connect YayPay to your FTP Server
When you have reached a logical point where your iterative test and data import is successful i.e. All your AR data is successfully extracted from your ERP system and prepared into the 6 CSV files that import with no errors, you are ready to stop the manual import approach and transition to connect YayPay to your FTP Server.
Your FTP Server will serve as the repository for you to upload the same zip file into YayPay. YayPay will connect to your FTP Server to import the same zip file.
At this point, the zip file that you place on your FTP Server may contain New/Daily changes from your ERP that you plan to update YayPay.
Refer to this Article link for connecting YayPay to your FTP Server.
