This article explains how YayPay is configured to connect to your FTP server which will automate the import of the 6 CSV files within the zip file, and reduce or stop the need to perform manual imports. (Note: the FTP server does not need to be a dedicated or a new one). Read on further if you have to whitelist YayPay.
Your FTP Server will hold the zip file, containing the 6 CSV files, as well as your Invoice Template/PDF files that YayPay will attempt to sync each time it connects with your FTP Server/Host. This frequency is about every 60-90 minutes apart.
1. What does YayPay bring over from your FTP Server?
There are 2 categories of data and files that YayPay will look to sync over from your FTP Server:
- The named Zip file containing your AR data records is represented in the 6 CSV files - i.e. customer.csv, contact.csv, invoice.csv, invoiceLines.csv, transaction.csv, transactionAllocations.csv
-
Your Invoice Template in a PDF file format – this is also synced to YayPay after the CSV import is completed (Refer to this Article link for more information)
- The purpose of bringing your Invoice Template/PDF over is to show your Customers the same Invoice template that you issue / bill them, which they can view through YayPay (e.g. when they click on the Invoice #).
- The same invoice Template/PDF can also be incorporated as a file attachment when you configure the Workflows / Email Reminders in YayPay.
2. What is the process of YayPay pulling the info from the FTP Server?
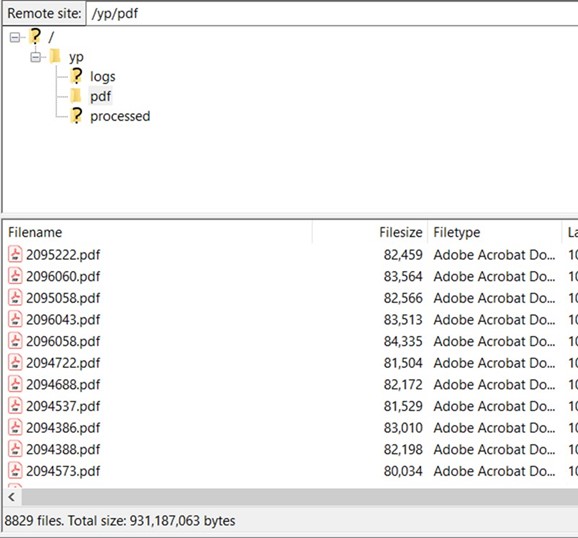
On your FTP Server (find instructions below), it is good practice to set up a main folder (set it up in Settings > Integrations > FTP section > Polling directory field) which contains:
- a folder with all zip files
- a zip file with PDFs (set it up in Settings > Integrations > FTP section > File name restriction field),
- a folder "processed"
- a folder with logs
The screenshot below represents the example folder names, your folders have different names

Figure 1. Setting up a pulling directory for the correct integration process.
When you drop the files on the appropriate folders and connect YayPay to FTP Server(find instructions below), click sync, and the info is pulled to YayPay.
1. The first thing to process is the zip file which is contained in the mail folder
2. When the info is processed, the system checks the pdf folder and looks for file names matching invoiceId of each line in CSV zip file to attach PDF files to the records
3. The processed zips and pdfs are moved to the folder "processed" (if the correspondent setting is on, read section 3 for details)
- If a PDF from the pdf folder does not match any invoiceid in the CSV file, it remains in the pdf folder
- If the pdf folder contains a file with the same name as a pdf file that is being moved, the newer file overrides the old one and is saved to the folder.
3. How to Configure YayPay with your FTP Server
This section describes the information required to configure YayPay to connect to your FTP server. If you have multiple instances of YayPay, the setting needs to be repeated for each instance.
Prior to configuring YayPay, use an FTP client software like FileZilla to test the connection to your FTP server.
To configure YayPay to connect to your FTP server:
-
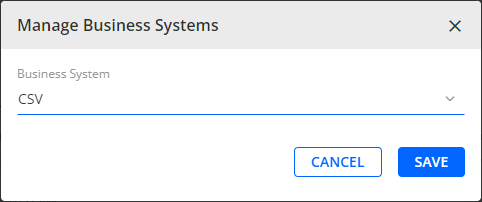
Go to Settings | Integrations page and click on the Manage Business Systems button located on the right side.

-
In the Manage Business Systems dialog that opens, select CSV.
On the CSV Connector Settings panel that appears, specify the settings needed for the synchronization.
-
Click SAVE to save all your settings.
Before you proceed, test the connection and settings by clicking on Diagnostic Sync.
- Return to the panel and press SYNC to start the import process (i.e. YayPay will process the 6 CSV files contained within the zip file on your FTP Server/Host).

Once the connection is established, YayPay remains connected to your FTP Host until you click DISCONNECT. From then on, YayPay will also poll the FTP Server multiple times a day to look for new zip files that you may have placed on the server, etc.
If you also have your invoice template/PDF files on the FTP Server (read on in the next section), they will also be imported after the zip file.
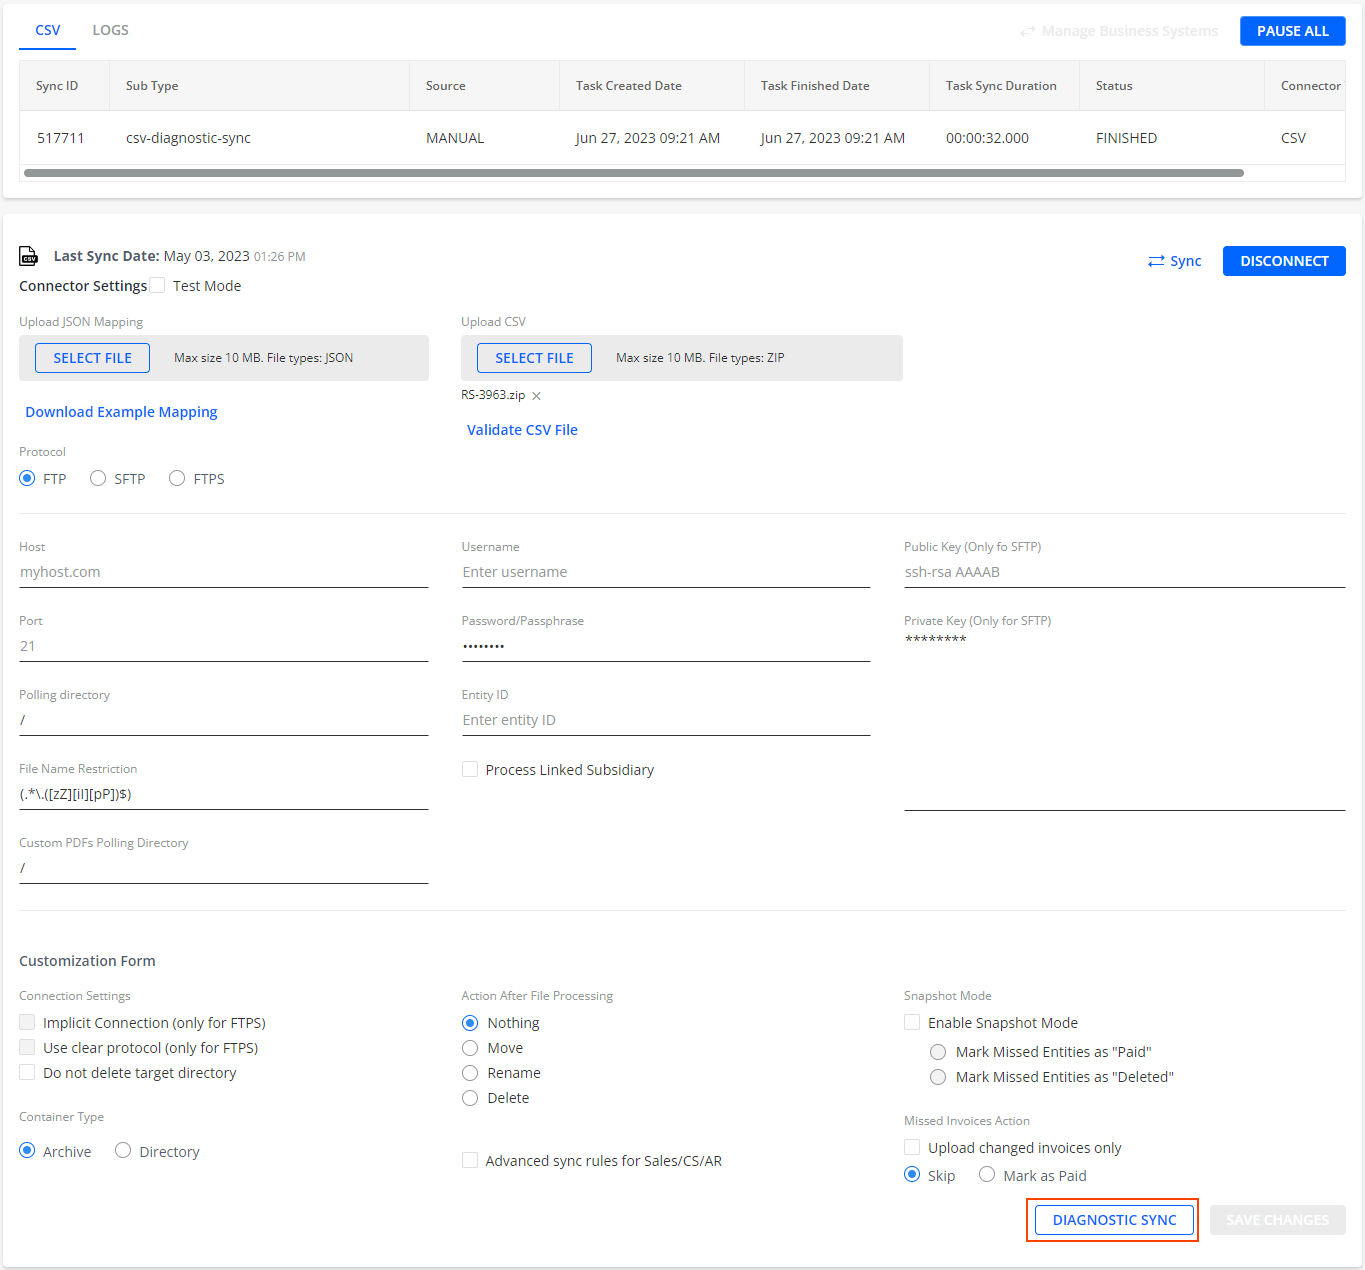
Connector Settings Panel
On the CSV Connector Settings panel that appears, specify the settings needed for the synchronization.
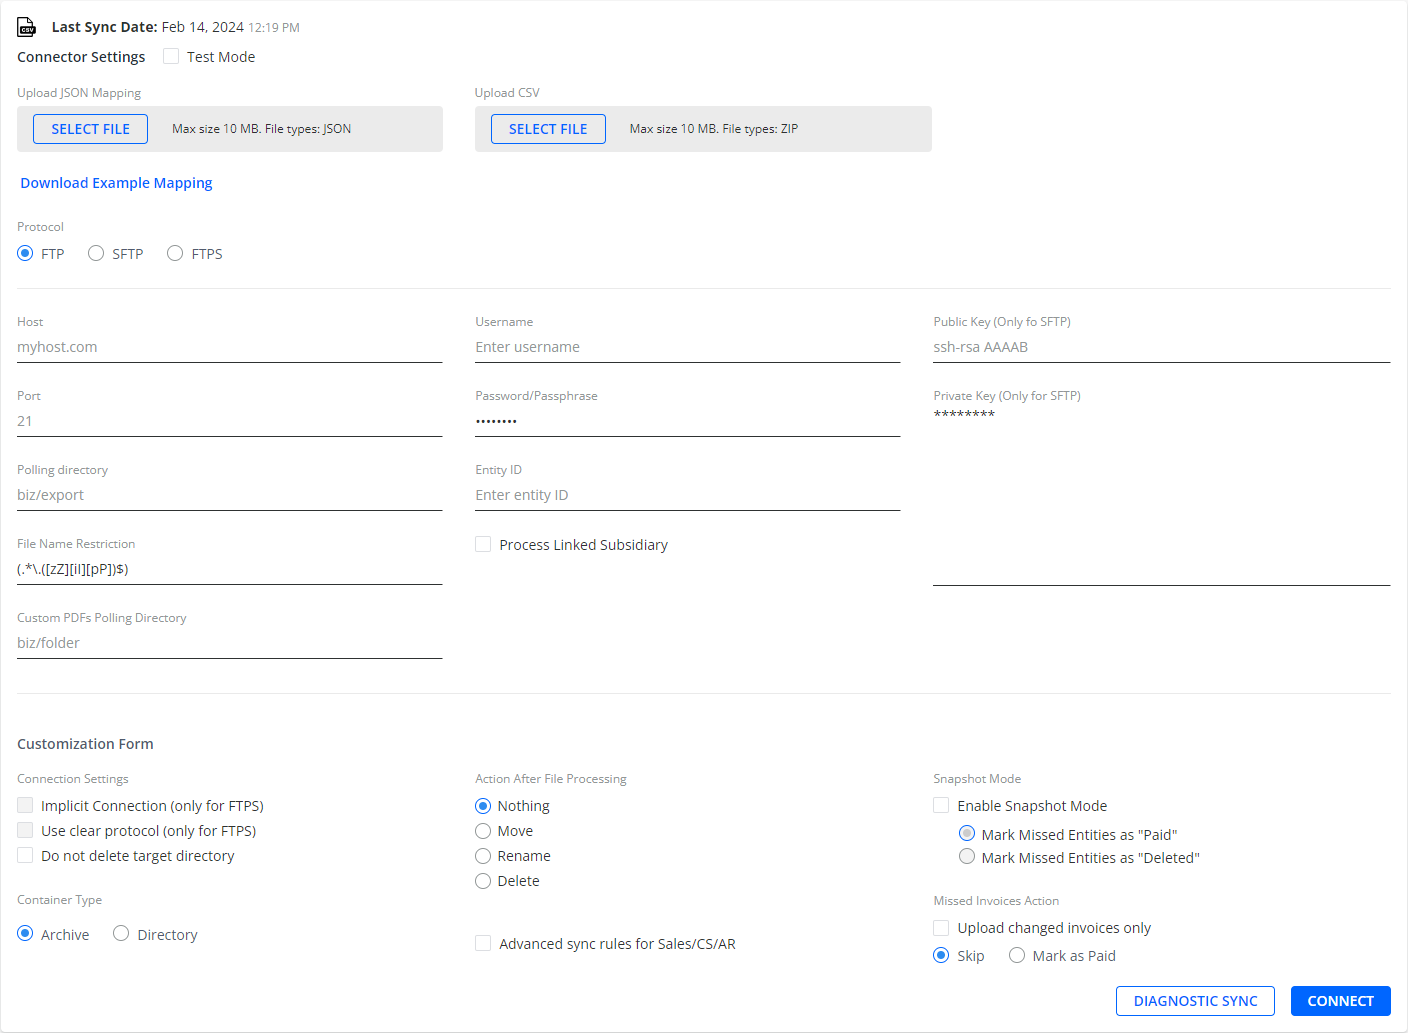
The required setup data includes the following (provide this to your YayPay the representative who can help you with the configuration):
Protocol
Selects the protocol for the file transfer (FTP or SFTP being the most common).
FTP – Standard File Transfer Protocol.
SFTP – Secure File Transfer Protocol (uses SSH to establish a secure connection).
FTPS – File Transfer Protocol Secure (uses SSL/TLS to establish a secure connection).
Host
Specifies the host/server name of your FTP server setup by your internal IT (e.g. ftp.yourftpservername.com, sftp.yourftpservername.com).
Port
Specifies the default port which is 21.
Available ports are: 25, 465, 587, 143, 993, 21, 22, 990, 989. Other ports might not work due to security protocols.
Polling directory
Specifies the folder where your zip file will be placed.
For example, put "/" for root level or /Subfolder_name/ if there is a subfolder where the zip file will be kept on the FTP server.
Use subfolders on your FTP server to separate the data extracted and prepared for your different business subsidiaries. This structure will help to ensure the right zip file will be imported into the appropriate YayPay instance.
-
Name your subfolders after your subsidiary same for easy reference so that there is no risk of the wrong zip file being imported into the wrong instance of YayPay.
For example, you can create the following folder structure on the root of your FTP server:
In this case, set the Polling directoryin the following way: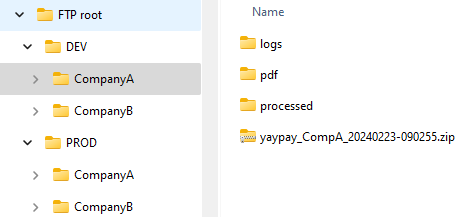
For the developer instance of Company A, set the Polling directory to /DEV/CompanyA.
For the production instance of Company A, set the Polling directory to /PROD/CompanyA.
File name restriction
Specifies the exact string of your zip file name from the FTP server.
Regardless of how you name your zip file on your FTP server, copy and paste this exact string into this field, including the .zip or .ZIP file extensions.
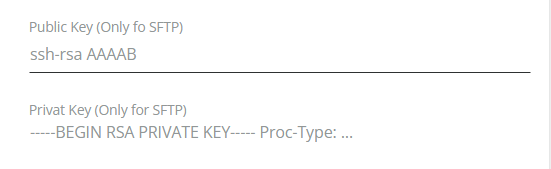
The user has three options to login to the SFTP server:
The user enters the Username (User in YP) and Password.
-
The user enters the Private key, the Public key, and the Passphrase.
This is available only for SFTP.
-
The user enters the Private key and Public key.
This is available only for SFTP.
Custom PDFs Polling Directory
Specifies the source of PDF files in case you do not want to use the default Polling directory folder.
For more details, see the Syncing Invoice PDFs from a Custom Folder section.
User
Specifies the FTP username that Yaypay will use to connect to your FTP server.
Password/Passphrase
Specifies the FTP password that Yaypay will use to connect to your FTP server.
If you use user login, use Password. If you use public and private keys, there is an option to create a Passphrase.
-
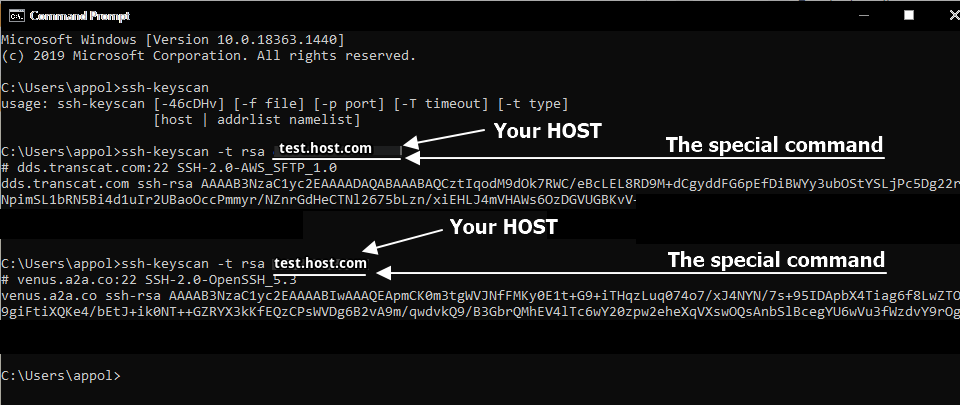
Public key (only for SFTP) – When creating a private key, a default public key is also generated. However, this default public key should not be used.
An additional step is required to obtain an appropriate public key, i.e. to create a server public key:Create a Server Public Key
- When a private key is created, execute the following command:
ssh-keygen -t rsa "yourhost.example.com"
-
Copy the received key and enter it into the Public Key (Only fo SFTP) field in Settings | Integrations.
For example:
- When a private key is created, execute the following command:
Private key (only for SFTP) – Follow these instructions to create a Private key.
Entity ID
Synchronizes the AR documents between the business and its subsidiaries by utilizing the Entity ID. The Entity ID is used as a filter to synchronize only the AR data associated with the specific entity, for example, the invoices linked to a specific entity.
For more details, see the Sync CSV Data by Entity ID section.
Process Linked Subsidiary
Enables data synchronization with linked subsidiaries.
Container Type
Selects a container type that is used to to synchronize CSV data sets via FTP/SFTP/FTPS server:
-
Archive – Processes zipped CSV files into the specified FTP's Polling directory. File name restriction might require specification like (.*\.([zZ][iI][pP])$) or *.*.
It is recommended to use this option.
-
Directory– Processes unzipped CSV files into the subdirectory in the FTPs pooling directory.
In other words, upload the CSV files into a separate directory located at the root of the data folder, e.g. csv-data. Once processed, this directory will be moved to a /processed folder on the FTP server. Using this method, you must create a new directory each time with a unique name, as duplicate names are not allowed.
Additionally, make sure that the value in the File Name Restriction matches the name of the directory where you upload the CSV files, e.g.csv-data (not (.*\.([zZ][iI][pP])$)).
This integration method only works for FTP integration and does not support manual uploads.
Action after file processing
Specifies what happens with the data once they are processed:
-
Nothing – Does not do anything with the zip archive file.
However, if you select this option, YayPay will import the same CSV data set during each synchronization session until you place the new data set on your FTP. This is not recommended for large data sets. Rename – Renames the zip archive file after it has been imported.
-
Move – Moves the zip file to another folder in the FTP server after the zip file has been imported. For this purpose,- a /processed folder will be created on the FTP server, and the zip file will be moved into it. This is the recommended option as it provides visibility that the zip file has been processed.
Additionally, ensure that the FTP user credentials configured for YayPay has the proper permissions to access folders on your FTP server, e.g.: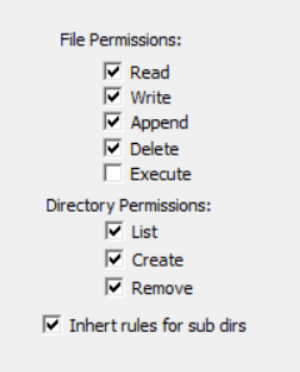
Delete – Deletes the zip archive file after it has been imported.
Advanced sync rules for Sales/CS/AR
Specifies the source for creating and editing sales and CS user roles.
For more details, see the Advanced Sync Rules for Sales/CS/AR Specialists section.
Snapshot Mode
Specifies how to handle entities that exist in YayPay (i.e. were synced earlier) but are missing in the current CSV file.
Such missing entities can be marked as either PAID or DELETED, and deleted from YayPay.
For more details, see the CSV Snapshot Mode section.
Enable pushing payments to FTP/FTPS/SFTP servers
Allows you to push payments and their allocation data from the Advanced Cash Application to the defined FTP server. Your ERP system can access this data there.
To learn how to push payments from the Advanced Cash Application, see the Exporting Payments to CSV section of the Payments in Cash Application article.
Follow these steps to set up YayPay and your FTP server for payment pushing:
- Create a folder called yaypay_payments at the root level of your FTP server.
This is where the CSV connector will store the payments as CSV files. - Grant the CREATE directory permission to your FTP user for the yaypay_payments folder.
- Confirm that YayPay has successfully connected to your FTP server.
- Ensure that the business process in YayPay is not paused when payments are being pushed.
The pushed payments are formatted as follows:
- Each payment (and its allocation data) is saved as a separate CSV file.
- Every invoice allocated to a payment represents a transaction row within the CSV file. For example, a payment allocated to 5 invoices will result in a CSV file with 5 transaction rows.
- Each CSV file is named in this pattern: yaypay_pay_yyyyMMdd_HHmmss_SSS.csv:
- yyyyMMdd - Represents the year, month, and day of the export timestamp.
- HHmmss - Represents the hour, minute, and second of the export timestamp.
- sss - Represents the milliseconds of the export timestamp.
Missed Invoices Action
Specifies the action for invoices that are not present in the next CSV upload:
-
Skip – If already uploaded invoices are missed in the next files, YayPay doesn't apply any changes to them.
This is the default option.
Mark as paid – Invoices which are absent in the next CSV uploading but exist in YayPay change their status to Paid.
Optionally, you can check Upload changed invoices only to upload modified invoices only.
4. Frequency of Imports and Updates to YayPay after the FTP connection is established
Once YayPay is connected to your FTP server, the application remains connected until you disconnect. There is a background process that runs every 60 min or thereabouts and polls to see if there are new zip files and/or Invoice PDF files placed in the folders on your FTP Server. Previous files placed on the FTP Server and imported can be moved to another folder by configuring that option in YayPay.
If you have a schedule to place the zip file & Invoice PDF files once in the early morning, and once in the evening, both zip files will be uploaded automatically and then moved to the /processed folder on your FTP Server for example
5. Setup and placement of Invoice template/PDF files on client’s FTP Server
Follow these steps to prepare and sync your Invoice Template/PDF files from your FTP Server:
- Create a new folder in your FTP Server/Host called ‘pdf’ and place your Invoice Templates/PDF files in this folder. See the illustration below:
- The filename for each Invoice Template/PDF file should be the same as the value used in the invoiceId column, to represent the invoice # or invoice record in the invoice.csv file
- The invoiceId and invoiceNumber columns in the invoice.csv file can be of the same value or different. You will have to choose one approach and remain consistent in the invoice.csv file:
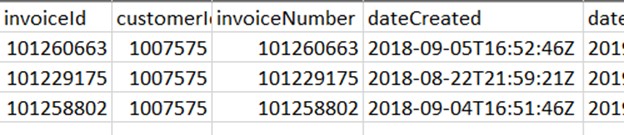
For example, the Invoice Template/PDF file name for invoiceNumber 101260663 represented in the invoice.csv file, should be 101260663.pdf IMPORTANT: for PDF file name please use the value from invoiceId column, values from other columns are not recognized by the system in this case.
The sync of the Invoice Template/PDF files will happen after the import of the zip file containing the 6 CSV files from your FTP Server.
Operationally, this process will tie back to your invoicing operations, i.e.
- When new invoices are created in your ERP, the same invoice records should be prepared and represented in the invoice.csv file so that YayPay is updated eventually
- And the corresponding named Invoice Templates/PDF files should also be placed in the pdf folder of the FTP Server (this does not have to be done at the same time as the above point, but preferably on the same day to avoid spilling over into the next day)
- If there are further changes to the original invoice record which was previously imported into YayPay, both the updated invoice record and the "updated" Invoice template/PDF file should also be prepared and placed on the FTP Server. The next import will update what is in YayPay
6. Allowed YayPay IP Address to connect to the FTP Server
For security reasons, we highly recommend that you block all attempts trying to connect to the FTP server, and only allow the hosts that you recognize:
- Your servers that should have access to FTP, for example, to push the ZIP/PDF files.
- Employees that should have access to FTP.
- YayPay servers listed in the table below:
YayPay Environment IP Address Additional Notes US Production 52.70.204.146, 34.195.225.244 v2 is 34.195.225.244 EU Production 54.170.157.209 Developer 34.228.204.221 US Prodlike/Apienv
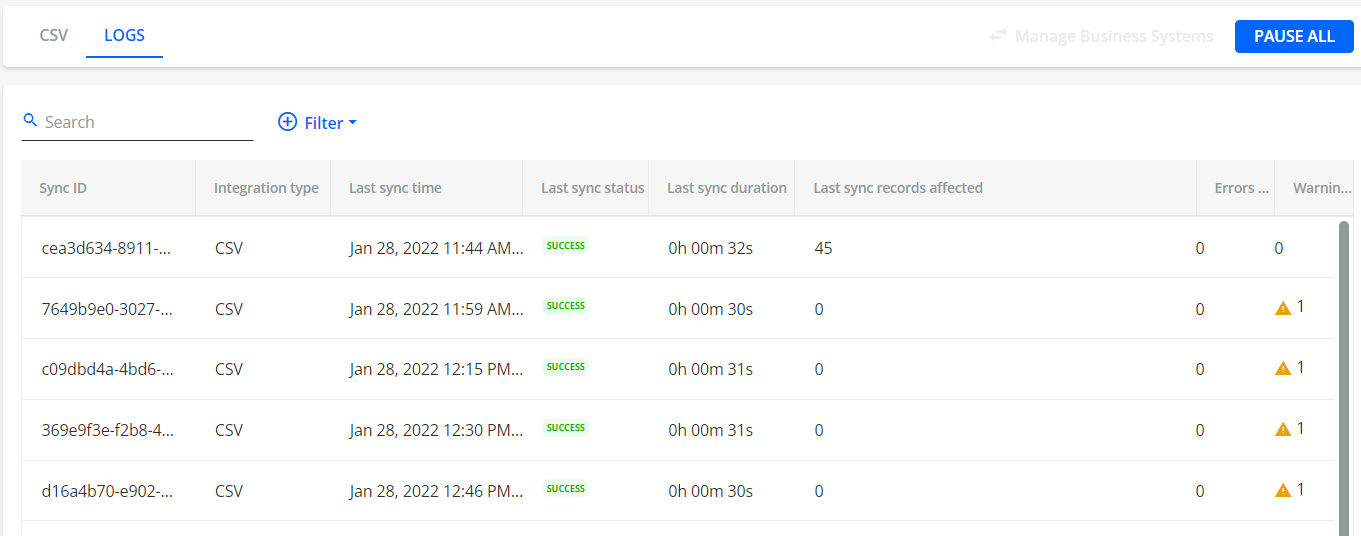
7. FTP Logs to show overall count of records imported
Go to the Settings > Integrations page and look for the FTP section. Click on LOGS to download a log file to Excel

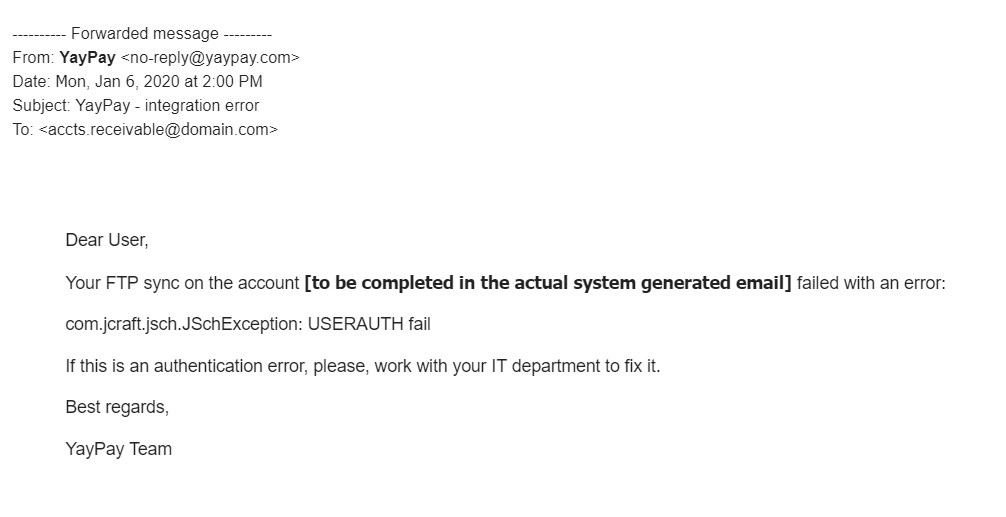
8. Email Notification for FTP Connectivity issues
If there is a connectivity issue to your FTP Server, a system-generated alert is sent to the email address configured in the main AR Email field, which is located under Settings > Business page.
The email notification is sent out after 3 consecutive errors/retries.
9. Bandwidth of the CSV Connector
Production Environment:
- The CSV connector can process up to 10,000 records in up to 5 minutes.
- The CSV connector can process up to 100,000 records in up to 50 minutes.
Development Environment:
- The CSV connector can process up to 10,000 records in up to 5 minutes.
- The CSV connector can process up to 100,000 records in up to 5-6 hours.
Summary
Overall, once YayPay is connected to your FTP server, this is the location where YayPay imports your AR data as well as your Invoice Templates (PDF files) summarized below:

Practical Points
Q: What does it mean if you receive a "Permission denied" error message shown in the Error Log?
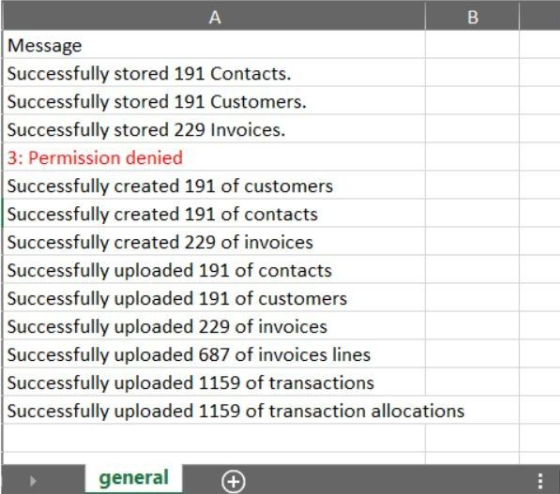
While the username/password credential established for YayPay was successful in the login attempt to access your FTP Server, and also read the zip file to import the AR data, the process could not resolve other related actions like moving the zip file to the /processed folder (if this was configured in YayPay in your instance) and creating the log file in the /logs folder of your FTP Server.
Review the Permissions setup for the YayPay username and ensure it has Read & Write on your FTP Server for all folders and subfolders that the credential should have access to (Note: Execute permission is not required).
