The internal Statement page provides information related to your customer.
The information includes:
- Customer Name, Address, Balance/Total Due
- Contacts - Internal Contacts such as AR Reps, Sales/CS Reps, and external Contacts - can either be Billing Contacts and/or Non-Billing Contacts
- The credit limit with an option to manage credit rates and IDs (provided a Credit Application is available for your account)
- Payment score, Credit Score (provided Credit Application is available for your account)
- Workflow Assignments
- Open / Closed invoices along with Open Credits, Payments history, Adjustments, etc
- Emails to and from your Customer
- Tasks, Customer Notes, and Invoice Disputes
- Payment-related activities taking place if you are using YayPay for payments.
Accessing the Statement Page
To access the Statement page of a specific customer, you have the following options:
- Go to the Aging Report and click on the name of customer whose Statement page you want to view.
- Perform a global search of the name of the customer whose Statement page you want to view.
Statement Page Structure
The Statement page consists of the following sections:
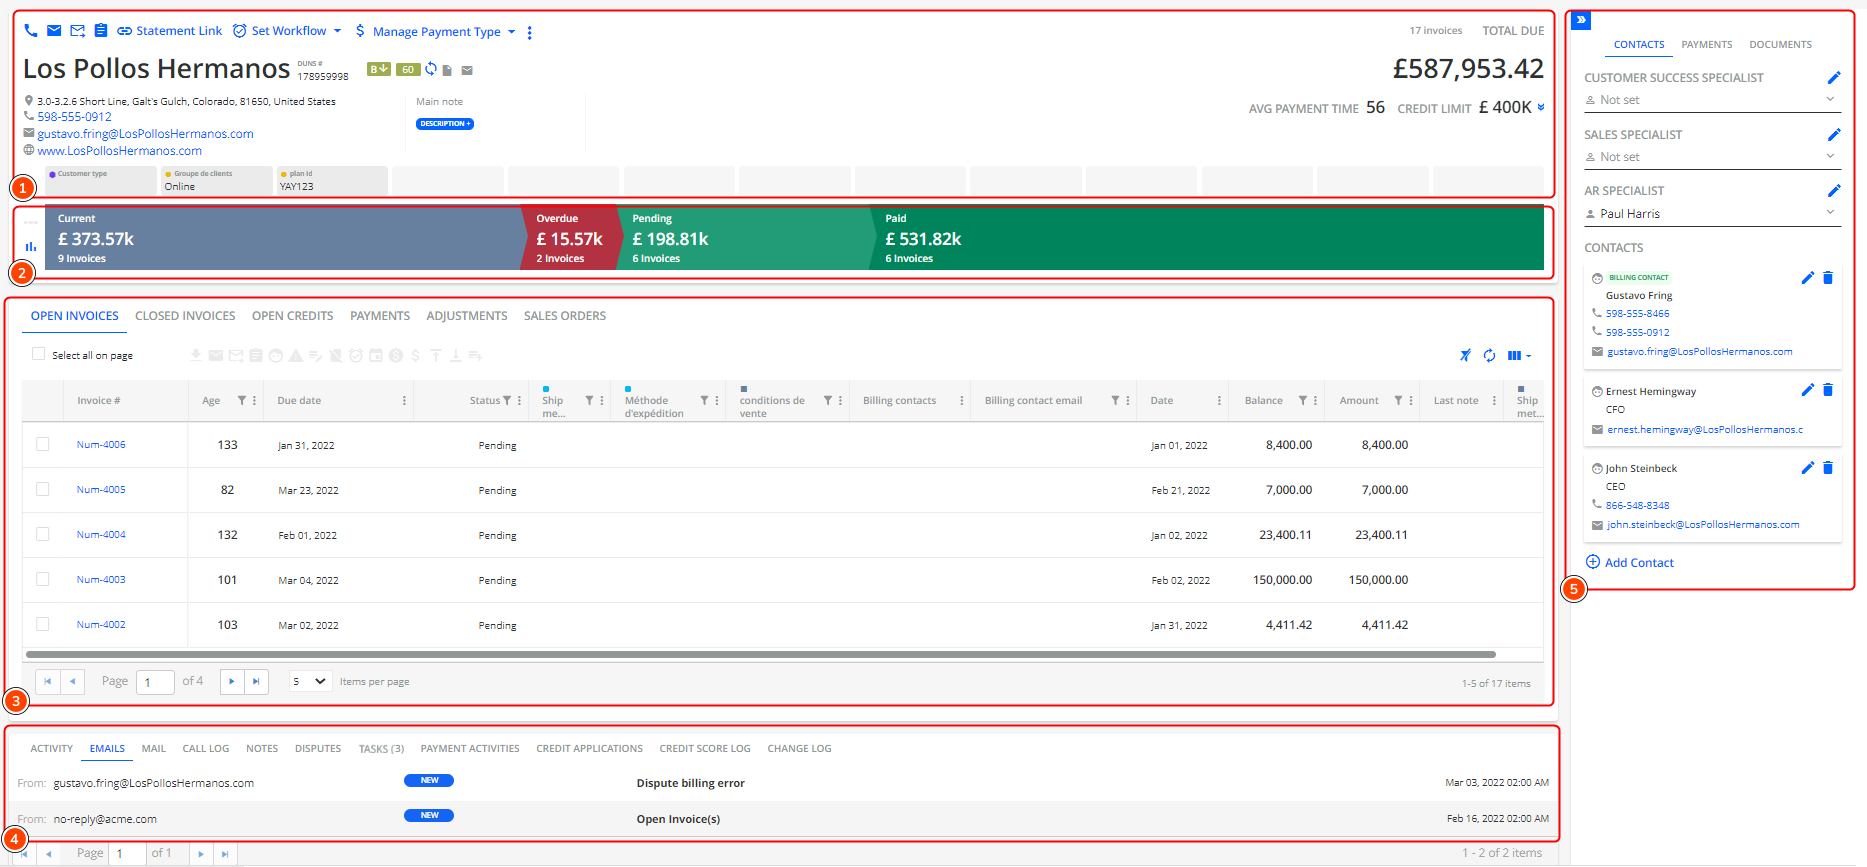
1. Statement Page - Header

The functions listed at the top of the page include:
Call Log - To capture call outcomes as a call log
Send Customer Email - To send an email to the customer (in addition to any scheduled Email Reminders you have configured through Collection Workflows)
Notes - To add a new customer note (with a date stamp and the person who recorded it), which can be viewed in chronological order under the NOTES tab (found at the bottom of the Statement page)
Statement link - Copies a URL to your clipboard that will link you to the Customer Portal. Paste the URL in a new browser tab to get to it, or you can send it via email to the end customer if you need to. (Note: This is the same Statement link that you can also embed into the message body of your Email Templates). The ability to copy statement links can be restricted in Security groups.
Set workflow - Choose from the dropdown options to select the workflow to be assigned to the customer. After a workflow has been assigned, you can also choose to "Pause Current Workflow" or "Unassign Current Workflow".
Manage payment type - If you use YayPay for Payments, this option will enable you to pause a specific Payment mode (i.e. Credit Card or ACH), or to pause all modes for your Customer
- The mode that is paused is the mode that is disabled on the Customer Portal page when making payments
- The pausing has no effect on the internal Finance team who can still make a payment on behalf of the Customer
Copy - Copies the name of the given customer to your clipboard.
Extra Functions
Clicking on the three vertical dots displays additional options.
The additional options include:
Child accounts - Opens the Aging Report page displaying all child accounts associated with the parent company.
This option only appears if the customer is a parent record in YayPay.
Download Statement PDF - Downloads a YayPay-generated Customer Statement in PDF format. TThe statement includes all open documents for the customer, e.g. open invoices, credits, adjustments, etc.
You can also set up your collection workflows to send this statement as an attachment.
Download Statement Excel - Downloads a customer statement in Excel format. For more details, see the Statement Excel article.
Download Open Entities Report - Downloads only the open invoices and saves them in an Excel file.
Invalidate All Statement Links - Deactivates all statement links that were previously sent in email reminders to the end customers, through workflows or manually.
For more details, see the How to Deactivate a Statement Link? article. This includes information related to what your end-customers would see if they clicked on an invalid statement link.
Assign Parent Company - Selects a company from the drop down menu to assign a parent to the current customer or remove it.
To avoid updates being applied during the next synchronization, check Use YayPay as the system of record for Parent/Child relationships in Settings | Business.
Assign Preferred Delivery Method - Sets the preferred method of invoice delivery for any individual customer or a group of customers. You can select from Email or Mail.
Resync Customer - Re-syncs all customer-related information, including their balance. Additionally, the connector also synchronizes all documents associated with the customer. This functionality is available for integrations with NetSuite and Sage Intacct.
This option is only available for admin users.
Resync Customer Data from Salesforce - Re-syncs specific customer data from the customer's account in Salesforce®.
Using this option, you can manually resync customer data when your Salesforce® account is integrated with the following ERPs:
- Sage Intacct®
- NetSuite®
- ZuoraTM
- Acumatica®
- Business Central®
- CSV
- API
This includes syncing:
- Sales Representative (Sales Rep) details.
- Customer Success Manager information.
- Custom Fields.
This option also pushes the following to Salesforce®:
- Pushing Statement Link to Salesforce (if the link is expired or missed in YayPay).
- Pushing customer and invoice level notes to Salesforce®
During the customer resync process, the system logs information such as the Salesforce® account information (ID, status, etc.), details of the located Salesforce® account, custom fields that are synced, deleted or excluded from syncing, the Statement link (if it's included in the sync) or details of the Sales Rep and CSM being synced (ID, status, etc.). You can find these logs on the LOGS tab of the Integrations page.
Manage Invoice Template - Uploads a custom invoice template.
This is similar to the option of creating a customized invoice template in YayPay, instead of using your ERP invoice template. For more details, see the Invoice View article.
Manage Statement Template - Uploads a custom statement template.
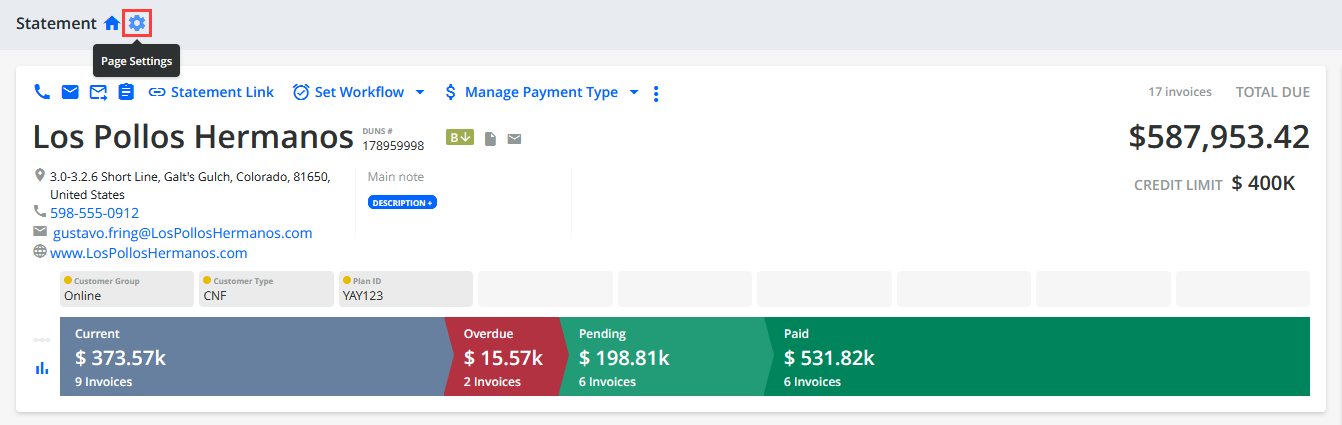
There is also an option to add a Main note at the Statement header:
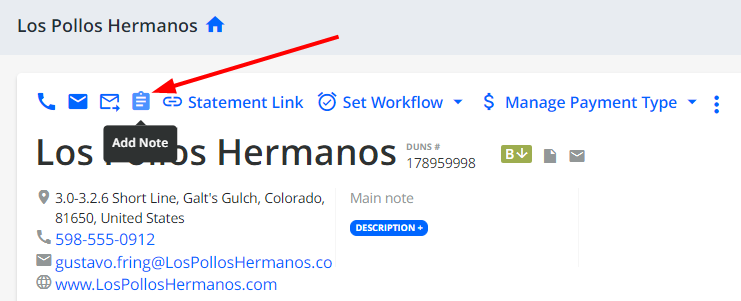
Main Note - Click on the "ADD MAIN NOTE" button to capture a main note at the header level. It will remain there until it is deleted. This Main Note is different from the NOTES tab located at the bottom of the Statement page (notes captured in the NOTES tab are dated, so history is kept along with the user who recorded the note)
Other information found at the Statement page Header level includes:
- The Balance or Total due amount for the end-customer
- The number of Open Invoices
- Customer's Days Sales Outstanding value (DSO)
- Customer's Average Payment Time value (APT)
- The Credit Limit for the Customer was brought from your ERP. Alternatively, it can be imported into YayPay. You can set a Workflow Event to monitor how close your Customer Balance is to this limit.
- Ability to manage credit rates and IDs (provided the Credit Application is available, contact your account manager for details):
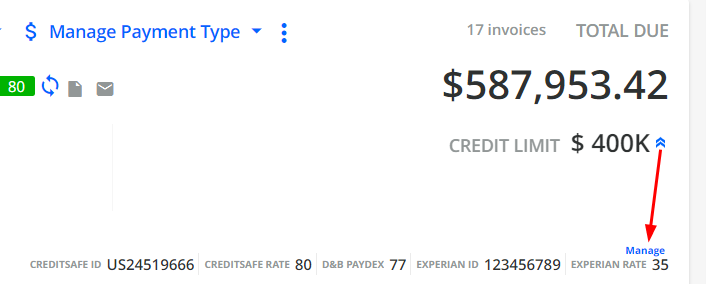
Upon clicking the "Manage" button you can edit the displayed rates and IDs manually.
Alternatively, they can be pulled from the submitted credit application form after the customer is assigned to it.
For a detailed description of credit rates and IDs displayed on the Statement Page, see the "Submitted Forms" article ("Credit Application" category in Tutorials).
DUNS number - currently is pulled from NetSuite, Intacct, CSV, or can be assigned manually.
2. Statement Page - Pipeline View
There are 2 views that you can choose from using the buttons on the left of the pipeline bar.
View #1 - This pipeline view displays the spread/state of the Invoices for the Customer

Current - displays the total amount of current Receivables aggregated from the # of Open Invoices that are Current (i.e. not past due, not in Dispute, without a Promise to Pay / Promissory Note, or if it is partially paid)
Dispute - displays the total amount of the Open Invoices with an open Dispute
Overdue - displays the total amount of Open Invoices that are past the Invoice Due Date
Promise To Pay - shows the total amount of Open invoices with an Open Promise to Pay
Paid - shows the total amount of Invoices that have been Paid (i.e. payment has been applied to the invoice)
Pending - shows the total amount of Open Invoices with a Pending Payment when using YayPay for Payments. When payments are made through YayPay, the Invoice status changes to Pending while the external funding / bank transfer process completes and the payment is also registered/applied to the invoice in the ERP. The Pending status in YayPay also prevents the same Invoice from being paid again by accident
View #2 - This pipeline view represents aggregated Amounts across Current and Overdue Invoices - the Aging brackets indicate the Aging of the Invoices for the Customer:

3. Statement Page - Invoices and AR data
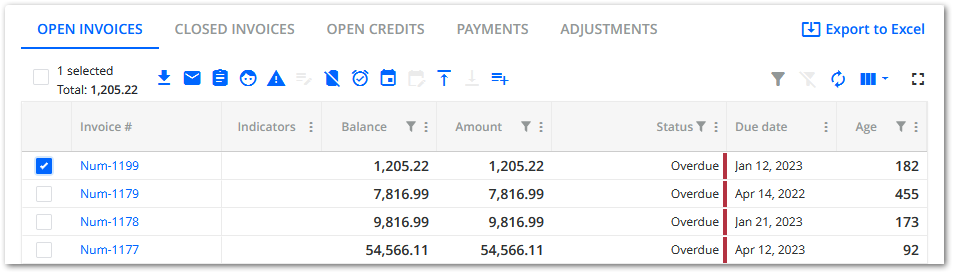
OPEN INVOICES
This tab shows all Open/Overdue (i.e. Unpaid or Partially Paid) Invoices brought over from your ERP.
Using Open Invoice Actions
Selecting at least one invoice record enables you to use open invoice actions. Hover your mouse over the icons to see a brief description/help text.

When a single invoice is selected, all actions are available. When multiple invoices are selected, only some actions are available (partial pay, and file up/down-loading are not available for multiple invoices).
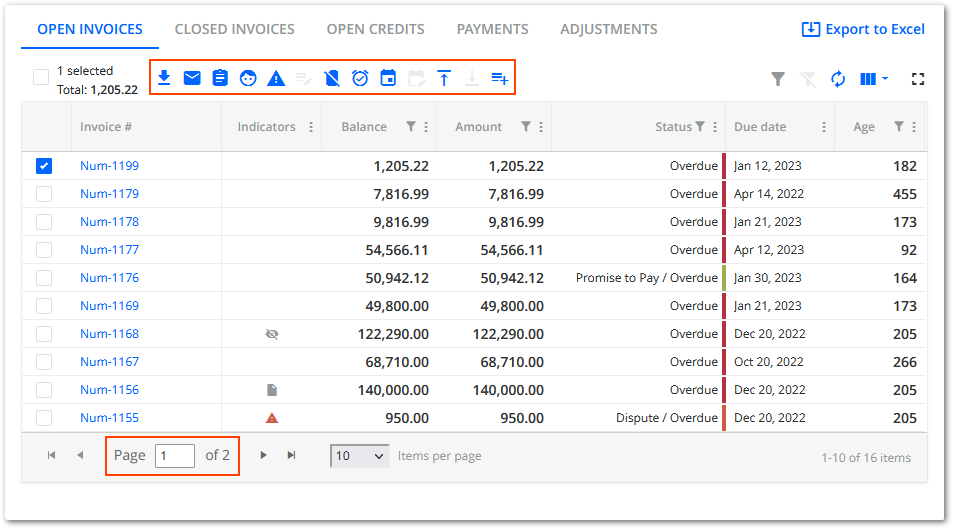
List of Open Invoice Actions:
Download invoice - Downloads a single invoice as a PDF file, or multiple invoices within a ZIP file.
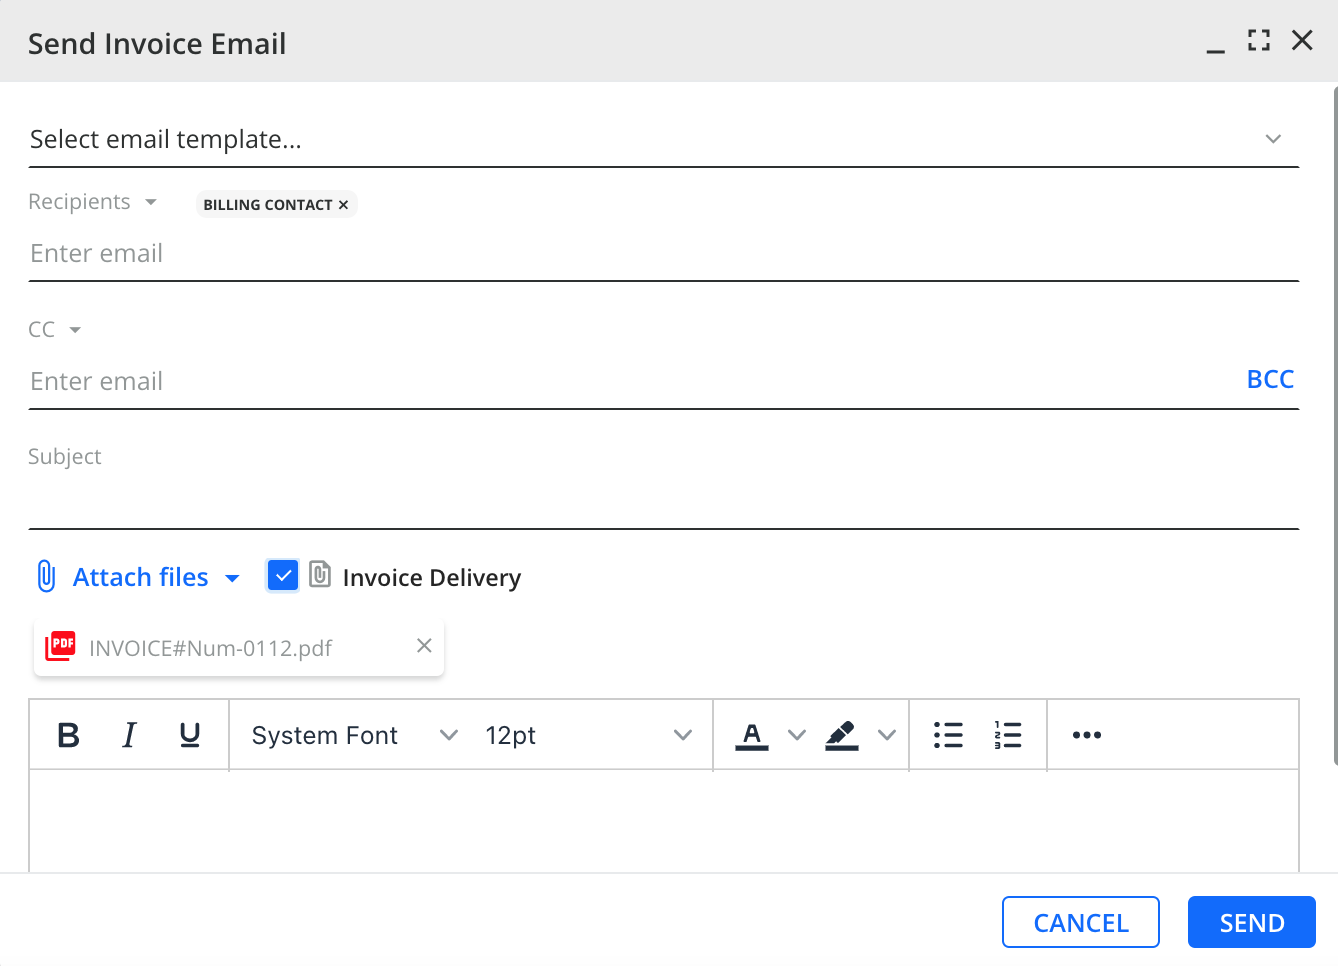
Send Reminder - Sends a manual email reminder related to the given document.
For invoices, the default recipient is the customer's billing contact and the invoice is attached as a PDF file. Optionally, you can also attach other files using the Attach Files drop-down menu or by using drag-and-drop functionality.
The activity of sending manual reminders is logged on the ACTIVITY tab located at the bottom of the Statement page.
For more details, see Manual reminders in the invoice section.
Send Mail (provided the Outsourced Mail feature is enabled) - Configures physical mail sending.
Add note - Creates a note on the invoice level (created notes can be found on the Invoice View page). You can also create a task on the invoice level along with the note.
Manage Invoice Billing Contact - Assigns a contact from Customer's contact list as an Invoice Billing contact or unassigns the current one.
Open dispute - Opens a dispute for the invoice.
By default, opening a dispute (for example from the Statement page or Customer Portal) also automatically creates a task. To prevent YayPay from doing so, go to Settings| Business and check Do not create task when dispute is opened.
Manage Dispute - Manages the opened dispute for the invoice: edit, resolve.
You can also request and access the advanced disputes functionality, which offers a dedicated Disputes page along with a range of additional features such as editing the Disputed Amount, managing dispute assignees, attaching documents, etc.
Exclude invoice from Workflow and Global Rules - Excludes the selected invoice from the current customer's workflow and global rules (manually).
Clicking on the icon opens the Exclude from Workflows and Global Rules dialog where you can choose whether to exclude the invoice from both workflows and global rules, or only workflows.To keep the invoice included in global rules only, check the Keep invoices included in global rules check box and click PROCEED.
Include to workflow - Includes the invoice in the current customer's workflow manually.
Manage Promise to Pay - Gives you the ability to create, edit and delete a Promise to Pay. You can modify the promise date, description text, and amount (only for a single invoice selected).
By default, opening a Promise to Pay (from the Statement Page or Customer Portal) also automatically creates a task. To prevent YayPay from doing that, you can use the Do not create task when promise to pay is opened business setting.
Pay - Allows you to pay for the selected invoices. It is not available when multiple invoices with different currencies are selected.
Manage Scheduled Payments - Opens the Manage Scheduled Payment dialog where you can view and modify the scheduled payment's settings of the selected invoice.
Partial pay (only for a single invoice) - Allows you to partially pay for the selected invoice.
Upload documents (only for a single invoice) - Allows you to attach documents (up to 10 files) on the invoice level (uploaded documents can be found on the Invoice View page).
Download documents (only for a single invoice) - Downloads attached documents (if there are any).
System Custom Fields - Allows you to set the value of the system custom field related to the selected invoices.
You can also filter, tailor the columns, and view shown by the table with these functions: 
Select Columns - Select from a list of additional columns and click on Apply Changes to add the additional column(s) into the view (e.g. invoice-level custom fields are also included)
Columns in the OPEN INVOICES grid
| Column name | Description and details |
|---|---|
| Customer |
This column is only available when the consolidated mode is enabled for the given parent company. It displays the name of the company (parent or child) for which the given invoice was issued. This is especially useful when viewing the Statement page of a parent company because the grid lists its invoices, as well as the invoices of any child companies. If a child company is displayed, you can click on it to open its Statement page. |
| Parent Company |
This column is only available when the consolidated mode is enabled for the given parent company. It displays the name of the parent company that owns the child company for which the given invoice was issued. |
| Customer ERP id | This column is only available when the consolidated mode is enabled for the given parent company. It displays the ERP ID of the child company for which the given invoice was issued. |
| Indicators | e.g. supplementary document(s) attached open disputes, etc. |
| Billing contacts | if an invoice has a billing contact, this field is populated with the icon |
| Billing contact e-mail | if an invoice has a billing contact, this field is populated with their e-mail |
| Date | invoice creation date |
| Balance | current amount to be paid for the invoice |
| Amount | the total amount of the invoice/amount to be paid before partial payments or adjustments |
| Status | current, overdue, partial, dispute, due date soon, bad debt, pending |
| Due Date | the document due date |
| Age | Number of days after due date. |
| Probability | for Current invoices: calculated probability in percent for Overdue invoices: time range past the due date for invoices with a Promise to Pay: promise to pay date |
| Custom fields | invoice custom fields columns are marked with a colored dot |
| Last note date | the date of the last note on the customer level |
| Currency | currency of the document |
| Dispute Code | if a dispute is open, the field is populated with the code |
| Disputed amount | if a dispute is open, the field is populated with the disputed amount |
| Delivery Date | the date the invoice was delivered |
| Delivery Method | Shows the delivery method that was used to send the given invoice to the customer. By default, it is empty until the invoice is sent. For example, the following methods might be displayed:
|
| Invoice Format | Shows the format in which the given invoice was sent to the customer. By default, it is empty until the invoice is sent. For example, the following formats might be displayed:
|
| Invoice Delivery Status | Shows the status of the invoice after it was sent to the customer. By default, it is empty until the invoice is sent. The following statues might be displayed:
|
| Invoice Delivery Status Date | Shows the date when the invoice status was last updated. |
| Original/Duplicate Invoice | "Original" means the invoice which was not previously sent, and "Duplicate" means the invoice that was previously sent by mail, email. |
| Discount | the amount of the discount (filterable) |
| Discount Date | the date the discount is valid to |
| Scheduled Payment Date | Shows the scheduled payment date of invoice. |
Reset to default - resets to the default view comprising these columns - Invoice number, Indicators, Billing Contact, Date, Balance, Amount, Status, Due Date, Age, and Probability. For companies with parent/child relationships, the default columns also include the Customer and Parent Company.
Clear filters - Some of the column headers have a filter that you can use. Clearing the filter resets any applied filters
Export to Excel - Downloads all transactions for a customer into an Excel file that contains different tabs.
For more details, see Exporting Open Documents to Excel.

Manual reminders in the invoice section
To send a manual email reminder:
- Select one or multiple invoices and click Send Reminder on the actions panel that becomes active.

- In the Send Emails dialog that opens, specify the reminder's details such as recipients, attachments, email template, subject and body.

By default, the recipient is the customer's billing contact and the invoice is attached as a PDF file. For more details, see Billing Contacts in sending Email Reminders and Email - Do not attach invoice PDF by default.
Optionally, you can also attach additional files using the Attach Files drop-down menu or the drag-and-drop functionality, allowing you to attach multiple files or content of an entire folder at once.
-
Click SEND to send the email reminder to its recipients.
Once sent, this activity is logged on the ACTIVITY tab located at the bottom of the Statement page.
Invoice Delivery
Invoice delivery - an additional option while sending a reminder, differentiates Invoice Delivery from any other communications to the customer and is marked with a special icon on the Communications Page and in the Activity tab of a Customer Statement (in an email preview popup). If enabled, the original invoice is sent to a customer (any adjustments and corrections are not considered in this case).
For manual reminders (from Statement only) it can be enabled instantly if: the invoice is sent for the very first time, the automated reminder with the invoice failed to be sent, Invoice Delivery is not preset in an Invoice Rule in the Workflow assigned to the customer.

For automated reminders, it can be preset with the Event "Invoice is created". The checkbox "Invoice delivery" becomes visible when "Attach PDF of the open invoice that triggered the action" is enabled.

The usage of the "Invoice delivery" functionality will be extended in future implementations.
Invoice Billing Contact Statement Link
When you add the {InvoiceBillingContactStatementLink} dynamic tag to your email reminders, it automatically become a clickable link when sent. This link will lead customers to a page where they can view and manage their open invoices:
You can use this invoice level dynamic tag when creating email templates, sending both automated email reminders (from Workflows) and manual email reminders, or you can include it in the Customer Open Invoices Table tag that can be inserted into an email template.
Using icons in the action bar above the grid, you can perform the following actions on unpaid invoices:
- Pay
- Partial Pay
- Download invoice
- Download attached documents
For details about the individual actions, see the Using Open Invoice Actions section.
In the top-right corner, you can also click Send Email to open the Send email dialog used for sending emails.
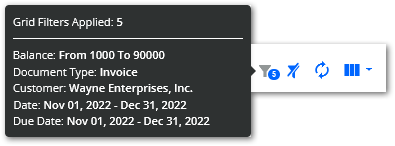
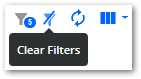
Additionally, you can filter the grid's content to see specific invoices only. Once you set up filtering, the total number of applied filters is indicated by the Filter icon with a number which is located in the top-right corner.
To clear all the filters, click on the Clear Filters icon located next to it.
CLOSED INVOICES
This tab shows all closed invoices (i.e. fully paid) when these updates are brought from your ERP.
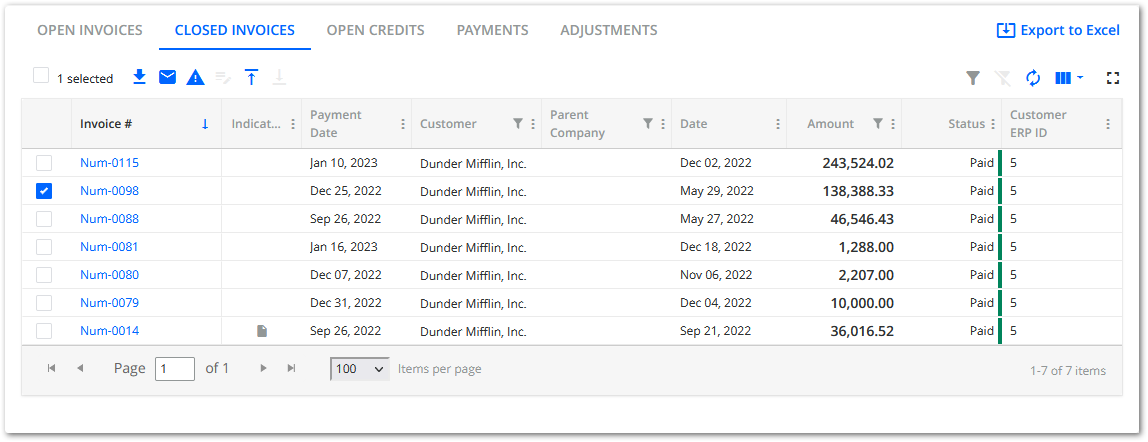
Select an invoice to see the available actions at the top of the grid. Alternatively, use the single action bar.
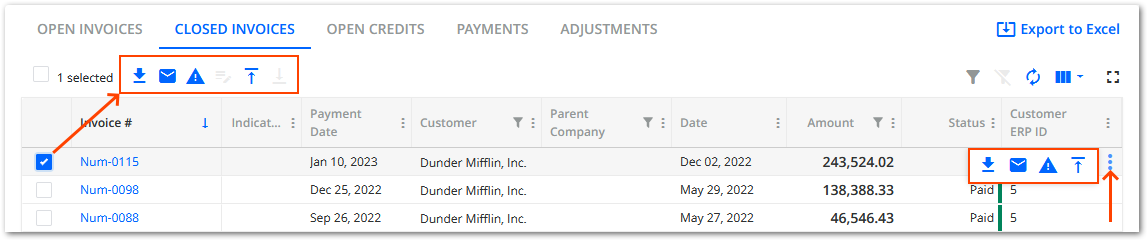
Actions with closed invoices:
Download invoice, Send reminder, Open Dispute, Manage Dispute, Upload documents, Download documents (see the details above)
Note: some actions are not available for multiple invoices selected.
Columns in the CLOSED INVOICES grid
| Column name | Description and details |
|---|---|
| Customer | This column is only available when the consolidated mode is enabled for the given parent company. It displays the name of the company (parent or child) for which the given invoice was issued. This is especially useful when viewing the Statement page of a parent company because the grid lists its invoices, as well as the invoices of any child companies. If a child company is displayed, you can click on it to open its Statement page. |
| Parent Company | This column is only available when the consolidated mode is enabled for the given parent company. It displays the name of the parent company that owns the child company for which the given invoice was issued. |
| Customer ERP ID | This column is only available when the consolidated mode is enabled for the given parent company. It displays the ERP ID of the child company for which the given invoice was issued. |
| Indicators | e.g. supplementary document(s) attached, open dispute, etc. |
| Date | invoice creation date |
| Billing Contact | if an invoice has a billing contact, this field is populated with the icon |
| Billing Contact Email | if an invoice has a billing contact, this field is populated with their e-mail |
| Payment Date | invoice payment date |
| Currency | currency of the document |
| Allocated Amount | the amount allocated to this invoice |
| Custom Fields | invoice custom fields columns are marked with a colored dot |
| Amount | the total amount of the invoice/amount to be paid before partial payments or adjustments |
| Status | the status of the invoice: e.g. paid, disputed |
You can filter, sort, move, and choose the columns to be displayed in the grid with Clear filters, Reset columns to default, and Select columns buttons.
OPEN CREDITS
This tab shows all the open credits brought over from your ERP. 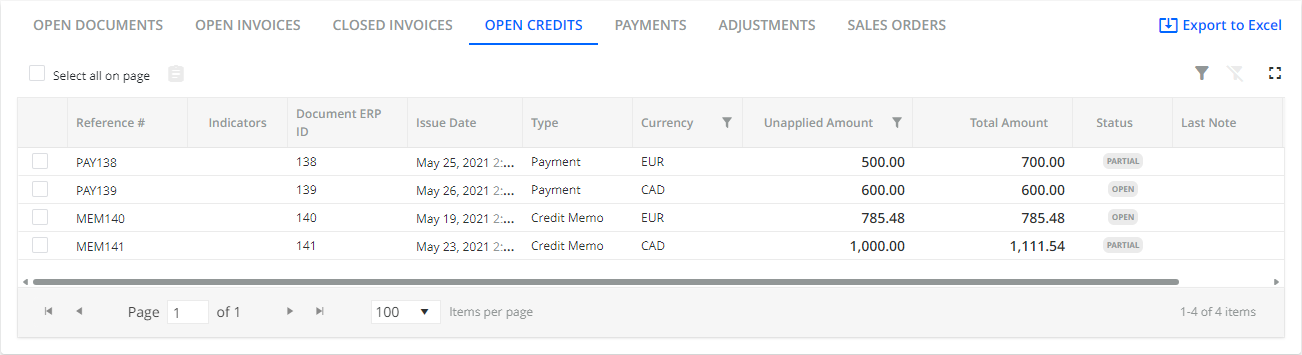
When you select one or multiple open credits records, the Add Note icon above the grid becomes active. You can use this icon to add notes to the selected open credit records.
The table contains the following columns:
- Reference # – Shows a reference number which is clickable in case there is a matching PDF document in the system.
- Indicators – Shows an icon in case there are supplemental documents attached, payment paused, credit limit exceeded, etc.
- Document ERP ID – Shows the document's ERP ID which serves as a unique identifier.
- Customer – Shows the customer name.
- Parent Company – Shows the name of a parent company for customers with the Parent level collections setting enabled in Statement page | ACTIVITY | SETTINGS).
- Customer ERP ID – Shows the customer's ERP ID.
- Issue date – Shows the date when the open credit was issued.
- Type – Shows the open credit type, for example Payment, Credit Memo.
- Currency – Shows the currency of open credits.
- Unapplied Amount – Shows the amount of the open credit which has not been applied yet.
- Total Amount – Shows the total amount of an open credit.
- Status – Shows the open credit's status, e.g. open, partial.
- Last Note – Shows the last note added to the open credit.
- Last Note Date – Shows the date when the last note was added to the open credit.
To download a credit memo PDF file, click on its reference number. You will be taken to the credit memo view page. Click "Download Credit Memo":
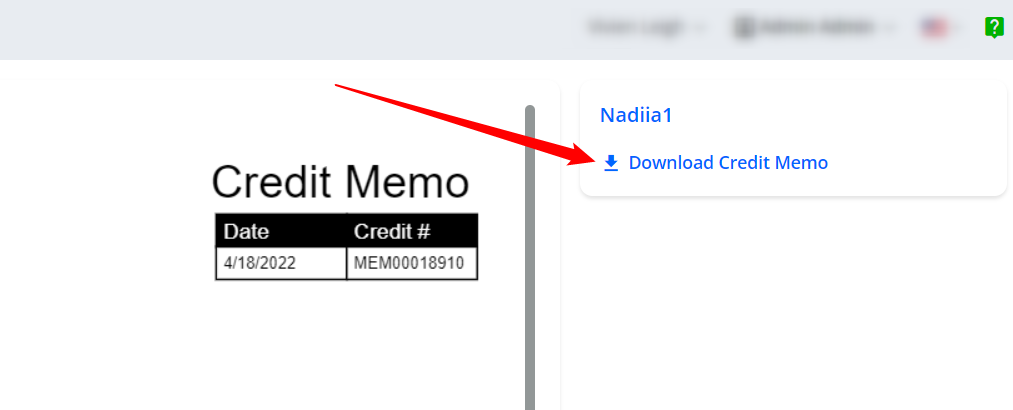
Your customers are also able to view and download credit memo PDFs from the Customer Portal.
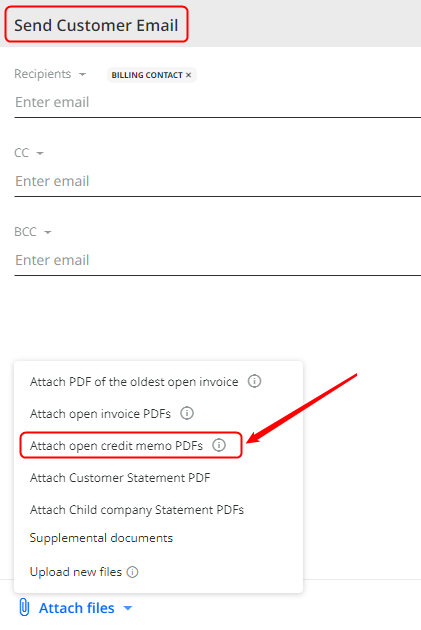
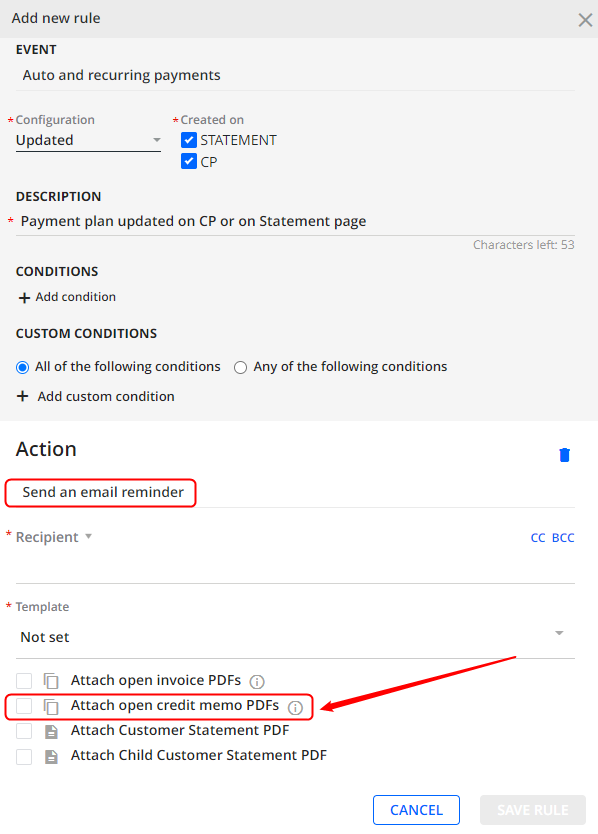
Besides downloading the credit memo PDFs to your device, you can attach them to email reminders - both manual (customer-level) and automated (from Workflows). See the examples below:
- Send Customer Email (from Aging Report, Statement Page header, Tasks Page, Communications Page):
- Send an Email Reminder (from a configured rule):
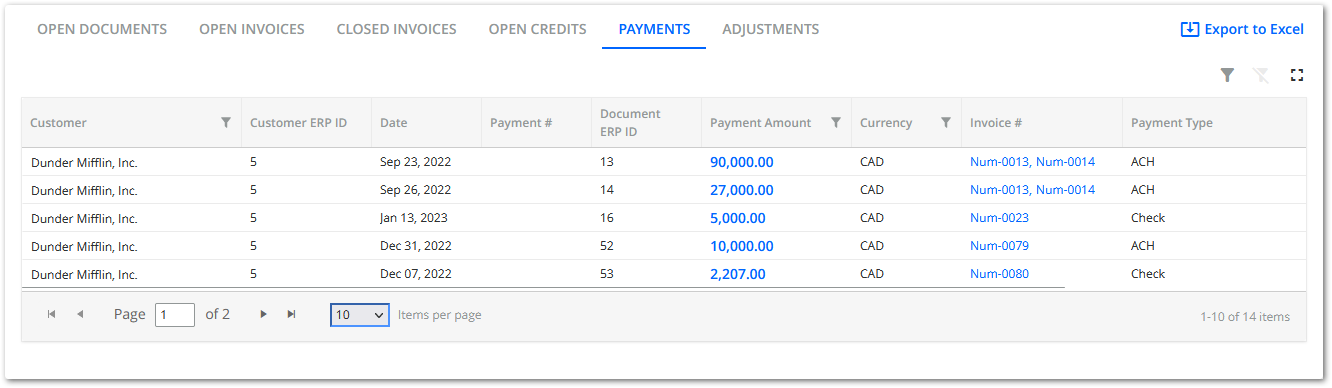
PAYMENTS
This tab shows all the payments made by the end-customer, brought over from your ERP. That includes any form of "cash" applied to the invoice in your ERP, i.e. Checks or EFT payments, Open Credits applied etc. If a Credit Memo is fully applied with no amount left, the OPEN CREDITS tab no longer shows the Open Credit record.
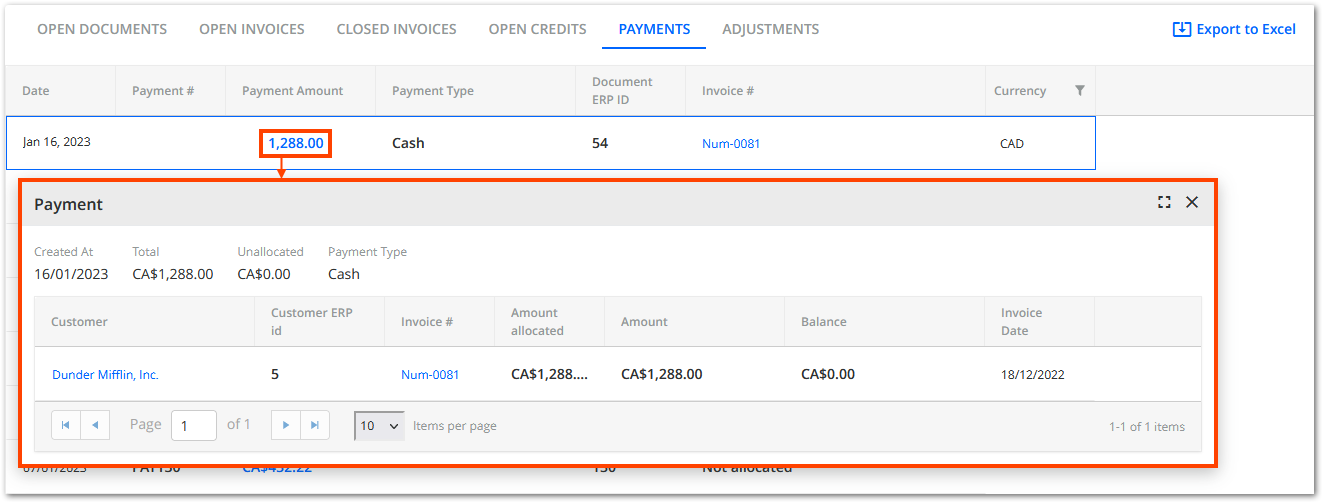
To see how a given payment was applied to one or multiple invoices, click on the payment amount:
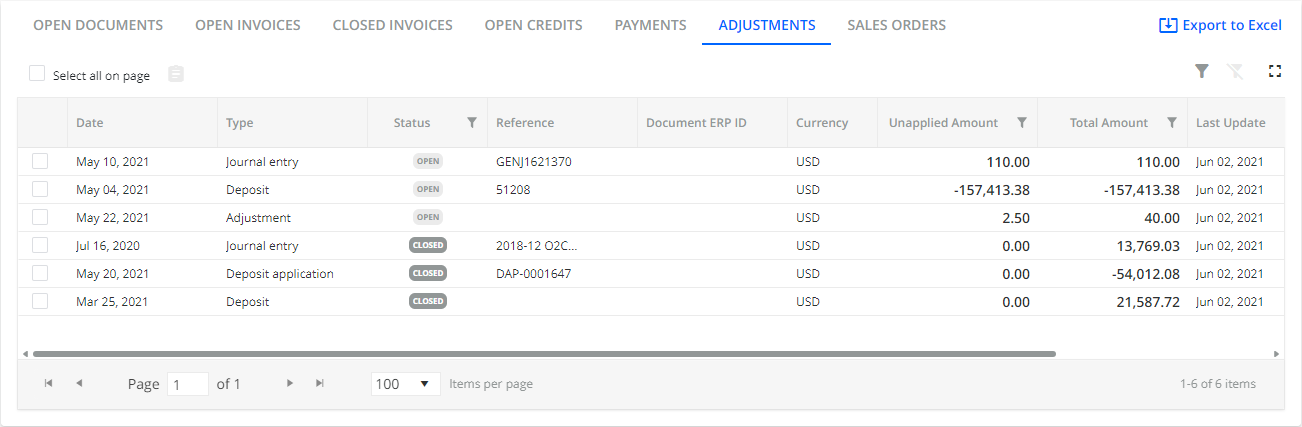
ADJUSTMENTS
This tab shows all adjustments brought over from your ERP, e.g. Journal entries, etc.
When you select one or multiple adjustments, the Add Note icon above the grid becomes active. You can use this icon to add notes to the selected adjustments.
The table contains the following columns:
- Date – Shows the date when the adjustment was issued.
- Type – Shows the adjustment type, e.g. Journal entry, Deposit.
- Status – Shows the adjustment's status, e.g. OPEN, PARTIAL.
- Reference – Shows a reference number which is clickable in case there is a matching PDF document in the system.
- Document ERP ID – Shows the document's ERP ID which serves as a unique identifier.
- Currency – Shows the currency of adjustments.
- Unapplied Amount – Shows the amount of the adjustment which has not been applied yet.
- Total Amount – Shows the total amount of an adjustment.
- Last Update – Shows the date of the last update made to the adjustment.
- Last Note – Shows the last note added to the adjustment.
- Last Note Date – Shows the date when the last note was added to the adjustment.
Additionally, you can also filter the tables' content, expand the grid or export the data from the grid to an Excel file. For the description of these options, see the OPEN DOCUMENTS tab.
SALES ORDERS
This tab shows all Sales Orders brought over from your ERP
The sales Orders tab is optional for the Statement page UI.
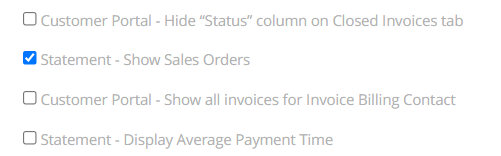
1. In order to turn it on you should go to Settings > Business Settings > check Statement - Show Sales Orders and save changes
2. Another important step for NETSUITE users is to turn on the integration.
Go to Settings > Integrations > NetSuite Settings and check Download Sales Orders from NetSuite to YayPay and save changes.
OPEN DOCUMENTS
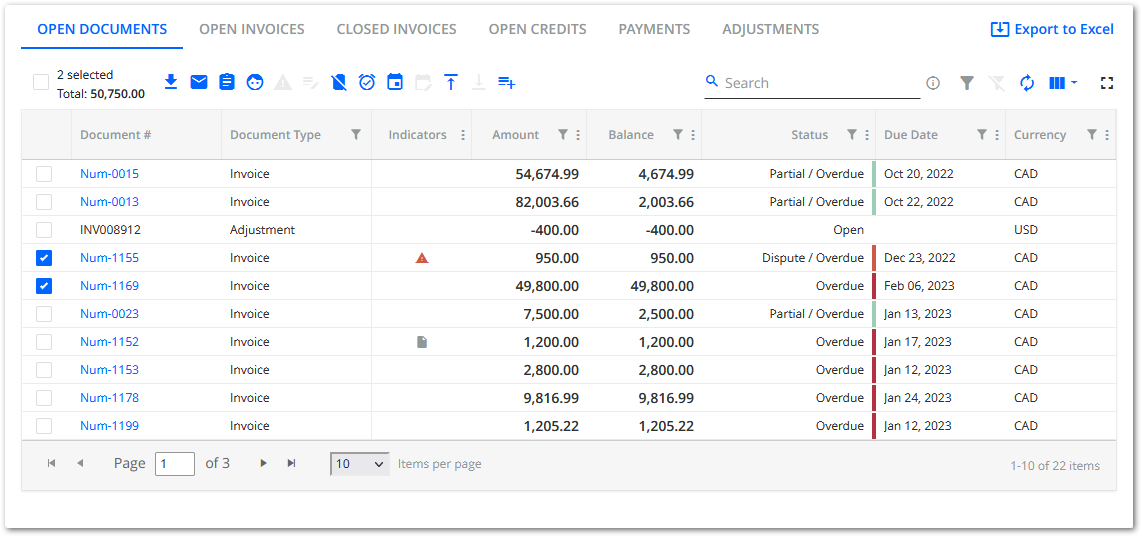
This tab provides an aggregated view of all the types of open documents whose data are individually available on the other Statement page tabs:
- OPEN INVOICES
- OPEN CREDITS (payments or credit memos)
- ADJUSTMENTS
Enabling the Open Documents Tab
The OPEN DOCUMENTS tab is optional for the Statement page UI. Only Admin users can enable it:
- Click on the Page Settings button on the Statement page of any company.
- Use the Open Documents Tab toggle to enable the tab.

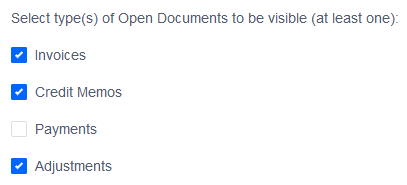
- Select all the types of open documents (at least one) that you want the OPEN DOCUMENTS tab to aggregate.
- Click on the SAVE CHANGES button to enable the OPEN DOCUMENTS tab.
- Go back to the Statement page to view the OPEN DOCUMENTS tab.
Searching for Specific Open Documents
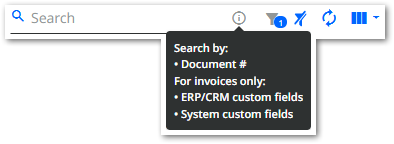
You can use the provided Search field to search for specific open documents.

An entered phrase is searched in different columns depending on the selected types of open documents that the tab currently aggregates. To see which columns are currently searchable, hover over the information icon next to the Search field.
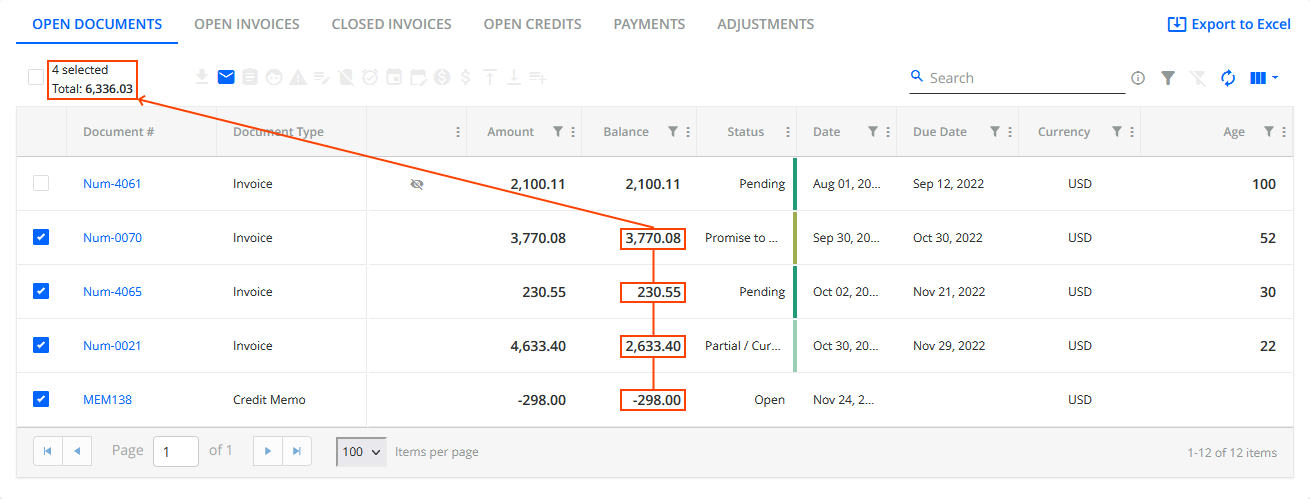
Calculating the Total Balance of Multiple Open Documents
You can calculate the total balance of multiple open documents at once:
- Check the check box of each document whose total balance you want to add up.
- Check the calculated total balance above the grid.
Using Open Document Actions
You can use various actions to manage open documents using the action panel:

Factors Influencing Action Availability:
- Number of selected documents - Most actions are available when you select a single document as opposed to multiple documents.
- Types of selected documents - Most actions are available for invoices. You can only send email reminders for the other document types.
List of Open Document Actions:
- Download Invoice - Downloads a single invoice as a PDF file, or multiple invoices within a ZIP file.
-
Send Reminder - Sends a manual email reminder related to the given document.
For invoices, the default recipient is the customer's billing contact and the invoice is attached as a PDF file. Optionally, you can also attach other files using the Attach Files drop-down menu or by using drag-and-drop functionality. The activity of sending manual reminders is logged on the ACTIVITY tab located at the bottom of the Statement page.
For more details, see Manual reminders in the invoice section. - Send Mail - Configures physical mail sending (provided the Outsourced Mail feature is enabled).
-
Add Note - Creates a note on the invoice level.
This opens the Add Note dialog where you can specify the note's details as well as create a related task.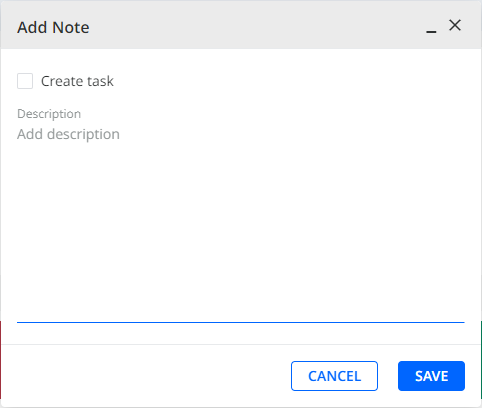 To see all customer notes, go to the NOTES tab at the bottom of the Statement page.
 - Manage Invoice Billing Contact - Assigns a contact from Customer's contact list as an Invoice Billing contact or unassigns the current one.
-
Open Dispute - Opens a dispute for the invoice.
By default, opening a dispute (for example from the Statement page or Customer Portal) also automatically creates a task. To prevent YayPay from doing so, go to Settings| Business and check Do not create task when dispute is opened. -
Manage Dispute - Manages the opened dispute for the invoice: edit, resolve.
You can also request and access the advanced disputes functionality, which offers a dedicated Disputes page along with a range of additional features such as editing the Disputed Amount, managing dispute assignees, attaching documents, etc. -
Exclude invoice from Workflow and Global Rules - Opens the Exclude from Workflows and Global Rules dialog where you can choose whether to exclude the selected invoice from both the customer's workflows and global rules, or only workflows (manually).
To keep the invoice included in global rules only, check the Keep invoices included in global rules check box and click PROCEED.
- Include to Workflow - Includes the invoice in the current customer's workflow manually.
- Add Promise to Pay - Create a promise to pay for the given invoice.
-
Manage Promise to Pay - Gives you the ability to edit or delete a promise to pay. You can modify the promise date, description text, and amount (only for a single invoice selected).
By default, opening a Promise to Pay (made from the Statement Page or Customer Portal) also automatically creates a task. To prevent YayPay from doing that, you can use the Do not create task when promise to pay is opened business setting. - Pay - Allows you to pay for the selected invoices. It is not available when multiple invoices with different currencies are selected.
- Manage Scheduled Payments - Opens the Manage Scheduled Payment dialog where you can view and modify the scheduled payment's settings of the selected invoice.
- Partial Pay - Allows you to partially pay for the selected invoice (only for a single invoice).
-
Upload Documents - Allows you to attach documents (up to 10 files) on the invoice level (only for a single invoice).
Uploaded documents can be found on the Invoice View page. - Download Documents - Downloads attached documents if there are any (only for a single invoice).
- System Custom Fields - Allows you to set the value of the system custom field related to the selected invoices.
Exporting Open Documents to Excel
You can export the open document data to an Excel file by clicking on Export to Excel.

The content of the exported file duplicates the grid's tabs. The content of each tab duplicates the columns selected for the given tab in YayPay.

Customizing the Grid
You can customize what the OPEN DOCUMENTS grid dislays:
-
Optionally, click on the Expand Grid icon to open an extended view of the grid, which makes it easier to customize the grid.

- Select which columns to display:
- Click on the Select Columns icon.

- Select all the columns you wish to display.
- Click on Apply Changes to confirm.
- Click on the Reset Columns to Default icon if you want to go back to displaying the default columns.

- Click on the Select Columns icon.
- Sort the grid’s data using a specific column:
- Click on the name of the column you wish to sort by in a descending order.
- Click the same way again to sort in an ascending order.
- Click the same way again to stop sorting by the given column.
- Rearrange the order of the columns in the grid:
- Click and hold inside the header of the column you wish to move.
- Drag the column in the desired spot.
Filtering the Data in the Grid
You can filter the data displayed in the OPEN DOCUMENTS grid using the Filter icon.
The Filter icon is available for the following columns:
-
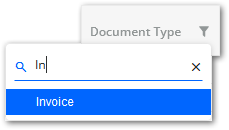
Document Type - Selects the type of documents you want to display in the grid.
- Customer - Selects the child company whose documents you want to display in the grid.
-
Parent Company - Selects the parent company whose documents you want to display in the grid.
-
Date - Defines the time period in which the documents you want to display in the grid were created.
-
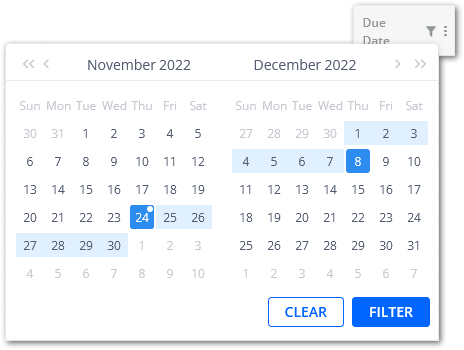
Due Date - Defines the time period in which the invoices you want to display in the grid have their due date.
- Status - Selects the status of the documents you want to display in the grid.
-
Amount - Defines the range of the total amount (to be paid before partial payments or adjustments) applicable to the documents you want to display in the grid.
-
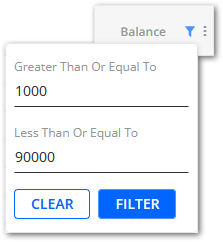
Balance - Defines the range of the current amount (synced from your ERP) to be paid for the documents you want to display in the grid.
- Currency - Selects the currency of the documents you want to display in the grid.
- Billing Contact Email - Selects the email address of the billing contact assigned to the invoices you want to display in the grid.
- Age - Defines the range of the age of the invoices you want to display in the grid.
- Custom Status - Selects the custom status of the invoices you want to display in the grid.
- Dispute Code - Selects the dispute code assigned to the invoices you want to display in the grid.
- Disputed Amount - Defines the range of the disputed amount applicable to the invoices you want to display in the grid.
4. Statement Page - Other Tabs

The following tabs are available at the bottom of the Statement page:
-
Activity - Represents an Audit trail of what has taken place with the Customer, shown in chronological order.
You can configure the audit trail to display the names of users who performed a given action in their customer portal, for example Email sent from Customer Portal by John Doe. To do that, go to Settings | Business and enable the Customer Portal - Enable authentication option. If this option is unchecked, generic names are used instead of user names, for example Email sent from Customer Portal.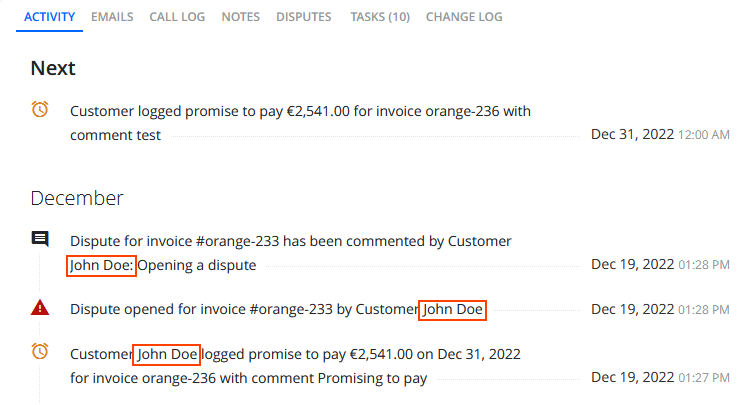
-
EMAILS (X) - Displays all outgoing and incoming emails of the customer.
The number displayed on the tab itself indicates how many unread emails the customer has.
Optionally, you can use the Mark all as read and Mark all as unread icons above the list of emails to change the email statuses. For more advanced email management options, navigate to the Communications page.
-
Call log - Displays the recorded call logs for the customer.
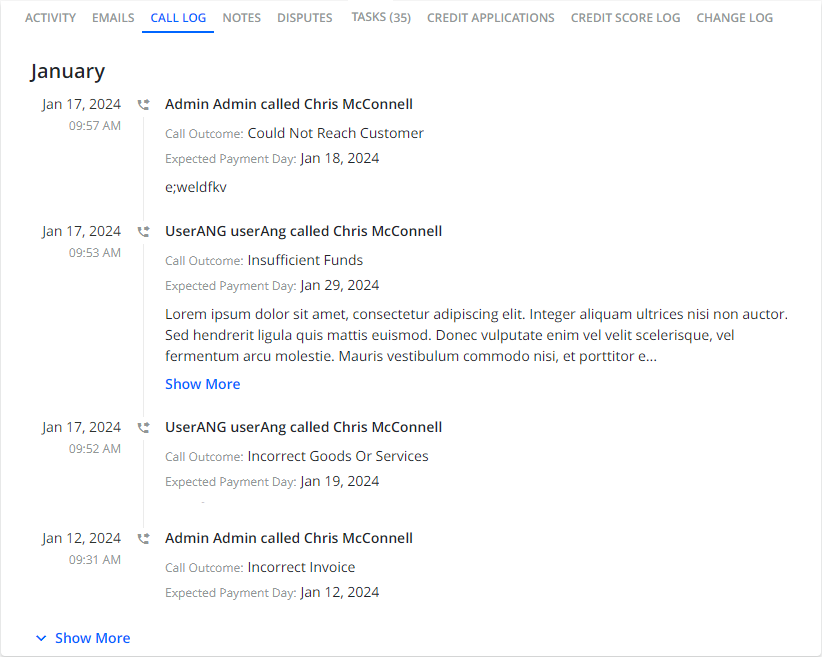 If the description of a call is too long, only a part of the text is displayed. To view the full description, click Show More below the description. Similarly, if the list of calls is extensive, only a part of it is shown. To view the complete list, click Show More at the bottom of the page.
 -
NOTES - Displays all the notes of the customer.
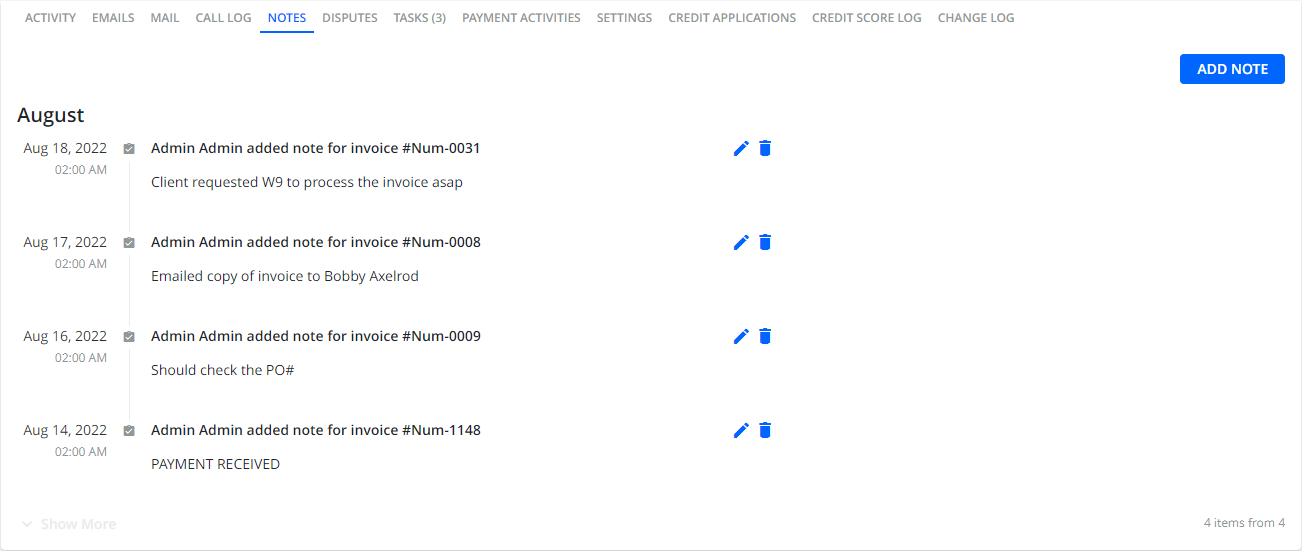
On this tab, you can also create a new note by clicking on the ADD NOTE button on the right. This will open the Add Note dialog where you can enter the note's description.
Optionally, you can also check Create task to create a related task.
If checked, additional options will appear allowing you to specify the task's details:
Date
Selects the task's due date.
This is done by clicking on the date-picker.
Title
Specifies the task's title.
Assignee
Selects a user who will be assigned to complete the task.
Priority
Sets the task's priority.
It can be Low, Medium or High.
Description
Specifies the task's description.
Once you have specified all the details and saved your changes, the task will appear on the Tasks page as well as on the TASKS tab where you can edit, resolve or delete the task.
Once a note is added, you can edit or delete it by clicking on the respective icons located next to the note.
The most recent customer note is displayed in the Last Note and Last Note Date columns on the Open Documents, Open Credits and Adjustments tabs on the Statement page.
-
DISPUTES (X) - Displays any open or closed disputes that have been recorded by the customer.
The number displayed on the tab itself indicates how many open disputes the customer has. Click on an invoice number to open the corresponding invoice. Additionally, selecting a line in the grid will open the Manage Dispute dialog where you can manage different aspects of the dispute.
Customers can also directly open the dispute through their Customer Portal web page.
You can also request and access the advanced disputes functionality, which offers a dedicated Disputes page along with a range of additional features such as editing the Disputed Amount, managing dispute assignees, attaching documents, etc. -
TASKS (X) - Shows all the tasks of the customer. The number in brackets indicates the total number of open tasks the customer has.
 This tab also contains the OPEN, OVERDUE, CURRENT and COMPLETED sub-tabs for a better overview of task statuses.
Optionally, you can use the Select date date-picker to display tasks that belong to a selected time range.
Additionally,you can search for tasks by company name or task title, filter tasks, or add new ones by clicking on the ADD TASKS button located in the top-right corner of the tab.
Clicking on a specific task will open the Task dialog containing all the task details. In this dialog, you can also complete, edit, or delete the task by using the icons located in the top-right corner of the dialog.
To see all the tasks, go to the Tasks page. -
Payment activities - Shows an audit trail of payment-related activities for the customer. This includes successful/unsuccessful payment attempts, saved payment profiles, paused or resumed payment methods etc.
This tab is primarily intended for the internal team (such as an AR Specialist or Sales Representative) to review the payment activities. It allows them to see actions performed internally on behalf of the customer as well as any actions taken directly by the customer through the Customer Portal web page.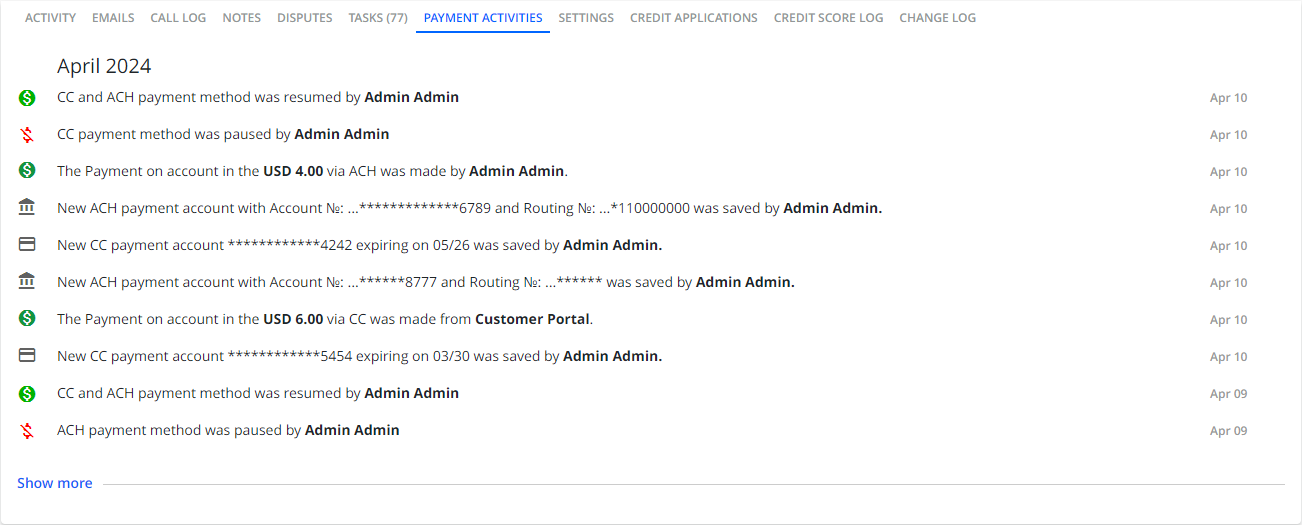
-
SETTINGS - This tab only appears for parent accounts.
It provides an option to activate the consolidated mode using the Parent level collections check box. If checked, it consolidates and shows all invoices belonging to the child companies on the parent's Statement page.This consolidation also affects values such as Balance or Total Due amount, i.e. merging the amounts from both the parent and child companies together. It also ensures that collection workflows assigned to the parent account apply to all child accounts. For more details, see Consolidated Collection Workflow.
Optionally, you can also check Copy to child level billing contacts. If checked, child account contacts will receive copies of email reminders as CC recipients.
-
CREDIT APPLICATIONS – Displays all the submitted credit applications. Two actions that you can apply to a submitted form: Preview Form and Download Attachments.
This tab is available for Advanced Credit users only. To obtain access to this feature, contact your YayPay account manager. -
CREDIT SCORE LOG – Creates a corresponding record in the log each time the system updates the customer's credit scorecard (either automatically or manually).
This tab is available for Advanced Credit users only. To obtain access to this feature, contact your YayPay account manager.
- Change log - Shows an audit trail of Workflow changes (e.g. assign/re-assign/pause actions) that users have made. Also, for better visibility and reporting, records are added to the Change log tab when system custom fields are added, removed, or edited. Changes applied on the Statement page, Aging report, Invoices page, in rules are logged to the Change log tab.
5. Statement Page - Contacts, Payments, Documents
There are additional features available in the panel to the right of the Statement Page.
The panel can be maximized and minimized. Click on the double arrow blue icon to expand or minimize the panel:

The options in this panel include:
-
CONTACTS (Refer to Article link)
- The ability for you to associate your Customer with Internal contacts - You can assign an AR Specialist, a Sales Specialist and/or a Customer Success Specialist. You can also do a Mass Import through an Excel Mapping file, found under the Settings > Excel Mapping file menu in YayPay. The assignment of Sales Specialist and Customer Success Specialist (as 2 different named individuals) could be integrated from Salesforce to YayPay as well.
Additionally, to enable Sales/CS roles to view assigned Customer Success Specialist, Sales Specialist and AR Specialist (hidden by default), go to Settings | Security Groups | Sales/CS and uncheck Restrict viewing of assigned AR/Sales/CS specialist on Statement. - The ability for you to associate your Customer with their contacts where Reminders will be sent to (i.e. contacts external to you) - these could be Billing (or Non-Billing) contacts. This information is typically synced and created in YayPay from your ERP, but you can also add additional ones in YayPay directly, or do a Mass Import through an Excel Mapping file, found under the Settings > Excel Mapping file menu in YayPay
- The ability for you to associate your Customer with Internal contacts - You can assign an AR Specialist, a Sales Specialist and/or a Customer Success Specialist. You can also do a Mass Import through an Excel Mapping file, found under the Settings > Excel Mapping file menu in YayPay. The assignment of Sales Specialist and Customer Success Specialist (as 2 different named individuals) could be integrated from Salesforce to YayPay as well.
-
PAYMENTS - Provides the ability to make the following forms of payments:
-
AUTO-PAY – Allows you to set up auto-pay arrangements or recurring payments at the account level.
For more information, see the Auto & Recurring Payments article. PAY ON ACCOUNT – Allows you to make a payment on account (only in USD).
That refers to a payment or partial payment made towards an outstanding amount that is not yet matched to a specific invoice in YayPay. This feature can be utilized by internal finance teams or end-customers through their Customer Portal page. Payments on account can be thought of as an advance payments which can be applied to future invoices as they are generated.
For more information see Making Payments On Account article.
-
AUTO-PAY – Allows you to set up auto-pay arrangements or recurring payments at the account level.
-
DOCUMENTS - Uploads supplemental documents for end customers.
- This is done by clicking on the Upload Document icon. In the dialog that opens, browse for the file or drag and drop it. Once uploaded, these documents can be made available for download via the Customer Portal web page.
For more details, see Customer Level Supplemental Documents.
- This is done by clicking on the Upload Document icon. In the dialog that opens, browse for the file or drag and drop it. Once uploaded, these documents can be made available for download via the Customer Portal web page.
Statement Page - Settings
Refer to this Article linkProvides the ability to make the following forms of payments: for various business settings that you can enable to adjust the Statement Page.
