The examples summarized in this article will help you configure and leverage different Collection Workflow examples to support your AR Collections and Back-Office operations.
Having worked with different customers and business use cases, this list represents a set of best practices within the YayPay platform that will help increase clarity and automate repetitive processes within your collections process (Refer to our Blog on Automating your Collection Process)
The Collection Workflows in the platform is a versatile and powerful automation tool that will allow you and your team to configure, combine and tailor any of the 17 Events (and counting), with a set of 20 available Actions, as well as to add custom conditions based on custom fields brought over from your ERP to filter, focus or exclude a set of Customers or Invoices.
Refer to these articles for a more in-depth look into the different Events and Actions you can use to set up your Workflows with:
You will also find several of the examples already in YayPay when your instance is provisioned.
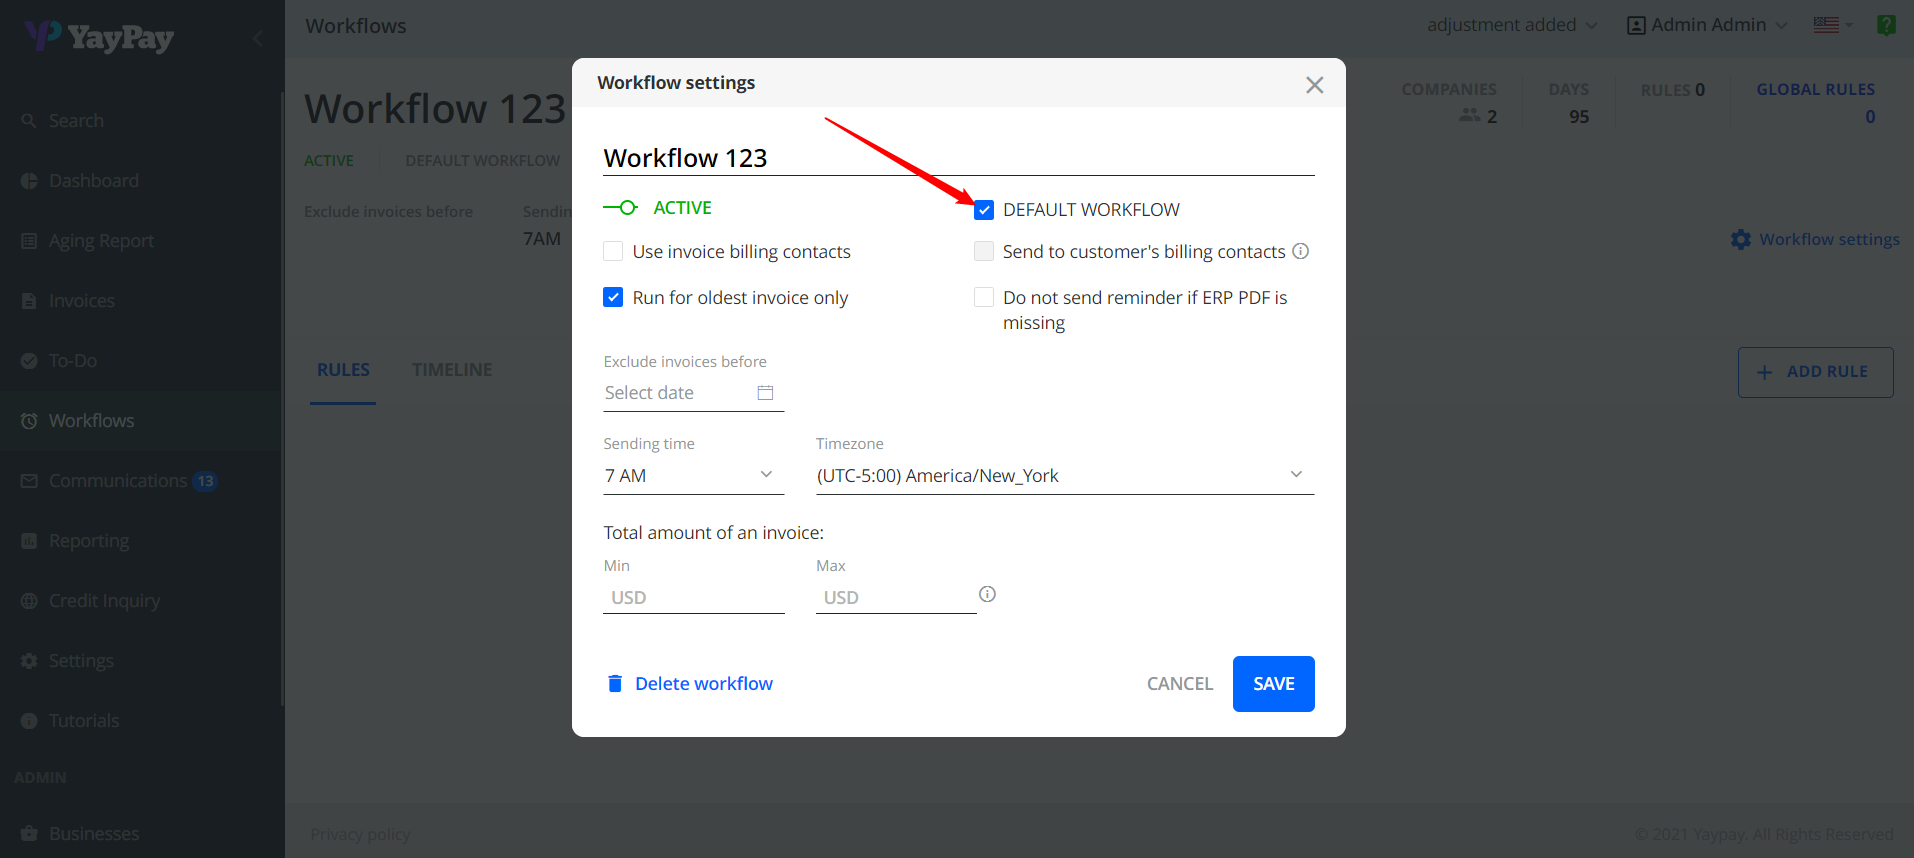
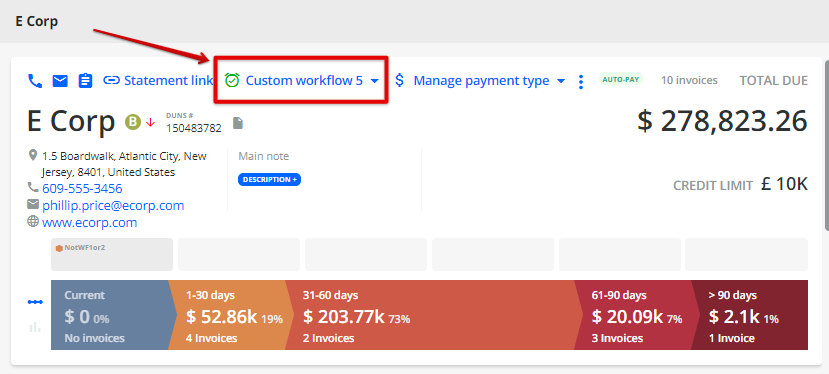
Example #1 - Default Workflow
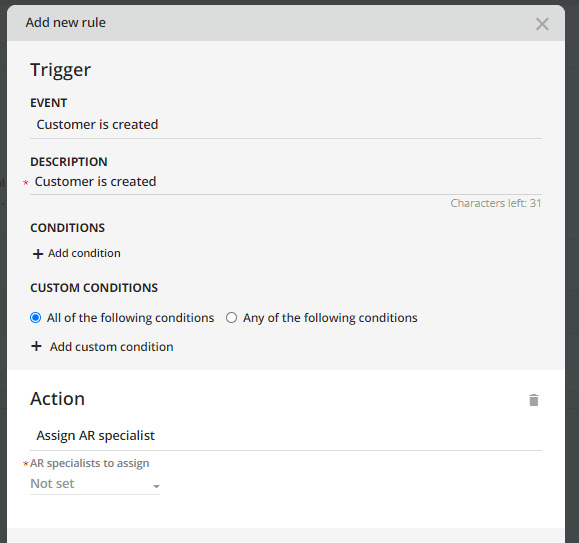
If you have a main or standard workflow that will operate for ALL your Customers in YayPay, select the "Default Workflow" option (under Workflow Settings) so that YayPay will automatically assign the same workflow to all the new customer(s) synced from your ERP and created in YayPay.
The “Default Workflow” setting ensures that no Customers will be left out or slip through the cracks after they are created in your ERP and synced over to YayPay:
 The same effect can be achieved by configuring a Customer Rule "Customer is created" under the GLOBAL RULES tab of the Collection Workflows page.
You may also add a Custom Condition to create more versatility in having YayPay check for a custom field/value before the Customer is assigned to the designated Workflow:
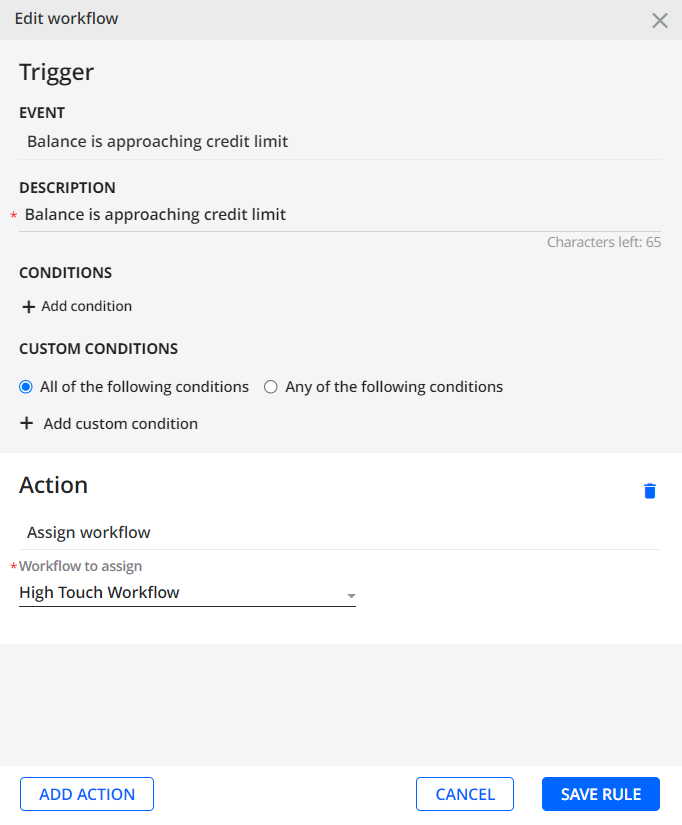
Example #2 - Using Custom Conditions
In addition to setting up your Events in the Workflow, you can further control if the Action should also observe additional conditions.
To illustrate, this is how a customer-level custom field setup in YayPay called "Customer Group", which is synced from your ERP, is configured within the custom condition
Building on Example #1, the Action to assign the Workflow to a new Customer in YayPay will only take place if that Customer is also part of the "Tier 1" Customer Group (See Custom fields Article link):
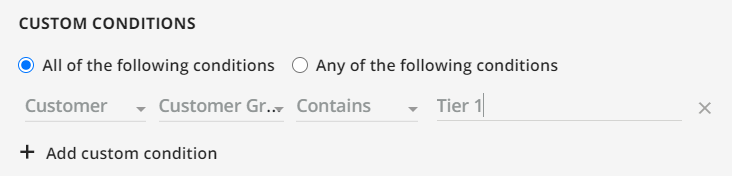
The options available to you under Custom Conditions come from your configuration in the Settings > ERP Custom Fields page.
Example #3 - Send Monthly Statements
Use a Time-based Event to send a Monthly Statement to all your Customers through YayPay.
To do this, select the "Daily/Weekly/Monthly time trigger" to configure the Event along with the Cadence and Date/Time of when YayPay should send the reminder:
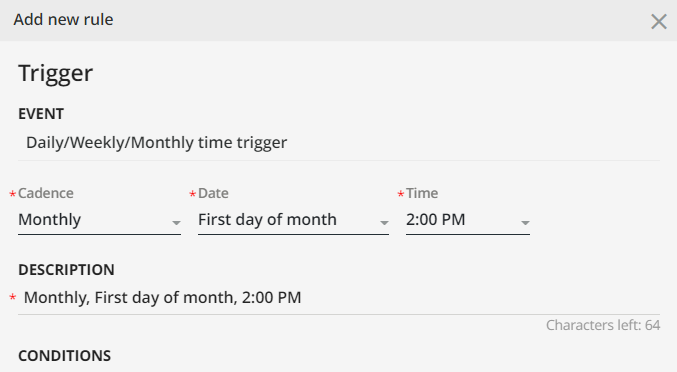
The other Cadence/Frequency types include Weekly or Daily. If you need to send Weekly statements, choose "Weekly" as the Cadence, followed by the day of the week.
The next step is to select the "Send an email reminder" action as a response to the Event to deliver the Monthly Statement via the designated Email Template that conveys your intent/message: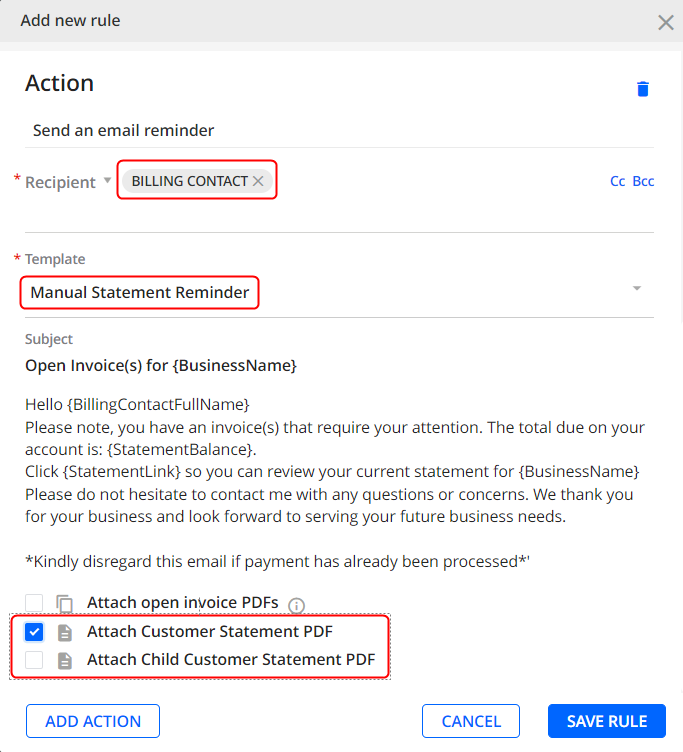
Complete the rest of the information:
- Recipient - Select a contact (Billing and/or Non-Billing) to receive the monthly statement, as well as other recipients who should be on copy (i.e. Cc:), including internal colleagues
-
Template - Select from the list of available Email Templates to use that will best convey your message, or create a new one and apply it. We recommend that the template includes these data tags
- {StatementBalance} - so that this informs your Customers about their total balance
- {StatementLink} - so that your Customers can also use this link to access their Customer Portal page (and also pay the invoices if you use YayPay for payments).
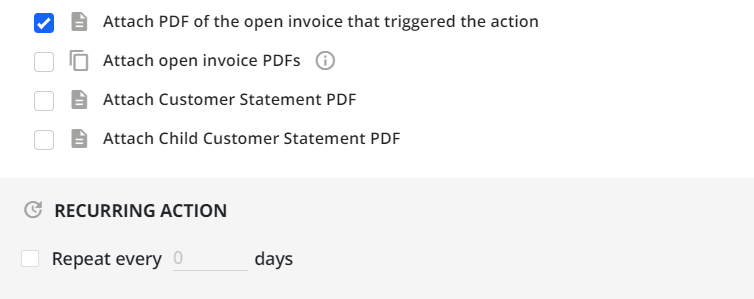
- Attachments - Select the Customer Statement PDF option which will be attached in the Email Reminder. If you have Parent Customers that this Monthly Statement goes to, you can also opt to include the Child Statement PDF(s)
Save your configuration. This Rule within the Workflow will execute monthly for each Customer assigned to the Workflow.
Other considerations:
- You can also add a Custom Condition before the Action, e.g. to check if the Customer Balance > 0 before sending the Monthly Statement Reminder
- You can also create this Event/Rule under Global Rules especially if this Monthly Statement Reminder is applicable to be sent to ALL your Customers
Example #4 - Using Invoice Reminders to apply the appropriate Communication Pressure
At YayPay, we recommend "double-down" on your Communication effort.
For example, if you were previously interacting with your customers only on a 30-day basis, consider adding in additional touch-points at 15 and 45 days. If you were sending a follow-up every 2 months, increase that to every month.
These touchpoints offer more opportunities to collect on outstanding invoices and increase your Cash Flow. Given the Workflow's automation capability, building out additional rules/steps is a one-time exercise and will also not increase any manual work in your team to monitor these additional reminders.
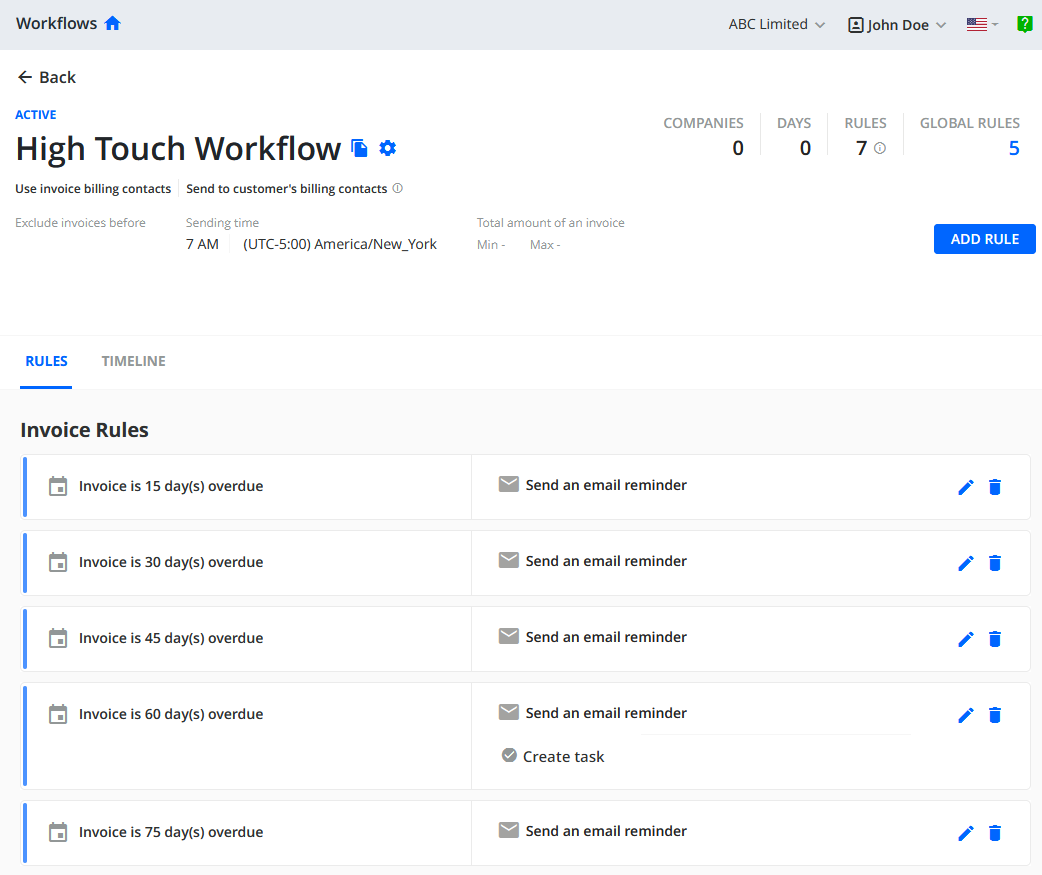
This example of a High Touch Workflow will track the Aging of each Invoice and send an Email Reminder to the Customer for each Open Invoice hitting the configured milestones (the Event "X days before/after Invoice Due Date" is used). Specifically:
- The Customer will be reminded to pay the Open Invoice on the Invoice Due Date (if the Invoice is still unpaid at that stage)
- And every 15 days thereafter, a reminder will also be sent to the same Invoice if still unpaid.
- If the Customer also has other Open Invoice(s) and those hit 30 days or 45 days, an Email Reminder will also be sent
You can also consider a Repeat of the Action.
For example, in the specific Invoice Event/Rule that will send the Email Reminder 45 days after the Invoice Due Date, you can also configure to send a follow up for the same Reminder to be sent every 5 days (after the Reminder at day 45), until the invoice is paid/cleared.
Example #5 - Internal Escalation
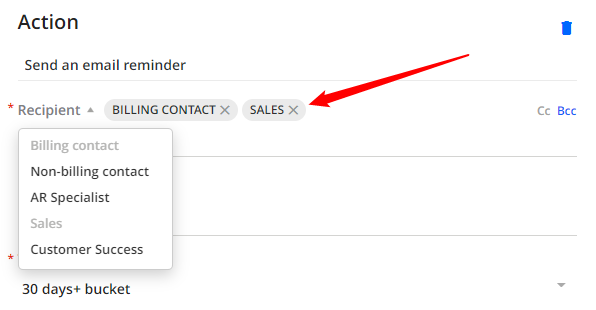
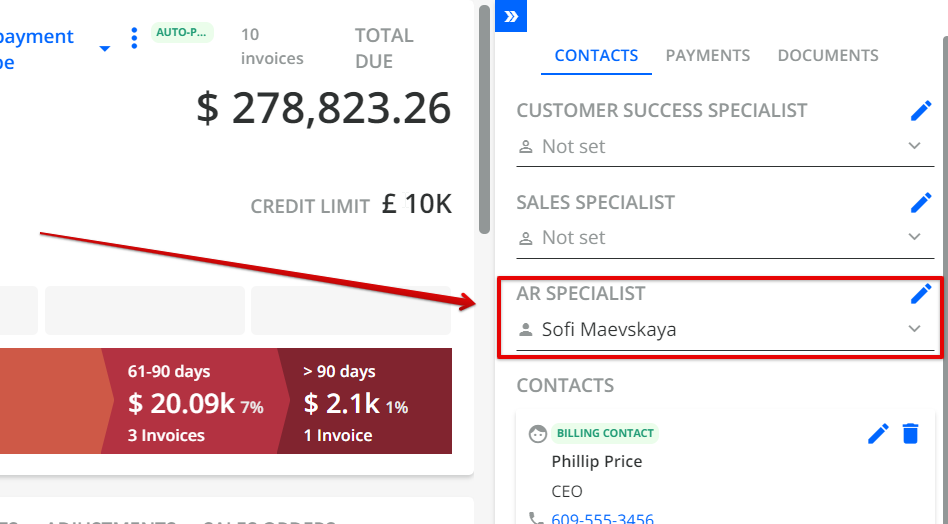
You can configure your Workflow to include your internal colleagues such as the AR Specialist, Sales, or Customer Success team.
At a certain point in the series of Invoice Reminders (e.g. at the 60 days overdue milestone), you may want to loop in other internal colleagues into the Collection process, e.g. the Sales Rep who may have closed the initial opportunity/sale, and continues to speak to the Customer on other ongoing deals.
Within your Collection Workflow, we recommend reviewing some of your Invoice Reminder Rules and adding the appropriate AR Specialist, Sales, or even Customer Success as the additional recipient(s), besides the Customer Billing Contact.
The pre-requisite for this is to assign them to the Customer in YayPay.
You can also configure your internal colleagues to be on copy (i.e. click on the Cc: )
Example #6 - Leverage the Customer Portal
The Automation concepts described so far to improve your Collections and Cash Application process has covered Statement Reminders, Invoice follow-up Email Reminders, using appropriate contacts with connections to the Customer to improve customer relations, etc
Another way to improve the speed and efficiency in the Collection process is for your Customers to access and use their own Customer Portal page where they can take a few immediate actions themselves directly, e.g.:
- Review the status of their Invoices
- Self-select Invoice(s) to pay for or to set up an Auto-recurring Payment
- Download the Invoice PDF / Template without approaching the AR Team or opening an Invoice dispute which can be tracked until closure, etc.
The Customer Portal page is a great way for your Customers to interact with you also, as it enables them to notify you with questions or an action to take due to changes in their Organization, e.g. to update a Billing contact who has left.
Through the Customer Portal, your Customer may notify you to expect an Invoice Payment at a certain date, or that an Invoice payment may be slightly delayed beyond the Invoice due date, etc.
You can set up the appropriate Rules to ensure that these notifications are tracked and not lost, and also determine the internal Actions to support these notifications without adding more tasks for your AR team, e.g. to exclude the Customer from the Workflow, or to exclude the Invoice from the workflow, while still keeping the Workflow to run for the Customer, etc.
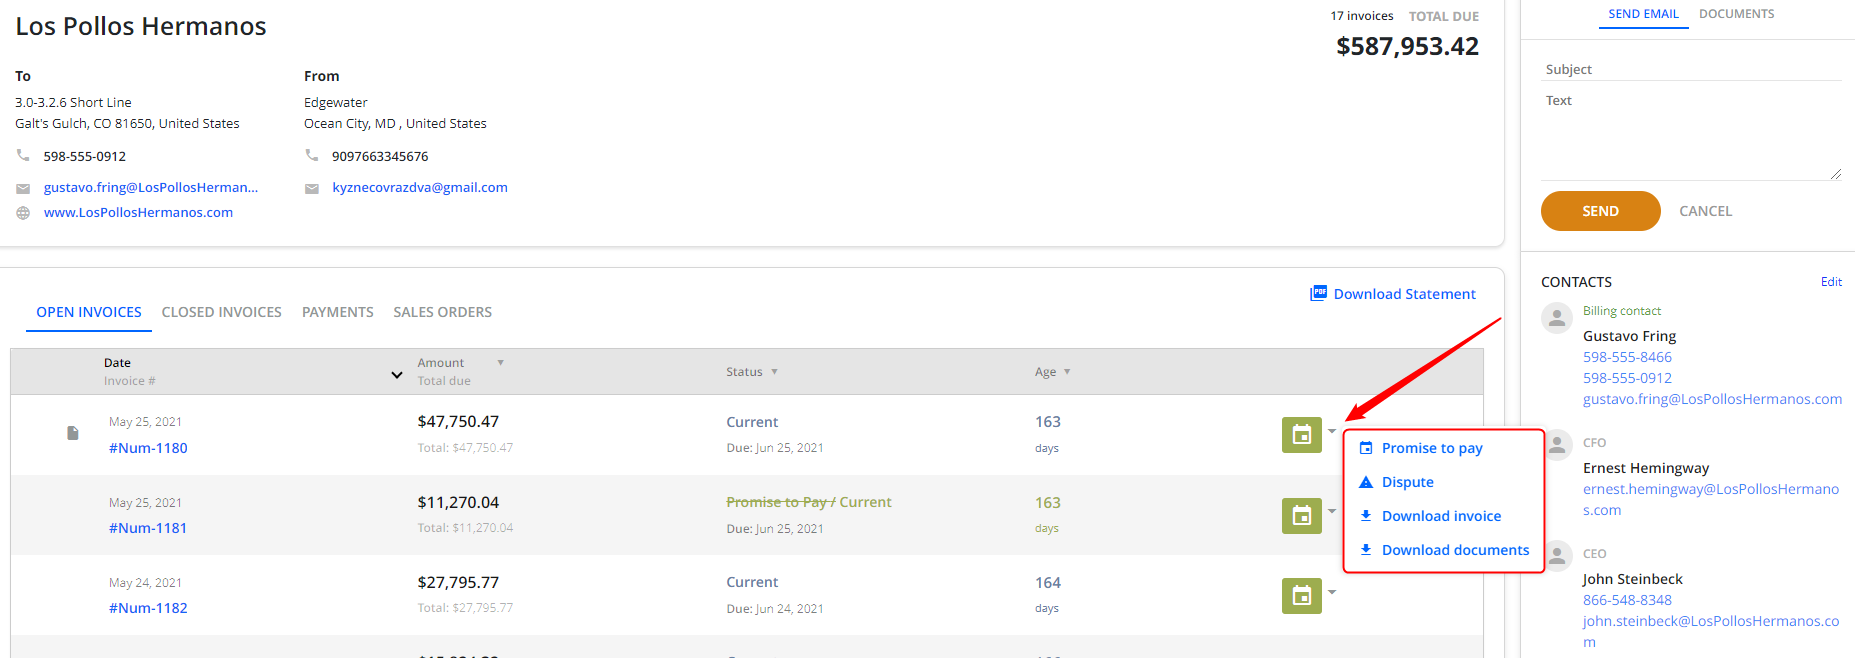
Example #7 - Handling Promise to Pays (Promissory Notes)
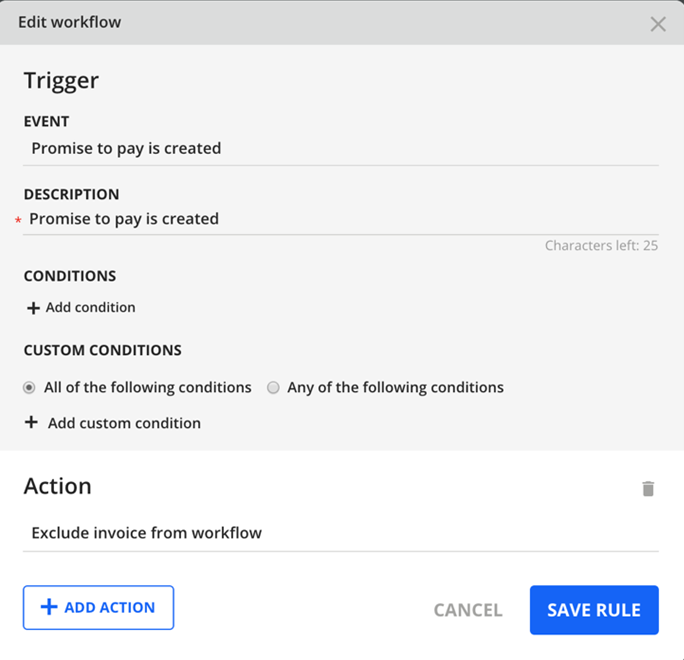
To leverage the Promise to Pay functionality and record that your end-customer will be making a payment in YayPay, so as to include and/or exclude the invoice from email reminders, you should use the following events to configure your rules:
- Promise to pay is created
- Promise to pay is broken
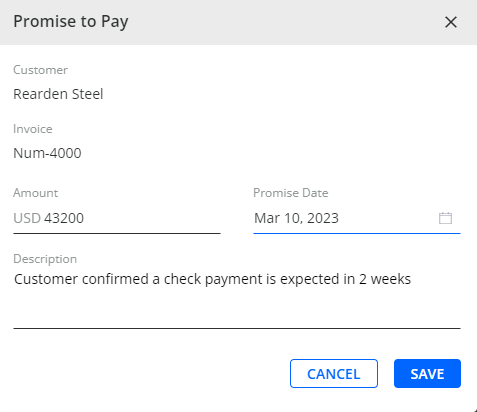
A Promise to Pay captured in YayPay looks as follows:
The first action we recommend to use is Exclude invoice from workflow to exclude the Invoice with an open Promise to Pay from being sent further reminders. This is to recognize that the Customer has taken the time to express their intent to pay even though the invoice is overdue. Excluding such an invoice from the workflow helps to avoid frustrating the customer with follow-up emails, and it also improves the relationship and experience.
The second action (when the Promise to Pay date has passed and the invoice is still unpaid) we recommend to use is Include invoice to workflow. This will reinstate the invoice into the workflow to continue on with the rules e.g. if a payment is not received by March 10 as shown above.
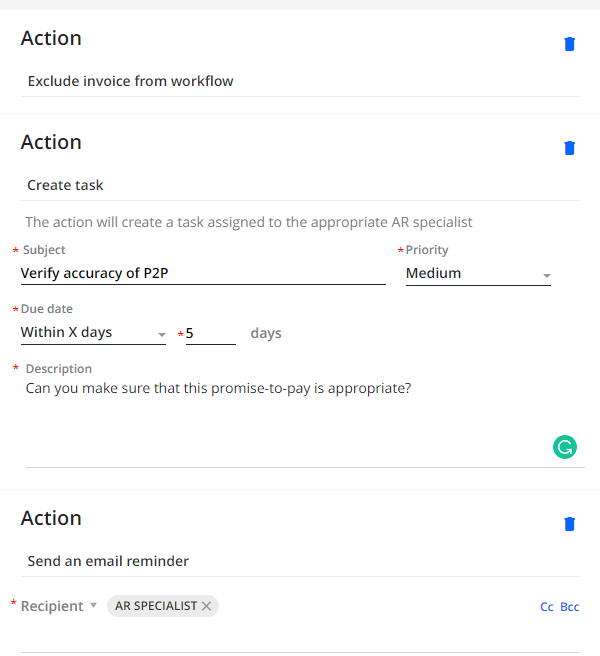
You can also configure additional Actions like sending an internal Email or "Create a Task" for the AR Rep/Specialist assigned to the Customer. This will appear as a new task in the AR Rep's tasks list to check on the validity of the Promise to Pay left by the Customer:
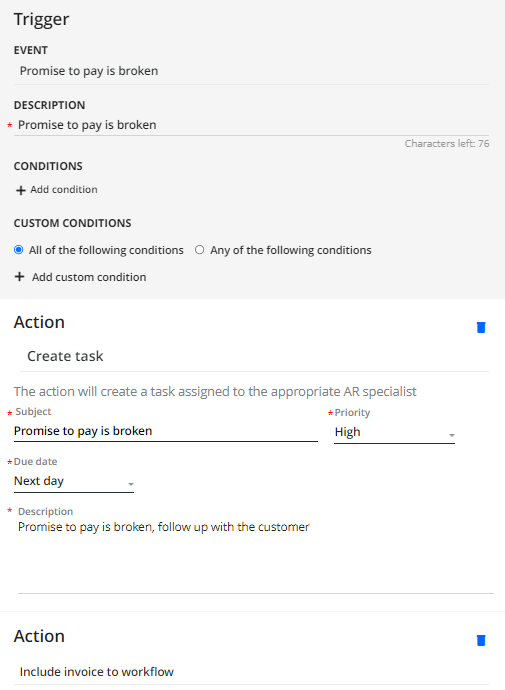
Conversely, if the payment is not received by the Promise Date (i.e. that Promise to Pay is now considered broken), you can configure an Action to create an internal task for the AR specialist to reach out to the Customer directly, and/or and include that Invoice back into the Workflow.
Perhaps the payment is running a few days late, and the added touch of the task to re-engage with your Customer will help to clarify the situation to decide the final way forward.
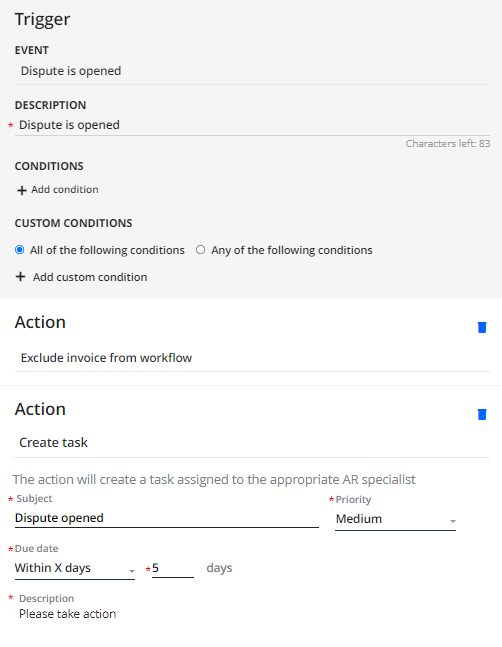
Example #8 - Handling Disputes
Your Customers can also open a new Dispute for an Invoice through their Customer Portal page. This is another important aspect to keep track of, if not more important, than a Promise to Pay.
YayPay provides 2 Events related to Disputes – “Dispute is opened” and “Dispute is closed”.
A "Dispute is opened" Event acts in the same way as the “Promise to pay is created” Event. By excluding that Invoice with an open dispute from the workflow, your Customer will not receive any follow-up reminders for that Invoice, at least until the Dispute is resolved for example.
- This helps to maintain transparency and trust, and your Customer is aware that their communications with you have not been ignored
- Using the comments / free text that your Customer recorded in opening the new dispute, it will be easier for the AR Specialist/Rep. to establish a conversation with the Customer. Configure an Action "Create a Task" for the AR Specialist assigned to the Customer in YayPay to follow up
Depending on the situation, if the invoice dispute is resolved and closed (e.g. the invoice payment is received), then that is all that is needed.
Alternatively, you can still include this invoice back into the Workflow to continue to have YayPay monitor this until the Invoice is fully paid (closed).
So while the dispute was resolved with the Customer, it may be that the Invoice is still unpaid, or a portion of the Invoice Amount is still outstanding. Putting the Invoice back on the Workflow takes away the manual need on your part to monitor and send follow-on Reminders if the Invoice continues to remain unpaid and hits the next Invoice Reminder Event. The remaining rules in the Workflow will help take care of this until the Invoice is fully paid and closed.
You can also configure and add other Actions in response to a Dispute resolution, such as to "Add a note to an Invoice" or to "Create a Task" or even just send an email to the team or your Manager that the Dispute is closed.
Refer to this Article link for more information on working with Invoice Disputes.
Example #9 - Managing New Customers
You can also automate actions and repeat them every time a New Customer is created in YayPay
1. Assign an AR Rep / Sales (so the customer is assigned an AR Rep /Sales when it is synced and created in YayPay)
2. Assign a Collection Workflow (so the customer is assigned to a selected collection workflow unless the default one is already created – see example #1)

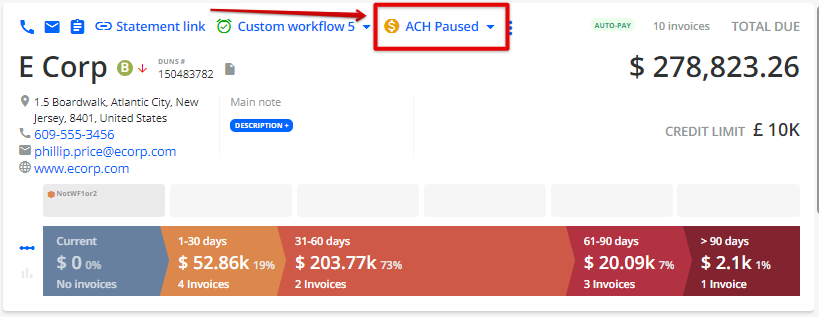
3. Disable Payment Mode (if the payment module is enabled, ACH or CC or both can be disabled for the newly created customer)

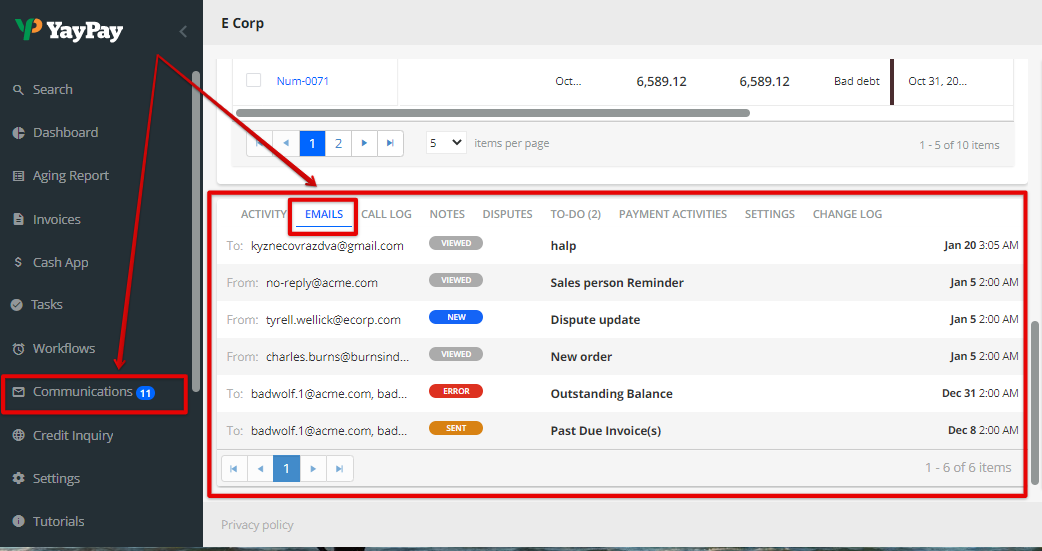
4. Send an Email Reminder (e.g. a Welcome Email and intro to how to use the YayPay Portal). You can review e-mails in the Communication tab or on the customer statement page.
Useful articles: Creating Email Templates, Reminder e-mail details

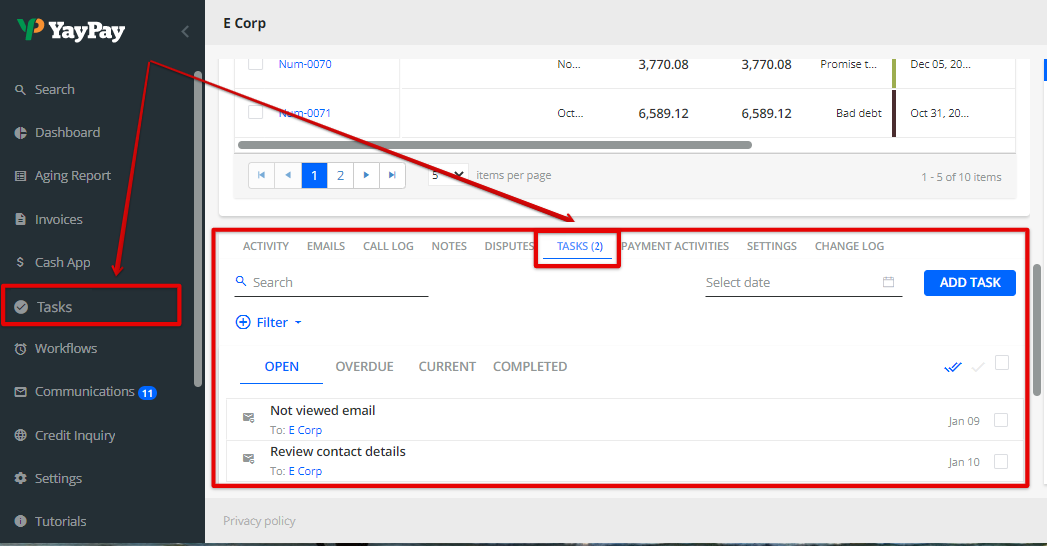
5. Create Task (an AR specialist assigned to the customer will get a task with some description). You can review tasks in the Tasks tab or on the customer statement page.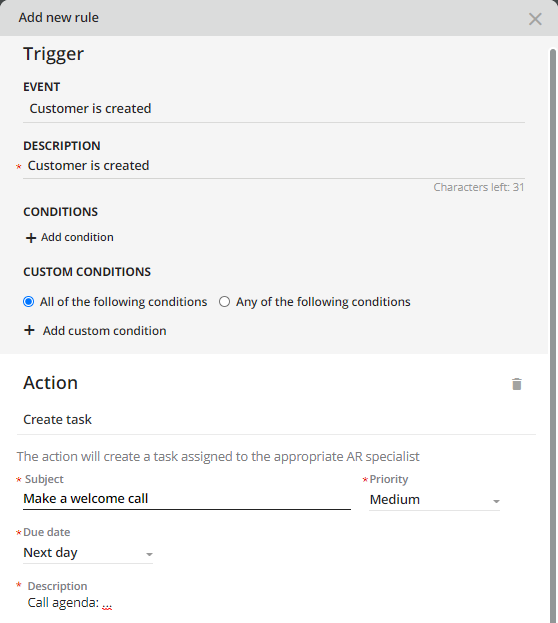
Example #10 - Creating a Rule to Help Check-Paying Customers Go Paperless
In today's digital age, many businesses are making the move towards paperless transactions, and creating a rule to help customers paying by check go paperless can be a great way to simplify the process.
To learn more, read our step-by-step guide below:
Download Digital Optimization Template Kit
If you think of other use cases for which you do not find a way to configure a solution that would address the issue, please reach out to support@yaypay.com and explain to us what the issue is. The team is always on the lookout to enhance the Rules Engine and make the configuration easier and faster for you.
Happy collecting!
