YayPay allows you to configure and display custom fields that you have set up in your ERP system. These custom fields are not part of YayPay's standard data fields or model. As they are imported from your ERP system, they can be used to store extra information from your ERP.
In YayPay, you can use custom fields for various purposes, e.g.:
To display them on the internal Statement page or on the Customer Portal web page for your customers.
- To use them as Filters:
-
On the Aging Report page.
For more details, see Aging Report - Overview.
On the internal Statement page and/or the INVOICE page.
-
To use them to create custom conditions when setting up your workflows.
These custom conditions are located between your event and action. For more information, see the Automating your Collection Process section.To incorporate them as data tags in the subject or body of your email templates.
This allows you to provide additional information to your customers and enhance the content of the email. For more details, see the Creating Email Templates section.To include them as additional columns in the grid on the Tasks page.
This will improve the readability of the tasks associated with a customer or invoice. For more information, see the Tasks Page - Overview section.To select the email address from the system custom field as a recipient when setting up the Send an email reminder action for events in workflows or global rules.
How do Custom Fields work with the AR Sync?
These are the 2 steps to enable the sync and display of Custom Fields in YayPay, which is outlined in this article:
Step 1: Use the Settings > ERP/CRM Custom Fields page in YayPay to represent additional fields that you wish to display and use in YayPay. The settings allow you to configure for 2 levels:
- Customer-level
- Invoice-level (not Invoice Line Item)
Step 2: The configuration in the Settings page also has to align to the ERP Source System & Connector Type that YayPay is configured for
These key points outline a few more practical points on how your ERP/CRM Custom Field(s) and values will be brought over through the Sync with NetSuite, Intacct Sage, via API calls, and also via CSV file imports:
- There are no longer restrictions on the number of custom fields you can represent in YayPay for the Customer and Invoice
- On the front-end of the Application, configure your ERP/Source Custom field and the Display name in YayPay
-
On the back-end, the ERP Custom field configured in the Settings will become part of the ARSync with your ERP, i.e. it will be part of the scope of the initial and subsequent Syncs until you press "Disconnect"
- For NetSuite and Intacct Sage, the Settings page can also be configured to include some Native fields with a slightly different syntax to an actual Custom field
-
Note: Once you press "Disconnect" to disengage the Sync (this button is found in the Settings > Integrations page in YayPay), your Custom Fields Settings configured will be removed and requires to be set up again (the data already synced remains in YayPay)

- You will be prompted to re-configure the same Custom fields in the settings page each time you Connect to initiate the Sync process (it is only the settings that require a re-configuration in tandem with your action to re-connect your Sync)
- If you add additional Custom fields in YayPay after the AR Sync with your ERP has been going on for a while, approach YayPay Support to do a one-off technical resync to bring over the custom field/values related to the Customers or Invoices already in YayPay
Go to the end of this page to have a visual reference of how your ERP Custom Fields appear in YayPay.
Bringing Over Custom Fields from Acumatica
Acumatica native custom fields lists for Customer and Invoice levels
Bringing Over Custom Fields and Contacts from NetSuite
https://yaypay.helpjuice.com/en_US/88167-netsuite/bringing-over-custom-fields-from-netsuite
Bringing Over Custom Fields from Intacct
https://yaypay.helpjuice.com/88168-sage-intacct/how-to-find-intacct-custom-filed-name

Bringing Custom Fields from Zuora
Bringing over Custom Fields from Sage X3
https://yaypay.helpjuice.com/en_US/sage-x3/bringing-over-custom-fields-from-sage-x3
Bringing over Custom Fields from Sage 300
https://yaypay.helpjuice.com/en_US/sage-300/bringing-over-custom-fields-from-sage-300
Bringing over Custom Fields from Salesforce
https://yaypay.helpjuice.com/en_US/90358-salesforce/salesforce-yaypay-integration
Bringing over Custom Fields through CSV Files
https://yaypay.helpjuice.com/en_US/88169-csv-ftp/bringing-over-custom-fields-through-csv-files
Bringing over Custom Fields through API
Go to Settings > Integration page, press "Manage Business Systems" and select API to activate & enable the configuration of the custom fields that you are pushing through the API for a customer or invoice record:
Go to Settings > ERP/CRM Custom Fields page to configure the customer level or invoice level custom fields.
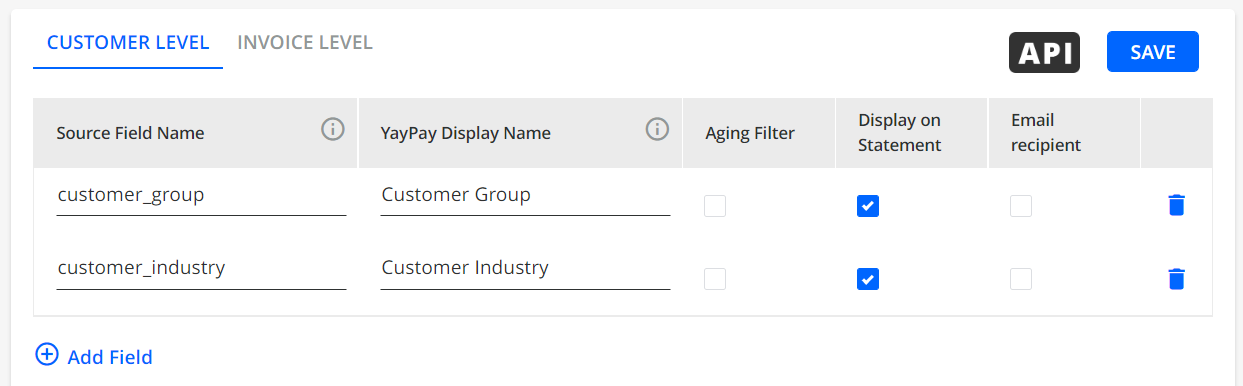
If you are pushing the fields "customer_group" and "customer_industry" as part of the customer record, your customer level custom field configuration would look like this:
For the API technical development, refer to our Swagger UI to review the API definition for customers and invoices:
- Refer to: /post/customers (click on Upload section)
- Refer to: /post/invoices (click on Upload section)
How to Configure ERP/CRM Custom Fields in YayPay
To configure the customer or invoice-level custom fields in YayPay, go to the Settings | ERP/CRM Custom Fields page.
On the ERP/CRM Custom Fields page, you will see the CUSTOMER LEVEL and INVOICE LEVEL tabs where you can add and configure custom fields from your ERP system.


Customer Level Custom Fields
On the CUSTOMER LEVEL tab, you can add and configure customer-level custom fields from your ERP that you want to display and use in YayPay.

On this tab, you can select:
Source Field Name – Enters the field name from your ERP/CRM system that you want to sync with YayPay.
YayPay Display Name – Enters the name of the field as it will be displayed in YayPay. The name can have a maximum of 20 characters.
Is Custom Field? – If checked, determines that the field is a custom field in your ERP/CRM system.
Leave unchecked, if the field is a native.-
Aging Filter – If checked, uses this field as a filter on the Aging Reportpage.

-
Display on Statement – If checked, displays the selected custom field on the Statementpage.

-
Email Recipient – If checked, makes the selected custom field (which contains an email address as its value) available in the Recipients drop-down list.
This applies to both manual email reminders and when configuring the Send an email reminderaction for events in workflows or global rules.ExampleIf the custom field Main Sales Rep is selected from the Recipients drop-down list, the email reminder will be sent to both selected email addresses, i.e. the email address from the Main Sales Rep custom field specified on the ERP/CRM Custom Fields page and the customer's billing contact email address.


Invoice Level Custom Fields
On the INVOICE LEVEL tab, you can add and configure invoice-level custom fields from your ERP that you want to display and use in YayPay.

On this tab, you can select:
Source Field Name – Enters the field name from your ERP/CRM system that you want to sync with YayPay.
YayPay Display Name – Enters the name of the field as it will be displayed in YayPay.
The name can have a maximum of 20 characters.Is Custom Field? – If checked, determines that the field is a custom field in your ERP/CRM system.
Leave unchecked, if the field is a native.-
Display on Statement – If checked, displays the selected custom fields on the Statementpage, i.e. you can select them from the grid's column-picker.

- If checked, displays the selected custom field on the Customer Portalweb page.

Email Recipient – If checked, makes the selected custom field (which contains an email address as its value) available in the Recipients drop-down list.
This applies to both manual email reminders and when configuring the Send an email reminder action for events in workflows or global rules.
All invoice-level custom fields are also visible on the INVOICES page.

