The Cash App (basic) module is an auxiliary tool in the platform to help you trace payments originating / created in YayPay manually, and then to manually push them to your ERP system. The other purpose is for payments attempted through YayPay and processed by the designated processor. Successful payments are listed as they are pushed to your ERP system after a payment attempt is successful.
The functionality of the Cash App (basic) module supports:
- Adding payments manually without linking or allocating them to invoices.
- Adding payments manually, applying them to open invoices in YayPay.
- Pushing (manually or automatically) payments recorded in YayPay to your ERP system.
Enabling Cash Application Basic
Contact support@yaypay.com or your YayPay account rep to activate the Cash App (basic) module for you.
Manual Payment creation
To create a payment
1. Go to CashApp and click on ADD PAYMENT button
 2. Enter the required information and click SAVE PAYMENT
 Attach Remittance advice - you can attach a receipt or any other payment document you want to attach to the payment
Account - Bank Account radio button offers a selection of your bank accounts pulled from ERP in the dropdown; if none of the Bank accounts is chosen, the payment will be saved and pushed to ERP later as Undeposited funds.
Payment date - can be the current day, past, or future date
Payment types: ACH, Credit card, Check, Cash, Other
Company - a customer's company name
Payment # - payment number (is used both in YayPay and pushed to ERP)
Payment amount - an amount of receivable funds (in customer's currency)
Currency - if a Bank account is set for the Account field, the currency will be set automatically, depending on your business account settings.
Exchange Rate - populates automatically, but can be modified manually
You can upload an invoice file by clicking on Upload after you save the record. Also, the record can be edited or deleted.

Manual invoice allocation
When you click on a created payment, you maximize some extra actions for the record. There are options: apply the payment to an invoice or apply the payment to a credit record.
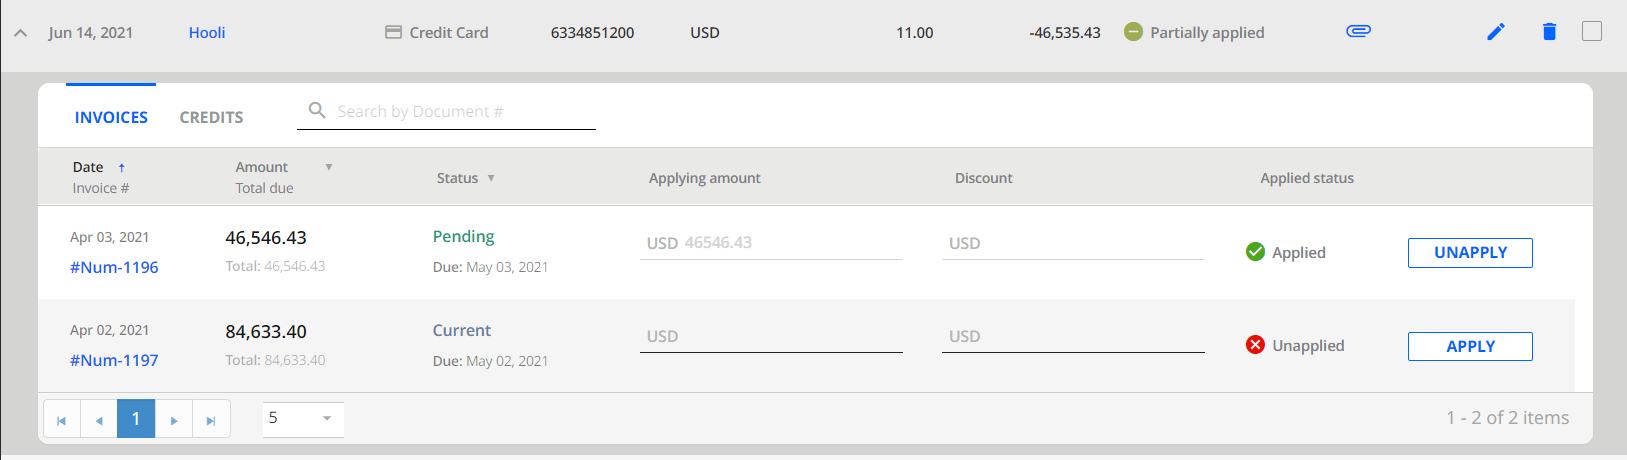
A payment might be applied to one or multiple invoices, and the invoice application can be edited later if required.
Push the payment to your ERP
In addition to manually created payments, payments made through YayPay's customer portal or recorded by the AR/Finance team will also appear in Cash App's OPEN PAYMENTS tab if they have been validated by the processor.
These payments will be automatically pushed to the ERP (e.g. NetSuite, Sage Intacct, Sage X3, and Acumatica) through the integration settings in YayPay.
On some occasions, you can use the Push to ERP icon to push a payment or multiple payments to the ERP:
1. Check the records from the list and click on the Push to ERP icon.
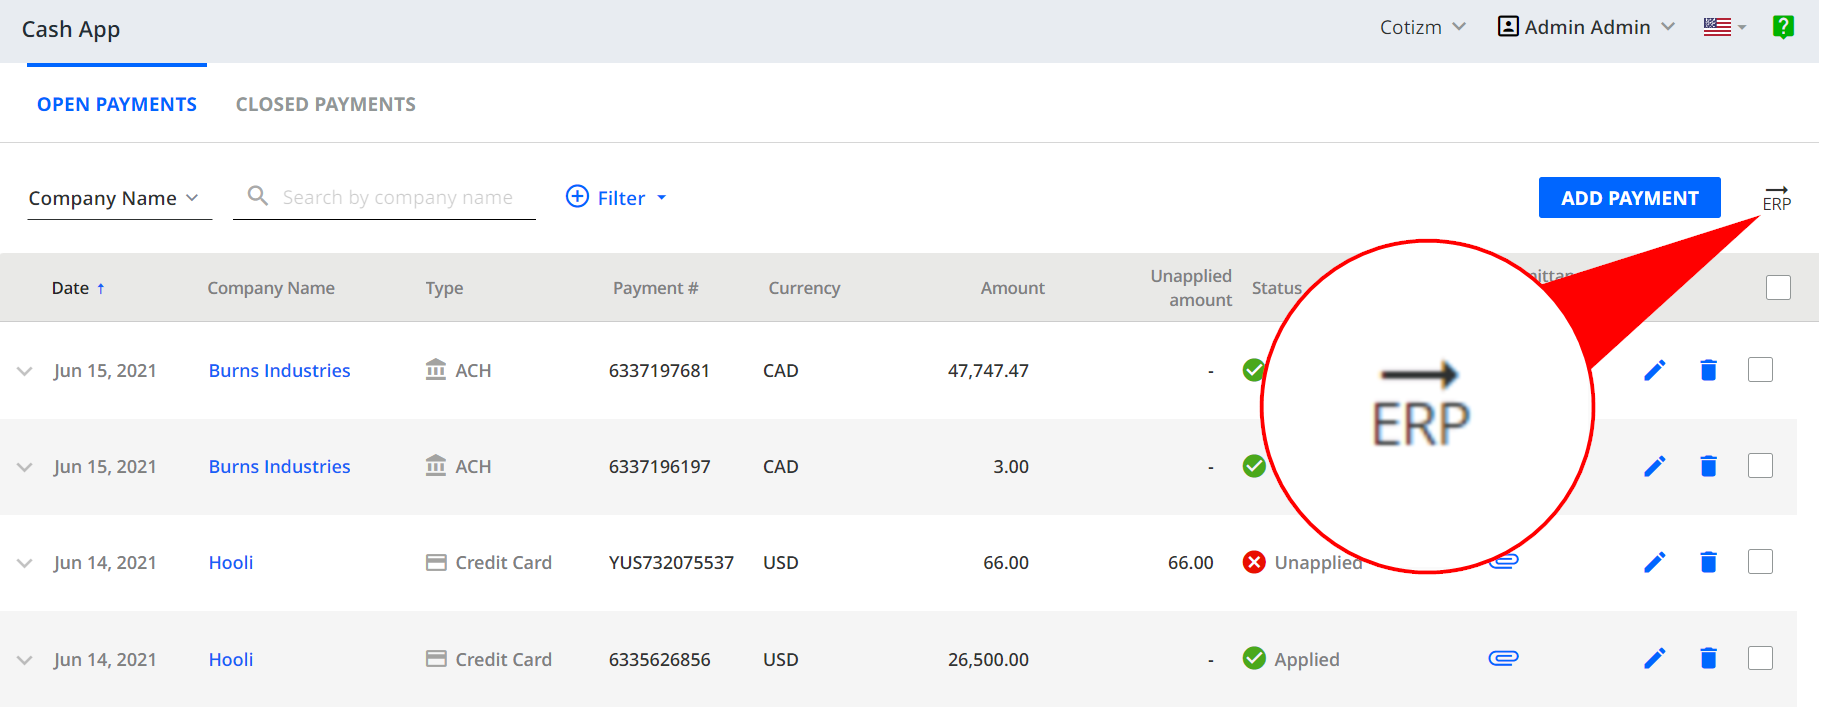
2. Confirm the action.
Payment Statuses under the OPEN PAYMENT tab:
Sending - the payment transaction is being sent to the ERP
(Note: these transactions have been successfully made through YayPay validated by the Processor, and will also be captured in the YayPay Payment Report)
Error - an indicator that the payment could not be sent to the ERP due to some reasons (network issues or the ERP has declined). Contact support@yaypay.com if with any relevant logs from your ERP and screenshots
Expired - the payment has exceeded more than the 7-day threshold that YayPay has attempted to send the Payment to the ERP but to no avail (It is recommended that the AR/Finance Team correct the situation to manually update the Invoice + Payment in the ERP since the card holder’s credit card would have also been charged - Confirm with the Processor/Merchant account also). Invoices that were paid via the YayPay Customer Portal which were in “Pending” status will also become "unlocked" after the 7-day limit)
Payment Statuses under the CLOSED PAYMENTS tab:
Pending - the Cash App page will show payments with PENDING status, displayed on the 'CLOSED PAYMENTS' tab. This status means that the payment was pushed to ERP without Errors. but it has not yet been synced back / from the ERP to YayPay
Synced - The payment and invoice from the ERP to YayPay have been successfully synced (e.g. via the NetSuite, Intacct, Sage X3, or Acumatica connector).
(Note: If you review the internal Statement page for the customer, the Invoice will appear under the “CLOSED INVOICES” tab, and a YayPay Payment Reference # that is also found in your ERP, appearing under the “PAYMENTS” tab.
Automatic payment creation and push
NetSuite, Intacct, and Sage X3 users can automate the process for creating payments in Cash App and pushing payments made in YayPay to ERP.
Payments made in YayPay are automatically created in Cash App for the NetSuite, Intacct, and Sage X3 connectors.
By default, the implementation allows users to create payments but not push them to ERP. If your business needs require an automatic push, follow these instructions:
1. Go to Settings > Integrations.
2. Find your ERP connection section.
3. Click on Edit.
4. In the list find the "Create payments" checkbox and enable the setting.
5. Save the changes.
