To simplify the process of requesting credit applications, the Advanced Credit module (to obtain it, contact your account manager) incorporates a Credit Form Builder. By using this form builder, you can automate the process of requesting your new or potential customers to fill out a customized digital credit application form.
You can either use the default Credit Application form as it is or you can customize it by adding or removing required elements.
Alternatively, create your own form and set it as default. You can add as many forms as you need.
How to Create Your Own Credit Form Template
To create your own credit form template:
Go to Credit | CREDIT APPLICATION.
- Click Add From Templatelocated in the top-left part of the page.

- In the window that opens, enter the form template's name and click SAVE.

-
Select and add fields to your credit application form template.
You can find the individual fields in the respective categories listed on the COMPONENTSpanel on the right.
To learn about individual fields and how to add them, see the How to Add Fields and Components section.
-
After adding all the required components to the credit application form template, click SAVE TEMPLATE located in the top right corner of the page.

Clicking SAVE AS saves the template under a new name, creating a new template while keeping the original.
How to Add Fields and Components
To add fields to a credit application form template:
- Expand a selected category on the COMPONENTS panel.

-
Select a field that you want to include in your credit application form template, hover your mouse pointer over the field's name, and click on the Add icon next to its name.

-
Add as many fields as you need. A maximum of 500 fields can be added.
The fields added to the application form template can be resized and can be moved around the template space.
The fields can be duplicated, except for Year Started, Applicant Business Name, Requested Credit Limit, Phone Number and Business Address.
- Once a field is added to a form, you can make it mandatory by checking the red asterisk check box next to its name.

Fields and Components
The individual fields and components for the credit application form template are listed in their respective categories on the COMPONENTS panel located on the right side of the page.

The following table lists categories and their respective fields that you can select and add into the credit application form.
| Components Categories | Available Fields and Components |
|---|---|
| Legal Entity Information | Applicant Business Name, Trade Style - DBA, Type, State of incorporation, Business Address, Business Phone, Company Website, Federal Employer Identification Number (FEIN), Debtor Name, Social Security Number. |
| General | Tax Exempt, Year Started, Owns or Rents place of business, Are purchase orders provided with the order, Requested Credit Limit (max number of characters is 12 and 2 decimals). |
| Business Contacts | Authorized Buyer Email, Authorized Buyer Phone, Accounting Contact Email, Accounting Contact Phone, Email Address for Invoices/Statements. |
| Trade References | Trade Reference Business Name, Trade Reference Contact, Trade Reference Email. |
| Bank Reference | Bank, Checking Account Number, Reference Email, Loans/Bank Line of Credit, Account Number, Account Number, Loan Officer Email. |
| Authorization | Debtor Name (if Sole Proprietor or Partnership), Firm Name, Title, Text of acceptance check box (enter your own wording). |
| Layout Structure Components | Short or long plain text (to embed any desired text, visible to your customer as a description within the form), TITLE, SUBTITLE, Disclaimer text, visual divider, Company logo (provided it is uploaded in Settings| Business). |
| Additional Documents |
|
| Custom Components |
|


Saving a Template and Managing the Existing Templates
After completing the template (adding all the required components), click "SAVE TEMPLATE".
By clicking the "SAVE AS" button you can save the copied template contents under another name.
After you save the template, the "Copy Link" button becomes available.
Click the "Copy Link" button, and the direct URL of the credit application will be copied to your clipboard.

Now you can share this link with your customers. Having filled in the form, they can submit the application back to you.
Clicking the "Show More" menu, you can choose to delete the template, rename it, or set it as default.
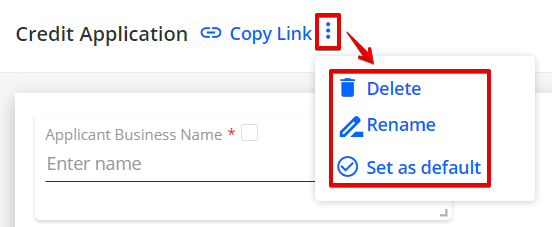
The default template is labeled with a tick in the list of templates.

Credit Application Links in Email Templates
Link to a saved Credit Application can be sent in a form of a dynamic tag (Credit Application link [Name] ) within Email Templates functionality:

The email templates containing Credit Application links in their body can be used in manual email reminders, "Send email" action within workflows/Global Rules, etc. Make sure the Credit Application form, whose link is used in the template, is not deleted from the Credit App, otherwise, you will not be able to use the related dynamic tag.
Credit Application Form Submission
Once sent, you can use the Submitted Applications tab to track, review, and manage sent credit application forms.

For more details, see the Submitted Applications section.
