At the completion of your first sync between Intacct and YayPay, you will find all open invoice records brought over to YayPay. These invoices may be Current, Overdue and/or partially paid, etc from historical time periods prior to the completion of your first AR Sync.
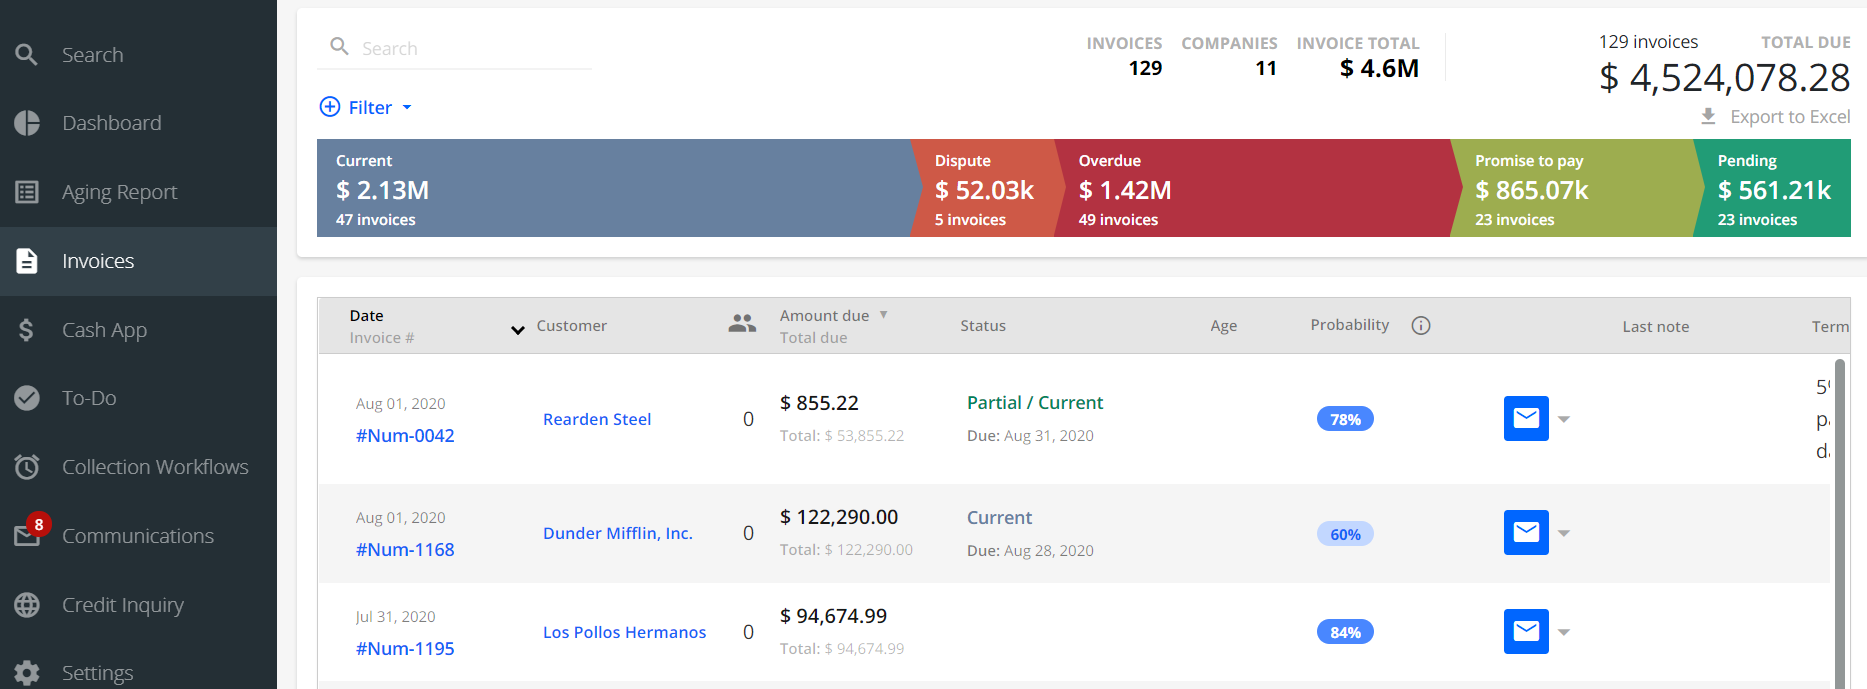
Use the INVOICES menu to take an overall look of your Invoice records:
You may also have observed that when you clicked on the Invoice # for these records, you will not yet see the corresponding Intacct Invoice Template/PDF displayed in YayPay (Refer to this Invoice Page Article link)
Run a report called the “Missed PDF Report” from the Settings > Business page in YayPay to give you this information:
- The total volume of Open Invoice/Credit Memo records in YayPay that do not yet have their Intacct Invoice/Credit Memo Document Template/PDF
- A listing that shows you each Invoice/Credit Memo # and the Date, which will give you the visibility of the entire date range across all these invoices/credit memos

The information from this report will be used to help you run the procedure outlined in this article, which is sourced & taken from Intacct Support / Community’s site.
This article will step you through the process of using Intacct’s built-in function to send mass emails (with the Invoice Template/PDF/Credit Memo PDF as an email attachment) to the same designated PDF Mailbox that you chose during the setup of the Intacct Smart Event (Refer to this Article link).
Also, refer to https://yaypay.helpjuice.com/en_US/105705-reports/yaypay-reports#download-missed-pdfs-report
1. Create a new Email Template in Intacct
Here you can learn how to create a new email template in Intacct. This is the template that you will select in Intacct later for each open, invoice record that requires the corresponding invoice PDF/template.
To create a new email template in Intacct:
Log into Intacct as an admin user.
Navigate to Company and click on Setup.
Select the Add / Create a new Email Template option.
Enter a suitable Name and Description for the template, e.g. YayPay Invoice PDF Extract.
Check Attach PDF to include the invoice document as an attachment in the email.
-
In the Address section:
In the Reply-to field, enter support@intacct.com.
In the To field, enter the PDF mailbox address that you configured in the Intacct Smart Event (also review the Smart link ID: OEINVOICE_PDF).
-
Scroll down to the Message Content section to specify the Subject and Body of the template you are creating.
Use the same format as when creating and configuring the Intacct Smart Event, i.e. use the same Intacct merge fields for the Subject and message's Body:-
Subject: Customer id:'{!SODOCUMENT.CUSTVENDID!}', Invoice id:'{!SODOCUMENT.DOCNO!}'
If you want to send the invoice PDF for Sales Credit Memos created in the Order Entry journal in Intacct, use the following format for the subject of the Smart Event: Customer id:'{!SODOCUMENT.CUSTVENDID!}', '{!SODOCUMENT.DOCNO!}', Credit Memo.
-
Body: Here is the PDF of Invoice {!SODOCUMENT.DOCNO!}
The following example shows the Intacct merge fields from the Smart Event that you previously configured: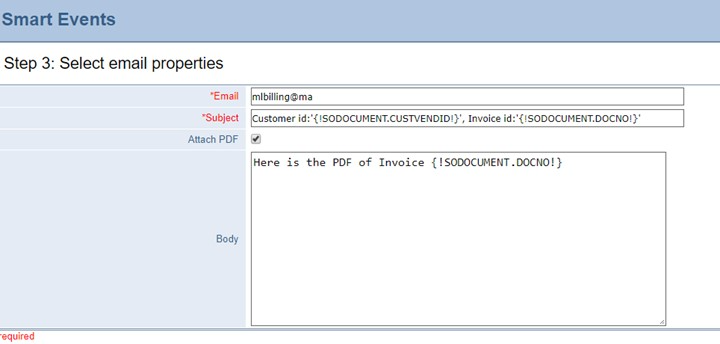
-
Click Save to confirm the settings.
2. Use Intacct’s Print/Email documents function
- Ensure you are in the Appropriate Intacct Entity
- Navigate to Order Entry from the navigation bar and look under All and then select Print or Email Documents item
- In the new page that opens, configure the Sender E-mail as support@intacct.com
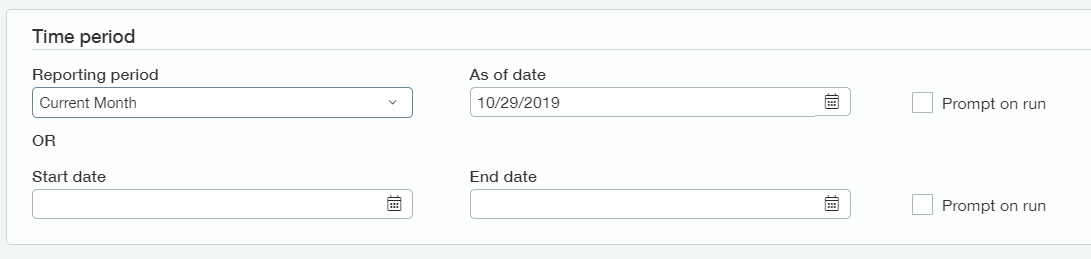
- In the Delivery options section, select the Time period/date range, i.e. Start date and End date, related to the batch of Open Invoices shown in the YayPay Missed PDF Report that you wish to bring the Invoice Template/PDF into YayPay - take a batch of Invoices at a time
- Select and enable the 2 checkboxes - "Previously sent" and "Unpaid" so as to send the mass emails with the Invoice Template/PDF attachment for "Open" Invoices
- If your intent is to also use this Intacct functionality to cover partially paid invoices, uncheck the Unpaid checkbox
- Under Filters, select the appropriate Transaction Types from the list provided
(choose all the Types that you use in Intacct) - Select the Email Template created from (1) in the "Override email template" field

- Click View to enable Intacct to provide you a listing of the appropriate Invoice documents that will be included to be Emailed
- From the Print/E-mail Documents panel, Intacct will show you:
- A list of all Invoice documents within the Date period you specified, where an email will be generated
- And the projected total number of Emails that will be sent - Scroll down or scroll to the last page to see the totals
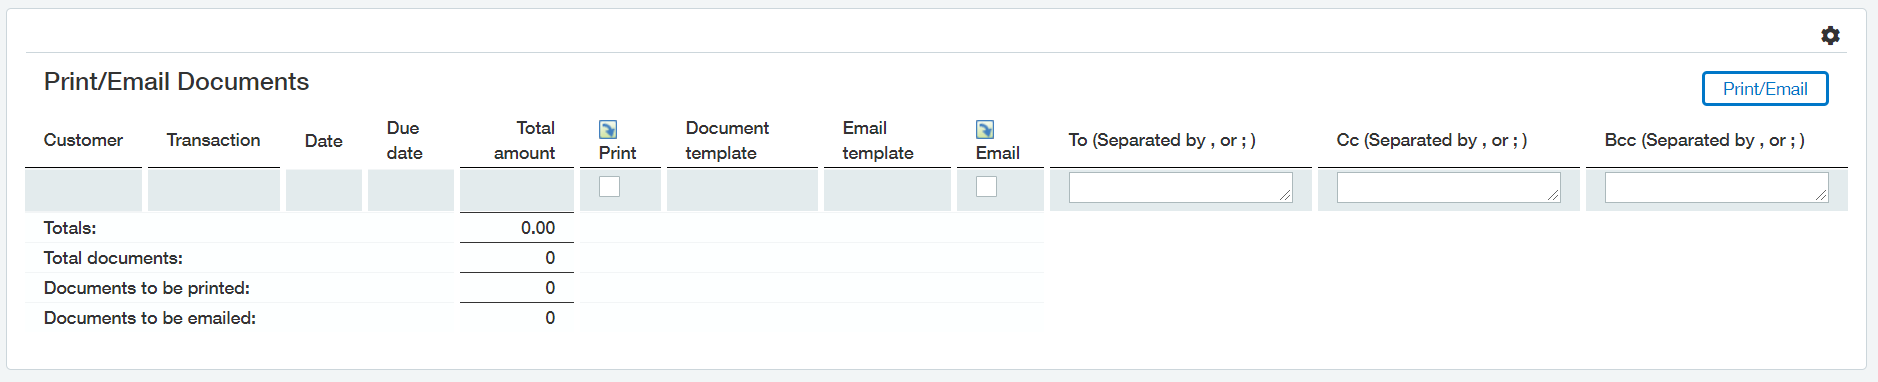
- Uncheck the "Print" checkbox column, and check off the "Email" checkbox instead for all rows - this will direct Intacct to send the emails for each Invoice to the designated email address that you see in the 'To' column
- Click "Print/Email" located on the top right of the panel to initiate the Send email process in Intacct
- There should be an equivalent number of Emails arriving in your PDF Mailbox - i.e. the same as the Totals in the Print/Email Documents panel in Intacct prior to initiating the Send
- Log in and check your designated PDF Mailbox to verify a few of these new emails with the Invoice PDF attachments have arrived from Intacct
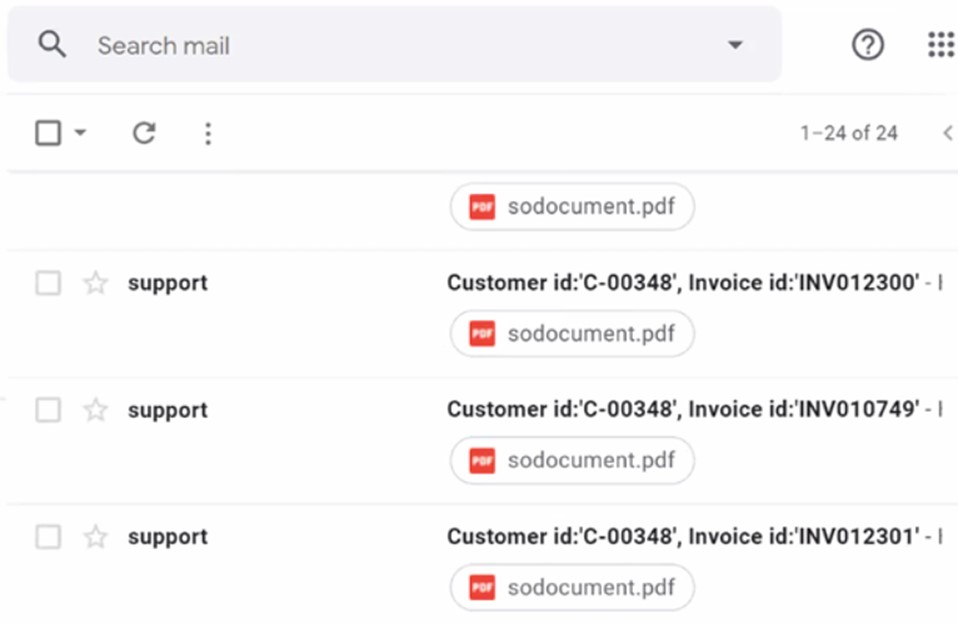
- The inbox should look something like this, i.e. new emails generated from this process, that may be alongside other similar emails sent by the Intacct Smart Event for new invoices created in Intacct, e.g.:
- The inbox should look something like this, i.e. new emails generated from this process, that may be alongside other similar emails sent by the Intacct Smart Event for new invoices created in Intacct, e.g.:
- Using the "PDF from Emails settings" in YayPay (located under Settings > PDF from Emails page) that was configured to work with your Intacct Smart Event, YayPay remains connected to this same PDF Mailbox to initiate the scraping/extraction process of the Invoice Template/PDF files. Wait a while to click on the Invoice # in YayPay to view your Invoice Template/PDF
- Alternatively, you can click on the "Download report" button to also start the extraction/scraping process manually after you've seen the new Emails + attachments in your PDF Mailbox

3. Troubleshooting Tips
If you experience issues where your Intacct Invoice Template/PDF/Credit Memo PDF does not display in YayPay after you click on its #, contact YayPay Support (or your YayPay Representative) and provide screenshots of the Email in your PDF Mailbox, e.g. the screenshot showing the subject line, i.e. customer & invoice ID.
This is to support the troubleshooting process and evidence of the Email and Invoice PDF attachment present for YayPay to extract/scrape from.
The approach to solving this is similar to what has been prescribed under the Troubleshooting section in this Article link.
