This section describes the available methods for adding Sales Specialists or Customer Success users into YayPay.
Each method results in one sales specialist and/or one customer success rep assigned to a customer (shown as internal contacts on the Statement page):
Option 1 - Create CS/Sales Rep users and Assignments directly in YayPay
- Navigate to the Settings > User management page in YayPay
- Select the Sales/CS tab and click on ADD USER
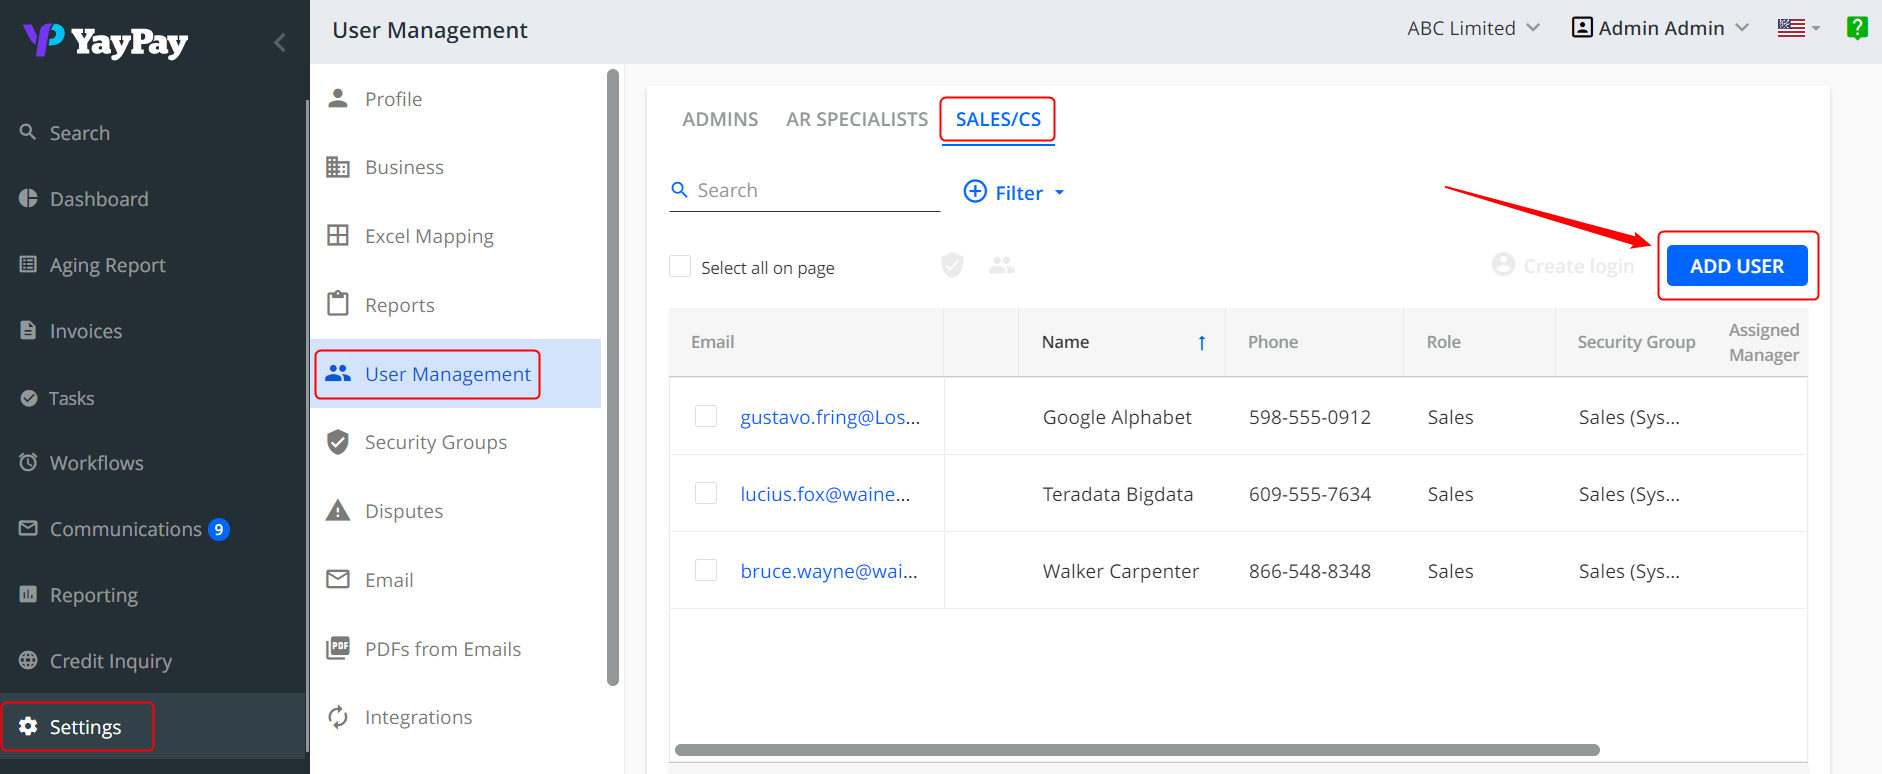
- Enter the Sales User information and choose the Role - Sales or Customer Success

- Click Send to save your changes (Sales Representatives will not receive a Welcome Email)
- Go to your Aging Report or Statement Page to assign these CS/Sales Reps (See FAQ Article link)
- These Articles on Sales/CS Users can also be helpful for your internal colleagues to receive updates through using YayPay
Option 2 - Create CS/Sales Rep users and Assignments via Mass Import into YayPay
- Navigate to the Settings > Excel Mapping page in YayPay and select the option "Sales Mapping Excel" in the dropdown list:

- Click on "Download Current Mapping"

- The Sales Mapping Excel file consists of two worksheets - "Customer Mapping" and "Sales Managers"
- Enter the Email, First & Last Name, and the Role of the User in a new row in the "Sales Managers" worksheet
- This is similar to a user action of adding a new Sales / Customer Success User summarized in Option 1
- The email address cannot be repeated - i.e. the same user cannot be a Sales and CS Rep at the same time
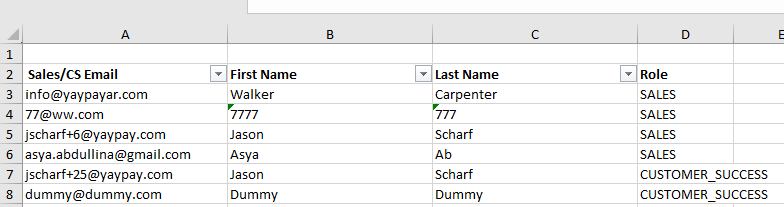
- To assign the Sales / CS Rep (user) to a Customer, copy and paste the email address under the Sales/CS Email Column next to the Customer Name in the "Customer Mapping" worksheet
- Leave the cell blank if there is no Assignment required for that customer

- Save the file on your C Drive.
- Go back to the Settings > Business page in YayPay to select the file
- Click Save to commend the upload of the Sales Mapping file

You should receive a Success message displayed on the top right of the screen.
Use the Statement to spot check a few Customer records using the Statement Page or Aging Report Filter to review the CS/Sale Rep Assignments in YayPay, against what was prepared in the Sales Mapping File.
Option 3 - Sync CS/Sales Rep users and Assignments from NetSuite or Salesforce
These additional options are also available to bring your CS/Sale Reps and the assignments directly from your NetSuite ERP and/or Salesforce.
This panel is available in your Settings > Business page of YayPay:

The definition of each option is explained to help you select the appropriate one so as to bring over your Sales and/or Customer Success Reps from the 2 external systems:
- YayPay - This option is enabled by default. This denotes that YayPay will be used to maintain your CS/Sales Rep Users and CS/Sales Reps Assignments, which has been described above in Option 1 and 2
- Salesforce - Select this option to sync your CS/Sales Reps from Salesforce, i.e. if you use Salesforce to maintain/associate a Sales Rep to each Customer (i.e. at the Account level). Refer to this Article link for more information
- NetSuite - Select this option to sync your Sales Reps maintained in NetSuite per Customer (i.e. at the Account level). There is no CS Rep sync in this option. See this Article link for more information
Reach out to support@yaypay.com if you encounter issues.
Option 4 - Sync CS/Sales Rep users and Assignments from CSV file imports
If you bring over your AR data into YayPay through a set of 6 CSV files (see Article link), you can add 2 additional columns into your customer.csv file:
- salesRepEmail
- customerSuccessEmail
- (arManagerEmail is for AR Reps)
These 2 columns added into the customer.csv file should contain the email addresses of your Sales and CS Reps (per Customer).
Use Option 1 or 2 to first create the User Accounts in YayPay beforehand so that the email address exists in YayPay. This also helps to ensure the emails are unique, with no overlaps of the same user being a Sales and CS Rep at the same time.
