This section outlines how to set up and connect YayPay to your Salesforce® system:
- Sync Sales Reps from Salesforce (at the account level) to YayPay.
- To sync Customer Success Reps from Salesforce(at the account level) to YayPay.
- Retrieve custom fields from Salesforce (at the account level) and sync them with YayPay at the customer level (for all connectors that work with Salesforce, i.e. CSV, Sage Intacct®, NetSuite®, Zuora®, Acumatica®, Business Central® or API).
CRM Custom Fields will sync to YayPay only if a Sales / CS Rep is assigned to the customer. - Send a Statement Link from YayPay to Salesforce. The information is attached to the account/customer in Salesforce.
Before syncing, create a new custom text field on the account level in your Salesforce system in the Object Manager section. The connector will fill this new custom text field with the Statement Link from YayPay. - Push Customer's Notes to Salesforce.
Both customer and invoice notes can be pushed to Salesforce at the customer level.
Configuring Salesforce
This section describes how to configure Salesforce before synchronizing it with YayPay.
Setting Up Your System
Before you start synchronizing data with YayPay, you need to configure certain settings in Salesforce. This section will guide you through the necessary configuration steps.
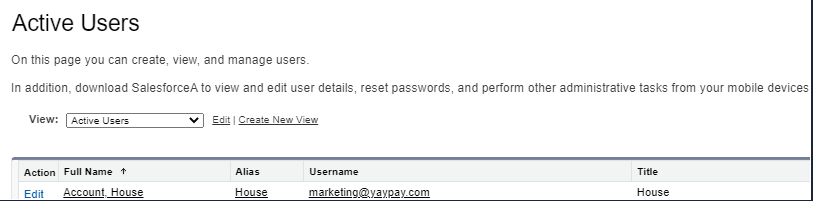
Log in to Salesforce using your admin credentials.
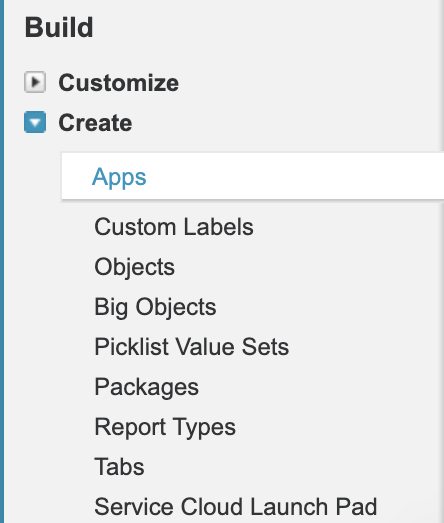
Switch to Salesforce Classic mode and navigate to the Administration page. On this page, you will find different sections categorized into Administer, Build, Deploy, and Monitor.
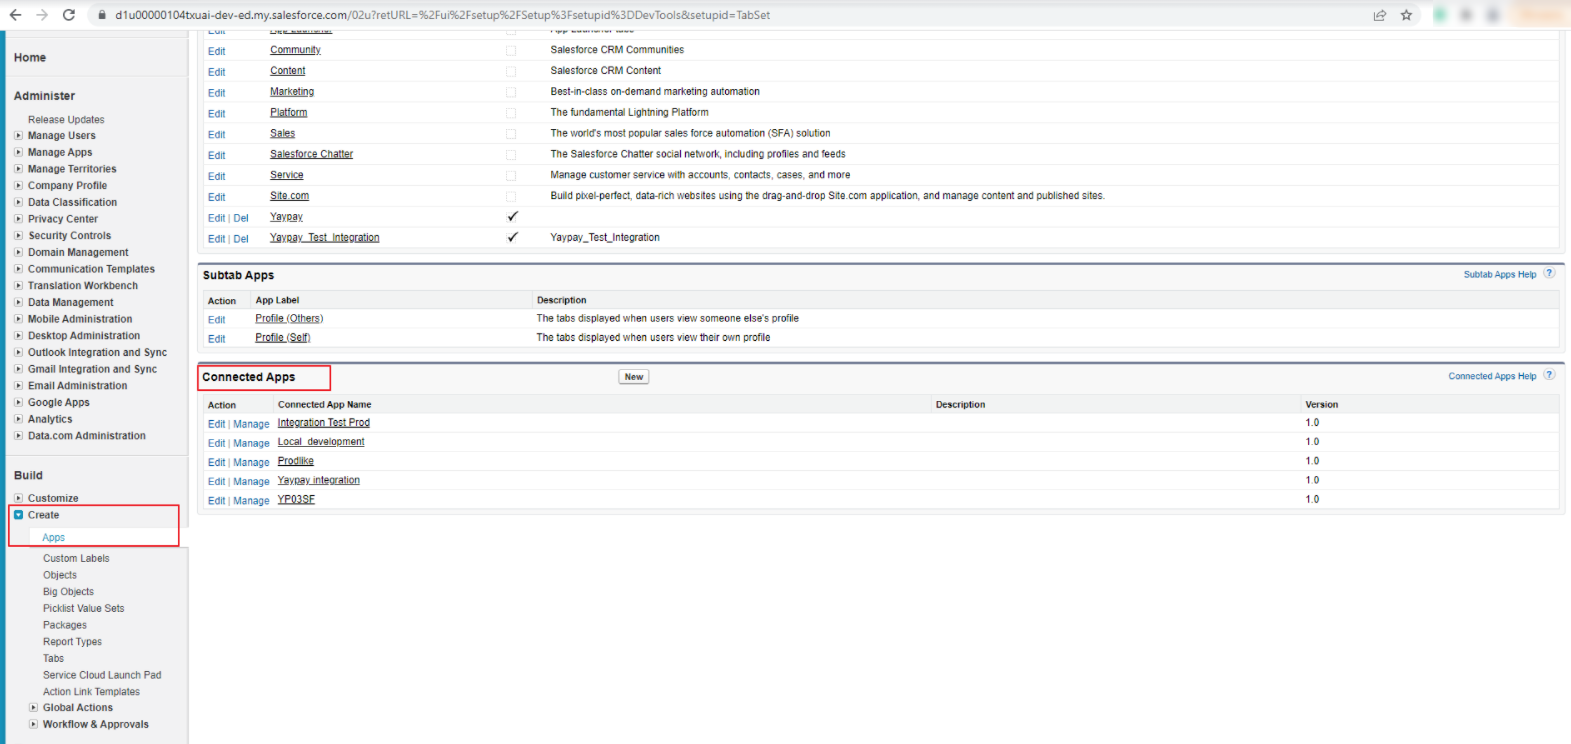
- Go to the Build section and click on the Create menu. From the sub-menu that appears, select Apps.
- On the Connected Apps page, click on the New button.

The purpose of this Connected App is to ask for permission to access your Salesforce data. It is connected to the Salesforce API using the OAuth protocol. In this context, the external application is called YayPay. For more details on how to create a Connected App, visit the Salesforce Community site.
- On the New Connected App page that opens, fill in the provided fields based on the information shown in the accompanying screenshot and name the new app new YayPay Integration.
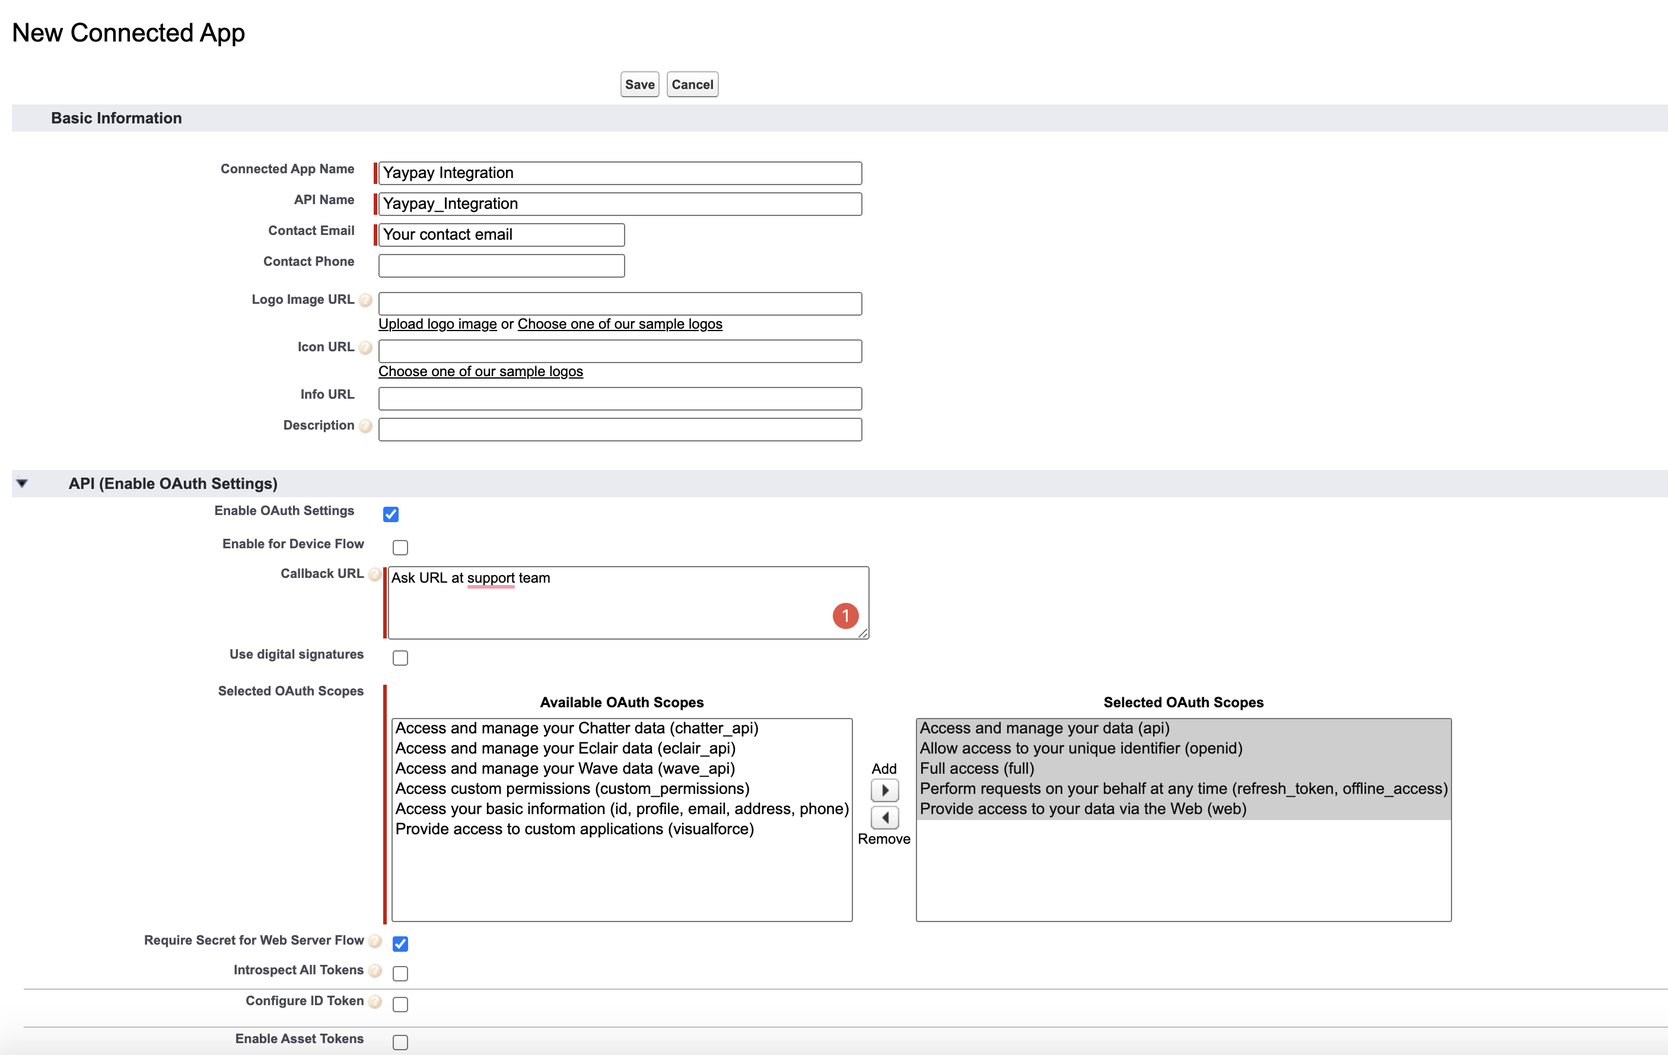
- Navigate to the API (Enable OAuth Settings) section and enter one of the YayPay application URLs into the Callback URL field.
Use one of these YayPay application URLs for the Callback URL: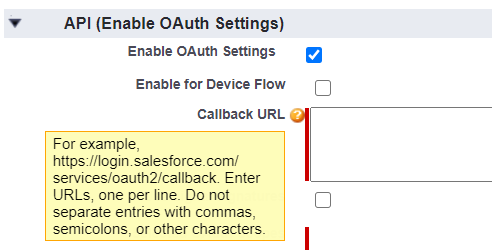
US Production – https://app.yaypay.com/salesforce/oauth2/redirect
EU Production – https://app1.yaypay.com/salesforce/oauth2/redirect
- If you have configured a Subdomain in your Settings | Business page, use the URL that you see after logging into YayPay. For example, https://mycompany.app.yaypay.com/salesforce/oauth2/redirect where mycompany is the subdomain you configured.
For YayPay Development environment, use the URL: https://developer.yaypay.com/salesforce/oauth2/redirect.
-
Click on the Save button to save your changes.
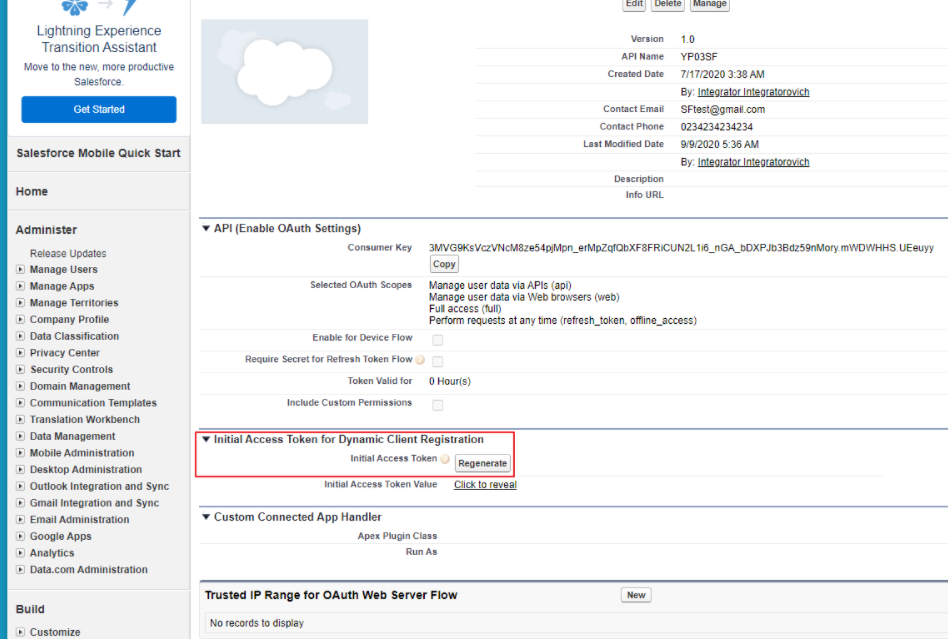
On the Yaypay integration page that appears, note the Consumer Key and Consumer Secret and save them in a secure location, such as a notepad or a document. You will need this information for configuring YayPay at a later stage.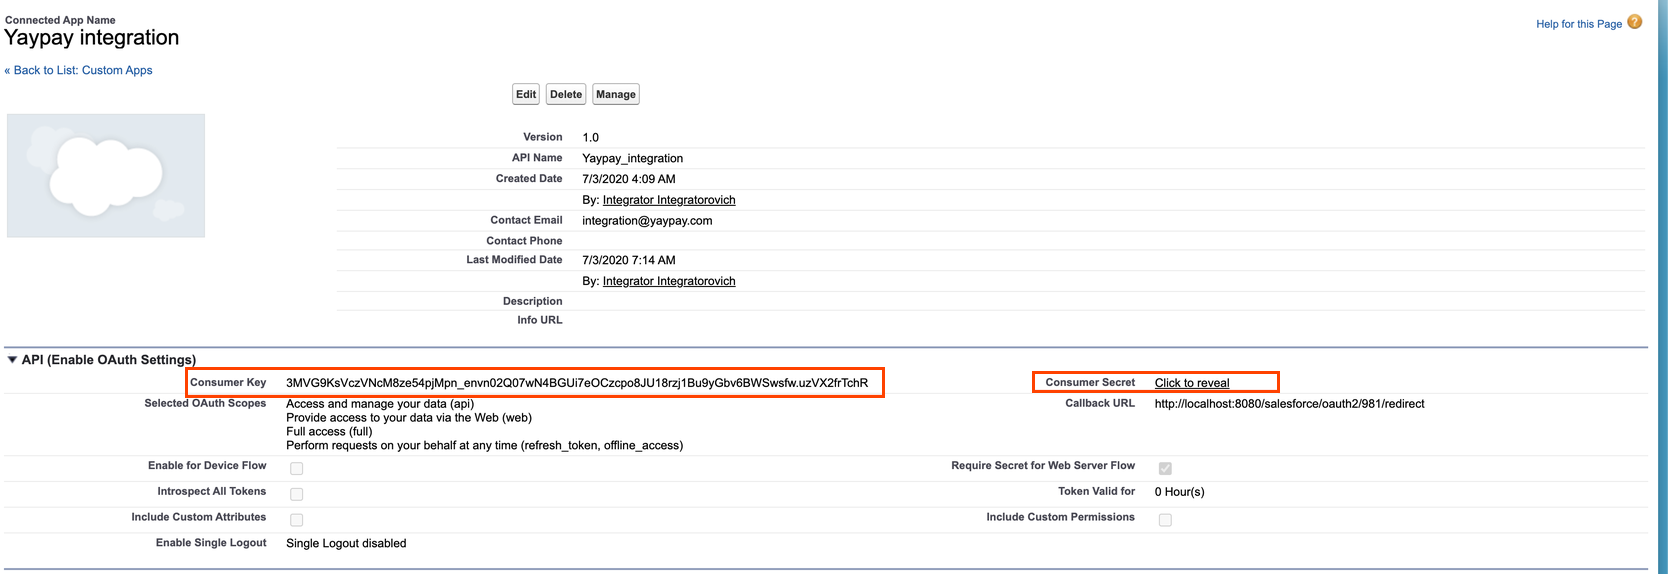
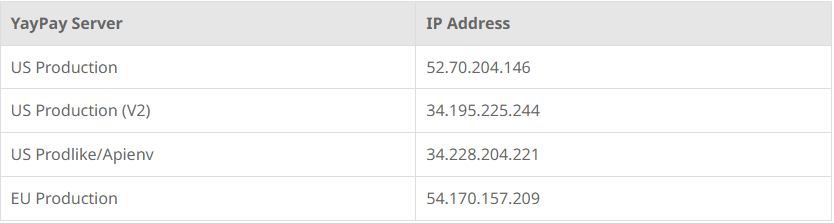
- After creating the connected app, navigate to the Trusted IP Range for OAuth Web Server Flow section and specify the IP addresses from which a user, such as YayPay, will be allowed to log into Salesforce. This helps to ensure that only authorized IP addresses can access your Salesforce account.
Add the following YayPay IP addresses to Trusted IP Range for OAuth Web Server Flow section:
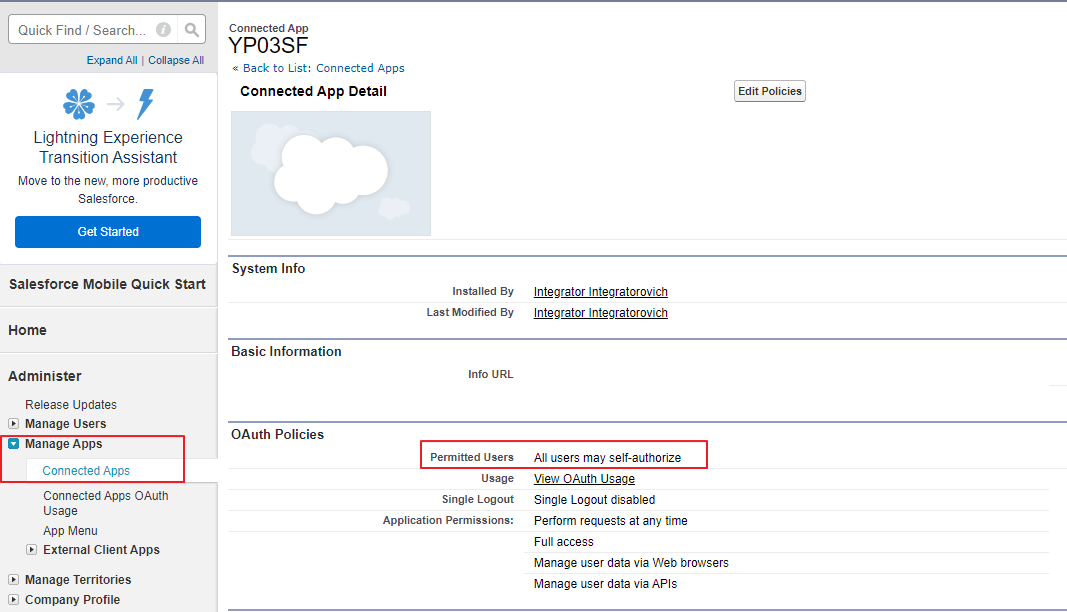
- Authorize all users in the organization by going to the Setup | Manage Apps | Connected Apps section in Salesforce.
- Find the desired app and change the Permitted Users setting to All users may self-authorize.
Save the changes to allow all users in the organization to authorize the app themselves.
Regenerating a Token
- Log in to Salesforce and go to Create | Apps section.
On the page that opens, navigate to the Connected Apps section.
Select your connected app, e.g. YP03SF.
- On the page that opens, go to the Initial Access Token for Dynamic Client Registration section and click Regenerate.
Configuring YayPay
This section explains how to configure YayPay to connect to your Salesforce.
Setting Up Your Sync Account
To configure YayPay to connect to Salesforce:
- Go to Settings | Integrations to check if an ERP system is connected.
Salesforce integration only works with the following connectors:- Sage Intacct®
- NetSuite®
- Zuora®
- Acumatica®
- Business Central®
- CSV
- API
This is because the integration between Salesforce and YayPay requires that the AR data is first synced from the ERP into YayPay. During the synchronization process, the customer ID is used as the common identifier. This customer ID is obtained after syncing with the ERP and must match the account ID in Salesforce. Go to Settings| Business and navigate to the Sync account level Sales/CS panel.
For both the Sales and Custom Success options, select the Salesforce option in order to prepare YayPay to sync the Sales and Customer Success Reps from Salesforce.
-
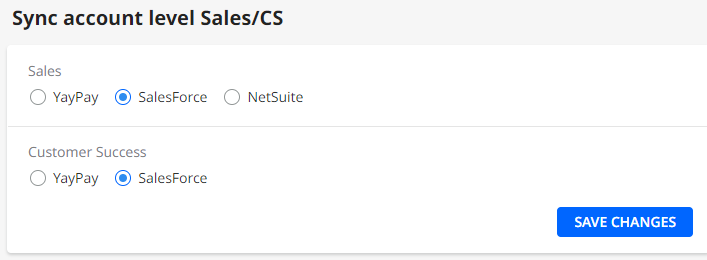
Click SAVE CHANGES to confirm the settings.

Integrating Salesforce® with Business Central®
To integrate customer data between Salesforce® and Business Central®, it's necessary to synchronize customers across both systems. Subsequently, the integrated data will be displayed in YayPay.
To achieve this, the connector synchronizes data between YayPay and Salesforce® by searching for the Salesforce® account based on specific criteria.
The criteria options are:
- Customer's System ID – Specified by the salesforceErpIdSource endpoint.
- Customer Number – Used when the endpoint is not defined, i.e. set to "salesforceErpIdSource": null.
This means that in Salesforce®, the account must include a custom field where either the customer's System ID or Customer Number is specified. By using one of these criteria, the connector will identify which Salesforce® account it can sync.
The connector will synchronize those Salesforce® accounts that already contain a Customer Number previously synchronized from Business Central®. Alternatively, if you specify the customer's System ID, the customer number that corresponds to this system ID must have already been synced to YayPay from Business Central®.
Once synchronized, the following data will be synced:
- Users (Sales Reps, CSM)
- Custom Fields
- Push Notes
- Push Statement Links
Searching by System ID
To integrate customer data between Salesforce® and Business Central® using a System ID value from Salesforce®:
In Salesforce®, create a new custom field at the account level. For example, you can name it BC_Customer.
Enter the customer's System ID value as the value for this new custom field.
Log into YayPay and go to Settings | Integrations | SALESFORCE.
-
On this tab, select the BC_Customer custom field that you crated in Salesforce® from the ERP ID drop-down menu.
This will map the data between Salesforce® and YayPay.
-
Go back to the Integrations page and switch to the BUSINESS CENTRAL tab.
On this tab, configure the integration with Business Central®:Click Download Current Mapping and open the downloaded mapping file.
In the mapping file, replace the "salesforceErpIdSource": null line with "salesforceErpIdSource": "ypBpCustomers_id".
Upload the updated mapping file back to YayPay.
-
Click SAVE CHANGES for the changes to apply.
As a result, YayPay will identify an account in Salesforce® using the customer's System ID value. For the identified customers, the connector will synchronize the relevant customer data from Salesforce® into YayPay.
For example: "id": "5b62698f-f1b2-eb11-9b53-000d3a89a8f6".
Searching by Customer Number
If you do not specify the salesforceErpIdSource endpoint for searching by System ID and leave it as "salesforceErpIdSource": null, YayPay will search for an account in Salesforce® using the Customer Number value.
For example: "number": "03MARCHES".
Connecting to Salesforce
Continue after Setting Up Your Sync Account by configuring the connection to your Salesforce:
Navigate to Settings | Integrations and select the SALESFORCE tab.
- Click CONNECT.

- In the Salesforce Authorization dialog that opens, configure the following options.
Enter values for the following options in this dialog: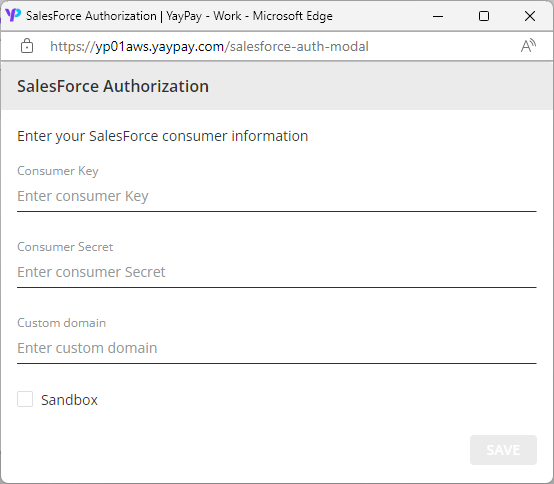
-
Consumer Key – Enter the key obtained from your Salesforce setup when configuring the integration with YayPay.
This field is required for the connection with YayPay to work. In Salesforce, you can find this information by navigating to the Setup | Create menu | Apps | Connected Apps section and clicking on the instance name. On a page that opens, click Manage Consumer Details to view the credentials.
-
Consumer Secret – Enter the secret obtained from your Salesforce setup when configuring the integration with YayPay.
This field is required for the connection with YayPay to work. In Salesforce, you can find this information by navigating to the Connected Apps section and clicking on the instance name. On a page that opens, click Manage Consumer Details to view the credentials.
-
Custom domain – If you have a subdomain in Salesforce and you want to synchronize it as a subsidiary in YayPay, fill in this field with the value of the Current My Domain URL field from Salesforce.
The domain name can contain up to 34 characters, numbers and hyphens. As a result, the connector uses this domain for authorization.
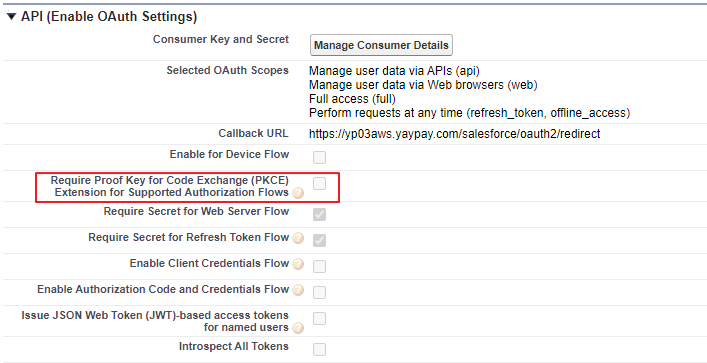
Additionally, go to Connected Apps section, click on the instance name and in the API (Enable OAuth Settings) section and make sure the Require Proof Key for Code Exchange (PKCE) Extension for Supported Authorization Flows check box is unchecked.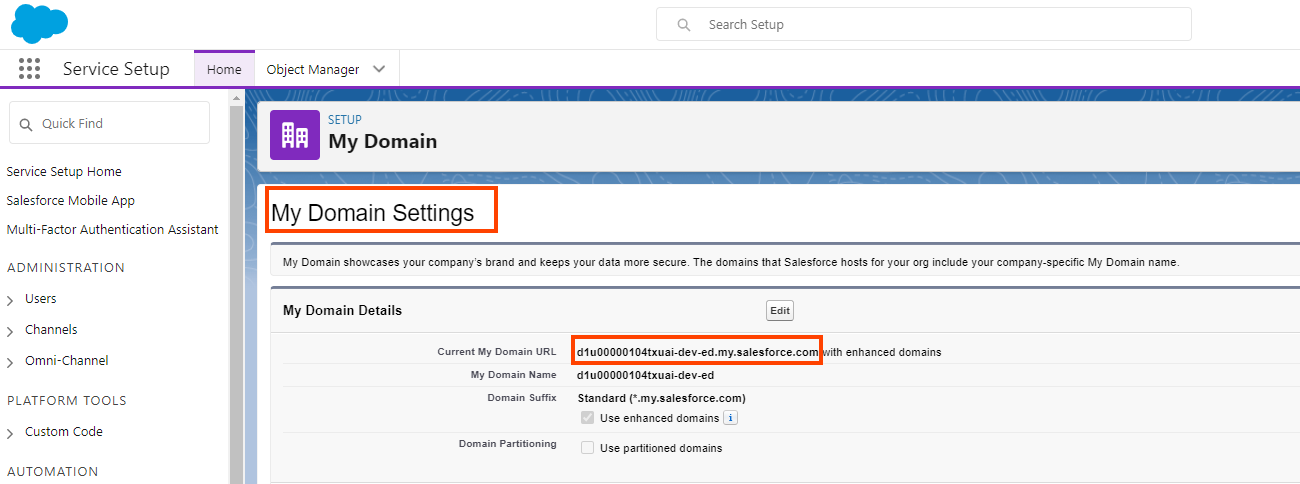
If you leave the Custom Domain field empty, the connector uses the following URL for authorization:https://login.Salesforce.com/services/Soap/u/38.0.
Sandbox – If you have a sandbox account and you want to sync data from it, check this check box before initiating the integration.
-
Click SAVE to close the panel and initiate an integration attempt (it will close with a successful integration prompt).
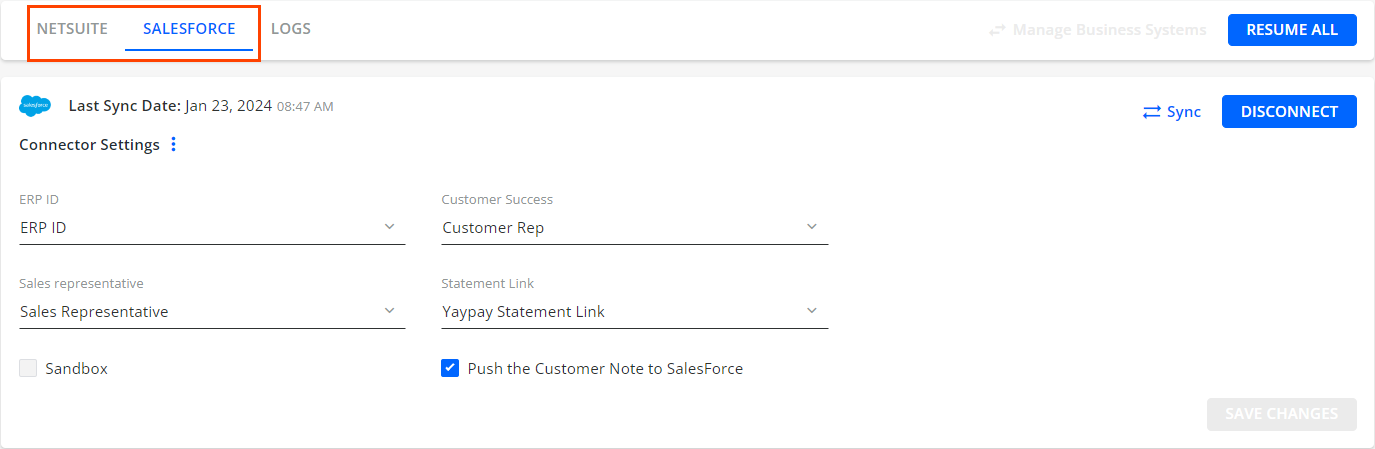
Connector Settings : Mapping Fields from Salesforce®
After completing Connecting to Salesforce, the Connector Settings panel appears.

On this panel, configure the following:
Click on the Load Field Mapping button to load fields from Salesforce.
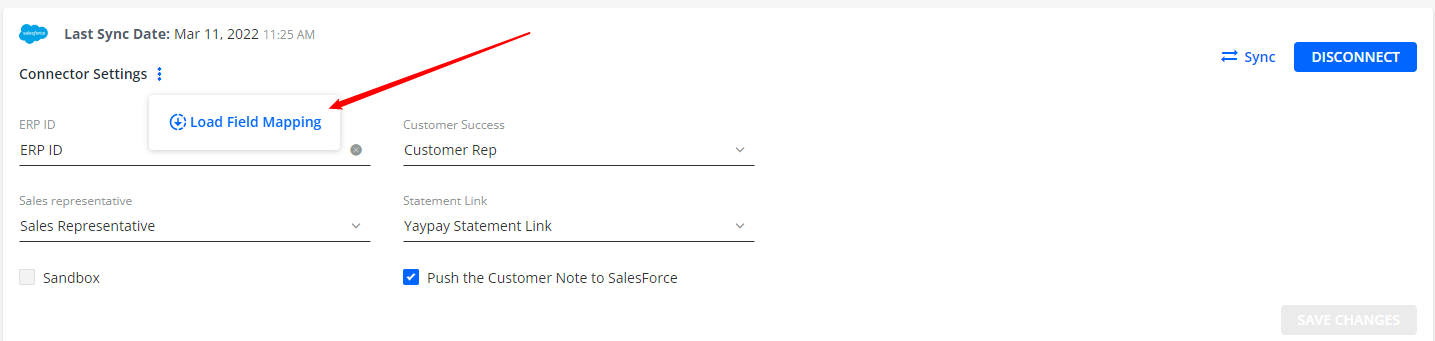
- Map YayPay fields to their corresponding Salesforce equivalents by selecting values from the provided drop-down menus.
The values displayed in the drop-down menus are taken from Field Labels in Salesforce. For example:
Thus, select these Field Labels as values in the drop-down menus: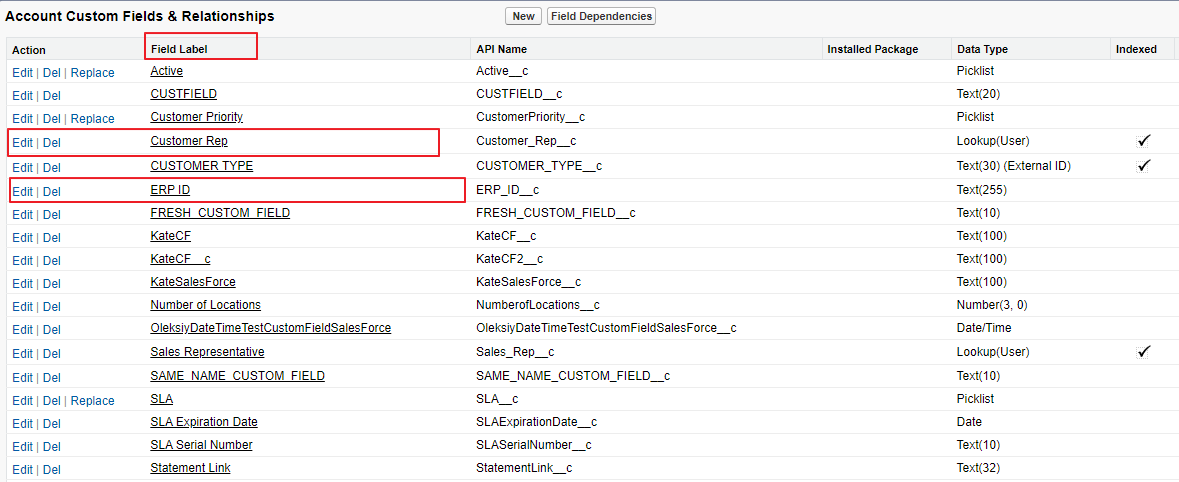
Select mapping for the following YayPay fields: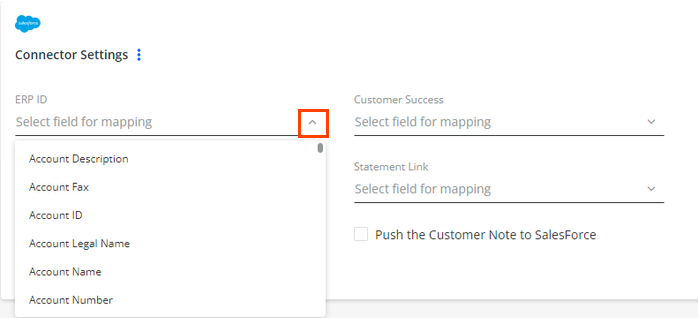
-
ERP ID (required) – Select your ERP ID value from the drop down menu.
This is a unique identifier that is used to match accounts in YayPay and Salesforce, ensuring accurate pairing between the two systems, i.e. before connecting to Salesforce, enter your YayPay customer ERP ID into the ERP ID field in Salesforce. The ERP ID column in YayPay can be inserted into the Aging Report page, its value is taken from your ERP system.
-
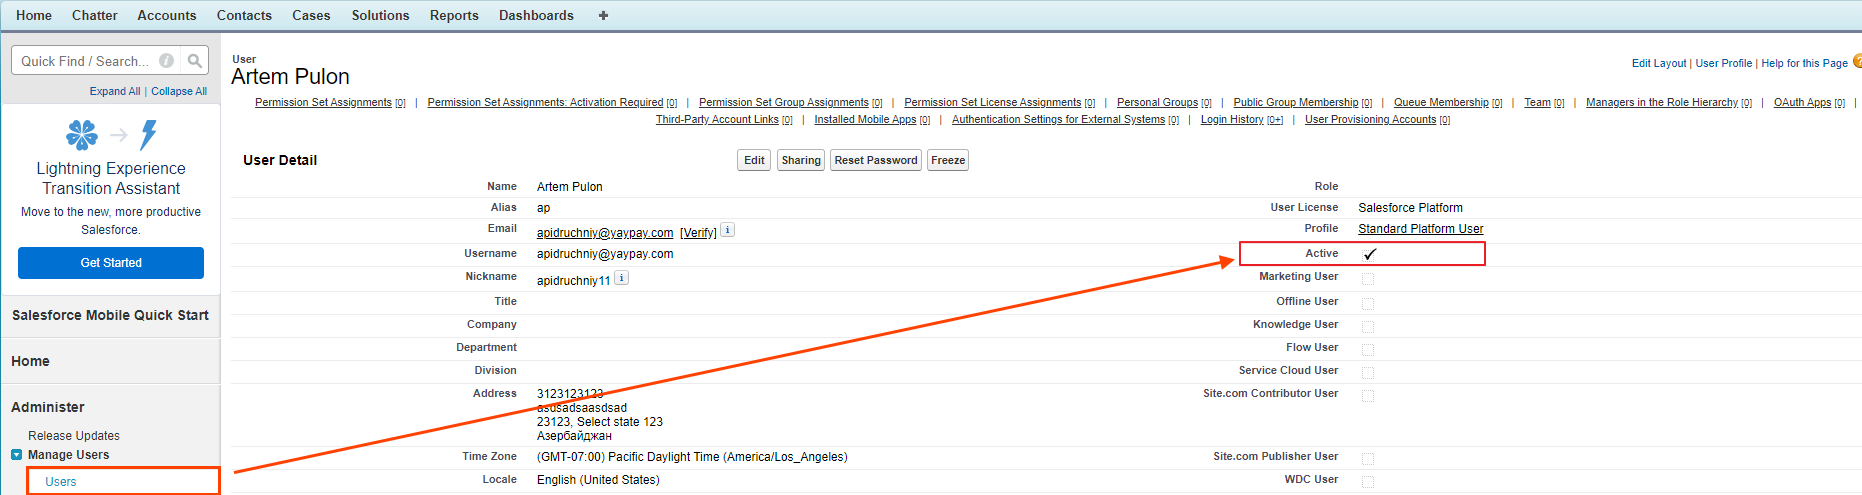
Sales representative – Select the corresponding Salesforce field, for example Sales Representative.
To sync this user correctly with YayPay, make sure to add the Sales Representative user in Salesforce by clicking on the Edit button in the Account Detail section and then clicking on the Lookup icon located next to the field. In the Lookup dialog that opens, select a user from the list. This user assigned to your account in Salesforce will be then synced at the account level to YayPay.
Also make sure that you set this user correctly when Setting Up Your Sync Account, i.e. on the Sync account level Sales/CS panel, select Salesforce for the Sales option.Additionally, this user must be unique withing all the your YayPay businesses, i.e. the user's email address must be unique across all subsidiaries. This means that you cannot sync the same sales representative for multiple customers within the same business account. However, if you have multiple subsidiaries, you can go to the Settings | Business and navigate to the Linked Subsidiaries panel. Here, you can specify the subsidiaries where the same person can work. This allows you to sync the same sales representative for multiple linked subsidiaries within the same YayPay instance.
As a result, you will see this user on the CONTACTS tab of the Statement page.
This field is required if you want to sync custom fields from Salesforce, for example Statement Link.
-
Customer Success – Select the corresponding Salesforce field, for example Customer Rep.
To sync this user correctly with YayPay, make sure to add the Customer Rep user in Salesforce by clicking on the Edit button in the Account Detail section and then clicking on the Lookup icon located next to the field. In the Lookup dialog that opens, select a user from the list. This user assigned to your account in Salesforce will be then synced at the account level to YayPay.
Also make sure that you set this user correctly when Setting Up Your Sync Account, i.e. on the Sync account level Sales/CS panel, select Salesforce for the Custom Success option.Additionally, this user must be unique withing all the your YayPay businesses, i.e. the user's email address must be unique across all subsidiaries. This means that you cannot sync the same customer success manager for multiple customers within the same business account. However, if you have multiple subsidiaries, you can go to the Settings | Business and navigate to the Linked Subsidiaries panel. Here, you can specify the subsidiaries where the same person can work. This allows you to sync the same customer success manager for multiple linked subsidiaries within the same YayPay instance.
As a result, you will see this user on the CONTACTS tab of the Statement page.
This field is required if you want to sync custom fields from Salesforce, for example Statement Link.
-
Statement Link – Select the custom text field that you previously created on the Account level in your Salesforce system in the Object Manager section. The connector will then fill this custom text field's content with the Statement Link from YayPay.
The Statement Link is a link leading to your Customer Portal.
During each sync, the connector checks and updates the Statement Links in Salesforce. If the Statement Link expires, the connector will remove it from Salesforce during the next sync.
If the Last Sync Date on the Connector Settings page in YayPay is not updated after the synchronization process, it indicates that the connector will not send the statement link to Salesforce.
-
- Optionally, you can also specify the following:
Sandbox – If you have a sandbox account and you want to sync data from it, check this check box before initiating the integration with Salesforce.
-
Push the Customer Note to Salesforce – If checked, new notes are pushed to Salesforce using the Salesforce connector. For this to work, you must also create the Notes tab for your account in Salesforce.
Both customer and invoice notes can be synced to Salesforce, where they will be added at the customer level. For example to push invoice notes to Salesforce, go to the Aging Report page, choose a customer and then select an invoice to add an invoice note. YayPay will then send a request to Salesforce to create a corresponding note at the customer level.
Click SAVE to confirm the settings.
Click Sync at the top of the Connector Settings panel to start the synchronization process in the background.
Once the integration is running, the Sales Rep and Customer Rep assigned to the Account in Salesforce will be synced and found in YayPay. They will be automatically assigned to the corresponding customer in YayPay. Additionally, the Statement Link will be sent as a hyperlink/URL to a field in Salesforce, as shown below: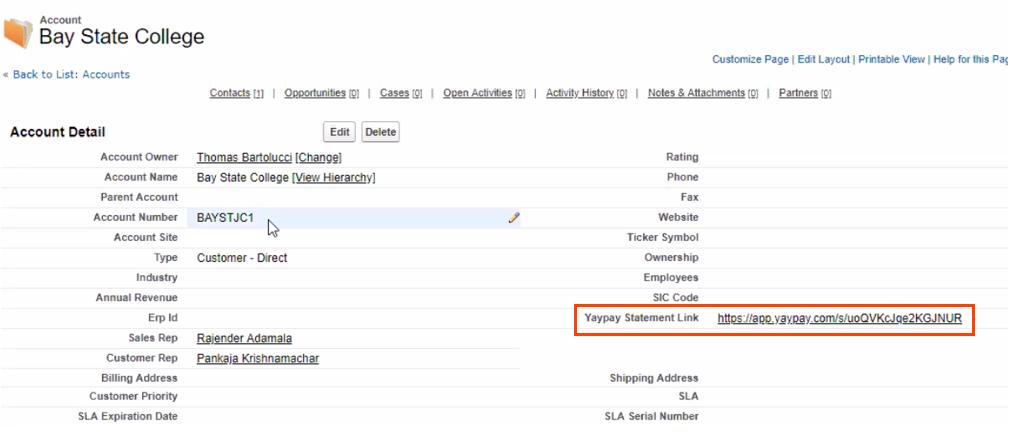
Mapping the roles correctly is crucial for the synchronization between YayPay and Salesforce. This ensures that the sync process can accurately find a match between the appropriate Account/Customer in both systems. By assigning the correct Sales Specialist Rep and/or Customer Success Specialist to the Customer in YayPay, the integration can effectively manage the relationship between the two platforms.
During the synchronization process, your sales users will be automatically set up as sales users in YayPay. To review this, you can navigate to the Settings | User Management page in YayPay. Under the Sales/CS tab, you will find the details of the sales users, including their assigned roles and permissions within the system.
Example During the sync process, there are several use cases that can occur. Here are a few examples:
- If multiple customers have the same ERP ID, the last updated Account will be used for mapping in YayPay.
Account 1 - has a Sales Specialist 1 - Customer ERP ID 455
Account 2 - has a Sales Specialist 2 - Customer ERP ID 455
Account 3 - has a Sales Specialist 3 - Customer ERP ID 455
- If a Note is created within a customer in YayPay, and there are multiple customers that share the same ERP ID, the notes will be created for each Account in Salesforce with the same ERP ID:
Account 1 - Note 1 - Customer ERP ID 455
Account 2 - Note 2 - Customer ERP ID 455
Account 3 - Note 3 - Customer ERP ID 455
Syncing Customer-Level Custom Fields
To map and sync account-level custom fields from Salesforce to YayPay, follow the steps described in this chapter. The mapped fields will appear as additional fields and values for synced customers from your ERP system in YayPay.
You can also synchronize custom fields from Salesforce to display them at the customer level in YayPay.
To do so:
Go to Settings | Integrations | SALESFORCE tab and make sure that you are connected to Salesforce and have the fields mapped, i.e. that the setup is completed.
- Once connected, navigate to Settings | ERP/CRM Custom Fields page to add and map the custom fields from Salesforce.
These custom fields are fields from the Account Detail page in Salesforce. For example CUSTFIELD field:
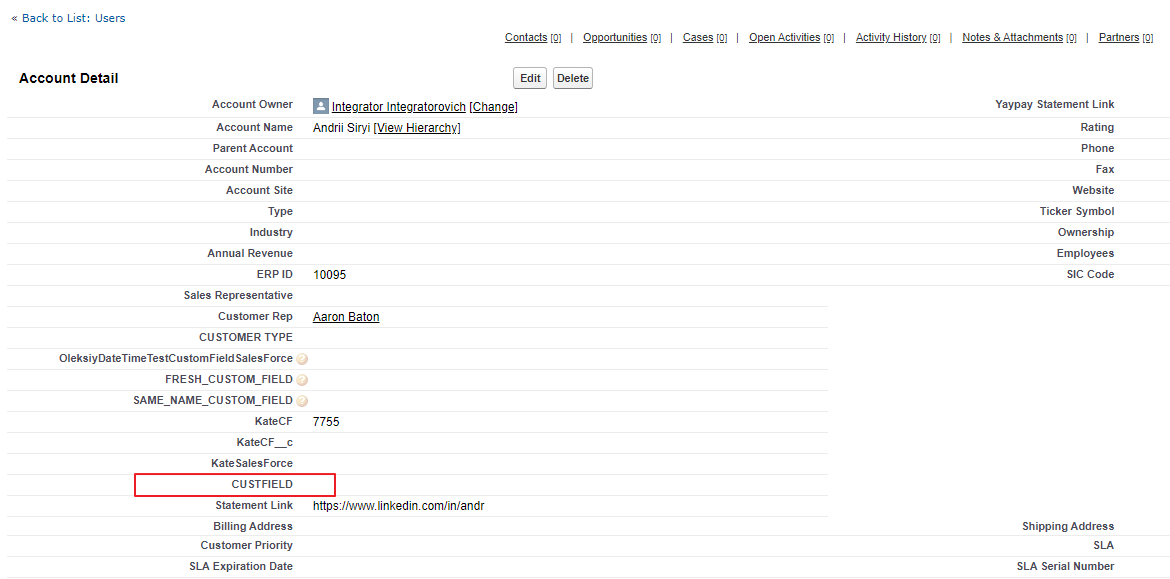
- Enter the value for the Source Field Name and YayPay Display Name columns on the ERP/CRM Custom Fields page:

-
The Source Field Name value must be taken from the API Name column in Salesforce.
To obtain it, navigate to Accounts | Fields and select a specific custom field. On the Account Custom Fields & Relationships page, select the fields value from the API Name column.
Enter this value into the Source Field Name column:

YayPay Display Name is the name under which your custom field will be displayed in YayPay.
-
Check the Salesforce check box next to the newly added fields to sync a custom field from your Salesforce system instead of your ERP system.
- Optionally, you can check the other check boxes such as Display on Statement if you want this custom field from Salesforce to be visible on the Statement page in YayPay or Email Recipient if you want to use this field as a recipient when sending email reminders.

-
Click SAVE to confirm the settings.
Once saved, the connector will pull the specified custom fields from Salesforce and display them at the customer level in YayPay. The Customer-level custom fields synced from Salesforce are displayed in the same way as the custom fields synced from other ERPs.
Before starting the sync process, it is necessary to initiate the sync process for the ERP connector. Once that is done, you can proceed to sync Salesforce to retrieve the Salesforce account along with its custom fields. Additionally, it's important to ensure that the Sales Representative or Customer Success Specialist is unique within your biz in YayPay.
During the sync process, there are several use cases that can occur. Here are a few examples:
- In Salesforce, there are three accounts (Account 1, Account 2, Account 3) that have the same custom field and are associated with a Customer that has ERP ID 455:
Account 1 - Custom Field 1 - Customer ERP ID 455 - the last modified date of the account 07/08/2021 10:00:00
Account 2 - Custom Field 1 - Customer ERP ID 455 - the last modified date of the account 07/08/2021 10:01:00
Account 3 - Custom Field 1 - Customer ERP ID 455 - the last modified date of the account 07/08/2021 10:02:00
- The ERP Connector will synchronize the custom field of Account 3, which is associated with the Customer ERP ID 455 and has a last modified date of 07/08/2021 at 10:02:00.
- In Salesforce, there are three accounts (Account 1, Account 2, Account 3) that have different custom fields but are associated with the same Customer that has ERP ID 455:
Account 1 - Custom Field 1 - Customer ERP ID 455 - the last modified date of the account 07/08/2021 10:00:00
Account 2 - Custom Field 2 - Customer ERP ID 455 - the last modified date of the account 07/08/2021 10:01:00
Account 3 - Custom Field 3 -Customer ERP ID 455 - the last modified date of the account 07/08/2021 10:02:00
- In YayPay, you have specified that you want to sync Custom Field 2 and Custom Field 3. After the synchronization process, you will see these custom fields at the Customer Level in YayPay. If you have multiple custom fields with the same name, only the most recent field that was sent to the YayPay Upload API will be stored.
If you decide to disconnect Salesforce in Settings | Integrations after the customer-level custom fields have been synchronized, the connector will no longer be able to establish the relationship between the Account ID and Customer ID. As a result, the custom fields that were set up for Salesforce in the ERP/CRM Customs Fields section will disappear after you upload the page.
If the connector is unable to synchronize the custom fields from Salesforce, such as when there is no connection due to entering invalid credentials during the connection process in YayPay, the corresponding error will be logged on the LOGS tab of the Integrations page.
Reviewing Sync Results
Through the data mapping and Sync process in YayPay, you can review the outcome of the synchronization in several places:
- Statement page
- Aging Report page
- Settings | Manage Companies page
- Settings | User Management page
Statement Page
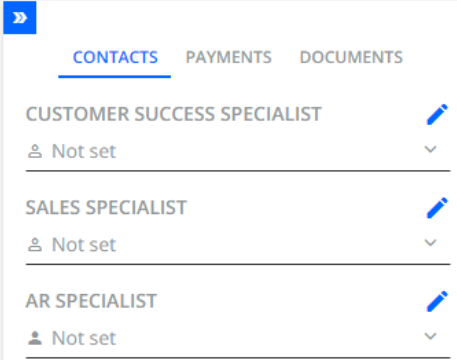
You can find the Sales Specialists and/or Customer Success Specialists assigned to a specific customer on the CONTACTS tab of the Statement page.
The Sales Specialist field will now display the Sales Rep information imported from Salesforce. Additionally, the Sales Specialist field will be made 'read-only', meaning it will be greyed out and users will not be able to make any changes to it to prevent accidental modifications.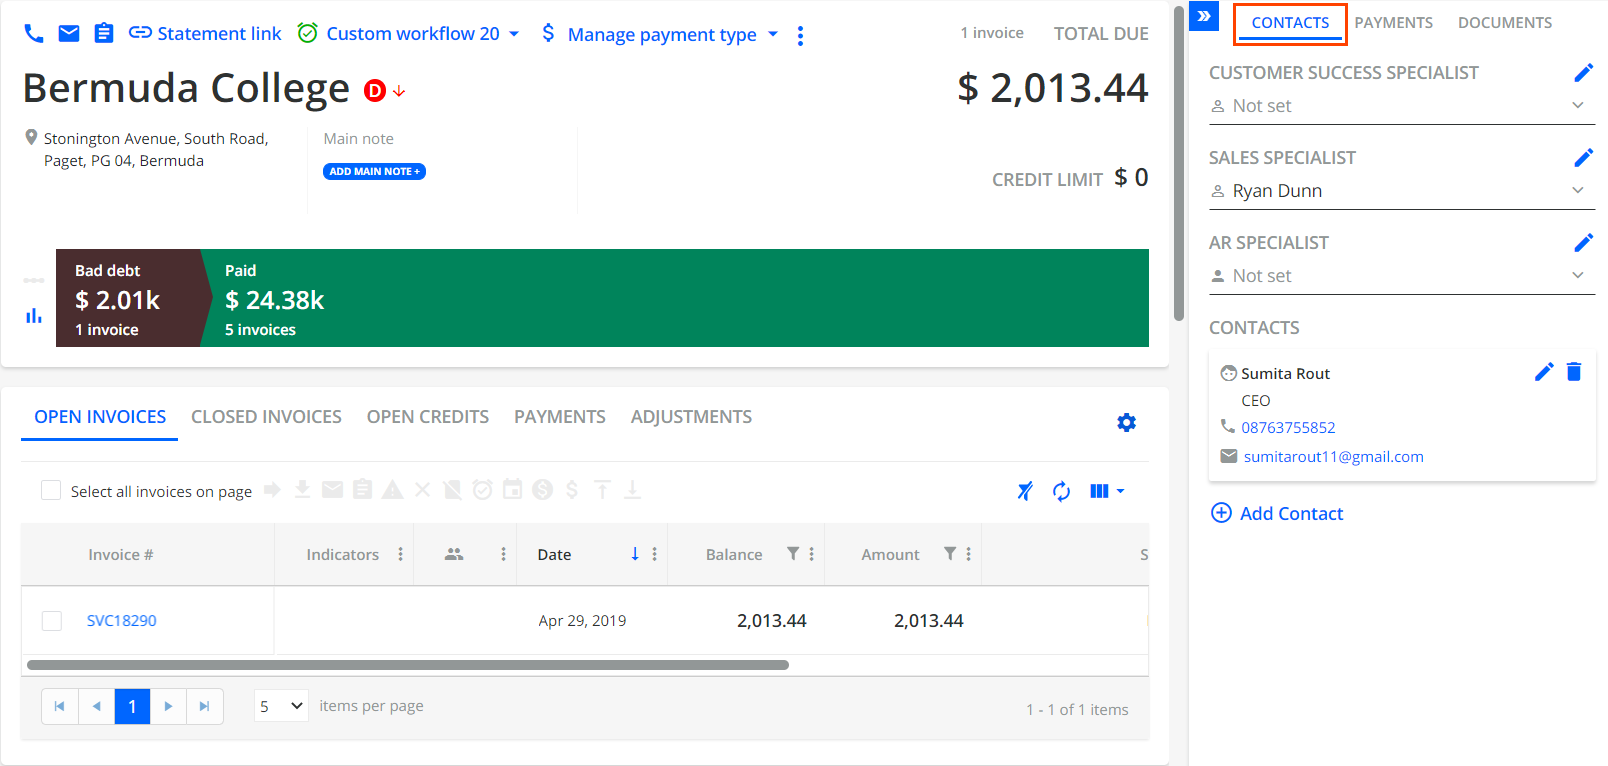
You can perform a sample check using the Statement page.
To look up a customer, use the Search page in YayPay.
Aging Report Page
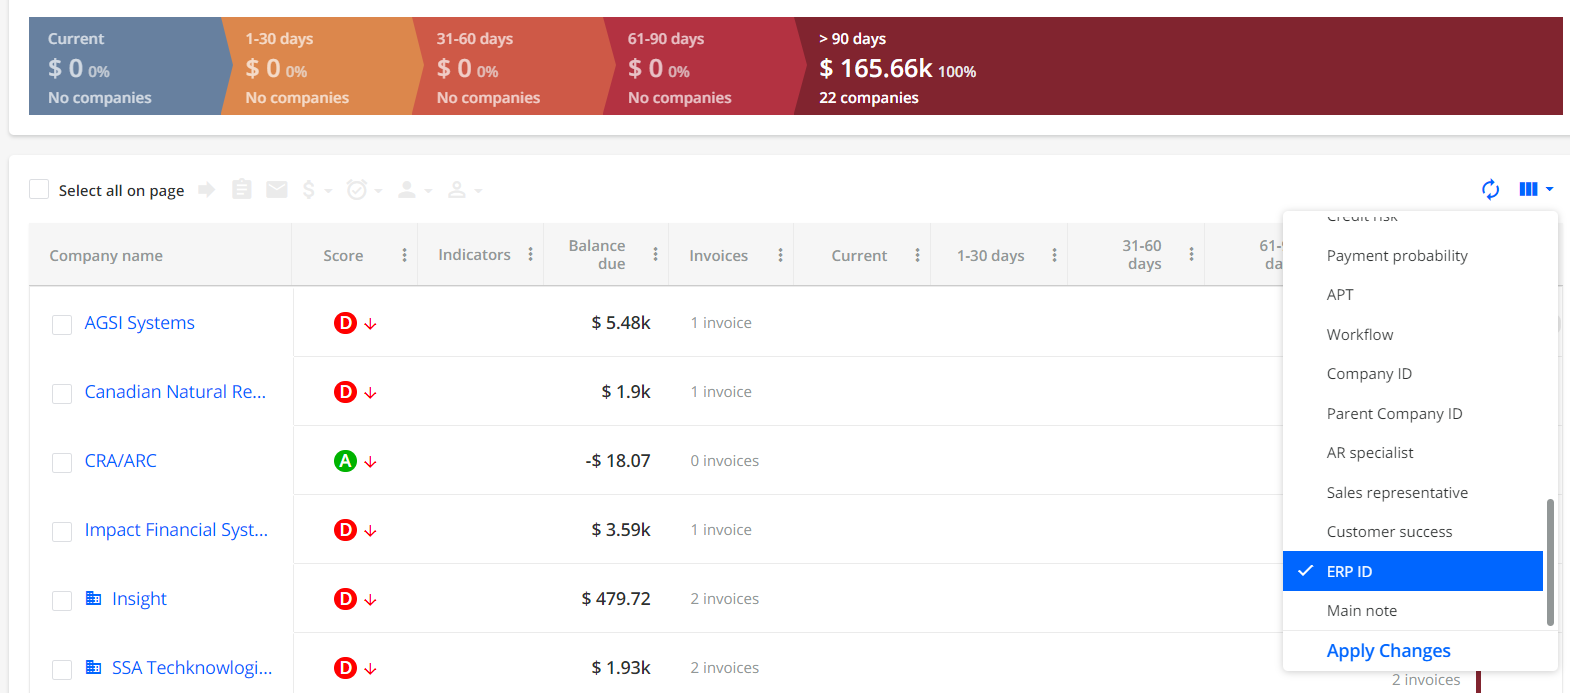
You can use the Aging Report to check for a broader data set. You can:
Add the column called Sales representative to the grid on the Aging Report page and export the data to Excel.
- Use the Aging filter called Assigned Sales Representative or Assigned Customer Success and select the appropriate employee.

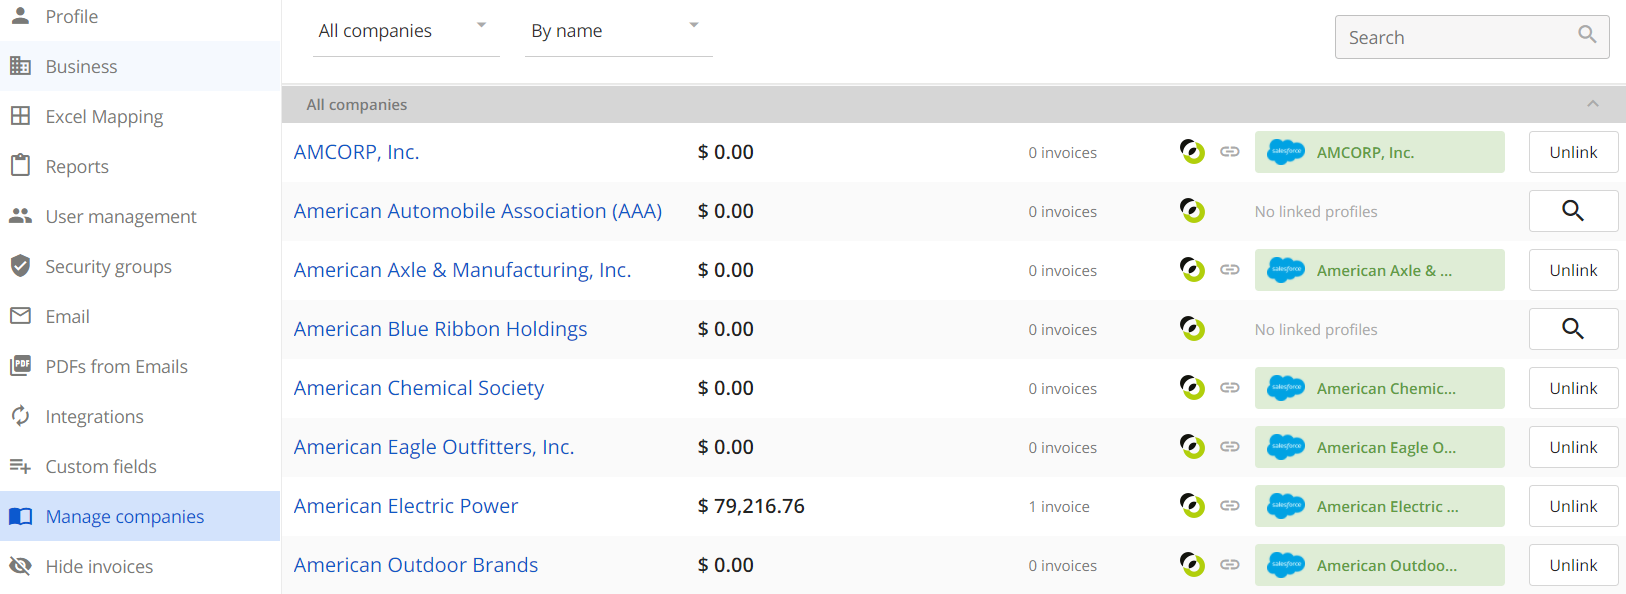
Manage Companies Page
Based on the number of Accounts/Customers in Salesforce that were mapped to YayPay's ERP ID in the mapping configuration, you will find the outcomes of both linked and unlinked accounts on the Settings | Manage Companies page.
User Management
During the sync process, your sales users will have been automatically set up as sales users in YayPay. To review this, you can navigate to the Settings | User Management page in YayPay.
Under the Sales/CS tab, you will find the details of the sales users, including their assigned roles and permissions within the system.
Engage your Sales/CS Reps During your Collection Process
With your Sales and/or Customer Success users assigned to the customers in YayPay, you can start involving and collaborating with them during your collection process. For more details, see the following section:
- To schedule a periodic email notification to all assigned Sales and Customer Success Representatives and provide them with visibility of their Accounts/Customers during the collection process, refer to the Send Aging Notification to Sales/CS Specialists section.
- To include Sales and Customer Success Representatives as recipients in Workflow Email Reminders for Invoice Overdue Milestones, refer to the Automating your Collection Process section.
Salesforce Objects and Fields
This section provides an overview of queries related to Salesforce® objects and fields that the YayPay connector can interact with. Salesforce® objects and fields store the individual pieces of data that make up the records in your Salesforce® organization.
Select Query
A select query is a method used to retrieve specific data from Salesforce®.
The following table provides some examples for your reference:

Push Statement Links and Notes
Push Statement Links and Notes are methods used by the YayPay connector to update or push data back into Salesforce®.
The following table provides some examples for your reference:

