This section outlines how to configure YayPay and NetSuite to facilitate payment integration from YayPay to NetSuite.
Before you start, make sure you have already configured your Payment Processor Gateway/ Merchant credentials in YayPay.
To learn about YayPay's payment features, see https://yaypay.helpjuice.com/payments.
1. Enable YayPay to send the payment information to NetSuite
o initialize the payment integration between YayPay and NetSuite:
Log into YayPay and navigate to the Settings | Integrations page.
-
On this page, click Manage Business Systems and select NetSuite from the Business System menu.
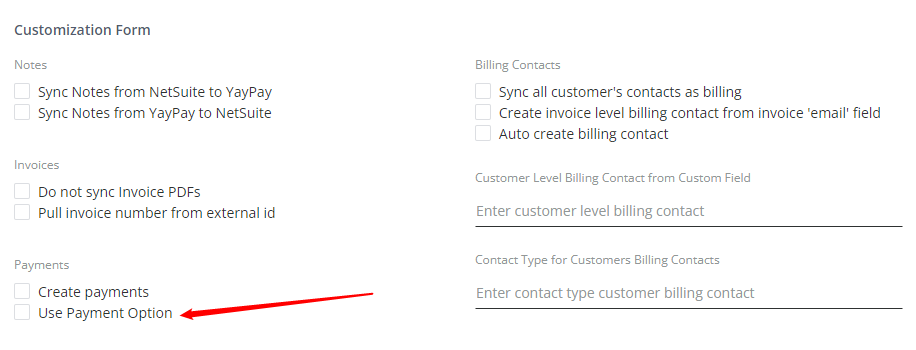
This will display the NetSuite Connector Settings panel and Customization Form: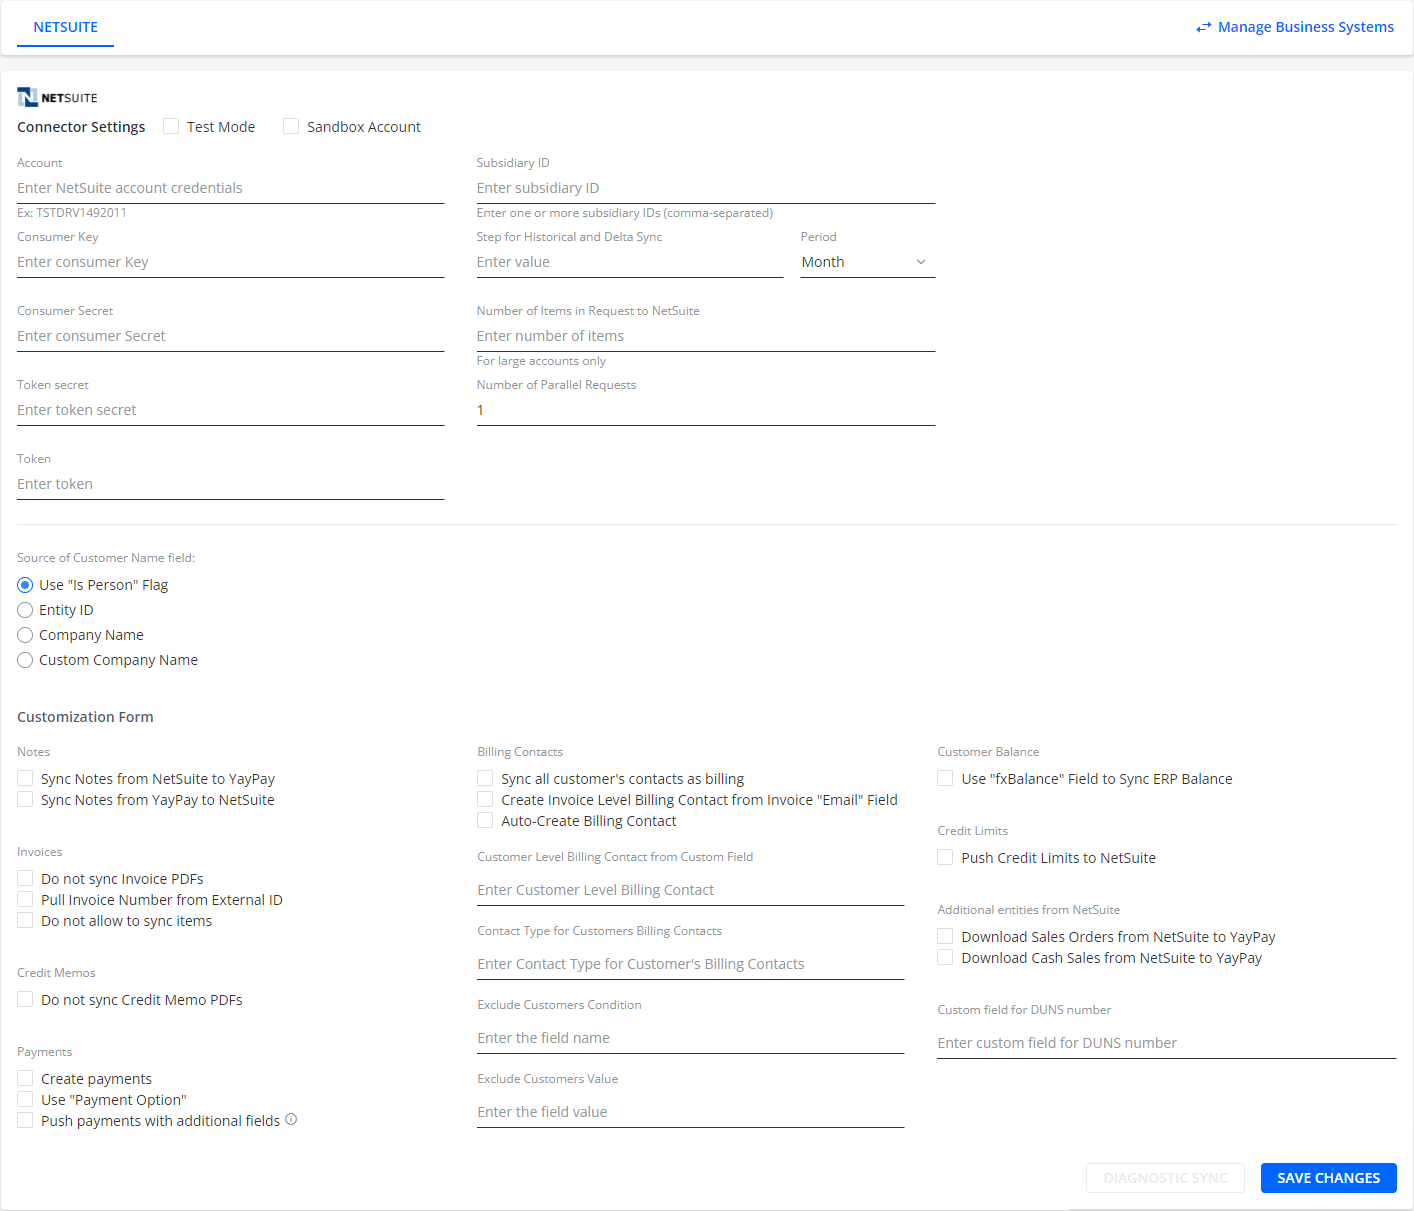
-
Check the Create payments check box to activate the payment integration and allow YayPay to send payments to NetSuite.
By default, this payment information is sent as undeposited funds.
Re-enter values for the consumer and Token secret options.
Specify the other options as described in the Oracle® NetSuite: How To Configure Account for YayPay section.
Click SAVE CHANGES.
The Subsidiary ID field's configuration also impacts the payment integration with NetSuite:
If the Subsidiary ID is not specified, the AR Sync and reverse payment integration will apply to all paid invoices throughout your company.
If one Subsidiary ID is specified, the AR Sync and reverse payment integration will apply to the invoices associated with the one specific NetSuiteTM subsidiary, represented by the Subsidiary ID in YayPay.
- If multiple subsidiary IDs are specified (separated by commas), the AR Sync and reverse payment integration will apply to invoices associated with the specified subsidiary IDs. For example:

2. Mapping to NetSuite Payment Entities
The NetSuite ERP System has the following payment entities:
- Payment Method
- Payment Option
By default, YayPay uses the Payment Method option to create payments in NetSuite.
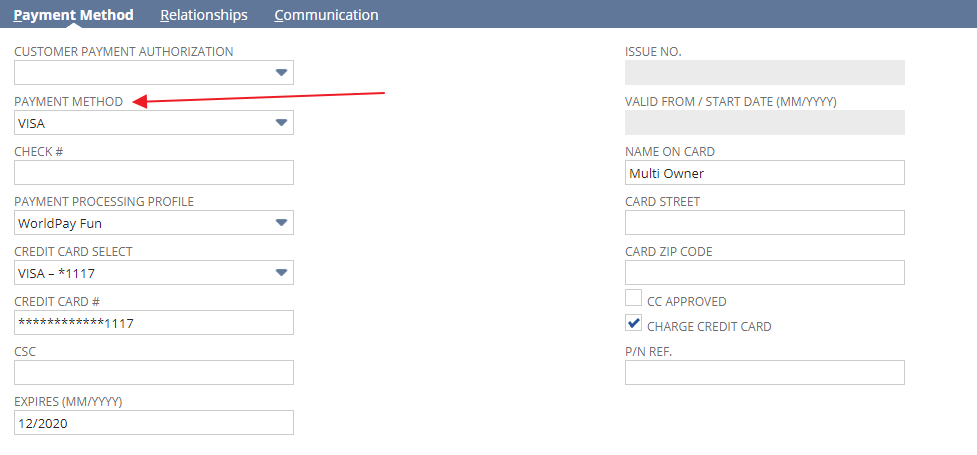
Before configuring payments, check what is your configuration in NetSuite:
Open any payment in NetSuite.
Go to the Payment Method tab and see whether it includes the Payment Method or Payment Option field.
- Depending on your NetSuite configuration, follow the instructions described in the respective sections, i.e.
-
If it includes the Payment Method field, then follow the instructions in the Payment Method section.

-
If it includes the Payment Option field, then follow the instructions in the Payment Option section.

-
Payment Method
If your NetSuite configuration includes the Payment Method field, then for the integration to work, you must map the payment type in YayPay to a corresponding payment method used in your NetSuite system. As a result, when you make a payment in YayPay, the payment is also pushed to NetSuite.
To map the payment types from YayPay to payment methods used in NetSuite:
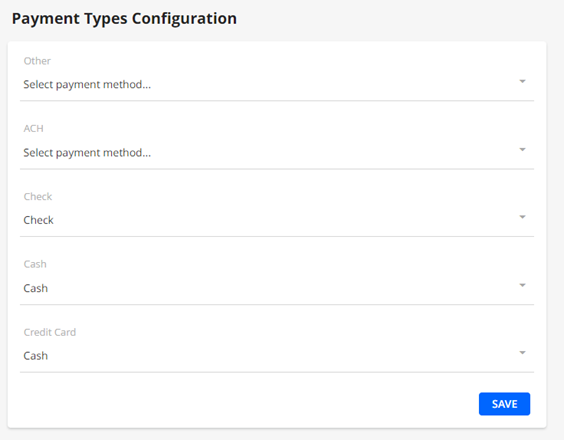
- Log in to YayPay and go to Settings| Business| Payment Types Configuration.
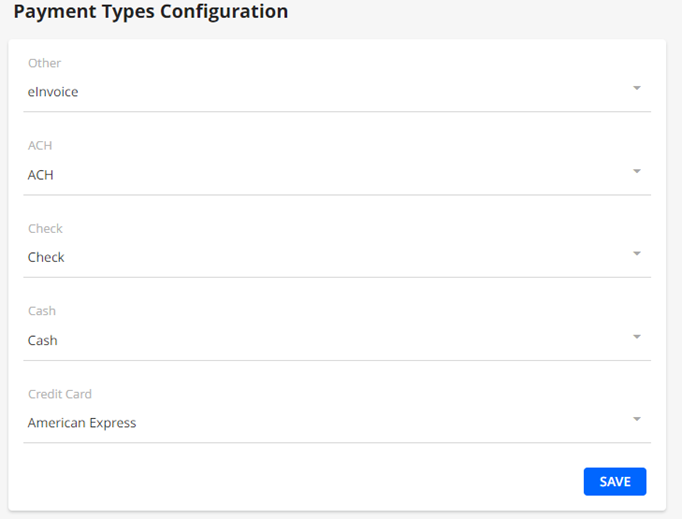
Set payment types to corresponding Payment Methods available in your NetSuite. This creates a mapping that will be pushed to NetSuite.
-
As a result, when you make a payment in YayPay, it will appear on the Payments tab of the Statements page and the same payment will be also created in NetSuite, with the payment method that corresponds to the mapping.
 .
.
For example, if you set the mapping for the Credit Card option to Cash in Settings | Business in YayPay, then all credit card payments made through YayPay will be displayed as having Payment Method set to Cash in NetSuite.
If no mapping is selected, the Payment Type will be blank. This information may be applicable if you are also using the Advanced Reporting module in YayPay to differentiate Payments by Payment Types.
Payment Option
If your NetSuite configuration includes the Payment Option field, then in YayPay you must create mapping for only such payment types that are supported for this type of integration. Only for these payment types YayPay can create the corresponding payments in NetSuite.
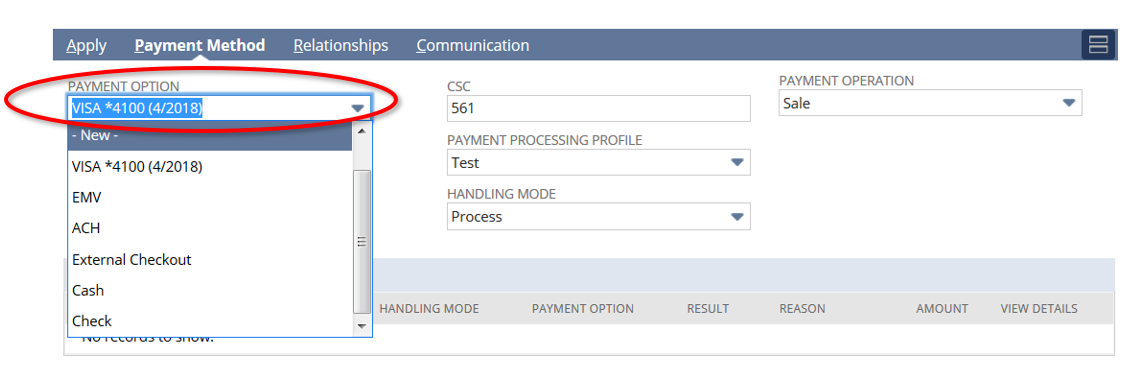
If your NetSuite configuration includes the Payment Option field, then YayPay supports mapping only for the following payment types:
- Check
- Cash
- Blank
If the Payment Option field is not set as mandatory on the Payment page in NetSuite, then you can leave the mapping blank.
To map the payment type from YayPay to a corresponding payment option used in NetSuite:
- In YayPay, go to Settings | Business | Payment Types Configuration.
-
Set payment types to corresponding Payment Options available in your NetSuite. This creates a mapping that will be pushed to NetSuite.
However, you can set mapping only for the supported payment types (cash, check or blank) so that YayPay can push and crate the corresponding payment in NetSuite without errors. If you select another payment type, the payment will not be pushed into NetSuite, and there will be an error.
Note It is important that the selected payment type in YayPay is also available in the Payment Option drop-down field in NetSuite. - Go to Settings | Integrations| NetSuite Connector and check the Use Payment Option check box.
-
As a result, when you make a payment in YayPay, the payment will appear on the Payments tab of the Statements page and the same payment will be also created in NetSuite, with the payment method that corresponds to the mapping.

3. Additional Permissions to also include/adjust in NetSuite
Log into NetSuite to also update the permissions associated with the Role that was set up for the sync between NetSuite and YayPay.
- Log in as the NetSuite Administrator
- Navigate to Setup > Users/Roles > Manage Roles (look up the YayPay Web Services role that was set up for the AR Sync)
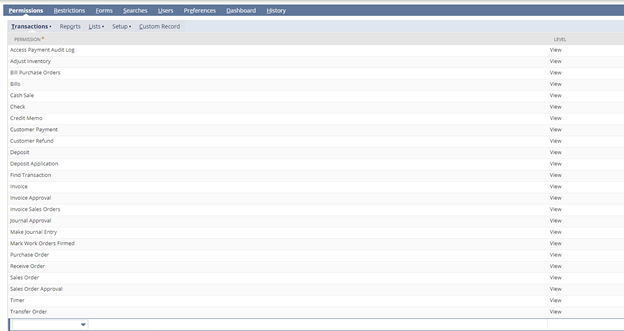
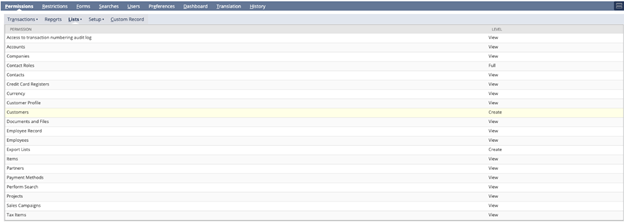
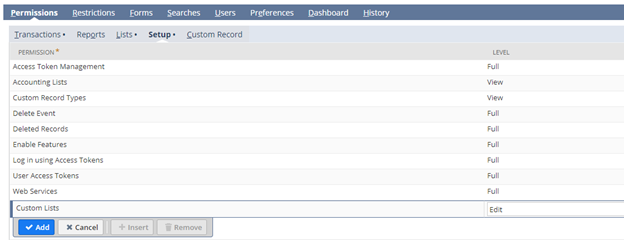
- Go to the Permissions sub-tab to update the levels for Transactions, Lists, and Setup
Updates to Transactions Permissions:
IMPORTANT: Add or update the permission on Transactions so that Customer Payment is at the "Edit" level.
The rest of the items/permission levels will follow this screenshot:
Updates to Lists Permissions:
IMPORTANT: Add or update the permission on Lists so that Currency is at the "Edit" level. Include Tax Records also at the "Edit" level. Without these changes, the integration will not work due to insufficient permissions.
The rest of the items/permission levels will follow this screenshot:
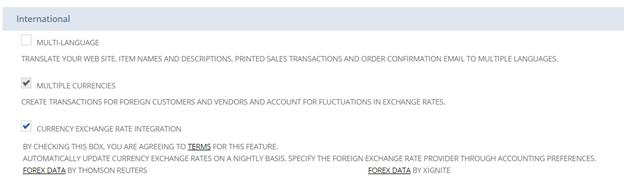
If you do not find the Currency item, it is likely that your Netsuite system is not yet enabled with Multiple Currencies. Do so by going to Setup > Company > Enable Features
Updates to Setup Permissions:
IMPORTANT: Add or update the permission on Setup so that Custom Lists is at the "Edit" level
The rest of the items/permission levels will follow this screenshot:
What happens if you do not see payment information in your Netsuite system after adjusting the permissions?
To the extent possible, the necessary permissions required for the payment integration have been included in this document.
There may be additional settings required to be added which YayPay Support will communicate to you (specific to your NetSuite instance - this will only be known in consultation with YayPay’s Engineering team based on their log analysis you provide, e.g.:
e.g.
Detail: INSUFFICIENT_PERMISSION Permission Violation: You need the 'Lists -> XXXX' permission to access this page. Please contact your account administrator.
e.g.
Detail: INSUFFICIENT_PERMISSION > You do not have permission to set a value for element exchange rate due to one of the following reasons: 1) The field is read-only; 2) An associated feature is disabled.
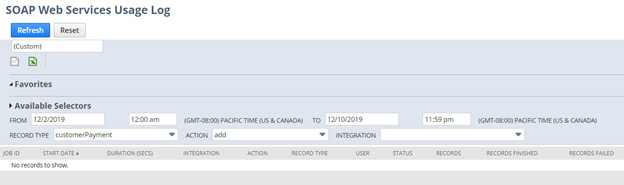
You should provide the NetSuite Log files (go to Setup > Integration > Web Services Usage Log) and use the Record Type: "CustomerPayment" and Action: "add" to download and provide the Request and Response logs in XML:
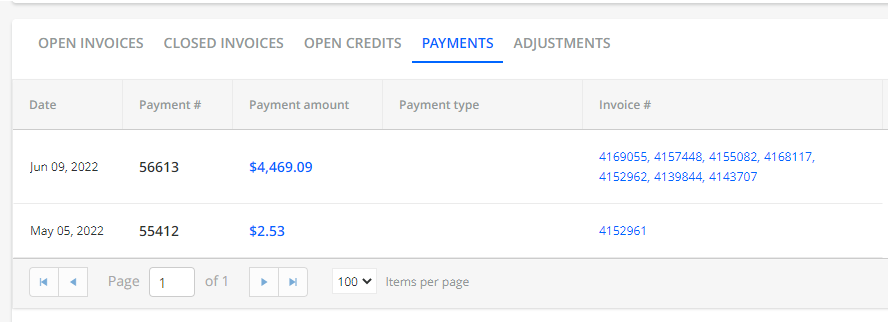
4. Viewing Payment information in NetSuite
Successful Payments captured through YayPay will be sent to NetSuite. Payments in YayPay can be:
- Payment made against one or several invoices
Refer to: https://yaypay.helpjuice.com/payments/payment-flow-from-internal-statement-page - Payment made at the Account level
Refer to: https://yaypay.helpjuice.com/payments/auto-recurring-payments
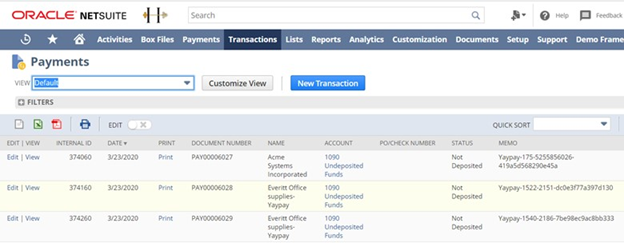
To validate this, log into your NetSuite system. Go to Transactions > Customers > Accept Customer Payments > List to view the transactions:
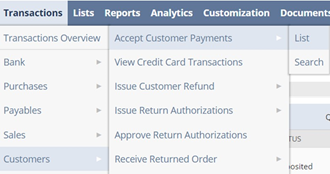
Click on View or Edit to look at the appropriate payment transaction – it should also be shown as “Applied” against the Invoice that the payment was made for
Note:
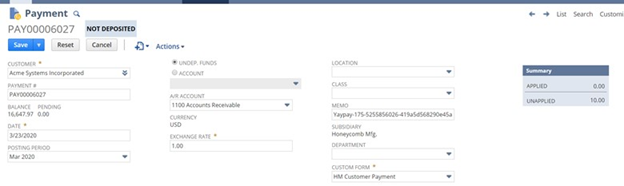
- The Memo field contains the prefix "Yaypay" to denote that this was sent from YayPay. The rest of the string/characters represent the Transaction Code from the Payment Processor (similar to what you would find in the YayPay Payments Report explained later)
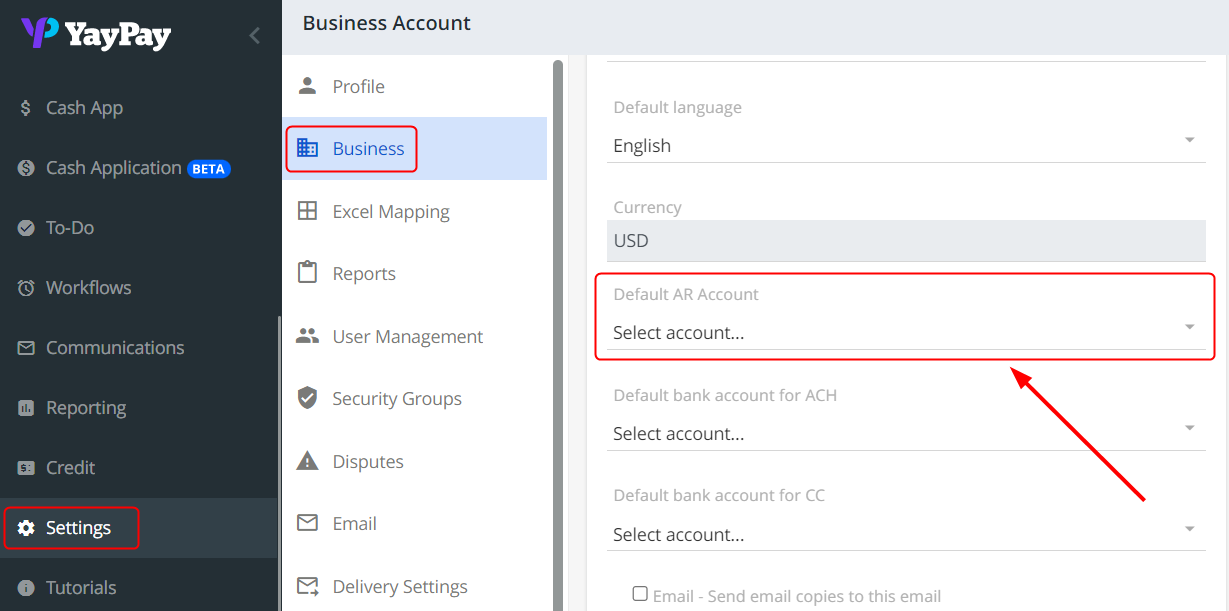
- Payment info will be typically sent to NetSuite as an undeposited fund (into the Undeposited Fund Account) unless you selected an Account linked to your Bank, which is configured under the Business Settings page of YayPay:
- Apart from Bank accounts, YayPay is also able to sync AR accounts with NetSuite.
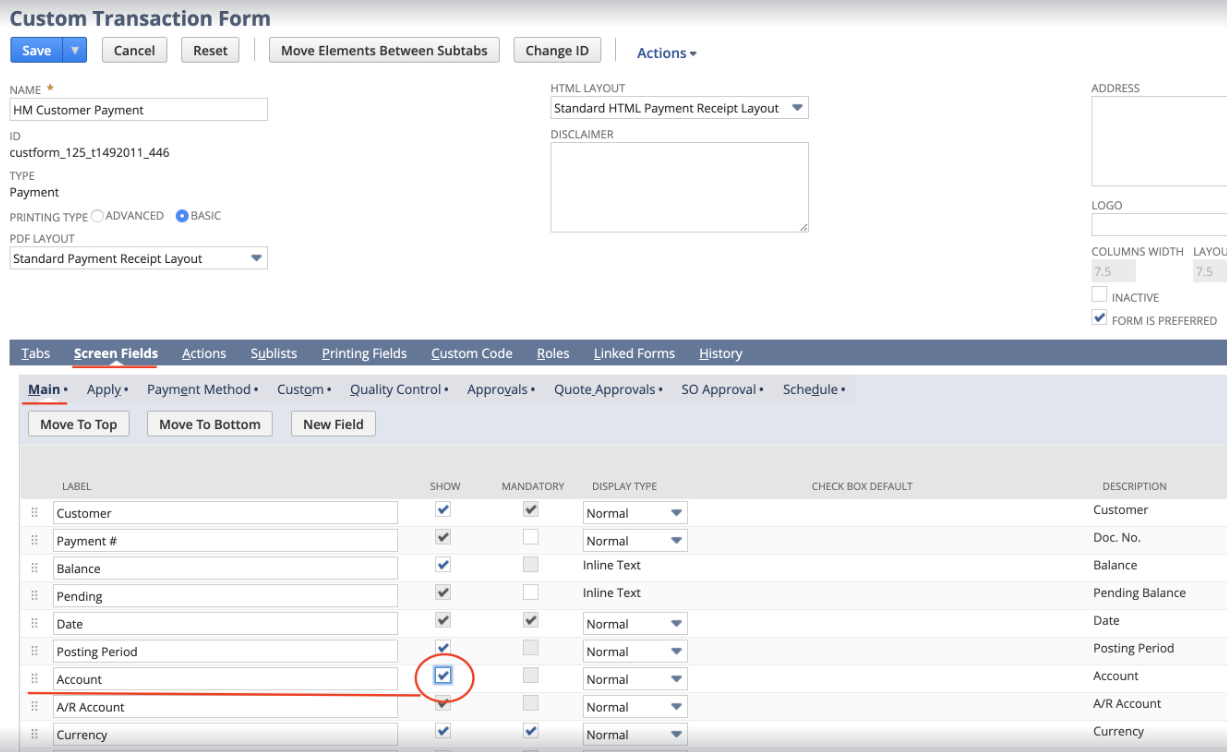
- If an Account is chosen for YayPay to send the information to in NetSuite, the following has to be done also on the NetSuite side, i.e. to expose the Account field by clicking on the "Show" checkbox (this is done by clicking on Customize on the top right corner):
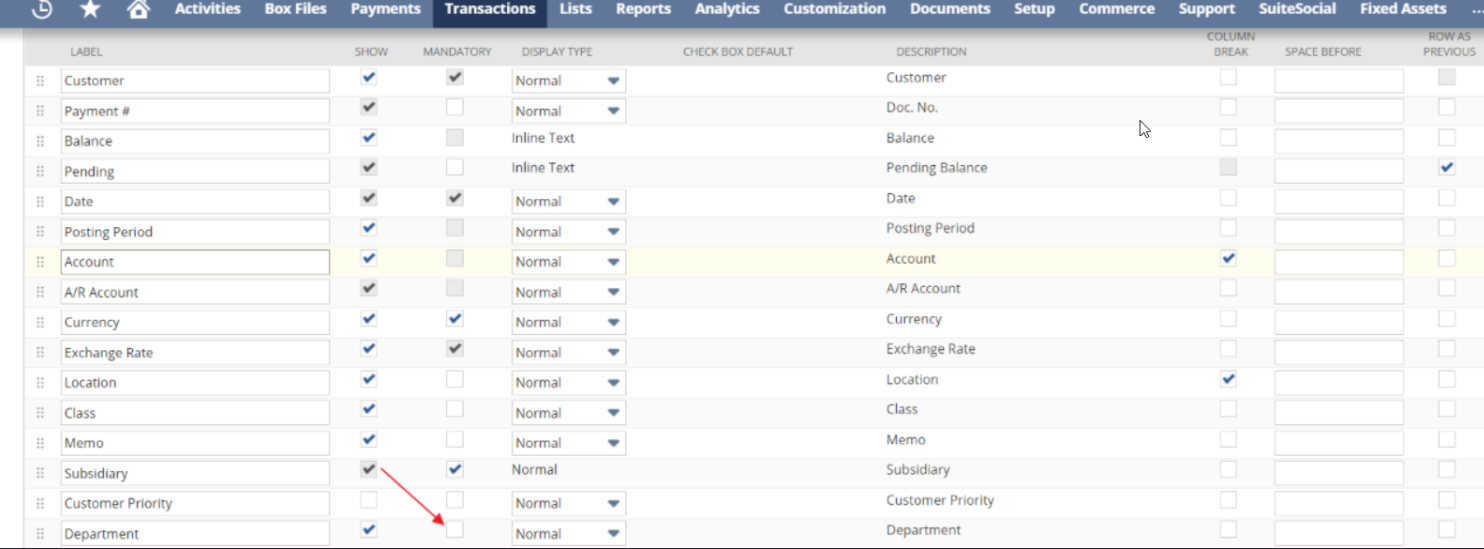
- Make sure the Department field is NOT set to be mandatory:
- If you have a Customized Form for Payments, go to Customization > Forms > Transaction Forms. Then go to Screen Fields tab > Main Subtab, disable the Department field under the MANDATORY column (i.e., make it OPTIONAL), and click "Save":
- If you do not have a Customized From for Payments, go to Setup > Accounting > Accounting Preference, disable the "Make Department Mandatory" preference in the General tab, and click "Save".
- If you have a Customized Form for Payments, go to Customization > Forms > Transaction Forms. Then go to Screen Fields tab > Main Subtab, disable the Department field under the MANDATORY column (i.e., make it OPTIONAL), and click "Save":
- If payment is made to a customer who is linked to an inactive subsidiary, such payment cannot be pushed to ERP (an error occurs!).
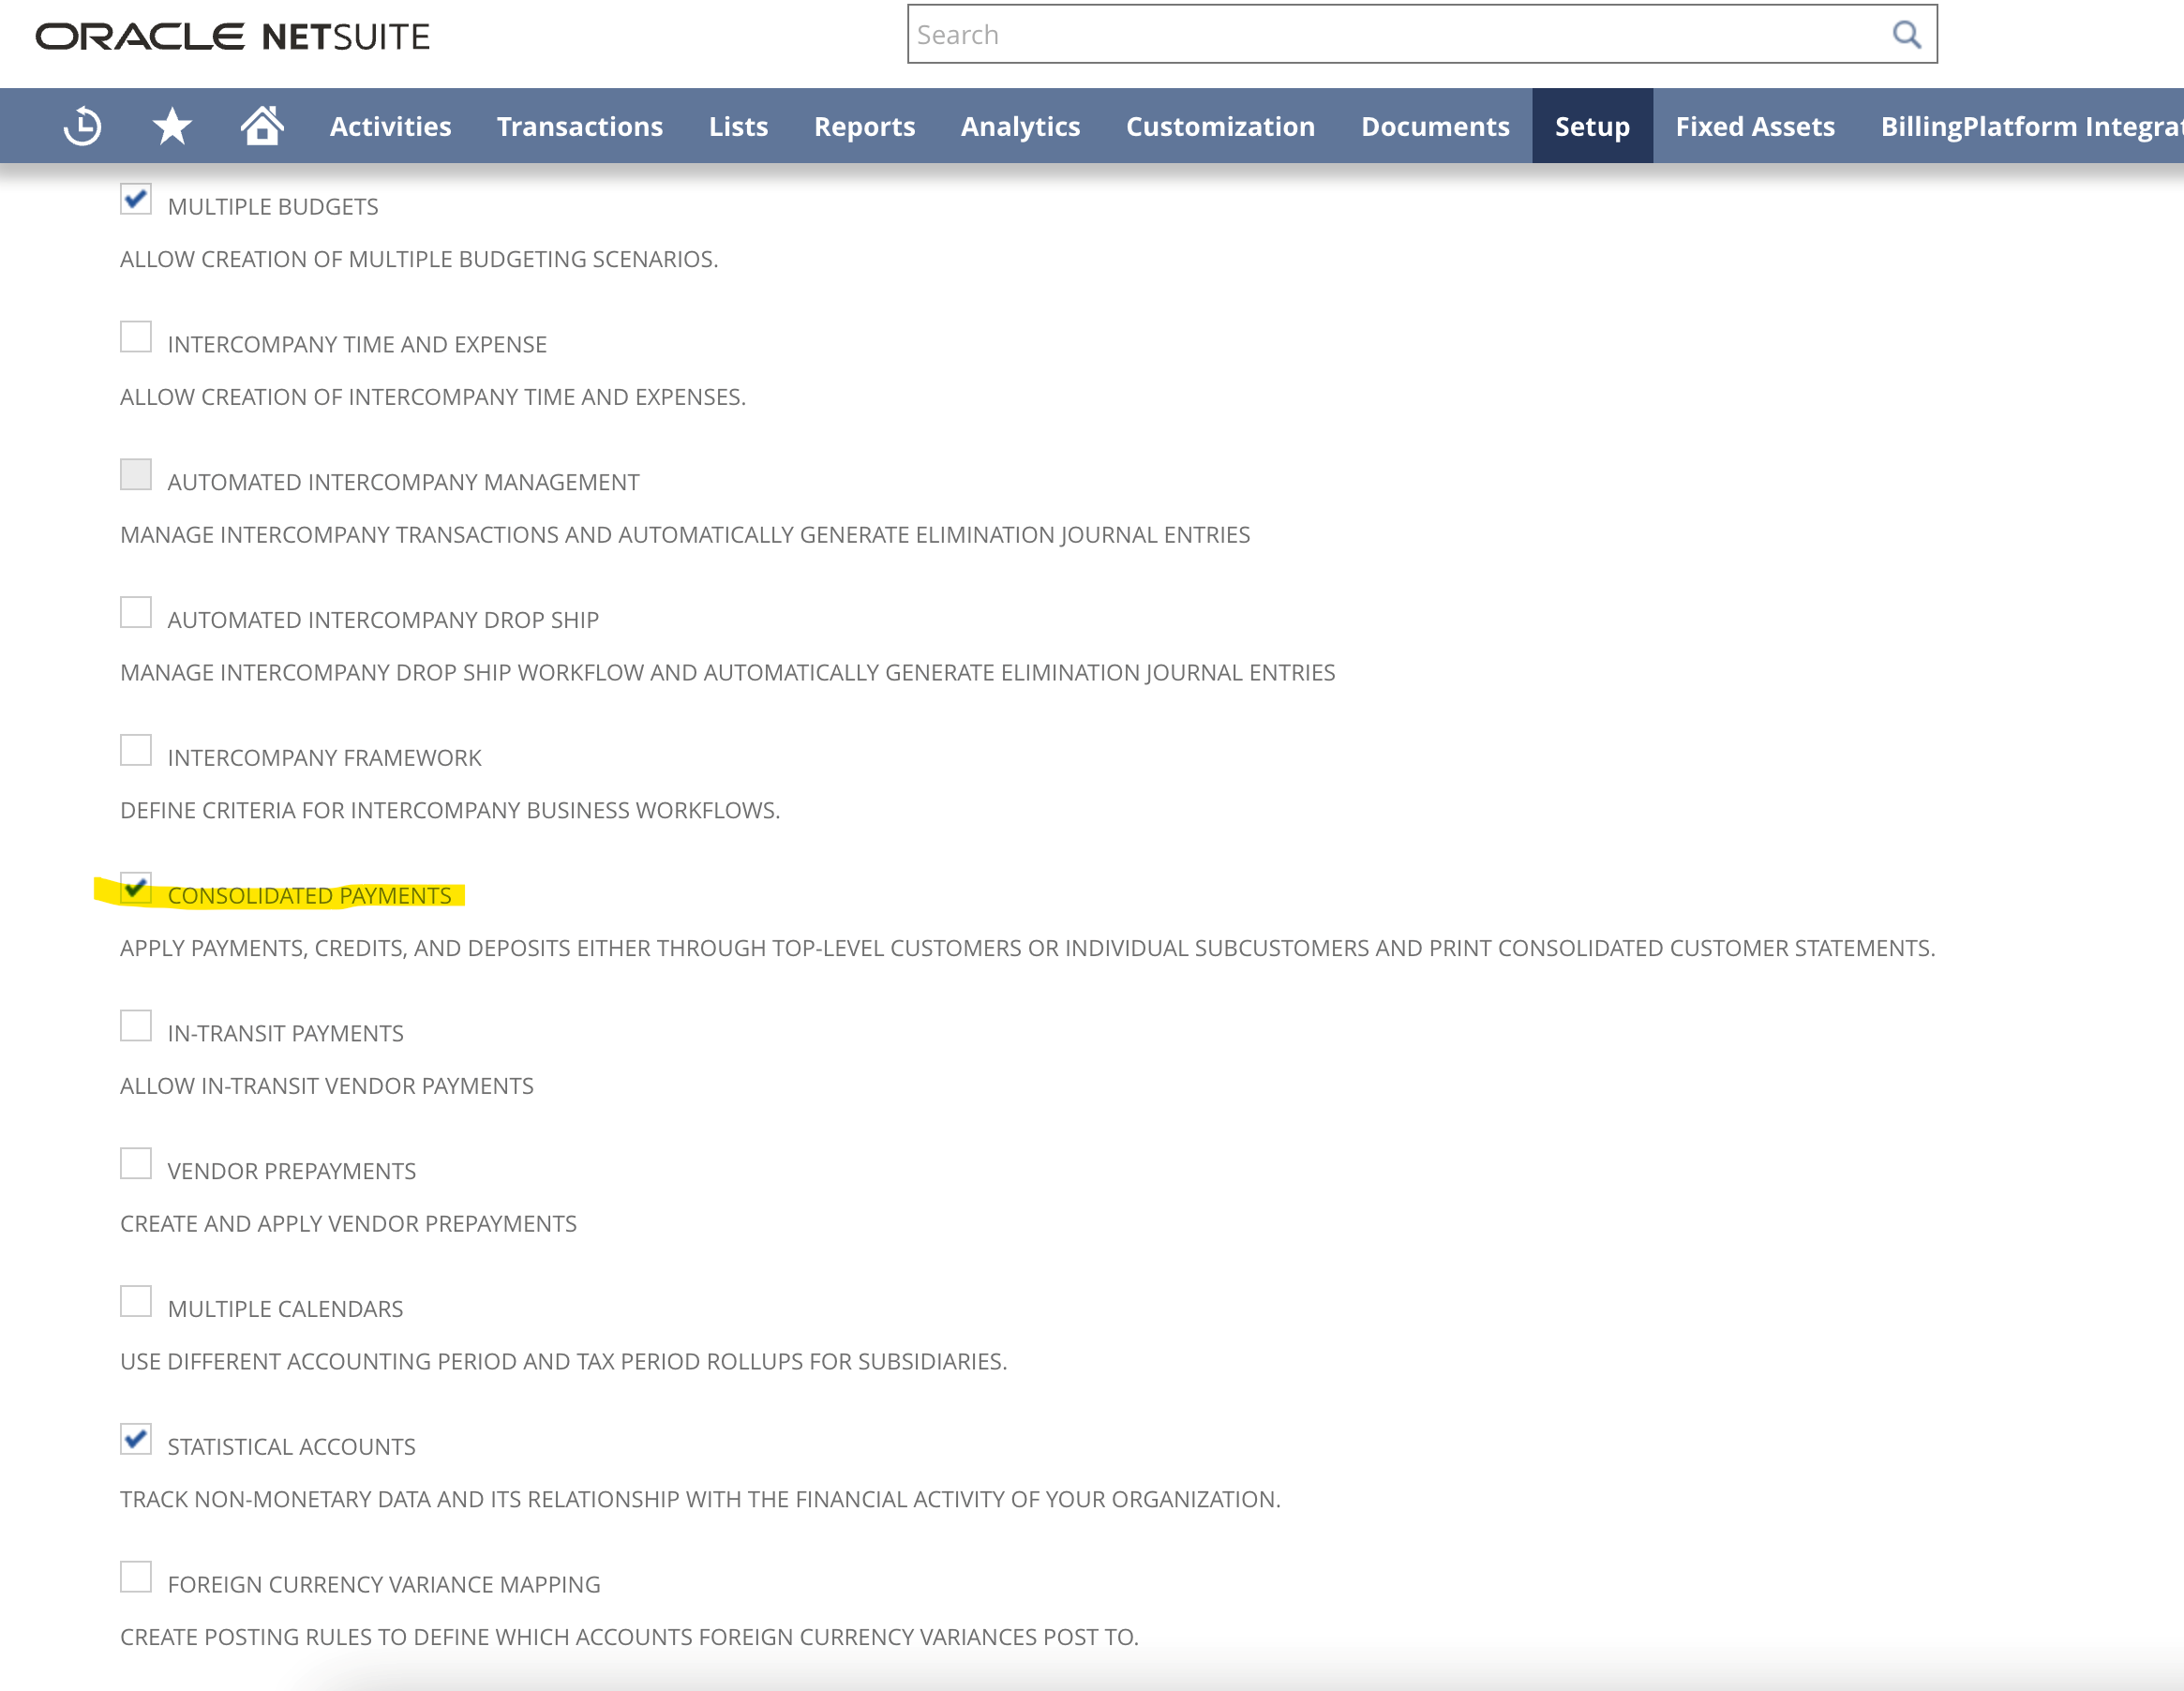
- YayPay system supports pushing payments made by a parent business for its child company. In order for this to work properly, enable consolidated payments option in NetSuite: Setup > Company > Enable Features > Accounting (subtab) > CONSOLIDATED PAYMENTS
- NetSuite doesn't allow to push payments in case the customer has status PROSPECT. It must have the status of the Customer or Project to accept payment.
5. Pushing Additional Payment Fields to NetSuite
By default, YayPay's payment modules can push payments to NetSuite with a predetermined set of data fields.
This section describes how to configure YayPay to include additional native or custom fields (e.g. class, division, location, etc.) to the payments pushed to NetSuite:
- Ask YayPay Support or your YayPay representative to activate this feature (i.e. pushing additional payment fields) for you.
You can also ask them for assistance with the following setup. - Go to Settings | ERP/CRM Custom Fieldsin YayPay to check that new tabs have become available to you:
-
CUSTOMER PUSH PAYMENTS – Configures customer-level additional fields that you want to push to NetSuite for each payment.
If you configure no additional fields on this tab, the connector pushes no additional fields to NetSuite. -
INVOICE PUSH PAYMENTS – Configures invoice-level additional fields that you want to push to NetSuite for each payment.
If you configure no additional fields on this tab, the connector pushes the default values of the corresponding fields configured on the CUSTOMER PUSH PAYMENTS tab.
-
CUSTOMER PUSH PAYMENTS – Configures customer-level additional fields that you want to push to NetSuite for each payment.
- Configure the additional fields you want to push to NetSuite using the same set of settings on both tabs:
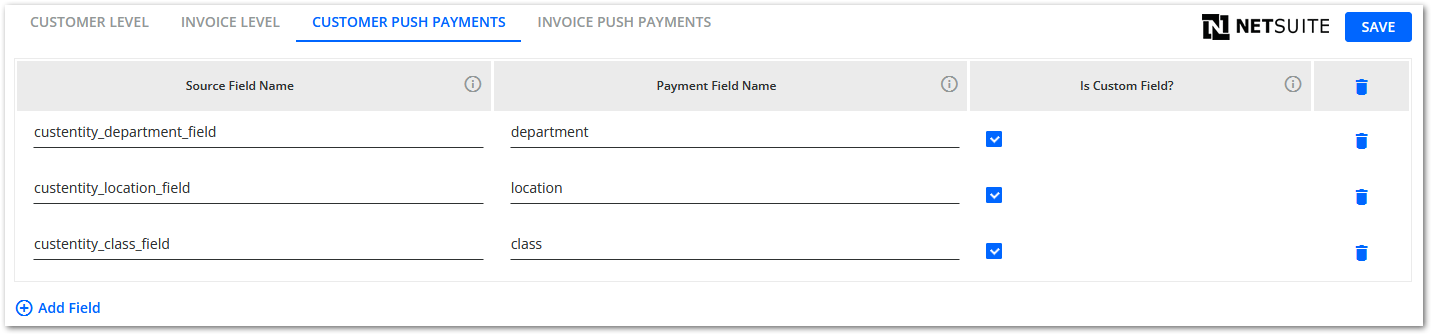
-
Source Field Name - Defines the ID of an additional data field (that exists in NetSuite) whose value you wish to include in each payment pushed from YayPay.
To obtain the given ID:- For custom fields – Obtain the ID of the given custom field in NetSuite:
- Go to the customer or invoice page that contains the given custom field.
- Click on the custom field to open its Field Help dialog.
- See the Field ID value.
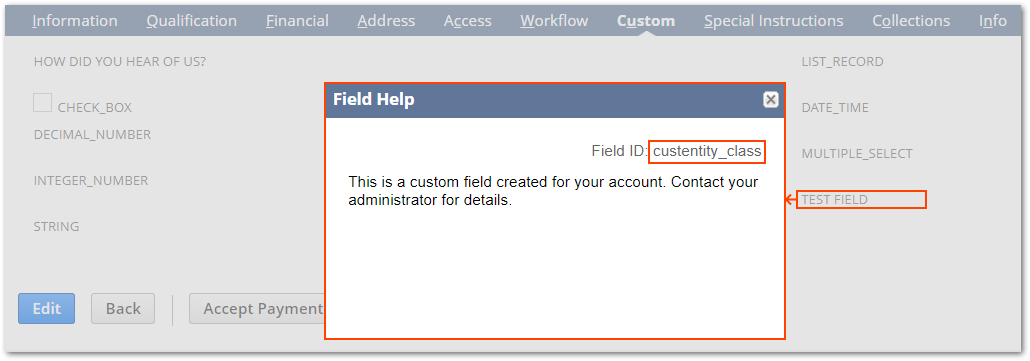
- For the native fields Class, Division, and Location use the following configuration:

- For custom fields – Obtain the ID of the given custom field in NetSuite:
-
Payment Field Name - Defines the ID of the additional data field that will display (on the NetSuite payment page) the value retrieved from the source field.
Obtain the given ID inNetSuite:- Go to the payment page that contains the given field (native).
The Payment Field Name only supports the following native payment fields:Class
Division
Location
- Click on the field to open its Field Help dialog.
- See the Field ID value.
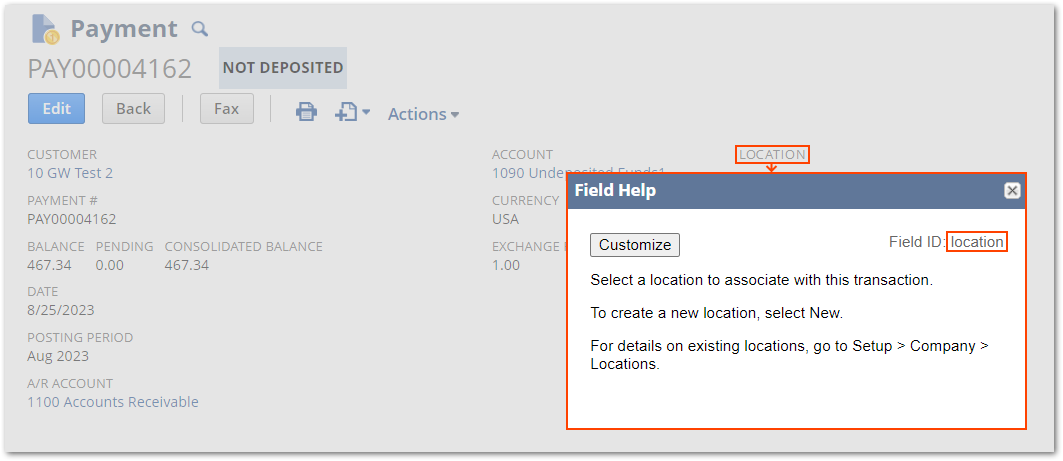
- Go to the payment page that contains the given field (native).
- Is Custom Field? - Defines whether or not the configured field is a custom field in your NetSuite system. You must check it for every custom field for the configuration to work.
-
Source Field Name - Defines the ID of an additional data field (that exists in NetSuite) whose value you wish to include in each payment pushed from YayPay.
- Click on SAVE to finish the configuration.
6. Frequently Asked Questions
Is the Payment Integration to NetSuite affected if the "PAUSE ALL" button is pressed (the button is found in the Settings > Integrations page of YayPay)
Yes, the Pause All operation pauses both the AR Sync from NetSuite to YayPay and the Payment creation from YayPay to NetSuite
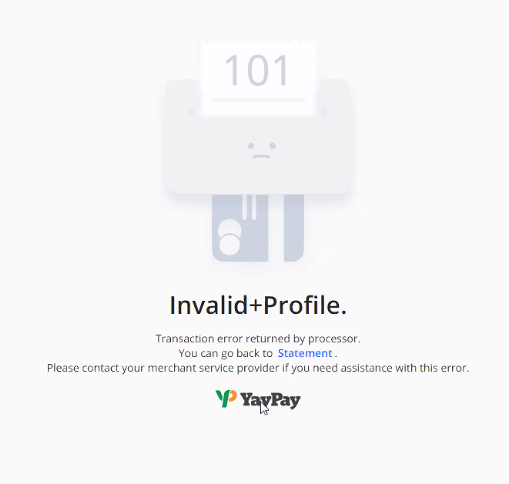
What does the 101 error code mean?
If you see a 101 error code, this usually means the Payment Type (e.g. ACH Payment) linked to your Merchant Profile provided by the Payment Processor may not be established yet, hence the ACH payment transaction captured via YayPay is shown to be not successful, and no transaction will also be pushed to NetSuite.
Why can't I allocate the payment pushed to NetSuite?
If you push a payment that is not allocated to any invoice in YayPay, NetSuite will display such a payment, but will not allow allocating it to any document. This is due to NS internal design issues, that's why it is a good idea to apply payments to invoices in YayPay before pushing them to ERP.
