As an AR Representative, you can use the customer's Statement to record and accept invoice payments on behalf of the customer. This includes managing payments for single or multiple invoices, setting up auto payments or accepting payments on account.

Your customers can also directly make the same invoice payments via their Customer Portal page. For more information, see Making Payments from the Customer Portal.
To learn about the configuration options related to making payments through YayPay, refer to the Payment Settings section.
Alternatively, you can make invoice payments via the INVOICES page: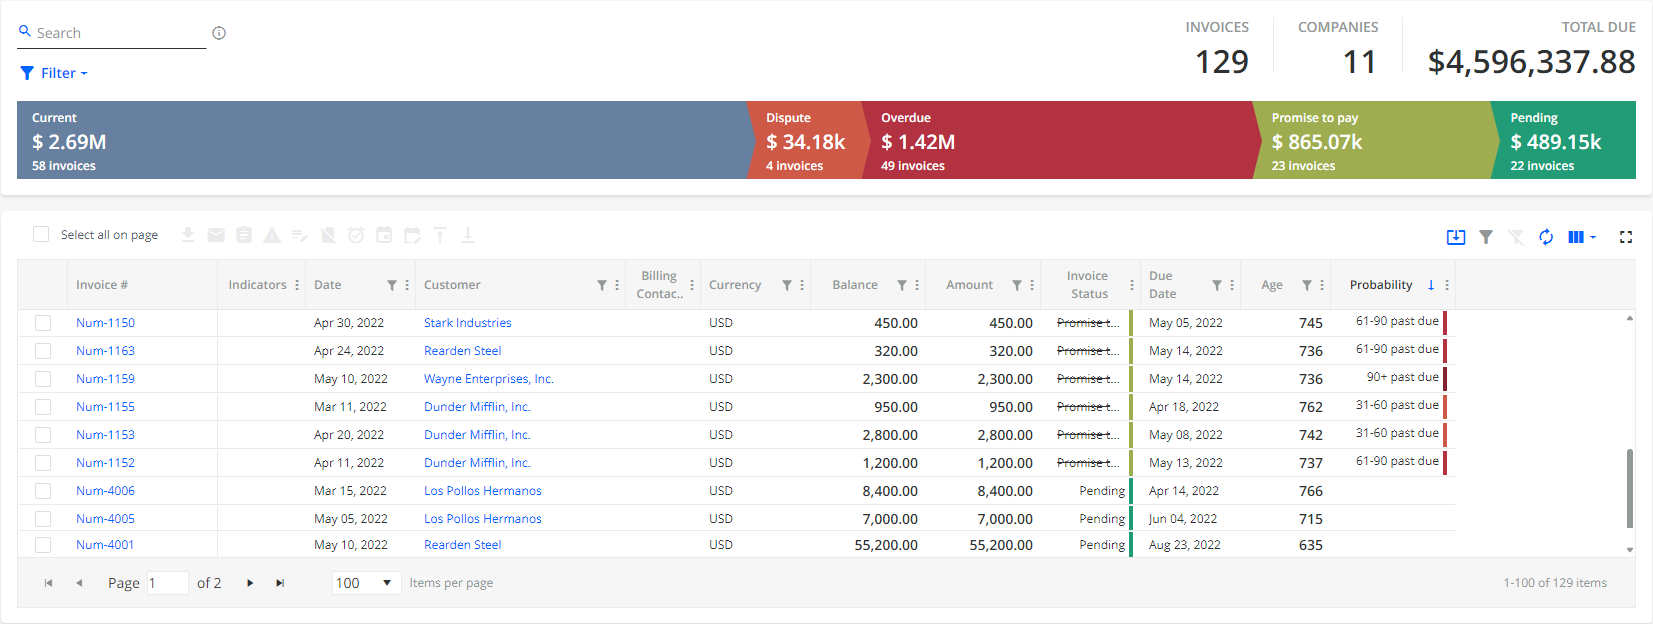
Accepting (making) Invoice Payments
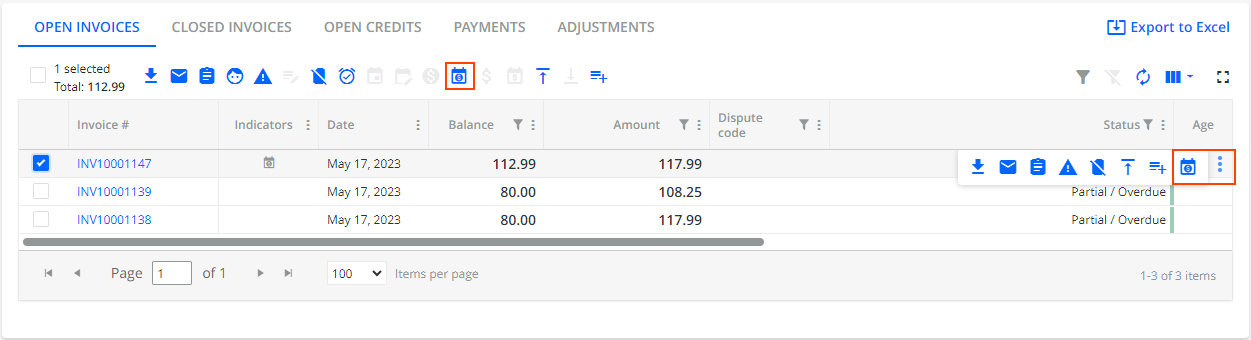
This is more useful if you are accepting (making) payments for multiple invoices within the same Customer. Select the checkbox next to each Invoice # and then select the Pay action/icon:
Note: the maximum number of invoices paid in bulk is 100.
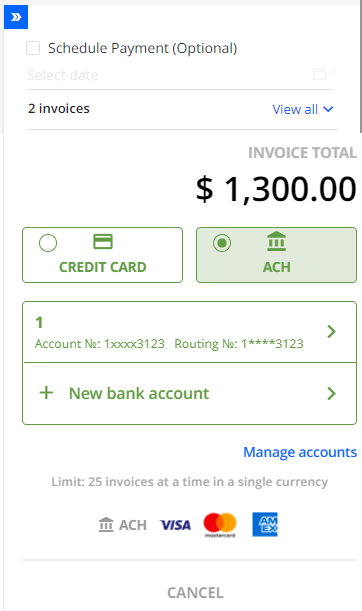
After selecting the Invoice(s), you will also have the ability to apply Open Credits on the Account to offset the payment. You can add multiple Open Credits if there is more than 1 Credit Memo that is Open.
Optionally, you can also schedule a payment. 
Note: Assuming the payment attempt was successful, the status of the Open Credit Memo will change from being "Open or Partial" to "Pending" so that it is not available to be selected again:

If you do not want to apply the Open Credits, choose the appropriate Payment Type in accepting (making) this payment.
Click on the "Credit Card" button or "ACH" ** button to move to the next step of the Invoice payment:
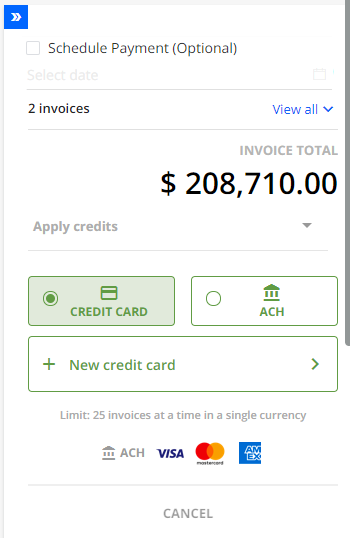

** The default Bank Payment Type Label "ACH" can be changed to "Bank" or "EFT" to suit the nomenclature in your operations. See the Payment Settings Article link above.
If there are no Payment Accounts saved previously, select "+ New Credit Card" for Credit Card Payment, or "+ New Bank Account" for ACH Payment, and you will be directed to a new page to enter the Billing address information.
Note: if a payment is made for the first time, the billing data from the customer's record will be pre-populated. For subsequent payments, the billing data from the previous payments will be used. 
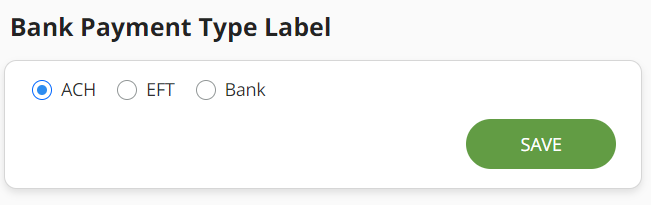
Next, you will be directed to a new secure page to enter the Credit Card number, Card Expiry, etc or the Bank Account and Routing Number, etc depending on the Payment Type selected previously.
You also have the option of saving the Payment account you entered for future use, or to continue without saving the Payment account. Once the payment information is completed, press the "Submit Payment" button:
Note: It could be possible that you may not be able to see the field/frame that allows you to enter the Credit Card Number securely (or Bank Account Number), etc. For example:
These are some possible reasons for the broken frame shown above:
- Review and check the Merchant Profile / Gateway URL settings in YayPay (remove spaces, etc). This is located on the Settings > Integrations page
- Review your Corporate Firewall settings with your Internal IT to enable the network traffic from YayPay to hit the Gateway URL
If a Payment account was saved previously, it will be listed to allow you / others in the AR team to select it instead of entering all of the information again.
An example of re-using a Saved Bank Account for another new Payment is shown below:
When the payment is submitted, the Processor will either return a successful or error result to YayPay - the outcome will be shown under the Payment Activities tab in the Statement page for the AR Team: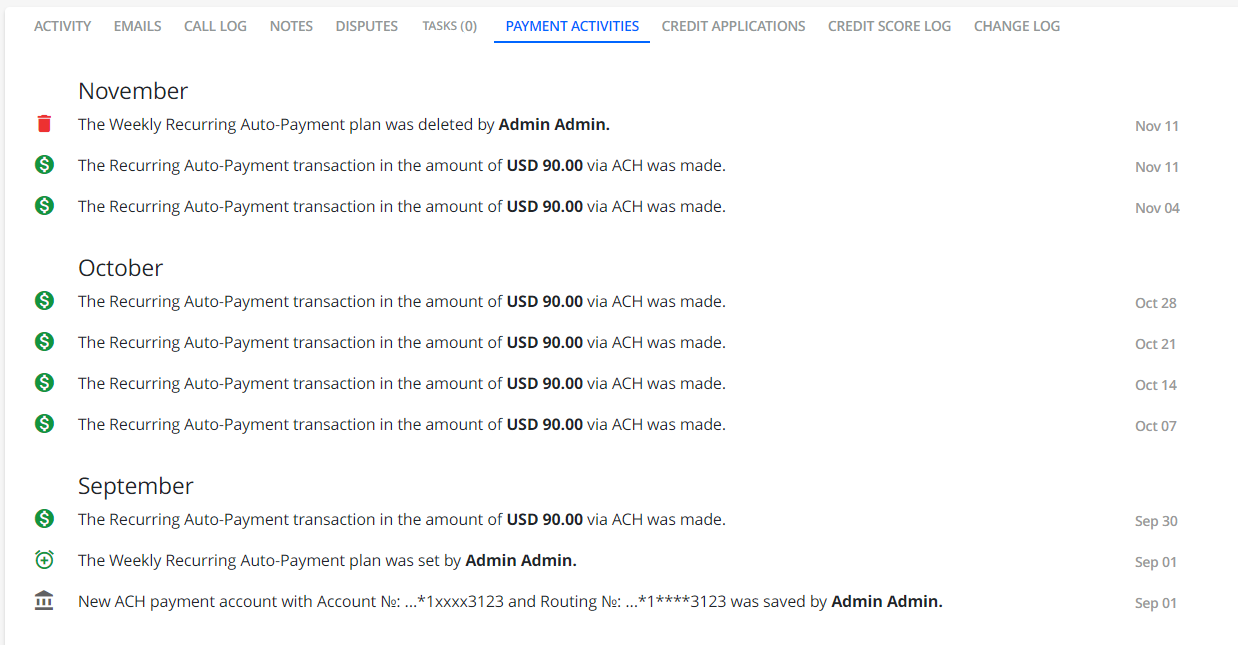
The Payments Activities tab (located at the bottom of the Statement page) will give you a Summary of all Payment related actions performed through YayPay, by you or your Customer through their Customer Portal page.
In addition, if the payment transaction was successful:
- You will have the ability to print a Transaction receipt
- The invoice(s) that were part of the successful payment transaction will have their status updated to "Pending" in YayPay. This is to make sure you and/or your Customers do not make another payment on the same Invoice(s) by accident
At the point when the Invoice status changes to "Pending", the Invoice payment information will also be sent from YayPay to your ERP in the background (this integration works for NetSuite and Intacct, as well as if you called YayPay's transactions API).
At the next sync with your ERP, the payment transaction that was accepted/applied to the Invoice will update the Invoice status in YayPay from "Pending" to "Paid".
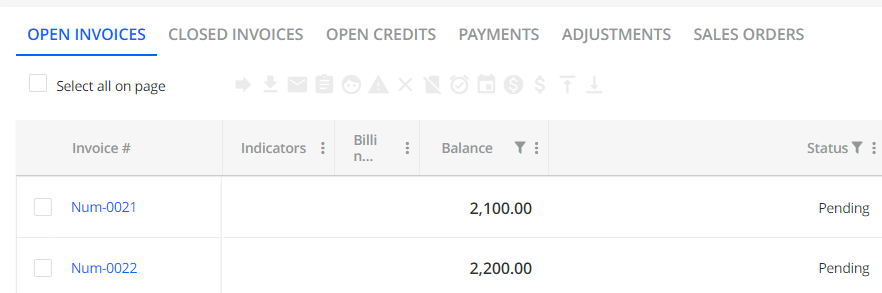
The Invoice record will also move from being shown under the Open Invoices tab to the Closed Invoices tab if it was a full payment. Otherwise, it will still remain under Open Invoices tab if it was only a partial payment.
Scheduled Payments
You can schedule your one-time payments for a specific day in the future. This reduces the risk of late payments and eliminates the need for notes and reminders to make manual payments.
The following sections describe how to schedule a payment and how to manage an already scheduled payment.
Scheduling a Payment
This section describes how to schedule a payment for a specific date.
To do so, you need to follow the same steps as when you want to make a full/ partial payment. There are only a couple of additional settings required for scheduling a one-time payment.
To schedule a one-time payment:
Go to the Statement page, select the invoices you want to pay, and click on the Pay icon.

-
In the Pay invoice dialog that opens, check the Schedule Payment (Optional) check box and select the day you want to pay the invoices from the date picker.

The date range available in the date picker depends on the number of days set in Available date range for scheduled payments _ day(s) on the Payments section in Settings | Business.
Fill in the other payments details in this dialog as described in the Accepting (making) Invoice Payments article.
Available payment methods for scheduled payments depend on the current business settings, i.e. the selected payment providers and their abilities to process payments. For example, if you set a Credit Card limit it also impacts scheduled payments and their execution.- Click on the Schedule Payment button to confirm the future payment and to proceed to the Payment page where you will complete the payment.

Once a payment is scheduled:
The information appears on the Payment Activities tab on your Statement page.

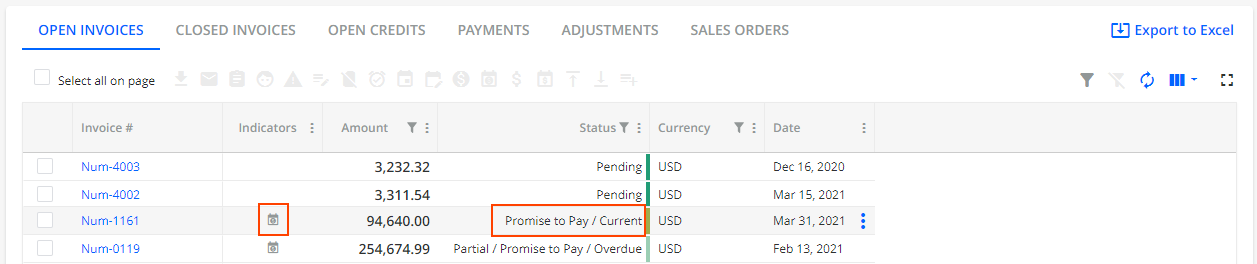
Invoices with scheduled payments are indicated with a Scheduled Payment icon displayed in the Indicators column and a Promise to Pay status in the Status column on the Statement page.
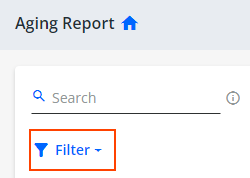
You can filter customers with scheduled payments by selecting Has Scheduled Payments from the Filter option located in the top left corner of the Aging Report page.
You can add an additional Scheduled Payment Date column on the Statement page, Invoice page or on the Customer Portal. The column displays the scheduled payment date of an invoice. You can sort the column as well as filter invoices with scheduled payments.
Managing Scheduled Payments
To manage an already scheduled full/partial payment, go to the Open Invoices or Open Documents tab (if enabled) on the Statement page, select an invoice which has a payment scheduled for a future date, and click Manage Scheduled Payments icon in the action bar located above the grid.
Alternatively, click on the three vertical dots that appear when you hover your mouse pointer over a single invoice with a scheduled payment.
Clicking on the Manage Scheduled Payments icon opens the Manage Scheduled Payment dialog. 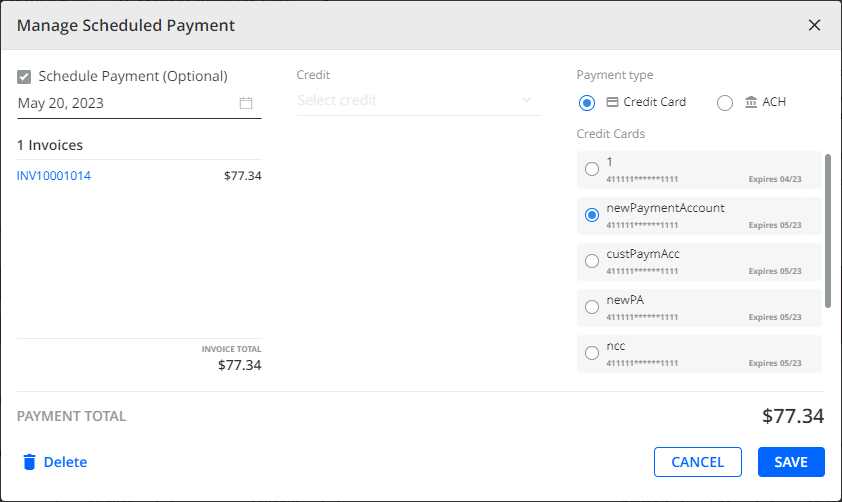
In this dialog, you can see the scheduled payment's details and edit some of the settings:
Schedule Payment (Optional)
Displays the date when the invoice will be paid.
Click on the date picker to change the payment date. The date range available in the date picker depends on the number of days set in Available date range for scheduled payments _ day(s) on the Payments block in Settings | Business.
1 Invoice
Displays the invoice number and the amount of money the invoice is issued for.
Clicking on the invoice number opens the invoice itself.
Payment type
Displays the payment method selected for making the payment.
Click on the method name to change the method for making the payment. When you select a payment method, additional options appear below. For example, if you select Credit Card Payment type, then below this selection, a list of your saved credit cards appears.
Available payment methods for scheduled payments depend on the current business settings, i.e. the selected payment providers and their abilities to process payments. For example, if you set a Credit Card limit it also impacts scheduled payments and their execution.
Delete
Deletes the scheduled payment and its settings.
Cancel/ Save
Discards or saves the changes made to the scheduled payment settings.
Additionally, if you create, edit or delete a scheduled payment, these actions are logged on the Payment activities tab of the Statement page.
Impact of Scheduled Payments on Promise to Pay Invoices
Once you schedule a payment, YayPay automatically checks whether there is a Promise to Pay linked to that invoice. Scheduling a payment or managing an already scheduled payment has the following impacts on promise to pay invoices:
If an invoice already has a promise to pay linked to it and you schedule a payment for that invoice, YayPay replaces the original promise to pay with a new one using the information and data from the scheduled payment.
If an invoice has no promise to pay linked to it and you schedule a payment for that invoice, YayPay automatically creates a promise to pay which using the information and data from the scheduled payment.
If you schedule a payment, you cannot manually create a promise to pay for that invoice. This is because when scheduling a payment, YayPay automatically creates a promise to pay associated with that invoice.
If you edit a scheduled payment, YayPay automatically updates the associated promise to pay to reflect the changes.
If you delete a scheduled payment, the associated promise to pay is also deleted.
IInvoices with scheduled payments are indicated with a Scheduled Payment icon displayed in the Indicators column and a Promise to Pay status in the Status column on the Statement page.

If YayPay automatically creates a promise to pay for an associated invoice, the system logs this action on the Activity tab of the Statement page.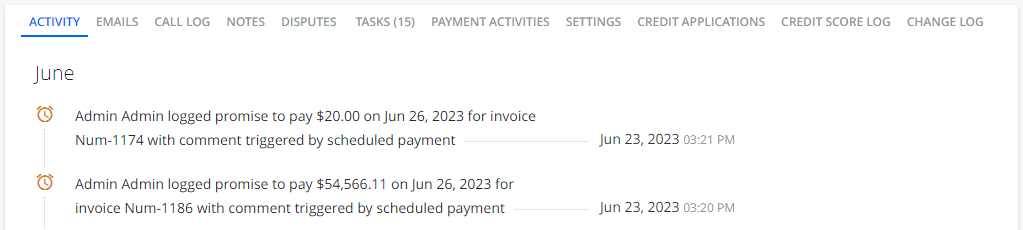
Saving a Payment Account
You can save a payment account on behalf of your customer (with their acknowledgment) for future use without making a payment transaction through YayPay:
- Go to a customer's Statement page.
- Click on the Manage payment accounts icon to open the Manage Payment Accounts dialog.
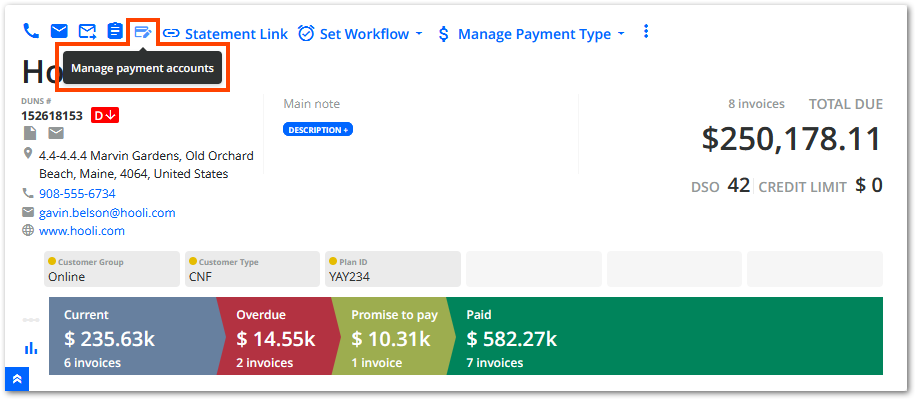
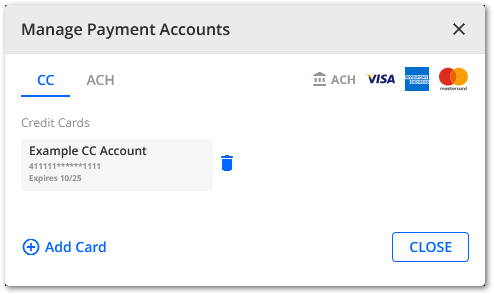
- Use the Manage Payment Accounts dialog to configure and save customer payment accounts:
- Click on the Add Card button on the CC tab to configure credit card accounts.
- Click on the Add Account button on the ACH tab configure bank accounts.
Configuring Payment Providers for Saved Payment Accounts
If your YayPay business utilizes both a primary and secondary payment provider, the primary provider is automatically assigned to each saved payment account.
This default behavior is ideal for most businesses as most primary payment providers can:
- Process credit card transactions in any currency.
- Process ACH transactions in USD.
However, if you need to process ACH transactions in a different currency, such as EUR, you need to take the following steps:
- Ensure your business has one of the following secondary payment providers set up:
- GoCardless® – Can process ACH transactions in any currency.
- FlyWire® – Can process ACH transactions in any currency that you have configured.
- Enable the Use Customer’s currency for saving payment methods setting in Settings | Business.
That instructs YayPay to link each saved payment account with a payment provider that can process transactions in the customer's currency.
Example Scenario
Consider this example scenario:
- Your YayPay business uses REPAY® (primary) and GoCardless® (secondary) as payment providers.
- A customer uses EUR as their currency.
- You need to save a payment account for processing EUR transactions for that customer.
By default, YayPay would assign REPAY® to a saved ACH payment account. However, REPAY® cannot process EUR transactions.
With Use Customer’s currency for saving payment methods enabled, YayPay will:
- Recognize that the customer's currency is EUR.
- Assign GoCardless® to the saved ACH payment account, as GoCardless® can process ACH transactions in any currency.
