This section summarizes the steps for setting up and starting the integration between Acumatica and YayPay.
See the following sections for detailed instructions on each step:
(1) Publish the Customization Package in Acumatica
To learn how to import and publish an external customization package in Acumatica, see the Acumatica: Import and Publish Customization Package article.
(2) Configure YayPay with your Acumatica Credentials
This section explains how to configure YayPay to connect to your Acumatica account:
Log into YayPay.
Navigate to the Settings | Integrations page and click on the Manage Business Systems button located on the right side.
- In the Manage Business Systems that opens, select Acumatica.
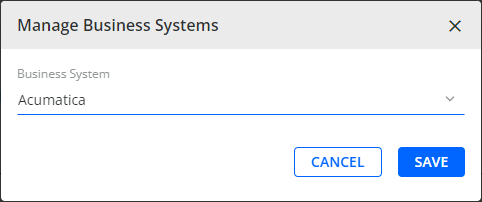
Click SAVE to confirm the settings.
- On the Acumatica Connector Settings panel that appears, specify the settings needed for the synchronization:
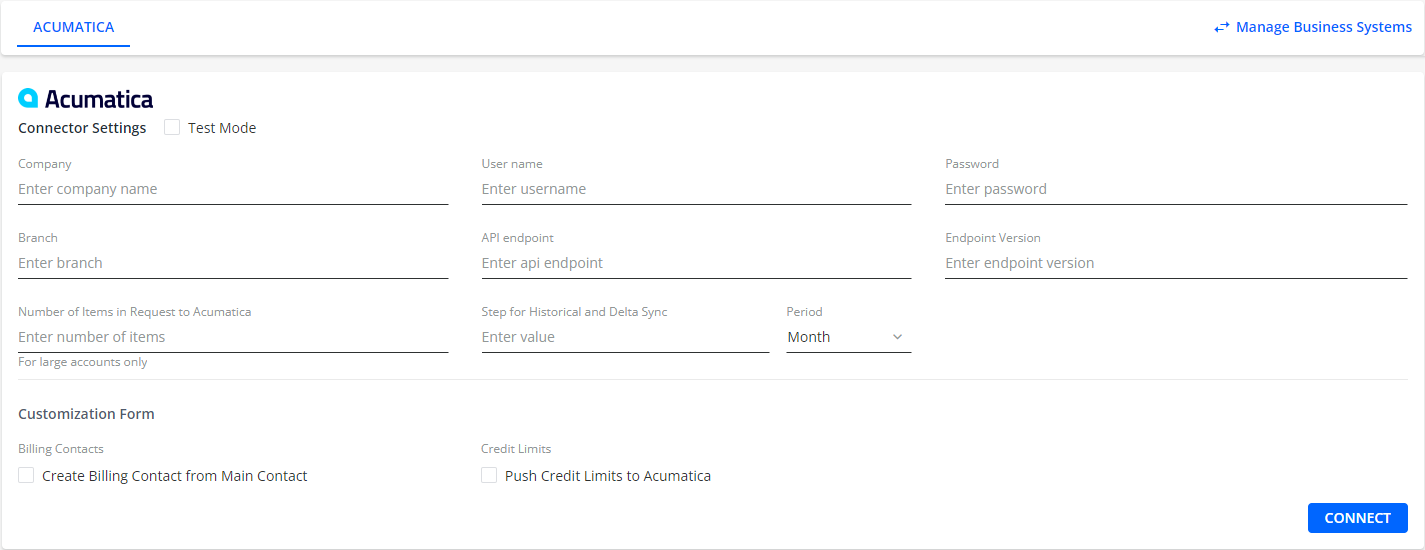
Test ModeIf checked, it verifies the connection settings without importing real data.
This can be useful when setting up or configuring the connection for the first time, as any entered data is stored separately and will not impact real data in Acumatica.
Company
Enter the name of the Company that you select on the Acumatica login page.
As the name is case sensitive, make sure to enter it exactly as it appears on your login page, for example: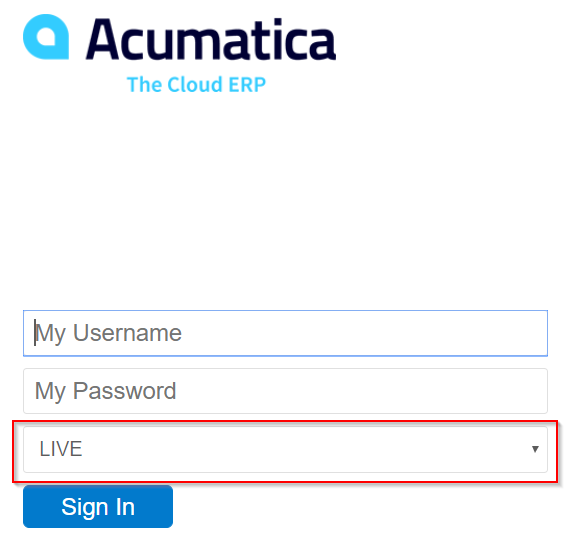
If your Acumatica ERP has multiple tenants that use the same application instance or URL, but access their own set of customer and AR data, then enter the Tenant Name in the Company field, i.e. the same name as you would select on your Acumatica login page. Additionally, make sure you use the correct YayPay Instance during the configuration.
YayPay can only import data from one Acumatica tenant (one Tenant ID). If you have multiple Tenant IDs in Acumatica, create a separate company in YayPay for each Acumatica tenant.Username/Password
Enter credentials to your Acumatica account.
It is strongly recommended to create a new user account with Administrator role privileges for the connection between Acumatica and YayPay (e.g. name the account "YayPay" for easy reference).
Branch
Enter a branch ID to synchronize data from an Acumatica Entity. The ID is case sensitive.
You can find the Branch ID in your Acumatica system under Configuration | Organization | Branches: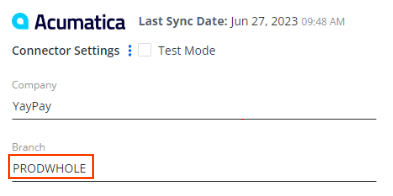

You can specify one branch only.
If you have multiple branches in your Acumatica system that represent subsidiaries under one company, you can sync them with YayPay and create separate YayPay subsidiaries. See the Subsidiaries section to learn more about working with multiple Subsidiaries. You have two options for syncing the branches:To consolidate your AR data from several Acumatica Branches, leave the Branch field empty.
-
To sync each Acumatica Branch as a separate YayPay subsidiary, enter the corresponding Branch ID in the Branch field.
You can find the Branch ID in your Acumatica system under Configuration | Organization | Branches: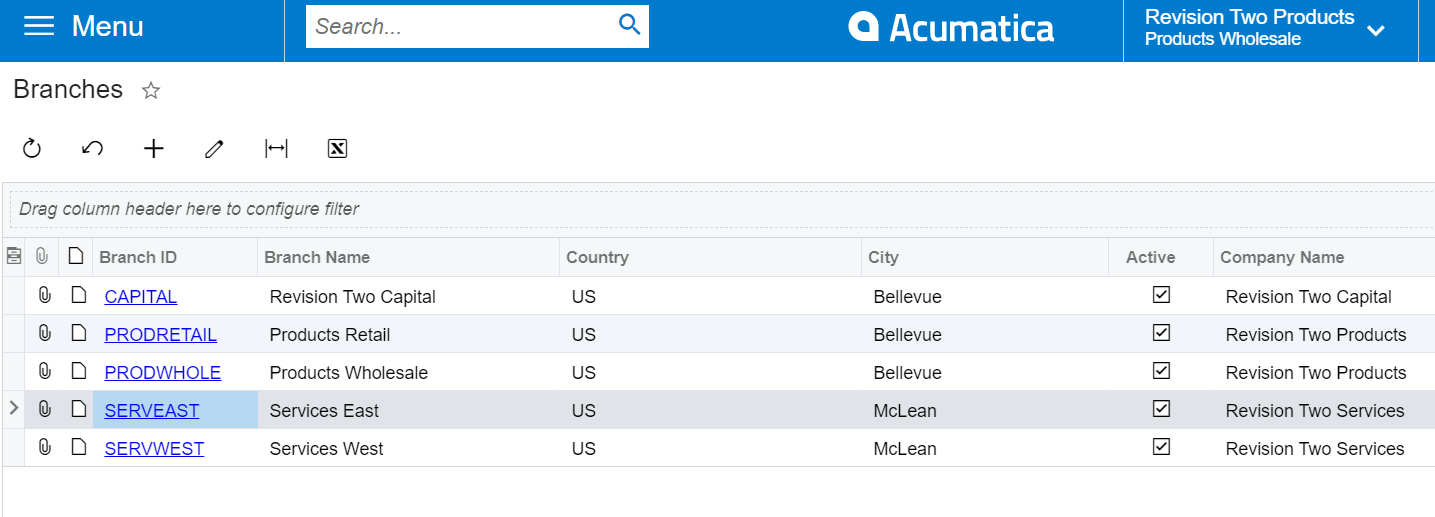
API endpoint
Enter the URL of your Acumatica system, e.g. https://acumatica_domain_name.Endpoint Version
Enter the endpoint's version that is displayed in Acumatica: This field is mandatory:
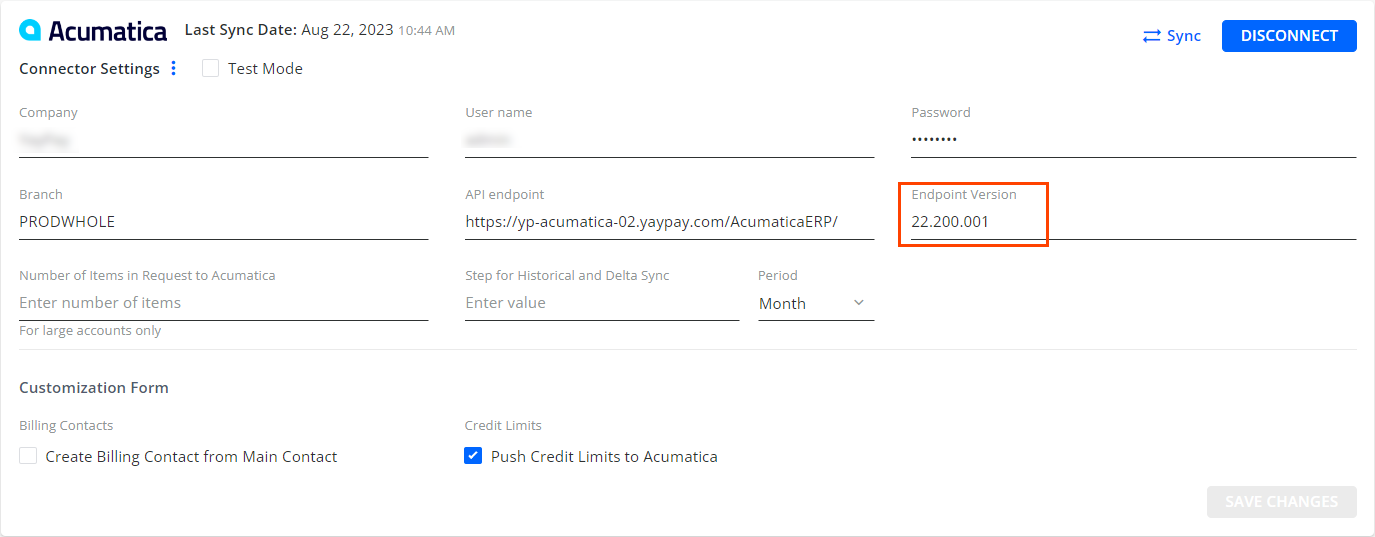
Number of Items in Request to Acumatica
If your invoice volumes fall in the range of 10,000 -15,000 invoices per month:
Specifies the number of items that will be retrieved within a single request.-
Enter 1 in Step for historical and delta sync and select Month to sync your historical data one month at a time. This happens in incremental steps until the sync moves forward to the current time.
If you do not specify this option, the first sync will import all open documents starting from 1st January 2015 until now.
Enter 500 in Number of Items in Request to Acumatica to keep the batch sync manageable.
Step for historical and delta sync
Optionally, you can use the setting to split the retrieved data into batches based on a specific time period.
For example, if you enter 5 and select Month for Period, the sync will import data starting from 2015 and split it into batches of 5 months each.Create Billing Contact from Main Contact
If checked, your Contacts for Customers in Acumatica will be imported into YayPay as Customer-Level Billing contacts.Push Credit Limits to Acumatica
If checked, credit limits updated in YayPay are pushed to Acumatica.
By default, YayPay imports credit limits from your ERP. However, if YayPay is used as the primary source for managing credit limits, the limits will not be imported from your ERP. Instead, any credit limits that are saved or updated in YayPay will be sent to Acumatica when you check this check box.
-
-
Click CONNECT and the Sync button to start the synchronization process.
This will import all Open and Historical AR data from Acumatica to YayPay.
During the initial synchronization, the connector only synchronizes open documents, i.e. documents with a non-zero balance such as open invoices, payments, adjustments, and credit memos, as well as customers (active and inactive with non-zero balance or with zero balance and open documents), contacts, accounts, etc.
The connector retrieves data from 1st January 2015 onwards. The initial synchronization is also performed when the integration is disconnected and then reconnected, i.e. there is no Last Sync Date value displayed. After the initial synchronization is completed, YayPay will continue to connect to your Acumatica system multiple times a day - these subsequent synchronizations will bring over new and updated data changes since the last synchronization point.DeleteThis historical synchronization will synchronize data based on the customer's YayPay environment:- For customers using the production environment (i.e.app.yaypay.com or app1.yaypay.com ), the synchronization period is 2 years from the current date.
- For customers using the development environment (i.e. developer.yaypay.com ), the synchronization period is 1 year from the current date.
- Invoices – AR + Sales that have a 0 balance.
- Customers – Active customers that have at least one closed document and a zero balance.
- Payments – Payments with a zero balance.
- Credit Memos – Credit memos with a zero balance.
- Adjustments – Debit memo, overdue charge, credit WO, prepayment, and customer refund a zero balance.
-
Go to the LOGS tab to see the details of the synchronization process.
After the first synchronization, the Last sync time will be replaced with a date-time stamp, and other statuses will indicate that YayPay is still connected to your Acumatica system: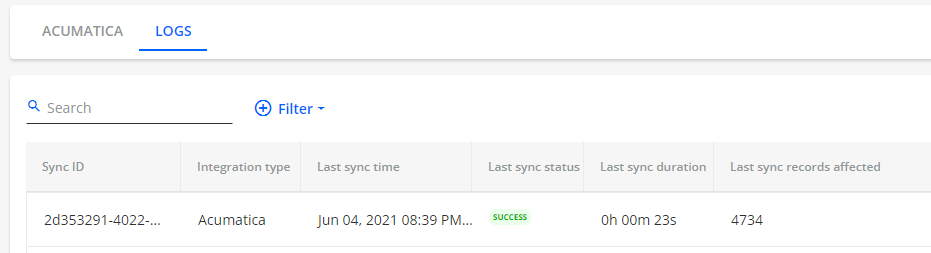
(3) Log Files from Sync
To review the volume and type of AR data pulled from Acumatica, click the LOGS tab. Each sync has its own log: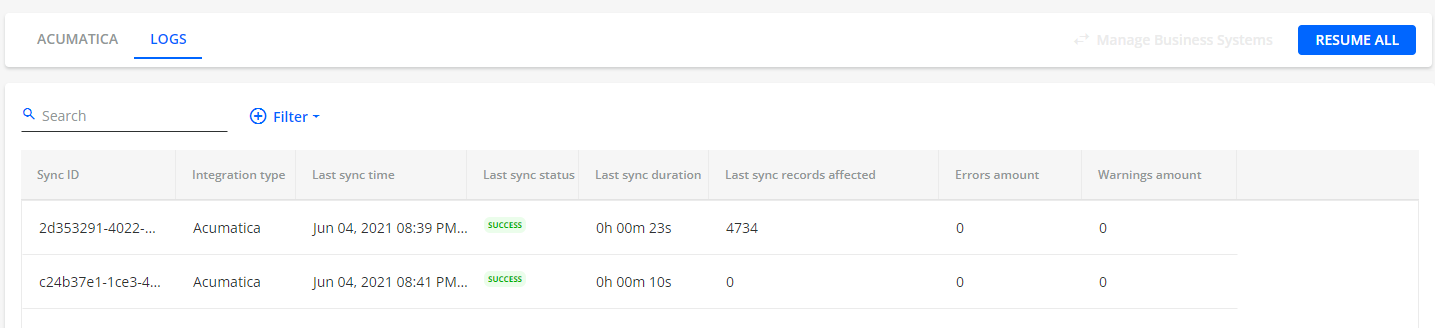
You can also download the log as an Excel file.
(4) Check if Sync with Acumatica was successful
To verify if the synchronization was successful, check if the imported AR data from Acumatica is present in the following locations:
-
Aging Report page:
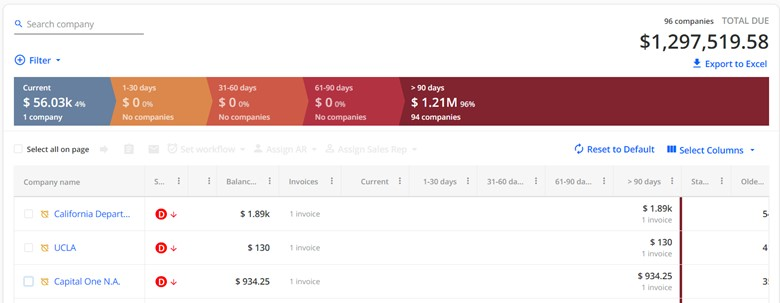
If the sync is successful, you will see your AR data in YayPay in the next day or two. If your Aging Report is still empty after 2 days, e.g there are no companies shown or no overall AR value shown, contact support@yaypay.com or your YayPay representative.
-
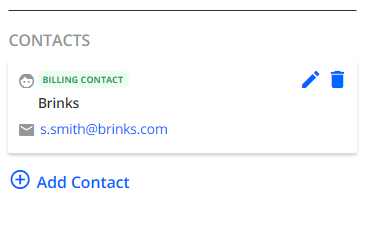
Billing Contacts on the Statement page:
To access a customer's Statement page, click on their Company Name on the Aging Report page. This will open the Statement page, where you can find the CONTACTS section on the right side of the page.
-
Currencies in the system:
During syncing, the Acumatica Connector uses your YayPay currency set in Settings | Business as a base currency. If your clients' currencies (or invoice-level currencies) are different from the base currency, you will see different currency codes on the Statement page and Customer portal website.
Frequently Asked Questions
Q: How do I disconnect and restart the Sync process?
- Go to the Settings > Integrations page in YayPay and press the "DISCONNECT" button in the Acumatica panel
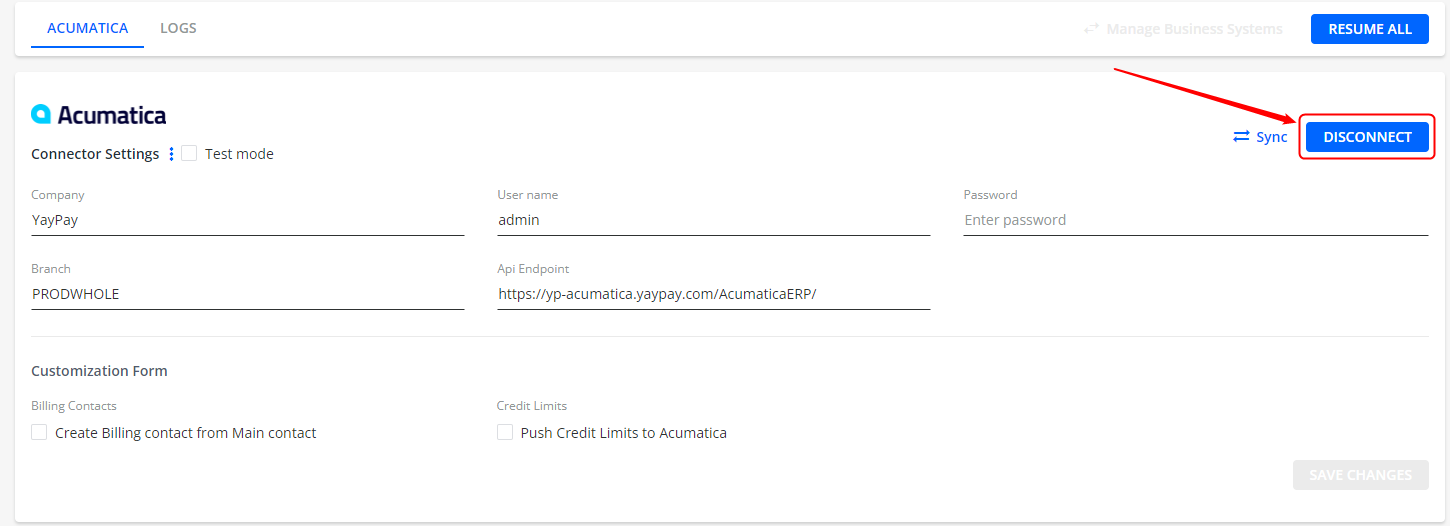
- Do a page refresh to be sure (e.g. the Acumatica Account displayed will no longer be shown)
- Re-enter your Acumatica credentials
- Check the "Create Billing Contact from Main Contact" checkbox
- Click "SAVE CHANGES" and "SYNC"
Q: How do I switch between multiple instances of YayPay to sync with Acumatica
- Check the drop-down list beside your profile name, located on the top right corner (For more background, refer to this link: https://yaypay.helpjuice.com/tutorials/adding-additional-yaypay-instances)
- The other YayPay instances aligned to your Subsidiary names will be shown in the list if your User Account has been granted access to that Subsidiary. Access to the Subsidiaries is maintained in each User, under Settings > User Management

