On this Reporting page, you can create, export, and edit various reports. You can also adjust privacy settings to meet your business needs, and allow team members to view the reports.

To quickly start working with the reports section, click YayPay Sample Reports group located on the left side of the page. This group contains ready-made examples of reports which you can use and adjust according to your needs or you can create your own custom reports based on these examples.
The group contains 15 sample reports:
- AR Specialist Snapshot
- Adjustments
- Calls
- Contacts List
- Credit Score
- Credits
- Customer List
- Customer Snapshot
- Disputes
- Emails
- Invoices
- Payments
- Promise to Pay
- Tasks
- Transactions
- User Activity
Once you create your reports, you can use them to build dashboards to visualize the data.
Create a new report
Also see: [Video Tutorial] Report Creation
To create a new report:
Step 1
- Click on the Add Report button located in the top-left corner of the REPORTS tab.

- In the Add Report dialog that opens, follow the steps to create a new report.
 On step 1, specify the following:
Report Title
Enters a name for your new report.
Data Source
Selects the data source for generating the report.
You can select from the following sources:Adjustment
Call log
Contacts
Customer
Dispute
Email
Invoice
Open Transaction
Payment
Promise to Pay
Tasks
User Activity
Report Group
Selects to which group the report will be added:
Create new Report Group – Enter the new report group name into the Report Group field.
Add to existing Report Group – Select an existing report group from the Report Group drop down menu.
Click NEXT to proceed to step 2 of the report creation process.
Step 2
-
On step 2, select the fields whose values will appear in the report.
Optionally, you can also click Add Formula to include formulas for calculating various business indicators.
The available fields for building your report vary based on the data source selected in Data Source in step 1.

When selecting fields, you can use the Select All or Unselect All option, or the Search functionality to find a specific field to include in your report.
If your search for a specific field returns multiple results, you can use the Select All/Unselect All options to add or remove fields from the search results.
-
Set whether the fields that you want to include in your report contain a corresponding value or any type of measurement, for example AVG, COUNT, MAX, MIN, SUM, COUNT DISTINCT of the values with the correspondent calculations.
To do so, select either Dimension (default) or Measure from the combo box next to each field.
Click NEXT to proceed to the third step of the report creation.
Step 3
-
On step 3, select who will have access to the created report.
You can select the following:
Private – The report will be available only for yourself.
Public – The report will be available for all users.
-
Click SAVE to create the report.
As a result, the report will then be listed in the report group on the right side of the REPORTS tab.

Managing existing reports

You can manage reports as follows:
SAVE REPORT AS
Creates a new report using the data from the original report, i.e. creates a copy of the report.
Clicking on the button opens the Copy Report dialog where you can specify the Report Title and select or create a new Report Group.
SAVE REPORT
Saves any changes made to the report.
Export to Excel
Exports the report as an excel file and downloads it to your device.
Select Columns
Opens the Select Columns dialog where you can select fields to add as new columns to your report or unselect the ones you want to remove.

Optionally, you can click Add Formula to include formulas for calculating various business indicators.
The available fields for building your report vary based on the selected data source, displayed in the in the Data Source field. When selecting fields, you can use the Select All/Unselect All options or the Search functionality to find a specific field to include in your report.
If your search for a specific field returns multiple results, you can use the Select All/Unselect All options to add or remove fields from the search results.

Additionally, select whether the fields that you want to include in your report contain a corresponding value or any type of measurement. To do this, select one of the following options from the combo box next to each field:
Dimension (default) – Indicates that the selected field contains a corresponding value, for example 5.
Measure – Indicates that the selected field contains a measurement, for example AVG, COUNT, MAX, MIN, SUM, COUNT DISTINCT of the values with the correspondent calculations.
Hide Column
Hides the column from the grid.
To do so, click on the three dots next to the column title you want to hide and select Hide Column.

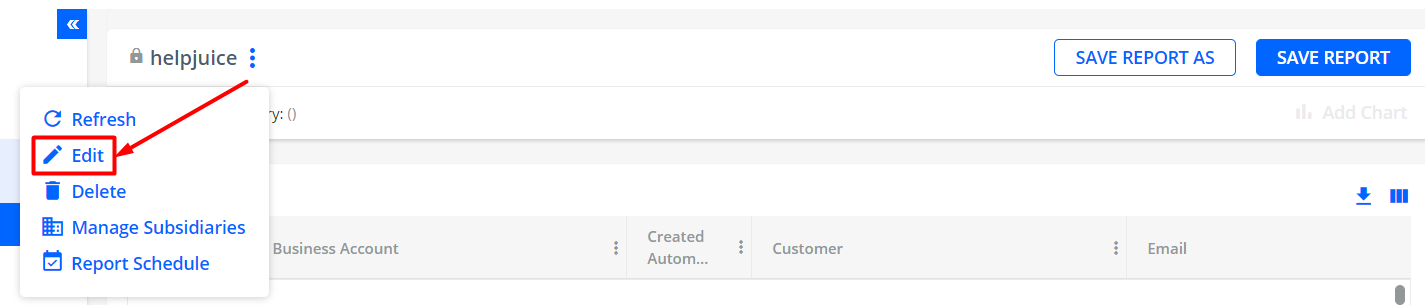
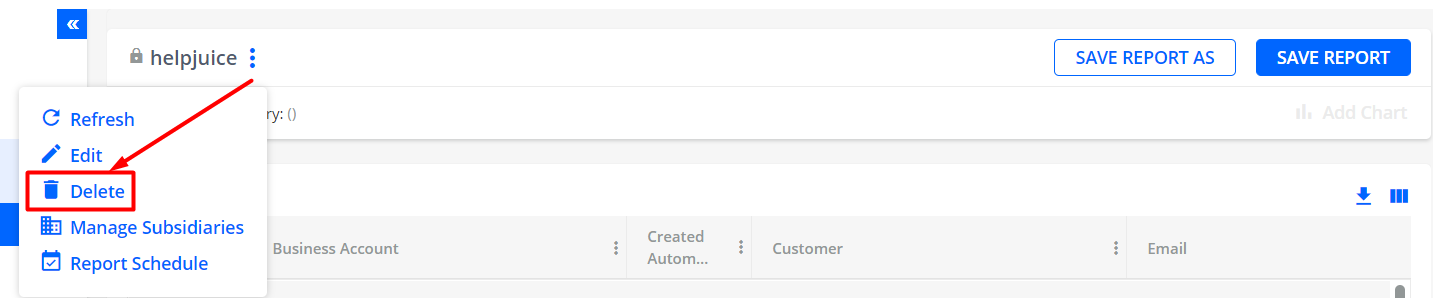
Actions with report
The following actions with the existing report are available for its author: Refresh, Edit, Delete, Manage Subsidiaries, Report Schedule.
Actions with the existing report available for non-authors: Refresh, Manage Subsidiaries.
Refresh a report
To refresh the data in the report, click on the three vertical dots next to the report name. In the context menu that opens, click on Refresh.

Edit a report
To edit the report data click on "Show more" menu on the right of the report name and select "Edit".
You can edit the name of the report, choose "Create new Report Group" or "Add to existing Report Group", and choose the report status.


Click SAVE, and the edited report will be saved.
Only the author of the report can edit it. However, if you need to edit a report, created by another user, simply save it under a different name (SAVE REPORT AS) and edit the obtained report as required. The original report will not be impacted.
Delete a report
To delete a report click on "Show more" menu on the right of the report name and select "Delete". Deleting is available only for the authors of reports.
Manage Subsidiaries
To include the data from your subsidiaries in the report, click on "Show more" menu on the right of the report name and select "Manage Subsidiaries".
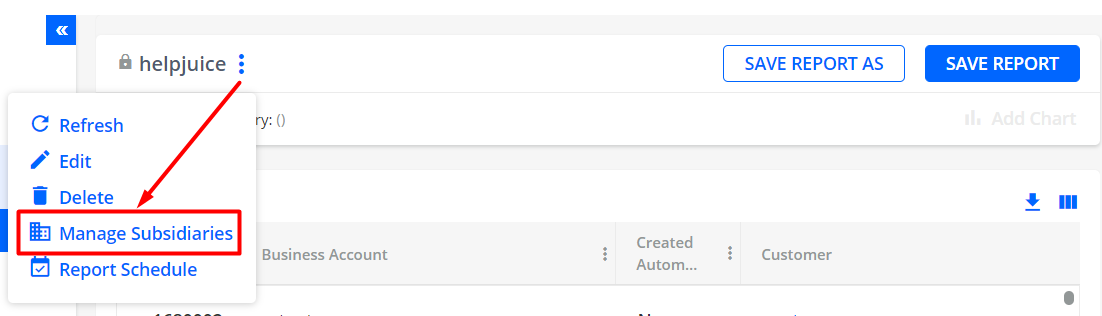
Select the Subsidiary(s) whose data you want to include in the report, and click "SAVE".
Report Schedule
The "Report Schedule" option can be applied regardless of the fact whether the report is private or public.
You can also set up the schedule for sending reports to other users via e-mails. Only ONE schedule can be set for each report.
In the "Show more" menu select a “Report Schedule” item.
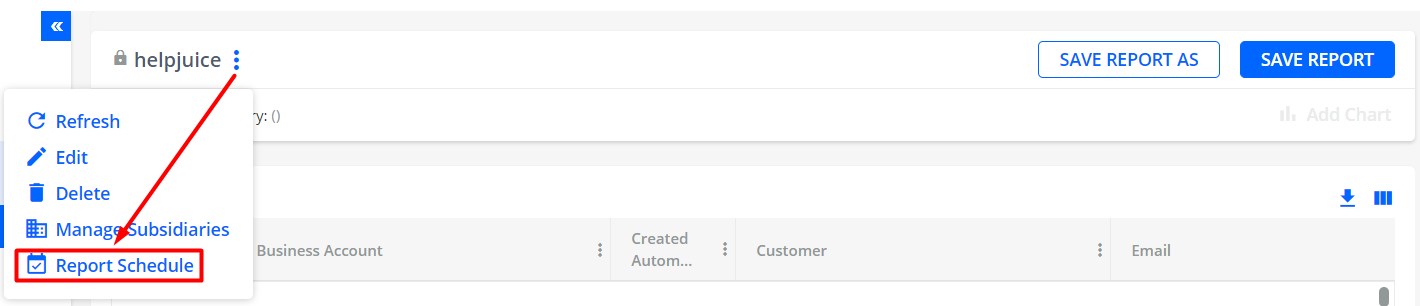
Add the recipients of the e-mail (up to 20), set the cadence (daily, weekly, monthly on a specific day or date), and specify the day and time.

The data in the report user receives in the e-mail corresponds to the data which the report contains when generated. The updates made after the e-mail generation will be sent in the next e-mail.
By default, the recipient gets an e-mail in two ways:
- if the size of the attachment is under 25 MB - it is attached as a spreadsheet (zip file)
- if the size exceeds 25 MB - it is sent as a link
Alternatively, there is a setting allowing to send the reports only in the form of a link: go to Settings > Business and enable the checkbox “Send link to scheduled analytics report” (available only for ADMIN users), and save changes.
Download a report
Click on the "Download to Excel" icon, to export the report to your computer in Excel format.
You can restrict the ability to download excel reports in Settings > Security Groups.

Security Groups
The access to Reporting module is managed in Settings > Security Groups:
For Admin/AR Specialist user roles:
Reporting module (page) - the ability to restrict the access to the Reporting module for a particular security group
Manage Reporting - the ability to restrict editing, creating, or deleting reports for a security group (only view mode)
Download Custom Reports - the ability to download excel reports can be restricted
For Sales/CS user role:
Restrict Access to Reporting Module (page) - the ability to restrict access to the Reporting module for Sales/CS users
Restrict Manage Reporting (function) - the ability to restrict editing, creating, or deleting reports for Sales/CS users (only view mode)
