The following is a summary of the necessary steps for the integration to work. Fore more details, see the description of each individual step:
- Obtain Your NetSuite Account ID
- Enable Token-Based Authentication (TBA)
- Create a New Custom Role
- Assign the Role to an Admin User
- Create a New Application Record in NetSuite for YayPay
- Create a New Access Token
- Configure YayPay with Your NetSuite Credentials
- Check if Sync with NetSuite Was Successful
First we outline how a NetSuiteTM administrator can obtain the credentials to configure YayPay:
- Obtain your NetSuiteTM Account ID:
Log into your NetSuiteTM.
-
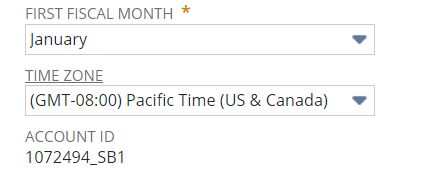
Go to Setup | Integration | Web Services Preferences or Setup | Company | Company Information to look up your NetSuite ACCOUNT ID.
Note this down to use it to configure YayPay later on.
- Enable the token-based authentication (TBA) feature in NetSuite:
Go to Setup | Company | Enable Features .
Click on the SuiteCloud tab.
- Scroll down to the SuiteScript section, and check the following boxes:
Client SuiteScript.
-
Server SuiteScript.
Click I Agree on the SuiteCloud Terms of Service page.
Scroll down to the Manage Authentication section, and check Token-based Authentication.
Click I Agree on the SuiteCloud Terms of Service page.
- Click Save.

- Create a new custom role:
-
In NetSuite, navigate to Setup | Users/Roles | Manage Roles | New.
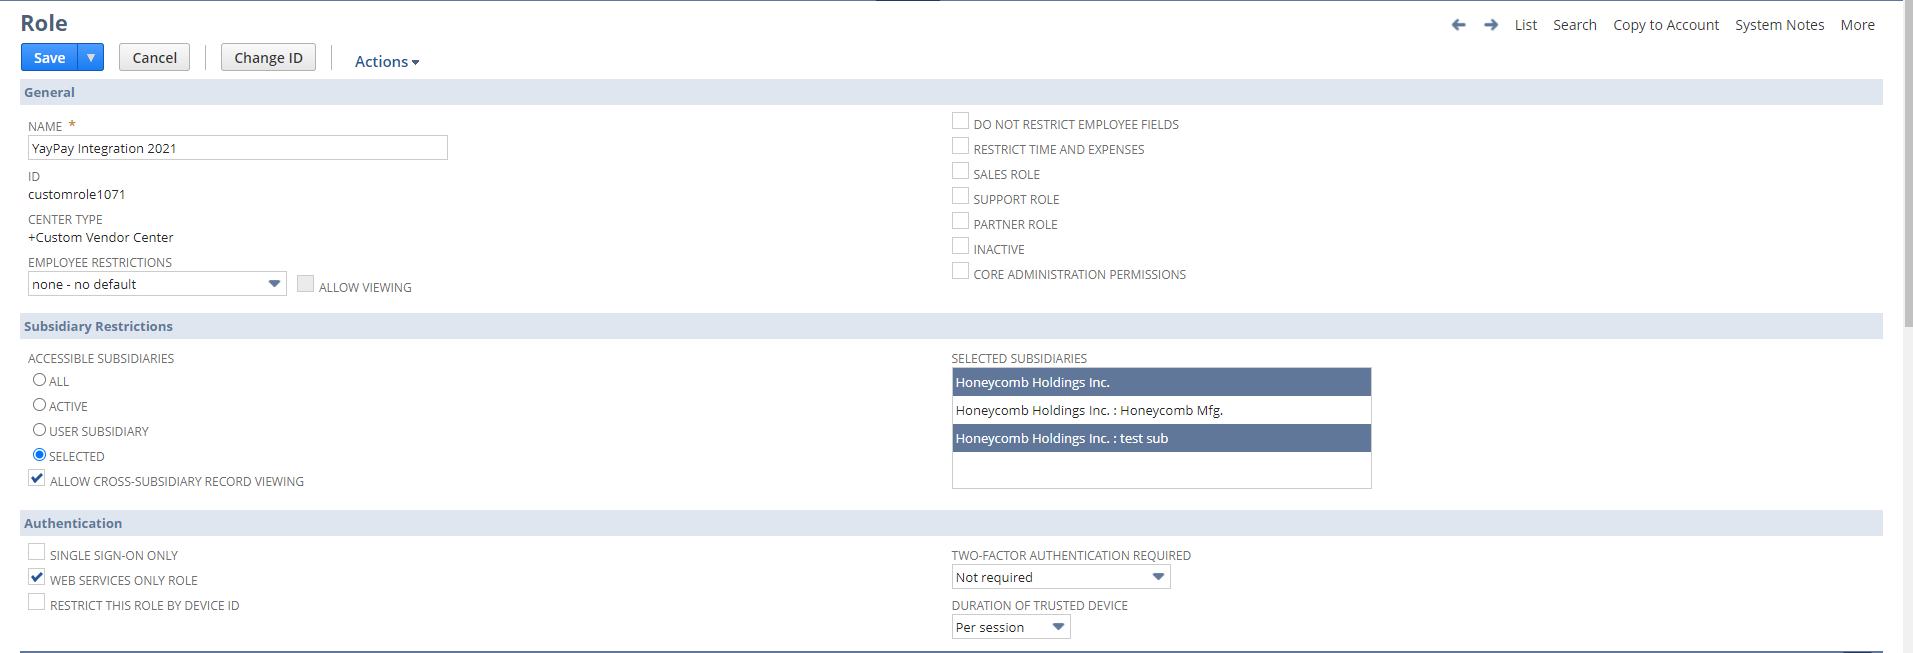
Name the Role (e.g. YayPay Integration).
Select Authentication | WEB SERVICES ONLY ROLE.
- For Subsidiary Restrictions, choose:
SELECTED - to sync the AR data for specific NetSuite Subsidiaries (select the appropriate NetSuite Subsidiaries).
ALL - to sync the AR data for the whole company.
Check ALLOW CROSS SUBSIDIARY RECORD VIEWING.
-
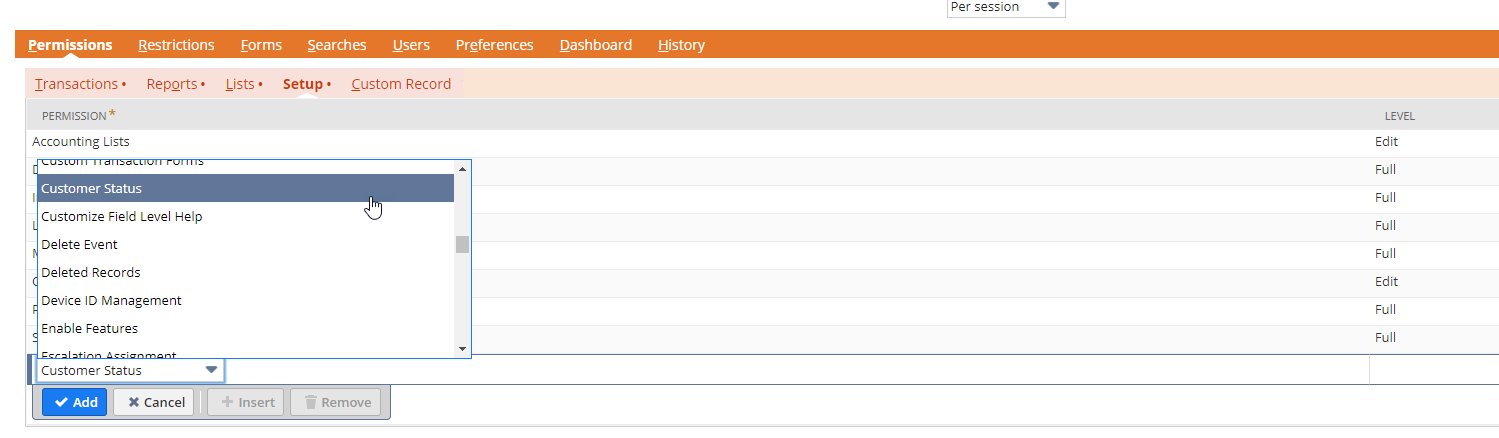
Go to the Permissions tab to include the appropriate permissions for this role.
See the Permissions tables (below) for a full list of minimum permissions that should be set.
-
- Assign the role to an admin user:
Go to Lists | Employees | Employees | Edit User | Access tab | Roles subtab.
Assign the new role created to an existing user, preferably with NetSuite Administrator access, or create a new Administrator user.
On the user page, click Edit.
-
Go to the Access tab to add the new role.
- Create a New Application Record in NetSuiteTM to denote the application you’ll be integrating with:
In NetSuite, go to: Setup | Integration | Manage Integrations | New.
- Fill in:
Application name – set it to YayPay or YayPay Integration so that you know what it was created for in the future.
In the state dropdown, select Enabled.
Check Token-based Authentication at the bottom of the page.
-
Note the Consumer Key and Consumer Secret string before you leave the page. Copy these values into a text file for future reference.
-
Click Save.
You are redirected to the Integrations page. Review to confirm that the State column shows Enabled, e.g.:
- Create a new access token to associate the created user and their role with the application we are integrating with:
In NetSuite, go to Setup | Users/Roles | Access Tokens | New.
Select the integration record, user, and role created previously and click Save.
-
From the Confirmation screen, note down the Token ID and Token Secret string. Copy these values into a text file for future reference.
- Configure YayPay with your NetSuiteTM credentials:
-
In YayPay, navigate to the Settings | Integrations page, click Manage Business Systems and select NetSuite from the Business System menu.
It displays the NetSuite Connector Settings panel and Customization Form:
You need the following credentials from NetSuiteTM for the Connector Settings: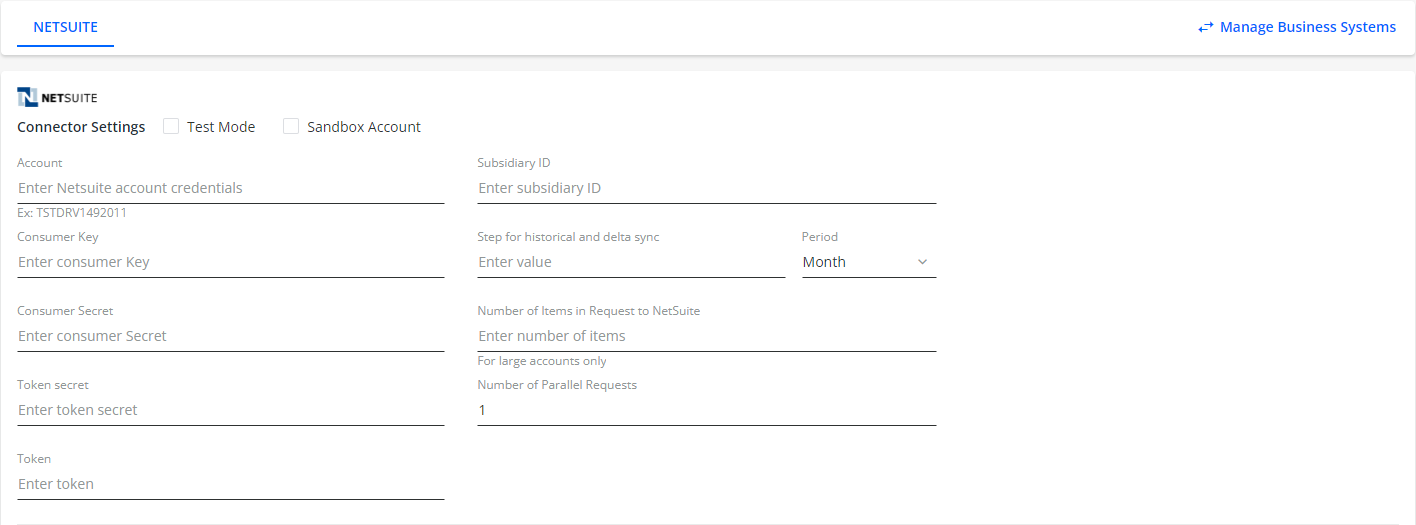
Account ID
Consumer Key
Consumer Secret
Token
Token Secret
-
Subsidiary ID
DeleteOne YayPay instance can synchronize data from a single NetSuite subsidiary, multiple subsidiaries, or the entire NetSuite company.-
To synchronize data from a single NetSuite subsidiary, enter a Subsidiary ID value, which is the NetSuite Internal ID value.
The Subsidiary ID value ensures the sync looks at customers, contacts, invoices, and other AR data (credits, adjustments, etc.) within that subsidiary in NetSuite.
However, if a customer is a child of another customer in a different subsidiary, and the Subsidiary ID value of the parent customer does not match the one specified in the Subsidiary ID field in settings, the customer and its data will not be synchronized. This is because the subsidiary specified in the settings has priority over hierarchical relationships. In other words, only the data belonging to the NetSuite subsidiary for which you enter its Subsidiary ID value in the settings will be synchronized.
If there are no invoice allocations for a payment and only one subsidiary ID is specified on the connector's settings page, the payment should be created with that specified subsidiary.
- To synchronize data from multiple subsidiaries, enter their individual subsidiary IDs in the Subsidiary ID field, separated by commas.
Once synchronized, the connector will automatically synchronize data from all the subsidiaries specified in the Subsidiary ID field.
To ensure the correct customer balance is displayed in YayPay, go to Business | Settings and check the Use calculated Customer balance check box. As a result, YayPay will calculate all received documents within the BIZ that were synchronized from different subsidiaries.
When creating payments in YayPay, the invoices being paid must be created in the same subsidiaries that are specified on the connector settings page. Additionally,if credits are used for payment, those credits must belong to the same subsidiaries as the invoices.
If a payment does not have any invoice allocations and there are multiple subsidiary IDs specified on the connector's settings page, the connector will not push the payment to NetSuite. This is because unallocated payments cannot be pushed when using multi-subsidiary sync.
If a payment has invoice allocations and there are multiple subsidiary IDs specified on the connector's settings page, the connector will push the payment to the ERP only if all invoices allocated to the payment belong to the same subsidiary, and this subsidiary is one of those specified on the connector's settings page.
If you use credits in addition to the payment to settle the invoice, the credits and the invoices being paid must belong to the same subsidiary, and this subsidiary must be one of those specified on the connector's settings page.
Similarly, a payment in NetSuite will be created in the subsidiary that corresponds to the payment documents.To correctly build reports in YayPay when synchronizing data from multiple subsidiaries with a currency different than the business account currency in YayPay, go to Business | Settings and check the Switch to multicurrency daily exchange rates check box. For more information, read the Currency in the App section.
- To synchronize data from all subsidiaries or the entire NetSuite company, leave Subsidiary ID empty. As a result, the sync will consolidate your AR data across multiple NetSuite subsidiaries into one YayPay instance.
Example
If you have 2 YayPay instances provisioned to mirror your 2 NetSuite Subsidiaries (HKG and SGP), configure "10" and "11" as the Subsidiary ID field in each YayPay instance, while reusing the same NetSuite credentials.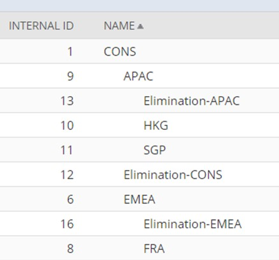
-
- Delete
- If your invoice volumes fall in the range of 10,000 -15,000 invoices per month:
-
Enter 1 for the Step for historical and delta sync and select Month to sync your historical data one month at a time (as incremental steps until the sync moves forward to the current time).
If you do not specify this option, the first sync will import all open documents starting from 1st January 2015 until now.
-
Enter 500 for Number of items in request to NetSuite to keep the batch sync manageable.

-
- Set the relevant options on the Customization Form panel accordingly:

See the Customization Form section below for a description of these options.
- Press SAVE.
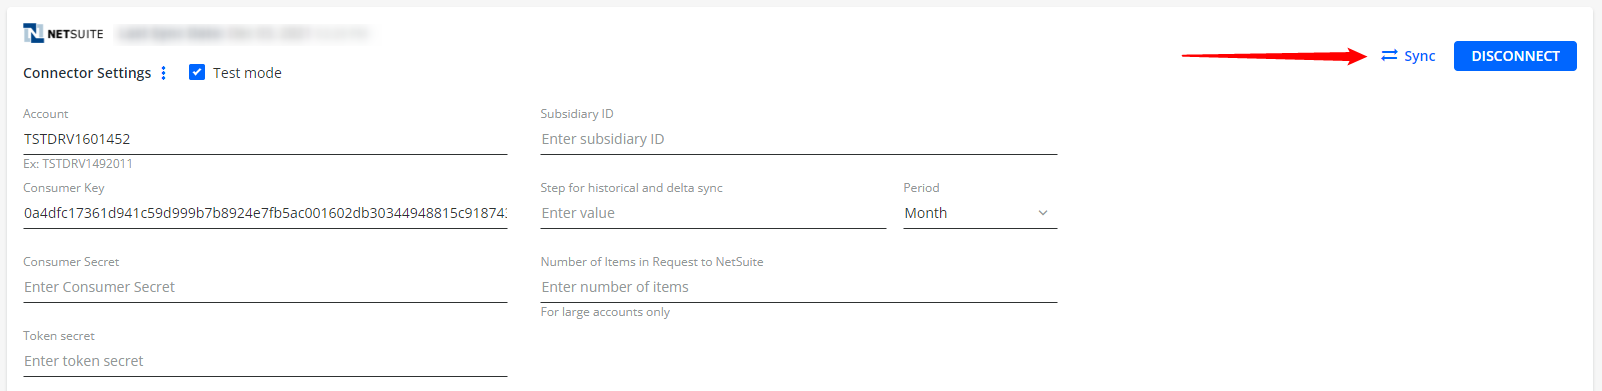
The Sync button will be enabled after saving your NetSuite credentials. Before you proceed and click it button located in the top-right corner of the page, it is recommended to test the connection and settings by clicking DIAGNOSTIC SYNC.
-
Validate that your NetSuite account (which you configured and saved earlier) is displayed next to the cloud icon.
-
Press Sync.
You will be prompted to configure Custom Fields (if there are any).
-
Configure any NetSuite Custom Fields under Settings|Custom Fields in YayPay and then press Sync again.
All Customer level or Invoice level Custom Fields configured will be part of the Sync process. Refer to this article for more background: https://yaypay.helpjuice.com/tutorials/synchronizing-custom-fields-from-your-erp
When the process is completed, the Last Sync time: Neverwill be replaced with an actual date-time stamp:
A recurring sync will automatically run multiple times a day.
- Check if your Sync with NetSuite was successful:
-
Aging Reports - you should see your AR data in YayPay in the next day or two (see illustration).
If your Aging Report is still empty after two days (e.g there are no companies shown or no overall AR value shown), contact support@yaypay.com or your YayPay representative.
-
Billing Contacts - click on any Customer Name in the Aging Report to go into the Statement page (of that Customer). Scroll to the lower-right of the Statement page and look at the CONTACTS section.
Example A Billing Contact created in YayPay for the Customer "Brinks", and the email address brought from your ERP: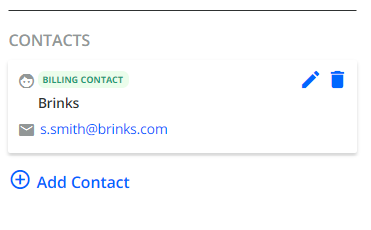
-
-
To stop syncing with NetSuite, click DISCONNECT.
This will stop any automated syncing until YayPay is reconnected.
NetSuite Settings
Permissions
These are the minimum permissions/levels required for YayPay to access your NetSuite application to bring over the relevant AR data into YayPay:
Transactions Permissions
| Permission | Description | Level |
|---|---|---|
| Access Payment Audit Log | View | |
| Adjust Inventory | View | |
| Bill Purchase Orders | View | |
| Bill | View | |
| Cash Sale | View | |
| Check | View | |
| Credit Memo | View | |
| Customer Payment | View | |
| Deposit | View | |
| Deposit Application | View | |
| Find Transaction | View | |
| Invoice | View | |
| Invoice Approval | View | |
| Invoice Sales Orders | View | |
| Journal Approval | View | |
| Make Journal Entry | View | |
| Mark Work Orders Firmed | View | |
| Purchase Order | View | |
| Receive Order | View | |
| Sales Order | View | |
| Sales Order Approval | View | |
| Timer | View | |
| Transfer Order | View | |
| Posting Period on Transactions | View |
Lists Permissions
| Access to transaction numbering audit log | View | |
| Accounts | View | |
| Companies | View | |
| Contact Roles | View | |
| Contacts | View | |
| Currency | View | |
| Customer Profile | View | |
| Customers | View | |
| Documents and files | View | |
| Employee Record | View | |
| Employees | View | |
| Export List | Create | |
| Items | View | |
| Notes Tab | If you intend to sync Customer Notes between YayPay and NetSuite. | Full |
| Partners Permission | If you use Partners in NetSuite | View |
| Payment Methods | View | |
| Projects | View | |
| Resource | View |
Setup Permissions
| Permission | Description | Level |
|---|---|---|
| Access Token Management | Full | |
| Accounting Lists | View | |
| Custom Lists | View | |
| Custom Record Types | Full | |
| Delete Event | Full | |
| Deleted Records | Full | |
| Enable Features | Full | |
| Log in using Access Tokens | Full | |
| SOAP Web Services | Full | |
| User Access Tokens | Full |
Show Partially Paid Invoices More Accurately in YayPay
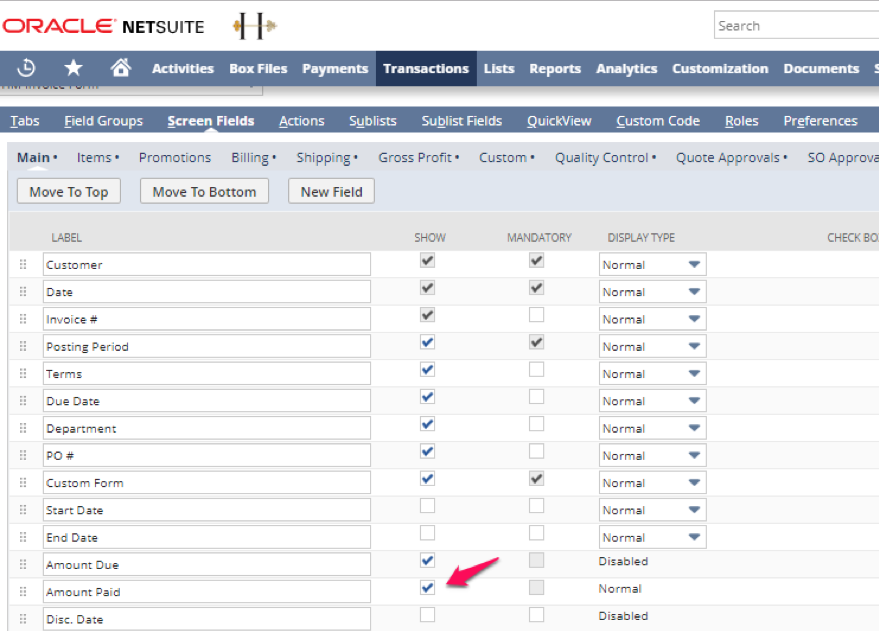
To support the Sync accomplished via the NetSuite API that brings over partially paid invoices, make sure that the "Amount Paid" field in NetSuite is marked as Shown so that the correct Invoice amounts (less the partial payment) are reflected in YayPay.
To do this, search for an Open Invoice and go to that Invoice Record in NetSuite. Click "Customize" on the top right corner (Customize Form). Then look for the "Screen Fields" tab and click on it.
Confirm the "SHOW" checkbox is marked for the Amount Paid label/field:
Multicurrency
If you use multicurrency in your NetSuite account for Account Receivable documents, it is necessary to have the exchange rate field on Account Receivable documents.
The availability of this field determines whether or not it will be returned by the NetSuite API. To ensure accurate customer balance calculation, YayPay should always receive the exchange rate field when using multicurrency.
Show Discount and Discount Date Fields in YayPay
To customize invoices in NetSuiteTM so that the discount amount and discount date fields are visible in YayPay:
In NetSuite, open any invoice.
Click on the Customize menu located in the top-right corner of the page and select Customize Form.
- Navigate to the Screen fields tab and check the check box next to the Disc.Date and Disc.Amt.fields.

-
Click SAVE to confirm the settings. This should be done for all invoice forms in NetSuite.
As a result, the connector will synchronize these fields and you will be able to see the discount amount and date when opening an invoice with a discount in YayPay.
YayPay Settings
The goals for syncing and creating customer contacts are:
- To create a Customer Billing Contact from NetSuite's Native Email field.
- To create Customer Billing Contacts from the Contacts maintained in the Relationship tab under a Customer in NetSuite.
- To create Customer Billing Contacts from NetSuite Custom Fields.
- To create Invoice-level Billing Contacts.
Connector Settings
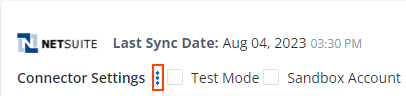
If you click the three dots, you can select from the following options:
Resync Invoices
Re-syncs only open invoices from the ERP system, using the internal ID as a reference.
Resync Customers
Re-syncs complete information of customers who have a non-zero balance, including their name, email, phone number, custom fields, billing contacts, etc. However, this sync does not include any customer documents such as invoices or payments.
The internal ID of each customer in NetSuite serves as a reference.
The time period used for sync:
open documents – syncs data from 1st January 2015 until now.
- closed documents – syncs data based on the customer's YayPay instance and NetSuite account type:
If a customer uses either app.yaypay.com or app1.yaypay.com with a NetSuite production account, the synchronization period is 2 years from the current date.
If a customer uses either app.yaypay.com or app1.yaypay.com with a NetSuite Sandbox account, the synchronization period is 1 year from the current date.
If a customer uses the YayPay instance developer.yaypay.com, the synchronization period is 1 years from the current date.
Sync Historical
Syncs only closed documents from NetSuite, for example paid invoices, adjustments, etc.
The historical sync will synchronize data for the following periods based on the customer's YayPay instance and NetSuite account type:
If a customer uses either app.yaypay.com or app1.yaypay.com with a NetSuite production account, the synchronization period is 2 years from the current date.
If a customer uses either app.yaypay.com or app1.yaypay.com with a NetSuite Sandbox account, the synchronization period is 1 year from the current date.
If a customer uses the YayPay instance developer.yaypay.com, the synchronization period is 1 years from the current date.
Optionally, you can use the Step for historical and delta sync setting to split the retrieved data into batches based on a specific time period. For example, if you enter 5 and select Month for Period, the sync will import data starting from 2015 and split it into batches of 5 months each.
Customization Form
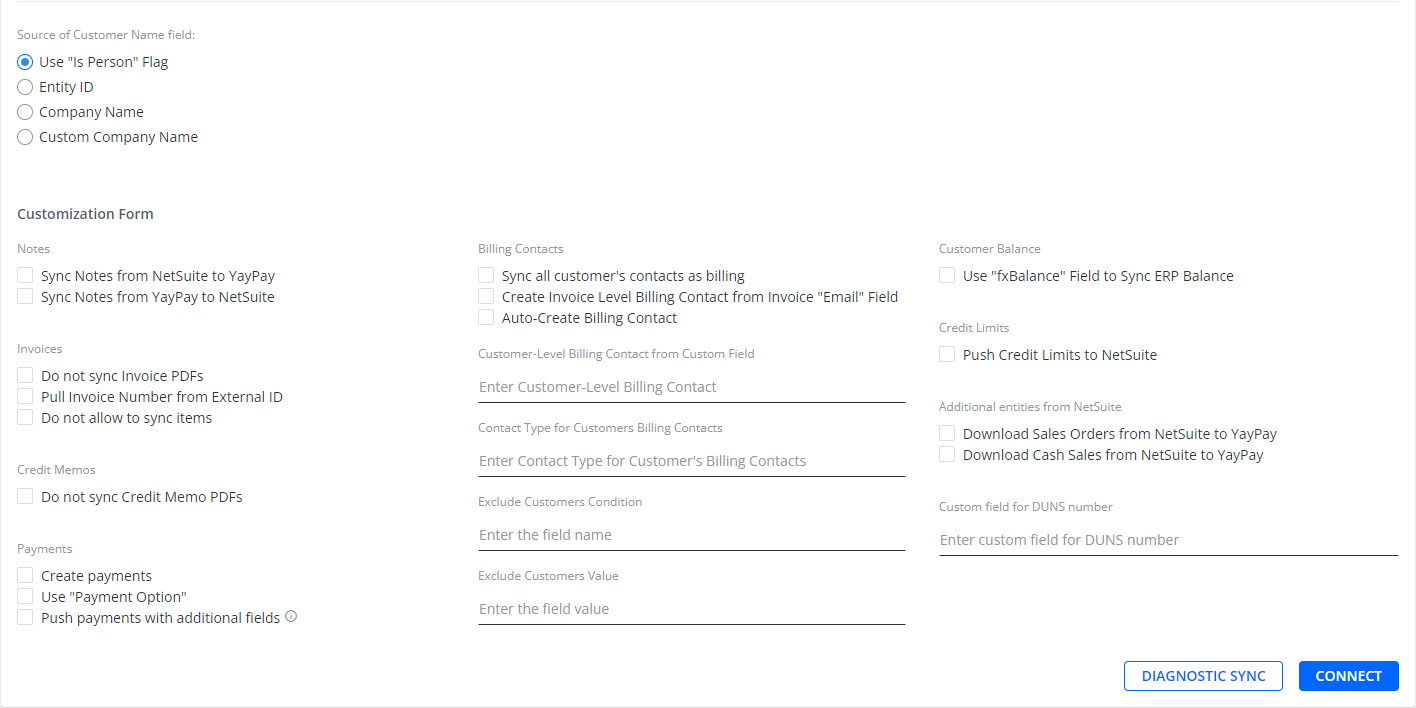
Source of Customer Name Field
Selects the field in NetSuite that will be used for extracting the company name.
You can select from the following options:
-
Use "Is Person" Flag – Company name will be extracted from the following field in NetSuite:
The CompanyID for customers who selected the INDIVIDUAL TYPE (isPerson flag is set to true).
The COMPANY NAME for customers who selected the COMPANY TYPE (isPerson flag is set to false).
Entity ID – Company name will be extracted from the CompanyID field in NetSuite.
-
Company Name – Company name will be extracted from COMPANY NAME field in NetSuite.
-
Custom Company Name – Company name will be set manually.
This is done by selecting at least one of the NetSuite native fields (for individual and company) from the four drop down lists that appear. By default, the drop down lists display field names retrieved by the ERP connector based on the Is person flag or Company Name.
To use other fields, click on the one of the following drop down lists and select one of the provided options:Individual Company First Name Source
Individual Company Last Name Source
Company First Name Source
Company Last Name Source
altName– Name of a person or company in NetSuite.
ParentID– ID of a customer's parent in NetSuite.
companyName– Legal name of a customer in NetSuite.
entityId– Name of a customer that appears in all lists and on the Pay to the Order of line of checks.
entityNumber– Name entered in the Number field in NetSuite.
firstName– First name of a customer in NetSuite.
middleName– Middle name of a customer in NetSuite.
lastName– Last name of a customer in NetSuite.
internalId– The internal identifier of a customer in NetSuite.
Once synced, the selected name will be shown on the Statement page. For example, if you select First Name for Individual Company First Name Source and Middle name for Individual Company Last Name Source where the corresponding fields values in NetSuite are Apple and Corporation, then (after the sync) YayPay will display Apple Corporation on the Statement page.
Notes
Sync Notes from NetSuite to YayPay / Sync Notes from YayPay to Net Suite
You can choose to sync your Notes back and forth between NetSuite and YayPay.
New customer Notes recorded in the Statement Page in YayPay will be found under the User Notes tab of the Customer/Account in NetSuite:

Invoices
Do not sync Invoice PDFs
If checked, the connector does not sync invoice PDFs.
If left unchecked, with each recurring sync, the connector only fetches PDFs for invoices that have been modified within the last 18 days.
Pull Invoice Number from External ID
If checked, the sync takes the invoice document number from the externalID field.
Do not allow to sync items
If checked, configures the connector to exclude individual invoice items from the invoices synced into YayPay:
If you make any changes in NetSuite to invoices previously synced to YayPay, the connector excludes both the invoice items and their respective changes.
If an invoice has been synced with items before checking Do not allow to sync items, checking it and then executing a re-sync removes all the items related to that invoice.
Payments
Create payments
If checked, sends and creates payment transactions in NetSuite.
See also to: https://yaypay.helpjuice.com/88167-netsuite/payment-integration-to-netsuite.
Use Payment Option
Refer to NetSuite: Payment Integration to NetSuite
Push payments with additional fields
If checked, pushes the payments to NetSuite together with additional native or custom fields (e.g. class, division,location, etc.) specified in Settings | ERP/CRM Custom Fields section.
Billing Contacts
Sync all customer's contacts as billing
If checked, synchronizes your contacts/email addresses maintained in the Relationship tab under the Customer record in NetSuite.
Create Invoice Level Billing Contact from Invoice "Email" Field
If checked, syncs invoice-level contacts in YayPay instead of customer level contacts.
See also:yaypay.helpjuice.com/integrations/bringing-over-invoice-level-billing-contacts-from-your-erp
Auto Create Billing Contact
If checked, automatically create the Billing Contact from the native Email field associated with the Account/customer in NetSuite.
Customer-Level Billing Contact from Custom Field
Enters the names of NetSuite custom fields that contain one or multiple email addresses. YayPay will use these fields to create one or multiple Billing Contacts.
For more details, see the Pulling the Customer Level Billing Contact from NetSuite section.
Contact Type for Customers Billing Contacts
Enters the name of the role selected in NetSuite as the primary contact.
If you want to enter more NetSuite roles, separate them by a comma, e.g. Decision Maker, Order Creator.
For more details, see the Pulling the Customer Level Billing Contact from NetSuite section.
Exclude Customers Condition / Exclude Customers Value
See Exclude Customers from the Sync.
Customer Balance
Use fxBalance field to sync erp balance
If checked (for customers with subsidiaries), the documents are synced from NetSuite in the biz's currency.
Credit Limits
Push Credit Limits to NetSuite
If checked, the credit limit updated within YayPay is pushed to NetSuite.
Additional Entities from NetSuiteTM
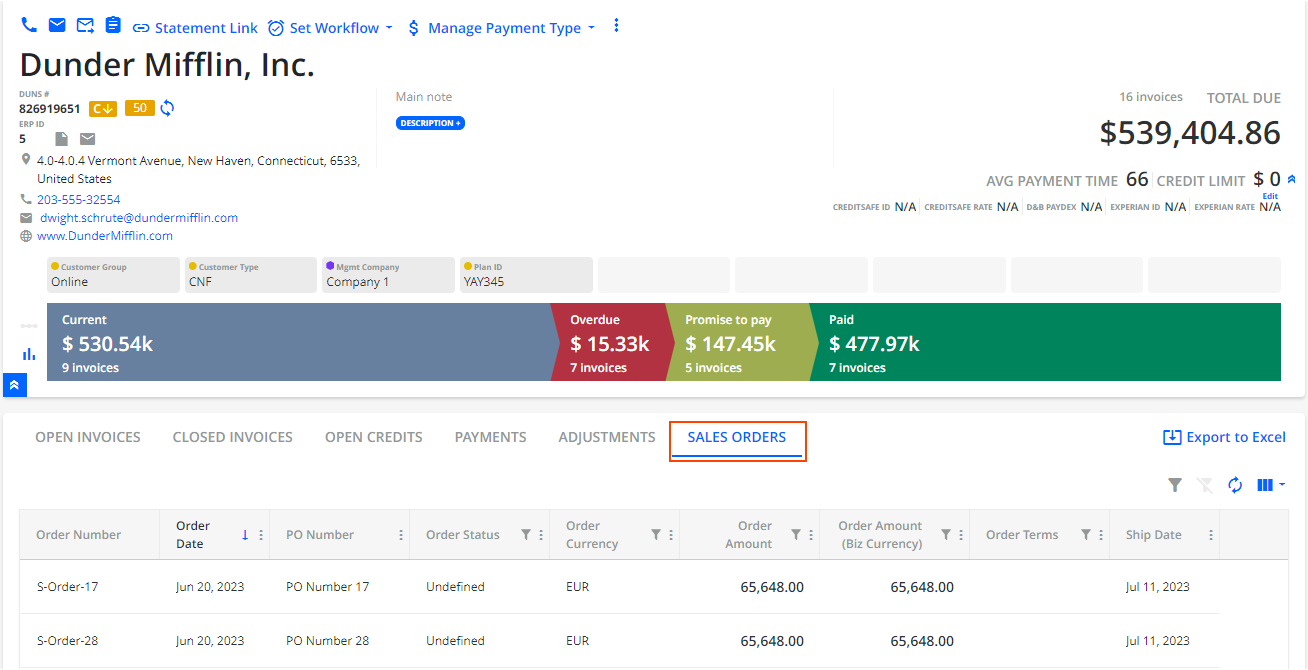
Download Sales Orders from NetSuite to YayPay
Synchronizes your Sales Orders from NetSuite so you can access them in YayPay.
Once synced, all Sales Orders brought over from your ERP are displayed on the Sales Orders tab on the Statement page. However, the tab is hidden by default. To display it:
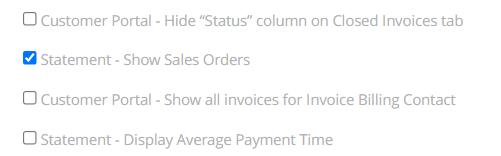
- Go to Settings | Business and check Statement - Show Sales Orders.
Scroll down the page and save the changes.
- Go to the Sales Orders tab on the Statement page to see the synced Sales Orders.
Download Cash Sales from YayPay to Net Suite
Determines that cash sales from NetSuite are synced the same way as invoices (that are already paid, i.e. mapped with the "Invoice" field).
A cash sale is a transaction record that is used to track the sale of goods or services for which the Company receives immediate payment.
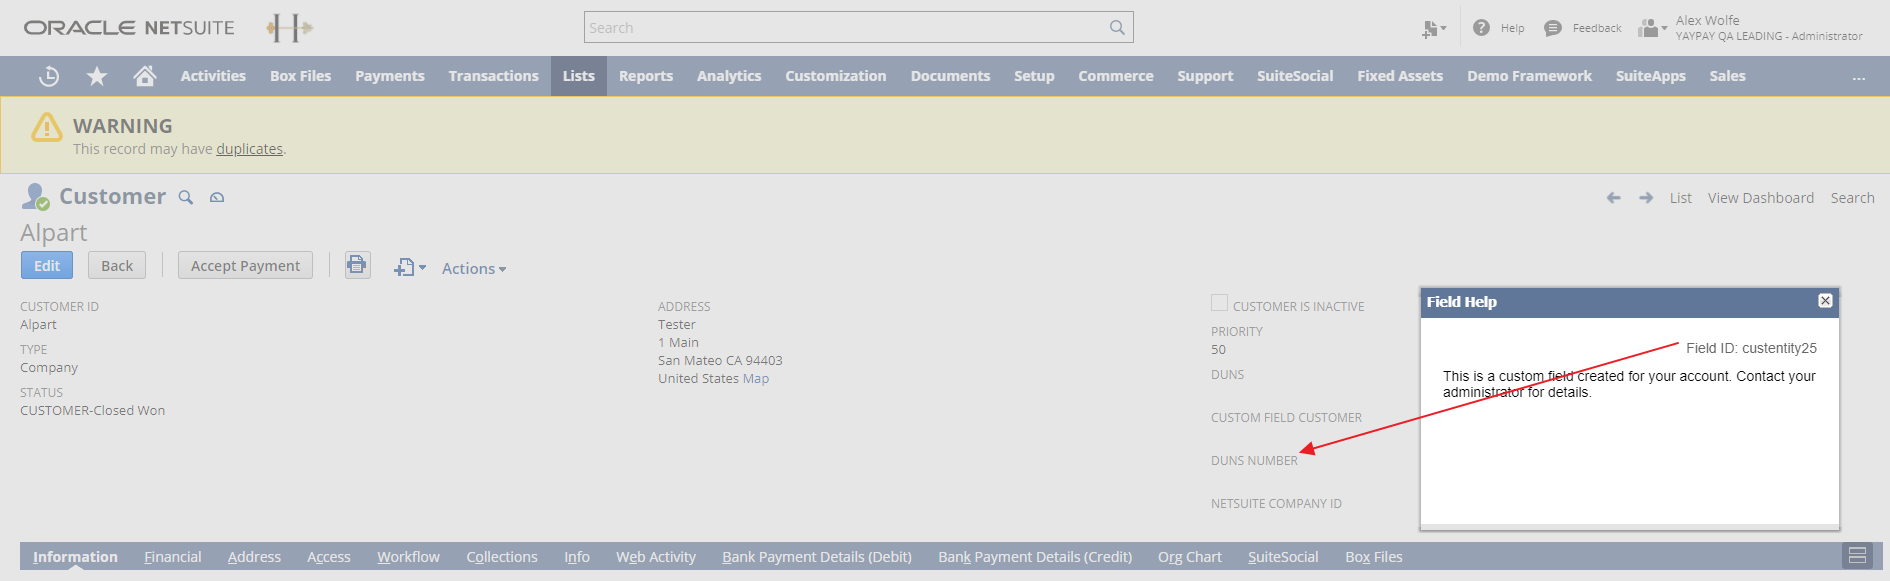
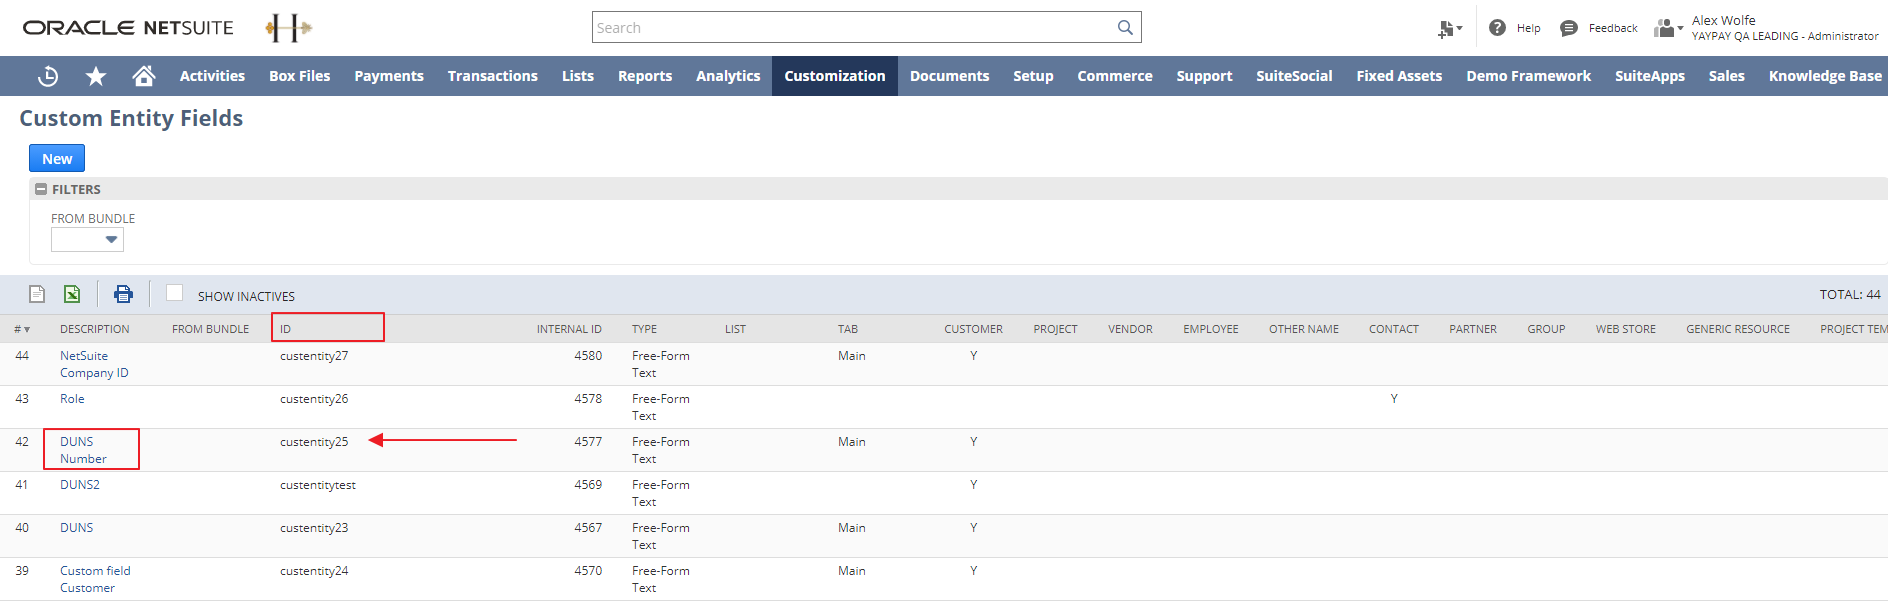
Customer field for DUNS number
Enters a NetSuite© Field ID value. The Field ID corresponds to the Custom Field name in NetSuite©.
For more details, see the Bringing DUNS Number from NetSuite section.
DIAGNOSTIC SYNC
Tests the connection and settings.
This is recommended not only before starting the sync process with NetSuite, but also after restarting/unpausing the integration between YayPay and NetSuite, or anytime you make changes to the connector settings and click Save Changes.
As a result, the connector will attempt to establish a test connection with NetSuite by using the credentials and options specified in the Connector Settings section. It will also send test API calls to retrieve at least one entity from the following NetSuite categories:
Required entities, i.e. Payment, CreditMemo, Invoices, Accounts (GL), Payment Methods, Customers, Contacts, Journals (adjustments)
-
Optional entities, i.e. CashSales, SalesReps, Notes, SalesOrders, Currencies
If the connector does not receive at least one required entity or the provided credentials are invalid, the test connection will fail, and an error message will be recorded on the Logs tab. However, if the connector receives at least one required entity but not an optional entity, the test connection will be completed, and a warning message will be recorded on the Logs tab.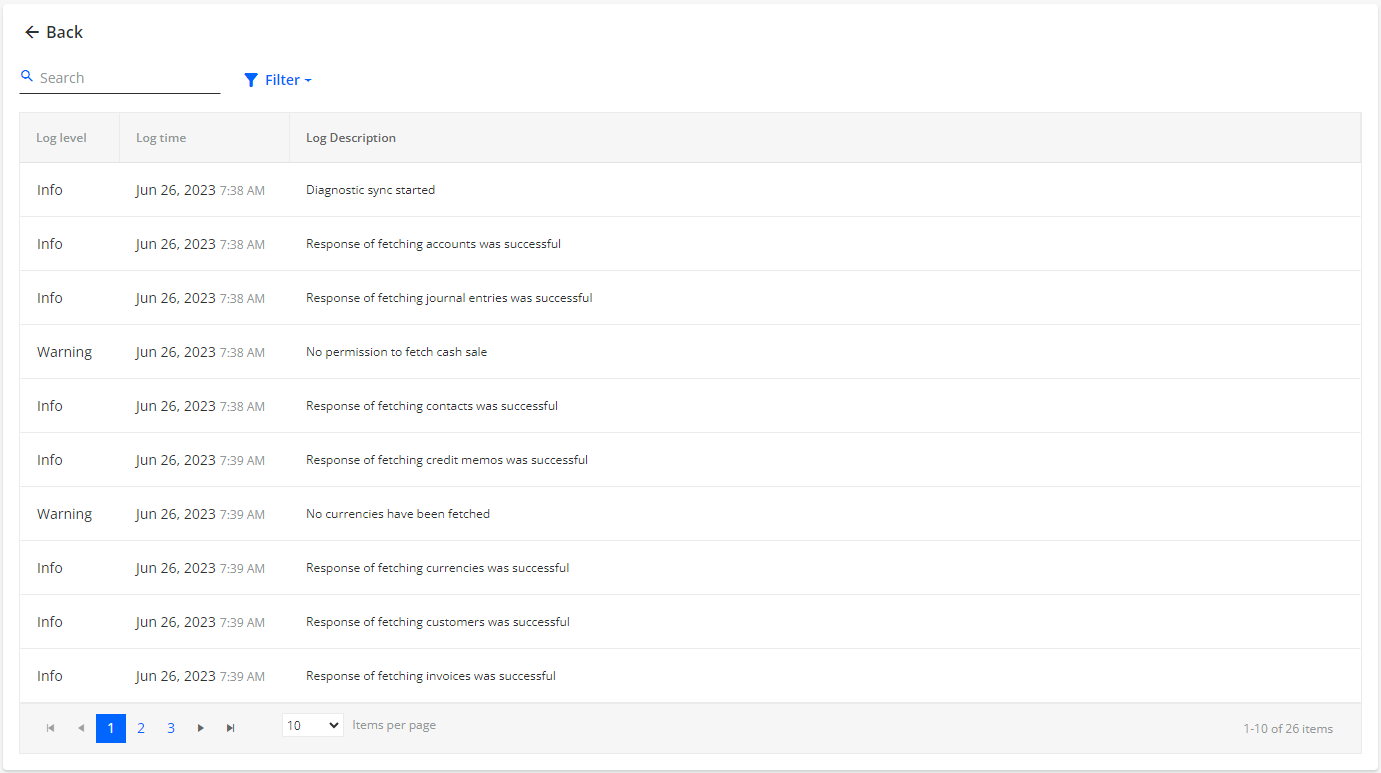
LOGS
Click on the LOGS tab to review the approx. volume and the type of AR data pulled over from NetSuite. There is a Log for each sync. These include any errors which occurred.

Download the Log as an Excel file to view the results.
Example
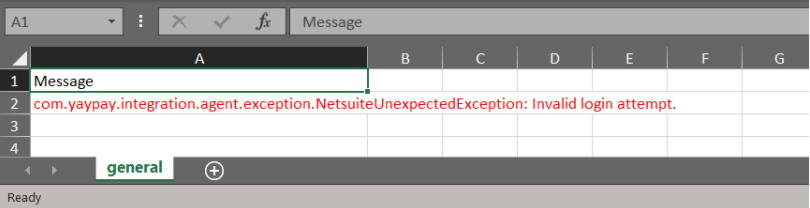
An invalid login attempt indicates that YayPay cannot log into NetSuite using the NetSuite credentials configured in YayPay. Review the NetSuite setup in this Article.
Bring over Sales Reps from NetSuite
You can also decide to bring over the Sales Rep assigned to the Account/Customer in NetSuite. This will create the User Account for the Sales Rep in YayPay, and the Assignment of the Sales Rep to the Account.
If Sales Rep users have already been manually added in YayPay - these users must be deleted before any Sales Users are synced over from NetSuite (as any duplicate email addresses will cause errors).
First / Last name and Email Address is required.
-
In NetSuite, there must be only 1 user instance that is assigned to groups.
We cannot sync multiples of the same user assigned to each individual group - the sync will find the first email address instance, and skip over the same duplicate email addresses. Even if there are 3 different names that share the same email address like ( Sales@Company.com ) the first person will load and the other 2 users will be skipped / error during the sync.
If you have multiple subsidiaries, ensure they are linked to the user in NetSuite and in YayPay.
Go to the Settings | Business page in YayPay and choose NetSuite to bring over the Sales Rep during the sync process:
If you configure this after your initial sync has already taken place, approach YayPay Support or your YayPay Rep to request for a one-off technical resync to bring your Sales Reps and link them to the customers already in YayPay.
You can review the Sales Reps in YayPay using the Aging Report after the sync is completed.
Insert the column called Sales Representative in your Aging Report and move the column to the left for better visibility. You can export the Aging Report to Excel to compare with your source, etc.
Frequently Asked Questions (FAQ)
Q: How do I disconnect and restart the Sync process?
If, for example, if you forgot to mark a check box, change a setting, etc.:
-
Press the DISCONNECT button in the NetSuite Section block - there is no need to press Pause.
- If you prefer, click on the EDIT button to expand the panel and take a screenshot of the parameters before you disconnect. If you also have Custom Fields configured, take a screenshot of that under Settings | Custom fields.

- If you prefer, click on the EDIT button to expand the panel and take a screenshot of the parameters before you disconnect. If you also have Custom Fields configured, take a screenshot of that under Settings | Custom fields.
After you disconnect, do a page refresh to be sure (e.g. the NetSuite account previously displayed will no longer be shown and your configuration parameters will appear empty to allow you to start again).
Check Auto Create Billing Contact before clicking on CONNECT again.
Re-enter your NetSuite Account, Consumer and Token credentials, and other check boxes where relevant.
Click SAVE.
-
Press the Sync button - you will be prompted to re-enter the Custom Fields Settings.
The Custom Field settings are lost each time a DISCONNECT operation is performed and have to be re-entered. However, the field/data for the custom field that was previously synced remains in YayPay.
Q: How do I switch between multiple instances of YayPay to sync with NetSuite?
Check the drop-down list beside your profile name, located on the top right corner (For more background, refer to this link: https://yaypay.helpjuice.com/tutorials/adding-additional-yaypay-instances).
-
The other YayPay instances aligned to your subsidiary names will be shown in the list if your User Account has been granted access to that Subsidiary.
Access to the subsidiaries is maintained in each user, under Settings | User Management.

When you are in that Subsidiary, navigate to the Settings | Integrations page to repeat the Sync instructions outlined above.
Q: How can I check if the scripts installed are executing as expected in NetSuite?
In NetSuite, you can log in and navigate to the Script Execution log section.
From there, you can search for specific logs using the FILTERS, which allow you to specify the log level, execution date range, and script name. Additionally, you can download the log list as a CSV or Excel file, or print it.

