/en_US/88168-sage-intacct/how-to-configure-intacct-for-yaypay-integration#syncing-documents-by-entity-id-and-location-idThe following is a summary of how to set up the Sage Intacct integration with YayPay using a new Web Services User/Role.
1. Enable Web Services in your Intacct System
Login to Intacct as the Admin
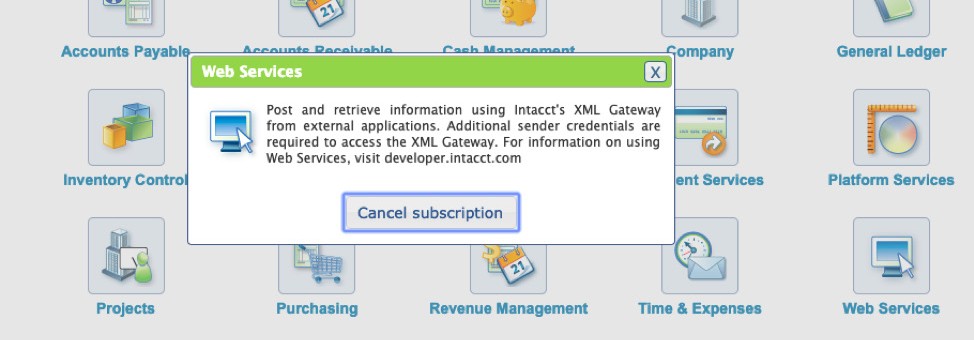
- Navigate to Company > Subscriptions
- Click “Web Services” and you will see if the service is enabled (see screenshot below)
- If the service is not enabled, please enable it
2. Add the Sender ID in Intacct to allow YayPay to sync data
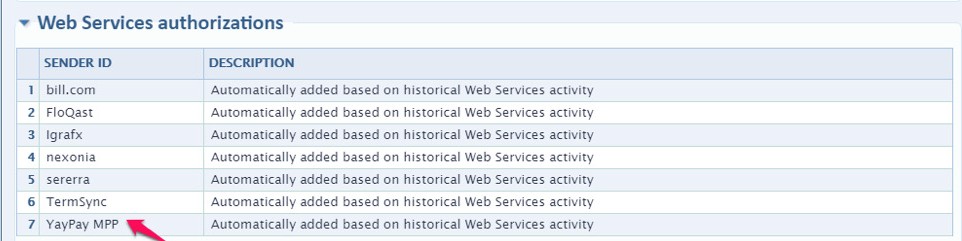
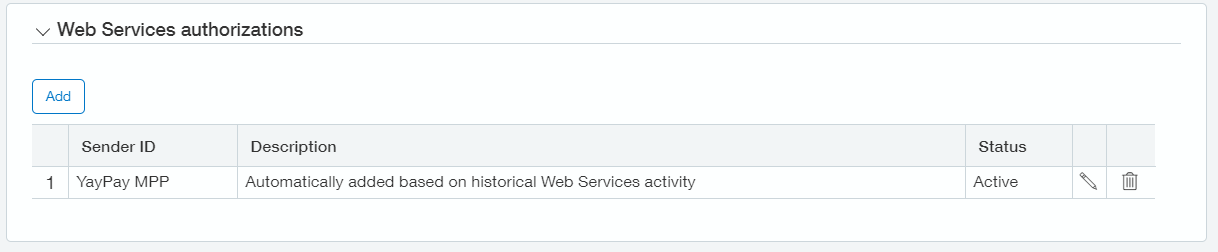
- In Intacct, navigate to Company > Company Info and then click the “Security” tab
- Scroll down to view the list of Web Services authorizations
- Edit your list and add “YayPay MPP” as a new Sender ID with a status of "Active" (see screenshot below).
- Label this Sender ID with an appropriate Description of your choice
3. Setup new Intacct Web Services User and Permissions
Create a dedicated Web Services user for YayPay.
The purpose of this Web Services user is to access the Sage Intacct API only through Web Services, to facilitate the integration of information between Intacct and YayPay (Note: it is not an Intacct User with a usual login).
(See Intacct Help Center for more background on Web Services Users: https://www.intacct.com/ia/docs/en_US/help_action/Administration/Users/web-services-only-users.htm?tocpath=Administration%7CUsers%7C_____10)
In Intacct, navigate to Company > Web Services Users > Add
- Enter the following under the "User Information" tab:
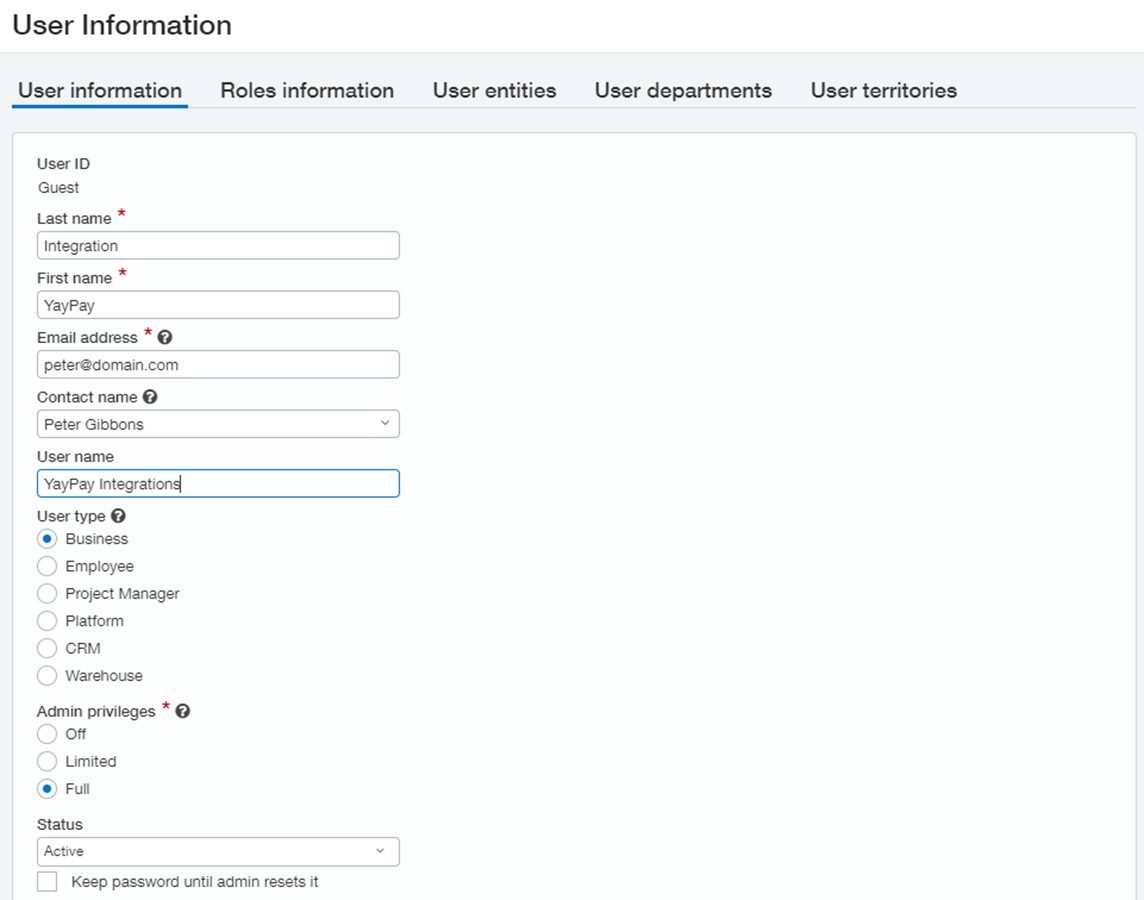
(Create this user at the Root / Top Level in Intacct and give it Full Admin permissions)
- User ID - Use "YayPay" (or Guest)
- Last Name & First Name - Use “Integration” for Last Name, and “YayPay” for First Name
-
Email Address - we recommend using the email address of the person/staff in your organization who will manage this Web Services account (e.g. your Intacct Admin).
- Intacct Sage will send a new password to this email address whenever a password reset is made
- User Type - Select “Business” for the User type
- Admin Privileges - Select Full or Limited for Admin Privileges. See the details below.
Administrator Privileges (click arrow to expand)
Depending on your integration needs (what types of entities you are operating and want to sync to YayPay), the Admin privileges for your User can be configured to be either Full, Limited, or Off.
For the full successful integration of all entities currently syncing with YayPay, the admin privilege should at least have a Limited level. If you configure the Off level, the risks are the errors on the sync at the attempt of the Connector to read and navigate the permission list, which is needed for the correct processing of separate entities.
For more info refer to Intacct’s explanation below.
A user with administrator privileges is given the highest possible level of system access. You can assign admin privileges to a business user, but you can’t assign admin privileges to any other user type. Intacct recommends that each company have at least two Full administrators. Limited Admin privileges include the following abilities:
- Create users.
- Configure and subscribe to applications.
- Assign permissions to users.
- Access financial reports to manage the reports.
Full Admin users have the same privileges as limited. Additionally, Full Admin users have the ability to:
- Create other full admin.
- Access to all features in Platform Services.
- Use the Try Role feature in Role-based companies.
- Status - Set or check the status set to 'Active'
Click Save to create the new Web Services User.
The Password will be emailed to the email address used and remains so until an Intacct Admin resets it
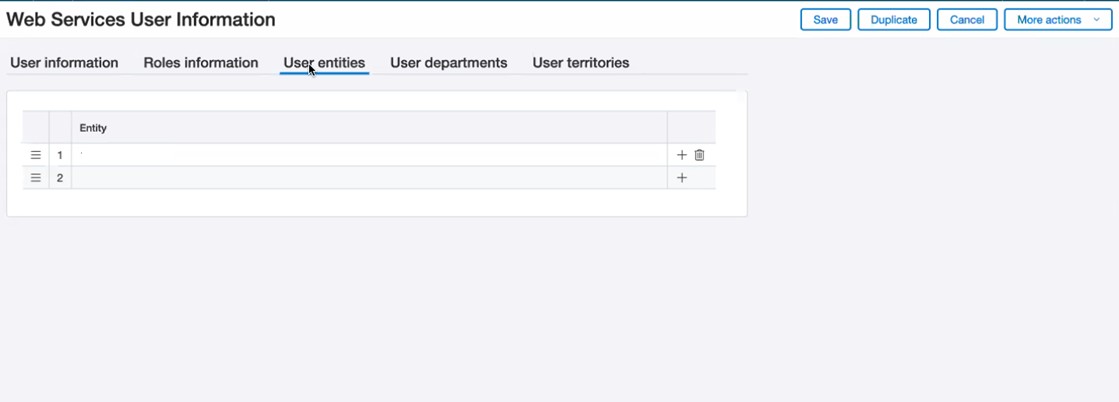
Navigate to the "User entities" tab to assign the designated Entities (Subsidiaries) for this Web Services User to have access to the appropriate Intacct entities.
If you operate a multi-entity Intacct environment, the Entities you select in this tab will define the scope of the AR Sync with YayPay (especially for Invoices issued from that Entity). For example:
- If you intend to sync your AR data for 1 Entity only, add the Entity in this tab
- If you intend to sync your AR data for several selected Entities and not the whole company, add only those Entities in this tab
Customers set on the Top level, can have their documents created in any of the Subsidiaries. The same applies to their child Customers. If there are no documents created in the Subsidiary, which is set to be integrated with YayPay, then the Connector will not attempt to sync the Customer with no documents, regardless of its relationship with the Parent Customer and its own documents.
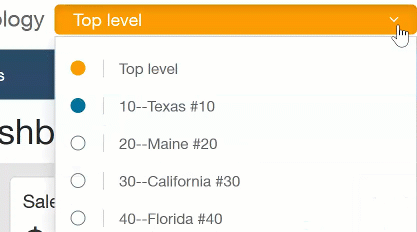
Note: If your Intacct Sage system is not a multi-Entity setup, leave the above tab blank and move on. The Entities you select above are the same as those you find in your Intacct Sage main page/picker list, when you toggle between Entities under Top-level, e.g.
This new Web Services User will also need to be assigned to a new Role created in Intacct, which will be configured with the permissions (selected in Subscriptions) outlined below.
User Role Permissions Necessary for Integration (click arrow to expand)
| Administration | Users: List, View, Permissions | Make sure this is checked even if your User has Full Admin perms. |
| Company | Entities: List, View | |
| Locations: List, View | If the Cash App module is in scope. | |
| Departments: List, View | ||
| Employees: List, View | ||
| Attachments: List, View | ||
| Transaction Currencies: List, View | ||
| Exchange Rate Types: List, View | ||
| Exchange Rates: List, View | ||
Order Entry |
Order Entry Transactions: Edit, List, View | |
| Payment: Add | ||
| Payment Account Information: View | ||
| Accounts Receivable | Customers: View | |
| Invoices: View | ||
| Adjustments: View | ||
| AR Terms: View | ||
| Customer Bank Accounts: List, View | If the payment module is in scope. | |
| Manage Payments: Edit, List, View, Add | ||
| Posted Payments: List, View | If the payment module is in scope. | |
| Print or email invoices: Run | To sync PDF invoices from the Printed templates. | |
| Cash Management | Checking Accounts: List, View | If the payment module is in scope. |
| General Ledger | Accounts: List, View, Add | If the payment module is in scope. |
4. Commence the Sync between Intacct and YayPay
Before starting the synchronization process, review the configuration.
Navigate to Settings | Integrations. Then click Manage Business Systems and select Sage Intacct from the list.
On the panel that opens, specify the following:
- Enter your Intacct Company ID, User ID (the Web Services User ID you created in Intacct), and Password.
- Enter your Entity ID (optional) - Enter the specific Intacct Entity ID (this field accepts a single value only) or leave the field blank. If left blank, the User Entities configured for the Web Services Role will be used.
The Entity ID configured in each YayPay application instance will be used as a filter to synchronize only the AR data associated with that Intacct Entity (e.g. the Invoices linked to that Entity):
- If you have several instances of YayPay provisioned to match the number of Intacct Entities, start in one YayPay instance and enter the appropriate Intacct Entity ID. Repeat this setup using a different Entity ID in each of the remaining YayPay instances, while using the same Intacct User ID/Password
Ensure you are in the appropriate YayPay instance by selecting from the drop-down list beside your YayPay Login Profile (Refer to this Article on Working with Multiple YayPay Instances/Subsidiaries) - If you have 1 instance of YayPay provisioned and the aim is to sync with only 1 Intacct Entity, enter the appropriate Intacct Entity ID
- If you have 1 instance of YayPay provisioned and the aim is to sync the AR for the whole company (i.e. you have no Intacct Entities), leave the Entity ID field blank
- If you have 1 instance of YayPay provisioned and the aim is to sync the AR data based on the specific User entities you configured previously for the Web Services User in Intacct, leave the Entity ID field blank
For more details, see Syncing Documents by Entity ID and Location ID.
3. Optionally, enter a value in Location ID to synchronize documents by Intacct location. During the synchronization, the connector will filter documents based on these location IDs and will sync only those documents that are associated with the specified Intacct locations.
Since the location in Intacct is specified at the document entry level, the connector will analyze each type of document (invoices, payments, credits, and adjustments) and inspect the entries to identify the location. If any location in the document matches a Location ID value specified in the Location ID field, the document will be synchronized.
You can specify one or multiple locations, separating them by commas, e.g. E101,E102,E103.
If you specify multiple locations and at least one location matches the invoice item's location, the connector will sync the entire document. For example, an invoice has three items – the first item has location 1, the second item has location 2, and the third item has location 3. If you enter location 1 in the Location ID field, location 1 will intersect and thus the connector will sync the entire invoice.
For more details, see Syncing Documents by Entity ID and Location ID.
4. Optionally, you can use the Step for historical and delta sync setting to split the retrieved data into batches based on a specific time period. For example, if you enter 5 and select Month for Period, the sync will import data starting from 2015 and split it into batches of 5 months each.
5. For a description of the fields available in the Customization Form section, refer to the relevant sections within this Sage Intacct chapter.
For example, see the Pulling the Customer Level Billing Contact from Intacct section for details on configuring the Auto-Create Billing Contact option.
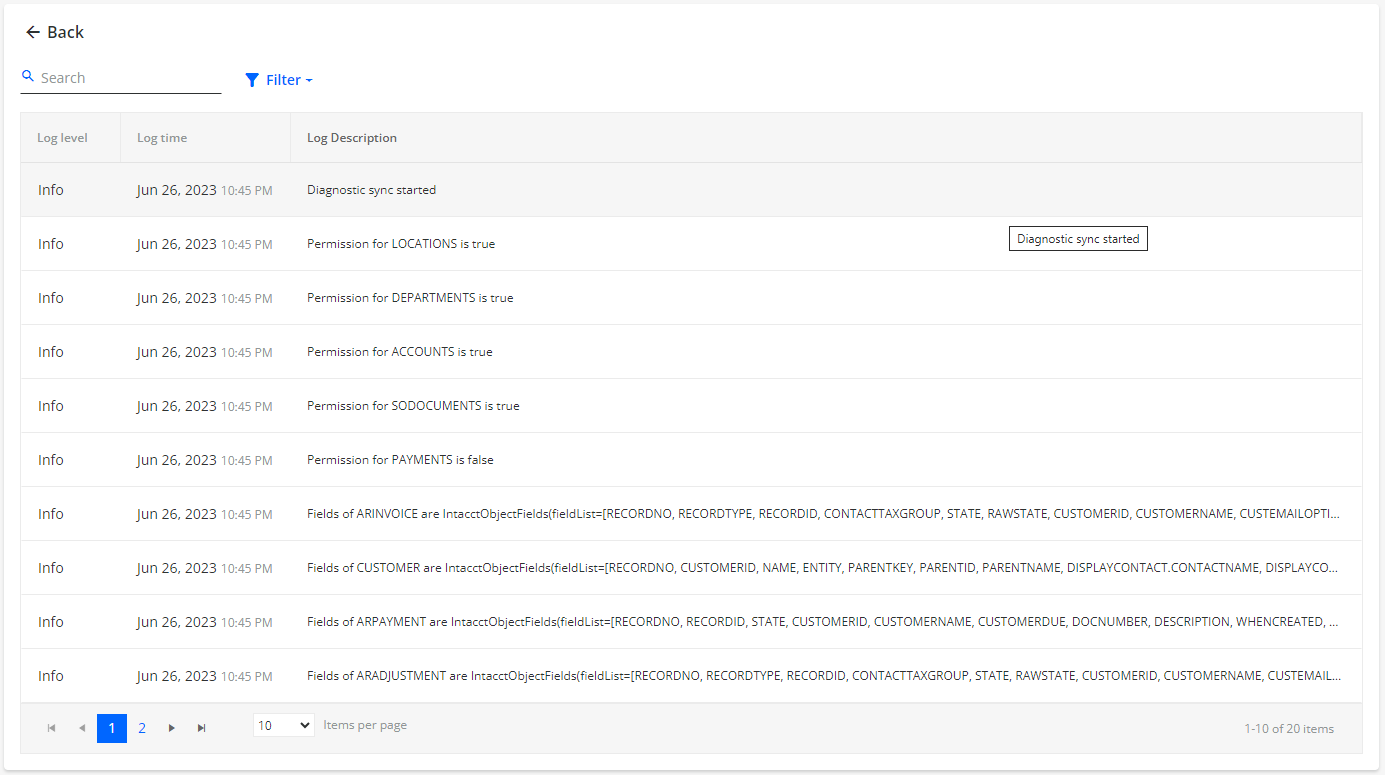
6. Before you proceed and click on the Sync button located in the top-right corner of the page, it is recommend to test the connection and settings by clicking on the Diagnostic Sync button. For details, see the Tip below. 
7. Click Save to save the credentials and other parameters entered.
8. Scroll upwards to click on the "SYNC" button.
After you do so:
- You will be prompted to configure Custom Fields
- Proceed to configure your Custom Fields under the Settings>Custom Fields page (if any)
- All Customer level or Invoice level Custom Fields configured will be part of the Sync process. Refer to this Article link for more background
- If you have no Custom Fields and/or if you have completed the setup, return to the Integrations page (Settings > Integrations) and press the "SYNC" button to start the Sync process. You will receive a message on the screen that the integration process will start in the background
When the Sync process is completed for the first time, the Last Sync Date: Never will be replaced with an actual date-time stamp:

The initial AR sync/integration will take about 1-2 business days to complete for the first time, depending also on our Customer / Invoice volume in Intacct.
During the initial sync, the connector synchronizes only open documents, i.e. documents with a non-zero balance such as open invoices, payments, adjustments, credit memos as well as customers (active and inactive with non-zero balance or with zero balance and open documents), contacts, accounts, invoice PDFs etc. The connector retrieves data from 1st January 2015 onwards.
The initial synchronization is also performed when the integration is disconnected and then reconnected, i.e. there is no Last Sync Date displayed.
After the initial sync has been completed, YayPay will continue to connect to your Intacct system multiple times a day - these subsequent syncs will bring over new & updated data changes since the last sync point.

Syncing Documents by Entity ID and Location ID
You can use the connector to filter and synchronize data by Intacct entity and location. In Sage Intacct, entity refers to the list of subsidiaries, while location refers to the location specified at the document item level.
You can find these fields in Sage Intacct in the following places:
- When searching for a top-level entity, for example:

- In the Location column at the document entry level, for example:

In YayPay, enter their value in the Entity ID and Location ID fields in the Connector Settings section.

These optional fields are empty by default.
You have the following options for data synchronization:
No filtering by entity or location – To synchronize your AR data without filtering by entity or location, leave the Entity ID and Location ID fields empty.
- Synchronization by entity – To synchronize data and filter it by a specific Sage Intacct entity, enter the desired Entity ID value in the Entity ID field.

- Synchronization by top-level entity with location filtering – To synchronize data by a top-level entity and then further filter the data by location, enter the specific Location ID value from Intacct in the Location ID field.

Synchronization by both entity and location – To first filter the data by a specific entity and then further filter it by location, fill in both the Entity ID and Location ID fields.
5. Check if sync with Intacct was successful
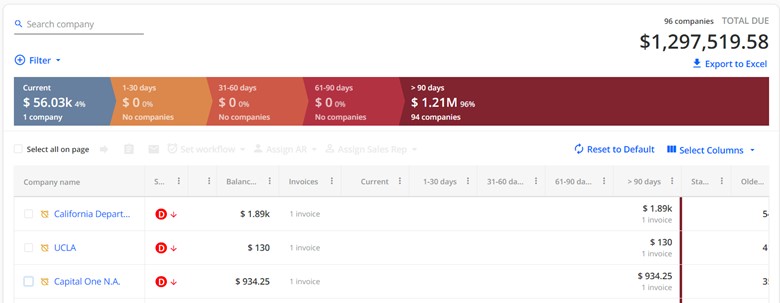
Check your Aging Report
If the sync is successful, your AR data will appear in YayPay within the next day or two.
Check Billing Contacts
To check that your customer Billing Contacts were imported correctly, click on any customer in the Aging Report page to access the Statement page for that customer. On the right side of the Statement page, review the contacts on the CONTACTS tab.
This example shows a customer Billing Contact created in YayPay, with the email address brought from your ERP:
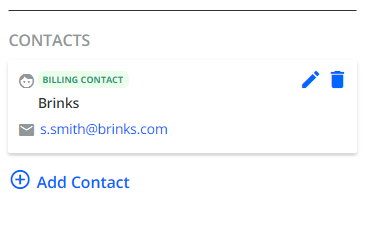
Depending on your Intacct setup, you can also have invoice-level billing contacts imported from your Intacct system. To view additional information such as email addresses, click on the face icon.
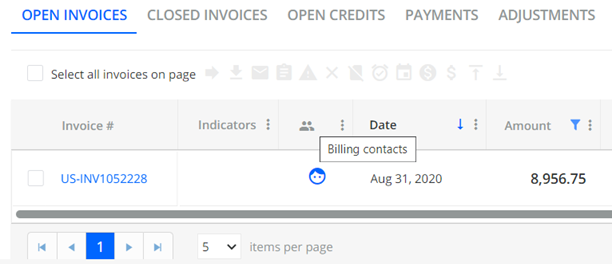
Check invoice view
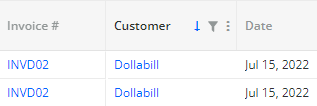
Click the invoice reference number (e.g. on the Statement page, Invoices page) to view its details and compare them to those in Intacct:

Accounts Receivable invoice mapping to YayPay invoice
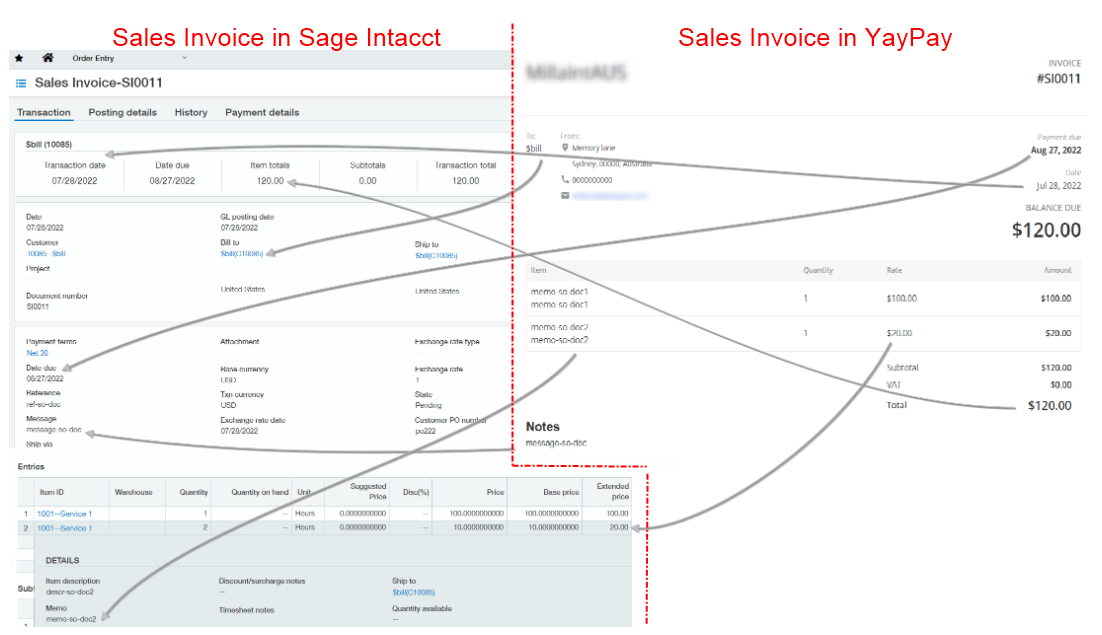
Order Entry invoice mapping to YayPay invoice
Understand Document Duplication
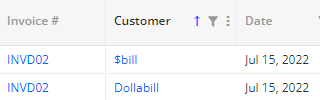
Because Sage Intacct® allows custom numbering of invoices, invoices may have the same number. However, YayPay prevents duplicate invoices from being loaded. It only allows invoices with the same number to be loaded if: they belong to different customers; or have different invoice dates.
During the initial sync, all duplicated invoice numbers are synced based on the invoice number, customer, and date. However, during the subsequent iterative syncs, the following applies:
If there are multiple AR (Accounts Receivable) invoices with the same invoice number, their updates can be synced without any issues.
-
If there are multiple Sales invoices that have the same invoice number, customer, and date, YayPay cannot guarantee that the correct one will be updated during the iterative sync.
This is because sales invoices change their internal identifier whenever any document update occurs, making it difficult to track and identify the correct invoice when multiple sales invoices with the same number are synced to YayPay.
Another peculiarity of Intacct's identifiers is that the internal IDs can be re-used for any type of documents. Once a document is deleted, a new one can inherit its ID, and that is where YayPay performs a duplicate check.
Also Intacct allows invoices with values duplicated by all 3 parameters to be synced during the initial sync, providing them with unique internal IDs.
6. Summary and Next Steps
This guide completes the first half of the flow outlined in the illustration below.
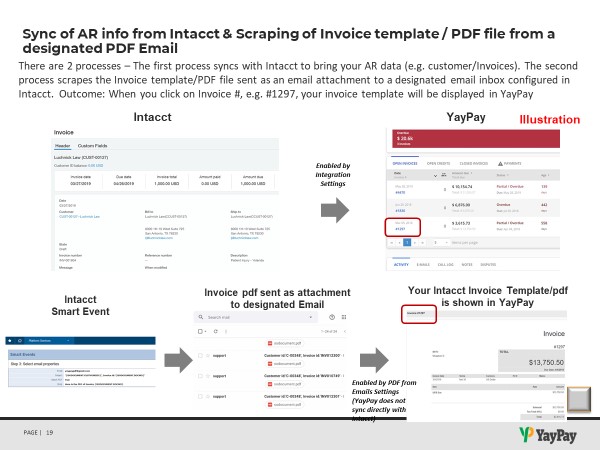
Move on to the next guide to configure the Intacct Smart Event that will send your Invoice Template/PDF to a designated PDF Mailbox (Refer to: https://yaypay.helpjuice.com/88168-sage-intacct/intacct-yaypay-invoice-pdf-sync-guide)
We recommend this be a new & dedicated mailbox where YayPay will connect to and retrieve/extract the Invoice PDF attachment so that the same look and feel is displayed within YayPay (Refer to: https://yaypay.helpjuice.com/71918-statement/invoice-page)
If you are also using YayPay for Payments, refer to this guide to setup YayPay and Intacct accordingly
7. Sync Frequency
During the regular synchronization process, the data of the Intacct connector is synced every 2 hours and 20 minutes. This timing supports YayPay's Service Level Agreement (SLA) for data delivery while also maintaining expected expenses for API calls.
Freqeuntly Asked Questions (FAQ)
Q: How do I disconnect and re-start the Sync process?
If you forgot to mark the "Auto create billing contact" checkbox, or decide that you want to want to try the Sync in Test mode for the first time without bringing your actual email contacts, etc)
- Press the "DISCONNECT" button in the Sage Intacct block
- Do a page refresh to be sure (e.g. the date/time stamp of the last sync will no longer be shown)
- Check the “Auto Create Billing Contact” checkbox
- Re-enter your Intacct credentials (and Subsidiary ID if any) that was used before to follow through and start the sync as described above
Q: What do the main indicators mean in the Integration Settings panel?
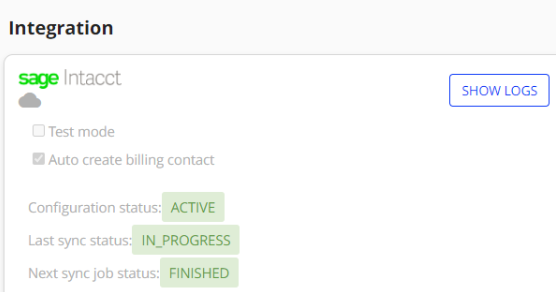
Configuration Status: Your Sage Intacct Credentials are configured, saved, and Active in YayPay
Last Sync Status: After the initial sync has completed, this shows the current Sync attempt by YayPay as part of a series of Recurring Syncs taking place throughout the day. (Note: if you don’t see any data in YayPay for more than 3-4 hours, it is a signal that the process is "not running or not doing anything". Reach out to support@yaypay.com)
Show Logs: Click on the button for further detail as well as the logs for previous Sync attempts (historical attempts). Download the log file to Excel
Q: How do I switch between multiple instances of YayPay to sync with Intacct?
- Check the drop-down list beside your profile name, located on the top right corner (For more background, refer to this link: https://yaypay.helpjuice.com/tutorials/adding-additional-yaypay-instances)
- The other YayPay instances aligned to your Subsidiary names will be shown in the list if your User Account has been granted access to that Subsidiary. Access to the Subsidiaries is maintained in each User, under Settings > User Management

- When you are in that Subsidiary, navigate to the Settings > Integrations page to repeat the Sync instructions outlined above
Q: How to get the correct total balance if the sync process is performed for a particular Subsidiary?
If you use Entities under Top-level in Intacct and wish to sync the documents impacting the balance for example by a single Entity, note the following:
Intacct processes all the documents impacting the balance by a selected Entity (Subsidiary) ID and calculates the Entity balance, but it cannot incorporate the Entity balance into the total balance.
The total balance is updated according to the documents received during the sync process on the Top-level only
To get the correct total balance in YayPay (incorporating the Entity balance), go to Settings > Business, and enable the "Use Calculated Customer's Balance" checkbox:

When this checkbox is enabled, all the documents pulled within the sync process will be included in the total balance calculation.
