Characteristics
With CardConnect, you can make payments using both credit cards and ACH.
While credit card payments can be made in any currency, ACH payments can only be made in USD.
How to Set Up CardConnect
- Go to Settings | Payments/Credits | CardConnect.
- Click on SET UP to open the Manage CardConnect Payment Provider dialog.
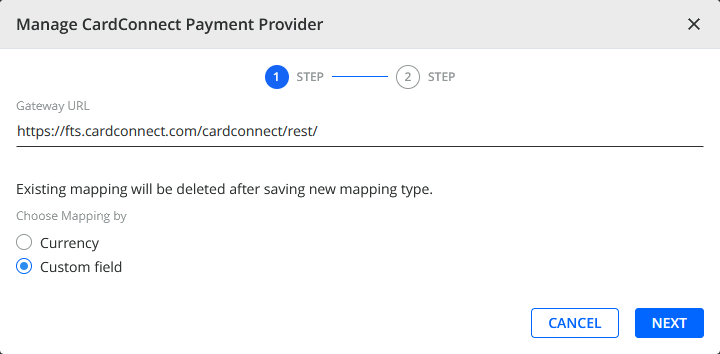
- Configure the settings of the first setup step:
-
Gateway URL - Set the value to CardConnect Gateway's API endpoint URL:
https://fts.cardconnect.com/cardconnect/rest/
-
Choose Mapping by- Select one of the available methods for how payments will be mapped to the configured merchant IDs:
-
Currency - Maps payments to merchant IDs based on the used currency.
You can configure up to 2 merchant IDs with the Currency mapping: a default one for any currency, and another one for a specific currency. -
Custom field - Maps payments to merchant IDs based on the custom fields assigned the customers.
You can configure up to 10 merchant IDs with the Custom field mapping.
-
Currency - Maps payments to merchant IDs based on the used currency.
-
Gateway URL - Set the value to CardConnect Gateway's API endpoint URL:
- Click on NEXT to move to the second setup step.
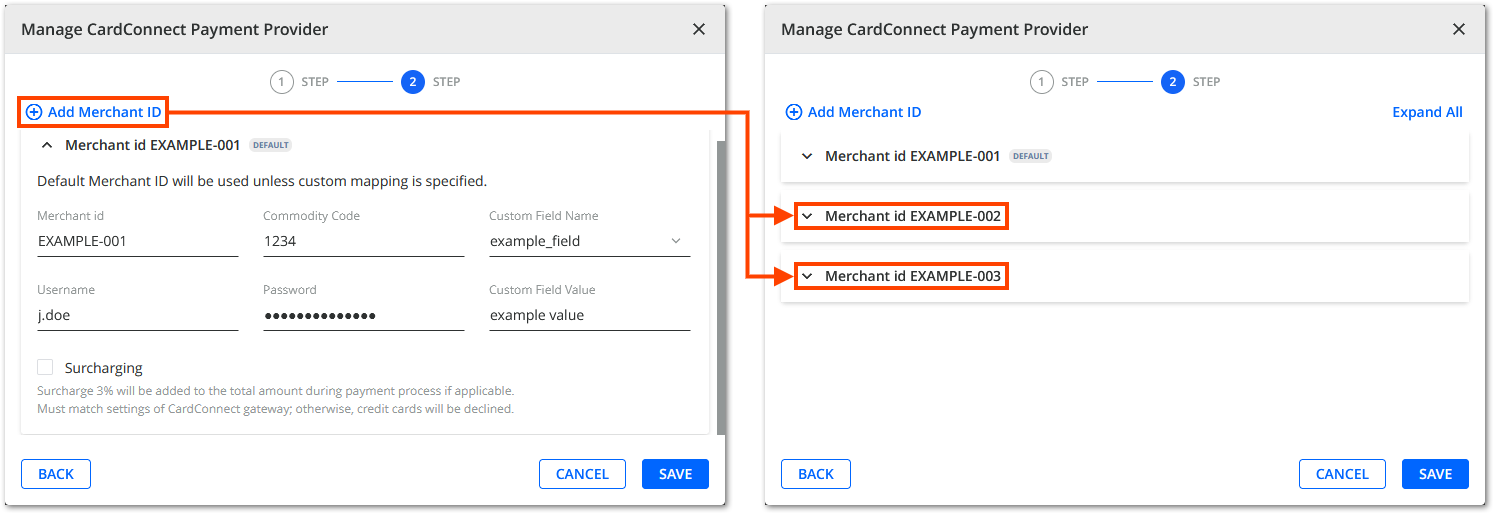
- Configure the default merchant ID:
Settings Mapping Description Merchant id All Obtain the values for these settings from your CardPointe account. Commodity Code Username Password Currency Currency Notice you cannot map the default merchant ID to a specific currency. It covers all currencies except for the one mapped to the additional merchant ID. Custom Field Name Custom field Select a customer-level ERP custom field that you want to use for the mapping. Custom Field Value Define the value that must be assigned to a customer by the selected custom field in order for their payments to be processed by the default merchant ID.
Additionally, the default merchant ID also processes payments made by customers that do not match any of the additional merchant IDs.Surcharging All Enable this setting if you want the given merchant ID to add a surcharge to the total amount of each payment. For more information, see the Surcharges within Cardconnect section. - Optionally, configure additional merchant IDs:
- Click on Add Merchant ID every time you want to start configuring an additional merchant ID (1 for Currency mapping, or up to 9 for Custom field mapping).
- Configure the same settings as the ones for the default merchant ID with these exceptions:
Settings Mapping Description Currency Currency Select a specific currency.
The additional merchant ID will only process payments made in that currency.
Payments in any other currency will be processed by the default merchant ID.Custom Field Value Custom field Define the value that must be assigned to a customer by the selected custom field in order for their payments to be processed by the given merchant ID.
Other payments will either be processed by the default or other additional merchant IDs.
- Click on SAVE to finish the CardConnect setup.
- Continue by connecting YayPay to CardConnect.
How to Connect to CardConnect
Once you set up the CardConnect payment service provider, you can connect YayPay to it:
- Go to Settings | Payments/Credits | CardConnect.
- Click on CONNECT.

After connecting to CardConnect, you can do the following:
- Use the DISCONNECT button that replaced the CONNECT button to disconnect YayPay from CardConnect.
- Use the EDIT button to edit the CardConnect setup.

Surcharges within CardConnect
Credit card transactions within CardConnect can be eligible for surcharges that amount to 3% of the transaction total. In order to enable this feature, the merchant must have this included in their agreement with CardConnect.
The exceptions* (cases when surcharges do not apply) are listed below:
- Debit cards
- Payments made from the following:
- States: Colorado (CO), Connecticut (CT), Kansas (KS), Massachusetts (MA)
- Territories: Puerto Rico
- Armed Forces Locations: Domestic (AF), EU (AE), Pacific (AP), US (AA)
*Subject to change
Payment process flow with surcharges for CardConnect
1. Select an invoice to pay (or choose the "AUTO-PAY" or "PAY ON ACCOUNT" option) from the Statement page or the Customer portal.
2. Follow the usual flow: select "Credit card", populate the required fields in the billing address information, and click "Continue".
3. On the Submit Payment page click the "Verify Account" button:
The system will check whether the surcharge fee can be added to your payment amount or not.
4. If the system response is positive, the surcharge fee is applied, and its calculated amount is displayed in the next step:
If the surcharge fee is waived as a result of account verification, the "Surcharge" field will not be shown.
5. Click "Submit Payment".
6. The surcharge amount applied will be displayed on the "Transaction Successful" page:

Ability to work along with other PSPs
Being a primary payment service provider, CardConnect can be connected along with any of the secondary PSPs.
For a detailed description of how CardConnect (primary PSP) works when connected simultaneously with other PSPs, see the
links below:
1) CardConnect + NMI
2) CardConnect + GoCardless
3) CardConnect + Flywire
ACH Payment Messages and Errors
The following table lists possible messages or errors that your customer might receive when attempting to make ACH payments through CardConnect.
By providing the specific error message received, the merchant's support team can better understand the problem and provide a more efficient solution.
| Code | Message | Comments |
|---|---|---|
| R01 | Insufficient funds. | |
| R02 | Bank account closed. | |
| R03 | No bank account found, or unable to locate the account. | |
| R04 | Invalid bank account number. | |
| R06 | Returned per ODFI request. | |
| R07 | Authorization revoked by customer. | Add ACH ID and provide a bank letter confirming that the ACH ID has been added. |
| R08 | Payment stopped. | The merchant is required to write a letter stating that the stop payment has been lifted and assure that they will no longer initiate any stop payments on debits from CardConnect. This letter should be sent to the collections department. |
| R09 | Uncollected funds. | |
| R10 | Customer advises not authorized. | Indicates that the customer has advised the bank that the transaction is not authorized. |
| R11 | Check truncation entry return. | |
| R12 | Branch sold to another RDFI. | |
| R13 | RDFI not qualified to participate. | |
| R14 | Representative payee deceased or unable to continue in that capacity. | |
| R15 | Beneficiary or bank account holder. | |
| R16 | Bank account frozen. | Provide a letter from the bank stating that the account is in good standing. |
| R17 | File record edit criteria. | |
| R18 | Improper effective entry date. | |
| R19 | Amount field error. | |
| R20 | Non-payment bank account. | |
| R21 | Invalid company ID number. | |
| R22 | Invalid individual ID number. | |
| R23 | Credit entry refused by receiver. | |
| R24 | Duplicate entry. | |
| R25 | Addenda error. | |
| R26 | Mandatory field error. | |
| R27 | Trace number error. | |
| R28 | Transit routing number check digit error. | |
| R29 | Corporate customer advises not authorized. | Add ACH ID and provide a bank letter confirming that the ACH ID has been added. |
