The Customer Portal web page provides your customers with the information about their Account & Receivables on one page.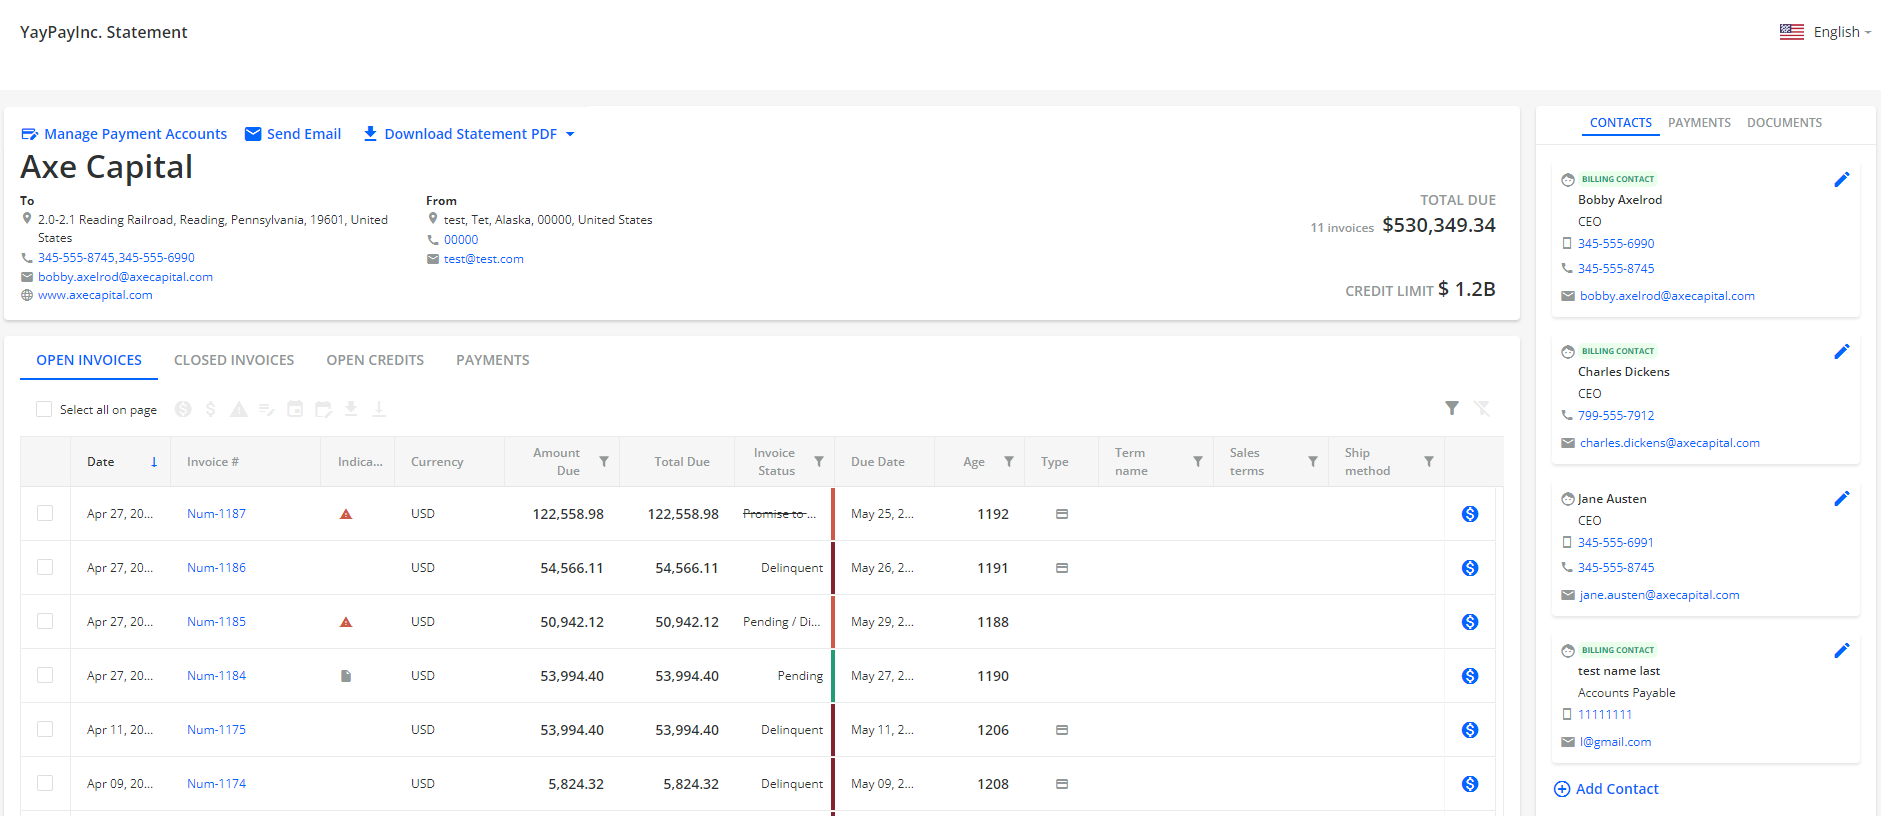
The appearance and behavior of the Customer Portal web page can be configured and adjusted in Settings | Business page in YayPay.
You can change the page language by using the Language drop-down menu, located in the top-right corner.
See also the following articles to learn more about the Customer Portal configuration:
- Business Settings – Appearance and behavior of the Customer Portal web page.
- Customer Portal Settings – Control what your customer can do or see on their Customer Portal web page.
- Custom Fields Settings – Show your invoice-level custom fields synced from your ERP system on the Customer Portal web page.
- System custom fields – Show your system custom fields created in YayPay on the Customer Portal web page.
Using Customer Portal
Customers can use the Customer Portal to do the following:
- View their Company Name, Address, Email, Phone, and Contacts they have registered with you.
This information comes from your ERP to YayPay.
- View and download open or closed invoices. Each invoice shows the status, paid amount, and other available details including custom fields.
You can download a maximum of 10 selected invoice PDF files at a time. - Update the Contact Details directly in YayPay (configurable, you can hide Contacts or prevent edits in Settings | Business).
- View any Open Credits (configurable, you can hide this tab in Settings | Business).
- View any Payments applied to invoices (configurable, you can hide this tab in Settings | Business).
- Download a Statement PDF (configurable, you can disable the download in Settings | Business).
- Download a customer statement in Excel format. This statement also includes invoice level system custom fields.
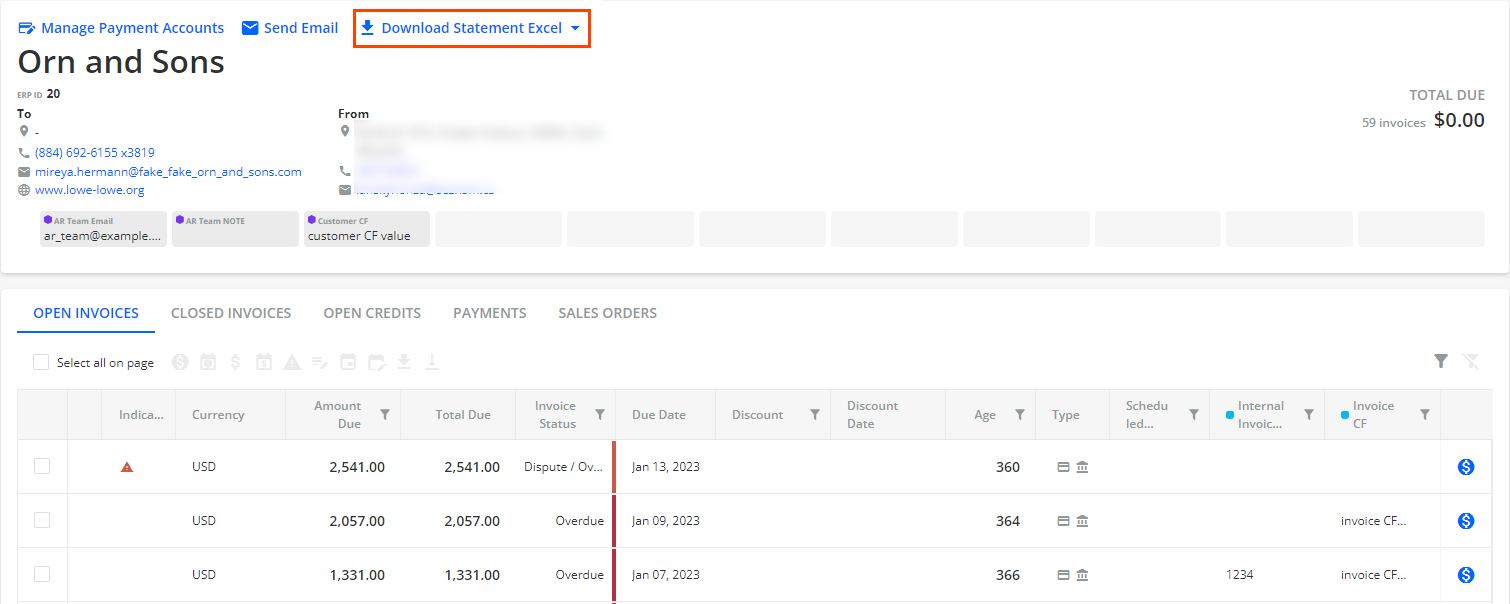
For more details, see the Statement Excel section. - Use the SEND EMAIL functionality:
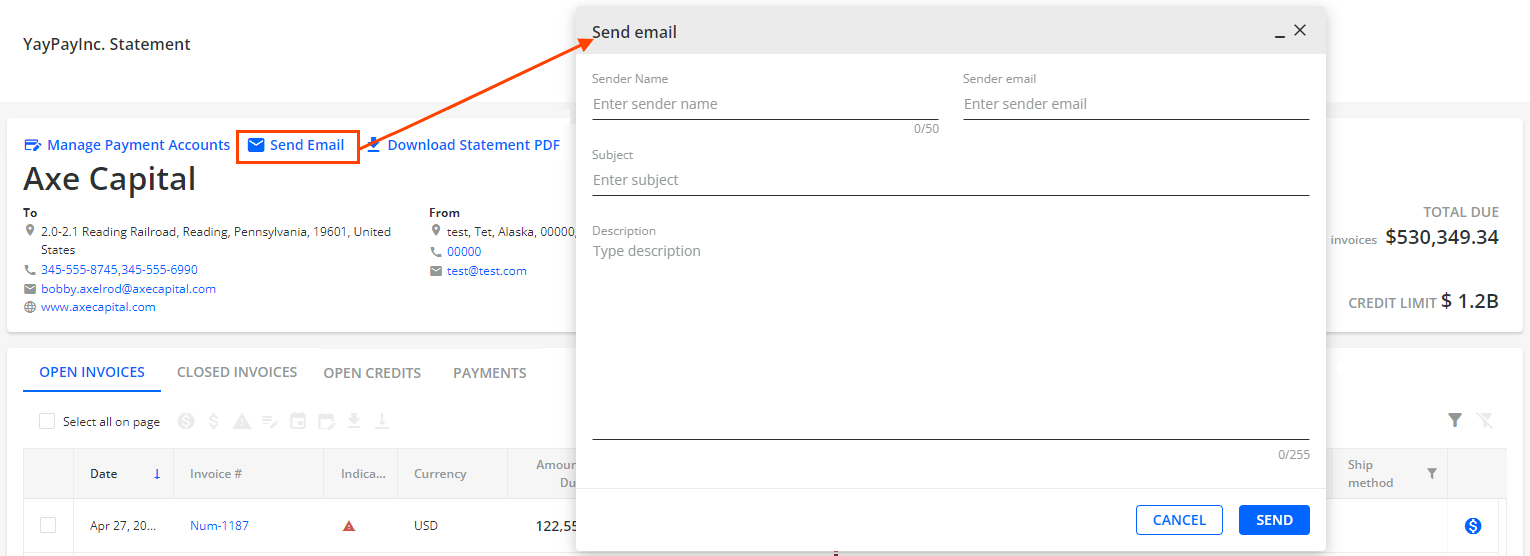
- Sender Name, Sender Email and Subject are required fields.
- If Customer Portal authentication is enabled, the Sender Name and Sender Email fields are automatically filled with the with the data of a customer who logged in to the Customer Portal.
- By default, the Customer Portal sends emails to the email address specified in the Main AR Email field in Settings | Business.
- If an AR Specialist is assigned to the given customer in YayPay, YayPay sends emails to the AR Specialist's email address.
- Make the following forms of payments:
- Full or partial payments for invoices – Using ACH or CreditCard mode (configurable in Settings | Business).
- Scheduled payments (full or partial).
To learn about this feature, see the Customer Portal - Allow Scheduled Payments article. - Auto and recurring payments – Using the AUTO-PAY feature.
To learn about this feature, see the Auto-payment/Recurrent plans on Customer Portal article. - Payments on account (only in USD) – Using the PAY ON ACCOUNT feature.
To learn about this feature, see the Making Payments On Account section of the Making Payments from the Customer Portal article.
- View and apply any open credits during the Payment process (configurable in Settings | Business).
- Use discounts when making payments (configurable in Settings | Business).
- Open/close a Dispute for invoices (configurable in Settings | Business).
- Open a Promise to Pay for invoices (configurable in Settings | Business, one promise to pay per invoice).
- Manage the Promise to Pay (modify the promise date, description text, and amount). Also, there is an option to delete the existing Promise to Pay.
- View payment history and download documents related to a particular invoice on the invoice view page (configurable in Settings | Business).
Customer Portal - Structure Overview
The Customer Portal web page consists of the following sections:
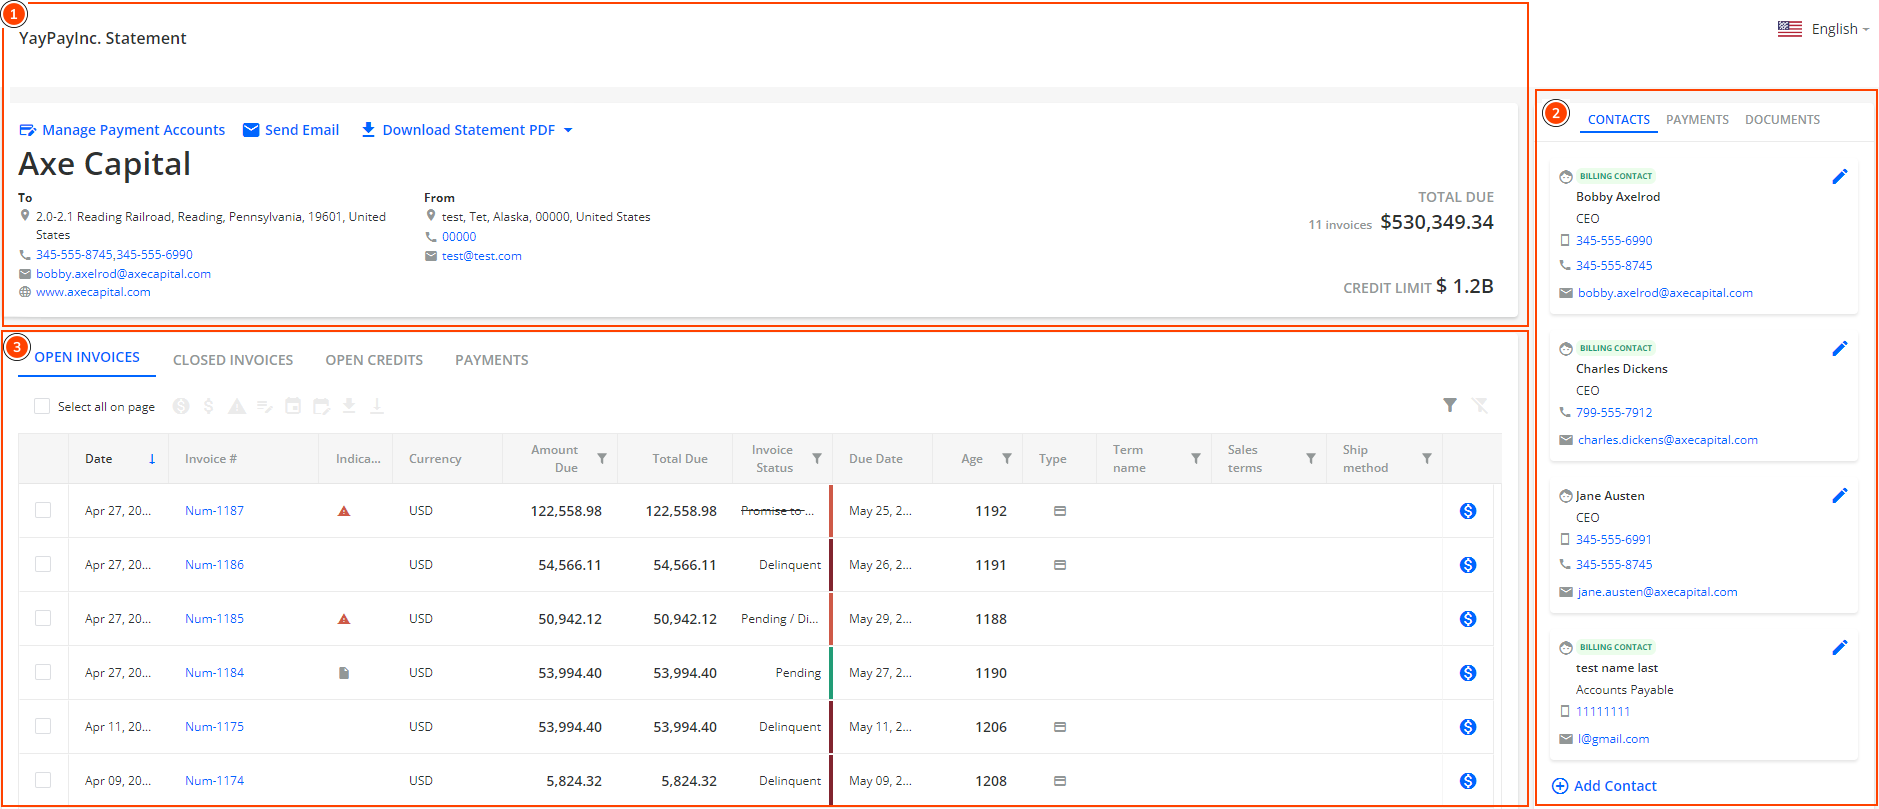
Customer Portal - Header

The top part of the Customer Portal web page includes the following:
Company Name
Displays a name of your instance that appears on your YayPay Login page, for example YayPayInc.
Manage Payment Accounts
Opens the Manage Payment Accounts dialog where you can save and manage payment methods associated with the customer's account.
Send Email
Opens the Send email dialog which you can use to send an email to the customer.
Download Statement PDF
Downloads a YayPay-generated customer statement in PDF format. The statement includes all open documents for the customer, e.g. open invoices, credits, adjustments, etc.
Download Child Statement Links
Downloads an Excel file containing a list of statement links for all first level child accounts.
To make the Download Child Statement Links button visible on the Customer Portal web page:
Ensure your company is a parent company for at least one other company, i.e. the parent company has Parent level collections checked on its SETTINGS tab on the Statement page.
Enable authentication for the Customer Portal web page, i.e. check Customer Portal - Enable authentication in Settings | Business.
Check the Allow Child statement links report export on Customer Portal check box in Settings | Business.
Customer Name
Displays name of a customer and the associated data.
To
Displays a customer's contact information.
From
Displays your company's contact details, i.e. your business contact details as specified in Settings | Business.
Total Due
Displays the number of invoices and their total amount that needs to be paid by the customer.
Credit Limit
Displays the credit limit available for the customer in the customer's currency.
For more information, see the Manage Credit Limit inside YayPay section.
Customer Portal - Contacts, Payments, Documents
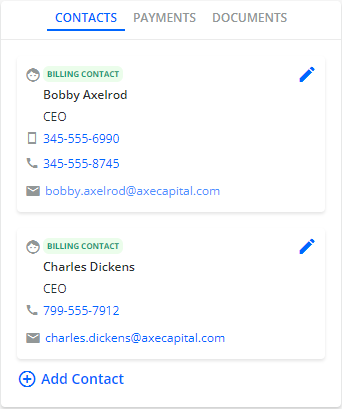
The panel on the right side of the Customer Portal contains the following tabs:
CONTACTS – Displays customer's contact information.
PAYMENTS – Displays settings for the AUTO-PAY and PAY ON ACCOUNT payment types.
DOCUMENTS – Displays customer's supplemental documents.
For details about the individual tabs and their features, see the Statement Page - Contacts, Payments, Documents section.
Customer Portal - Invoices and AR Data
This section of the Customer Portal web page displays and allows management of customer invoices on the following tabs:
OPEN INVOICES
CLOSED INVOICES
OPEN CREDITS
PAYMENTS
OPEN INVOICES
This tab displays all Open/Overdue invoices from your ERP, i.e. invoices that are unpaid or partially paid.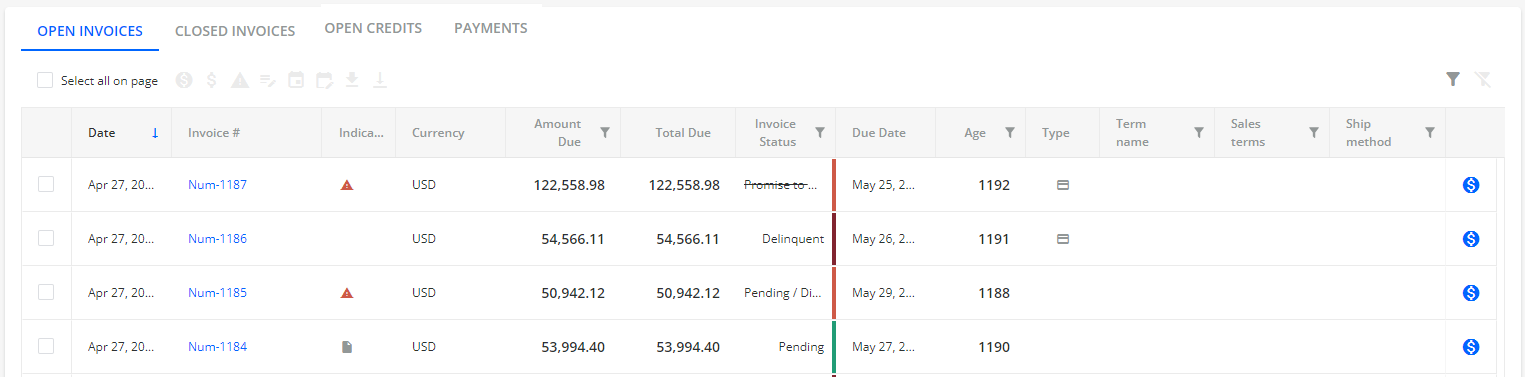
When selecting one or more invoices, relevant open invoice actions become accessible on the action bar. However, if multiple invoices are selected, only some actions are available. Hover over icons for brief descriptions or help text.

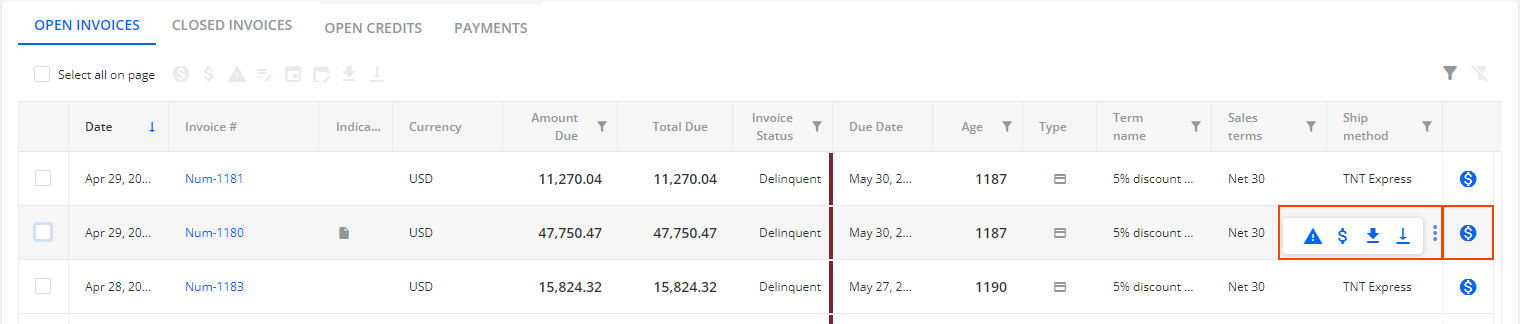
The following actions are available on the action bar:
Pay
Opens the Payment dialog allowing you to pay for selected invoices.
If multiple invoices with different currencies are selected, the icon is not available.
Partial Pay
Opens the Partial Payment Invoice dialog allowing you to partially pay for the selected invoice.
This action is available only if a single invoice is selected.
Open Dispute
Opens the Open Dispute dialog to open a dispute for the selected invoice.
By default, opening a dispute (for example from the Statement page or Customer Portal) also automatically creates a task. To prevent YayPay from doing so, go to Settings| Business and check Do not create task when dispute is opened.
This action is available only if a single invoice is selected.
Manage Dispute
Manages the opened dispute for the invoice, i.e. you can edit or resolve the dispute.
Add Promise to Pay
Open the Promise To Pay dialog to create a Promise to Pay for the selected invoice.
By default, opening a Promise to Pay (from the Statement page or Customer Portal) also automatically creates a task. To prevent YayPay from doing that, you can check the Do not create task when promise to pay is opened check box in Settings| Business.
Manage Promise to Pay
Manages a Promise to Pay for the selected invoice, i.e. you can edit the date, description, and amount or delete the Promise to Pay.
This action is available only if a single invoice is selected.
Download Invoice
Downloads a single invoice as a PDF file, or multiple invoices in a ZIP file.
You can select a maximum of 10 invoices to download their invoice PDF files at a time.
For more details, see the Statement Excel section.
Download Documents
Downloads attached documents (if there are any).
This action is available only if a single invoice is selected.
Alternatively, you can access actions for a single invoice by clicking click on the three vertical dots that appear when hovering your mouse pointer over a specific invoice.
Additionally, you can filter the grid's content to see specific invoices only, for example: 
Once you set up filtering, the total number of applied filters is indicated by the Filter icon with a number which is located in the top-right corner.
To clear all the filters, click on the Clear Filters icon located next to it.
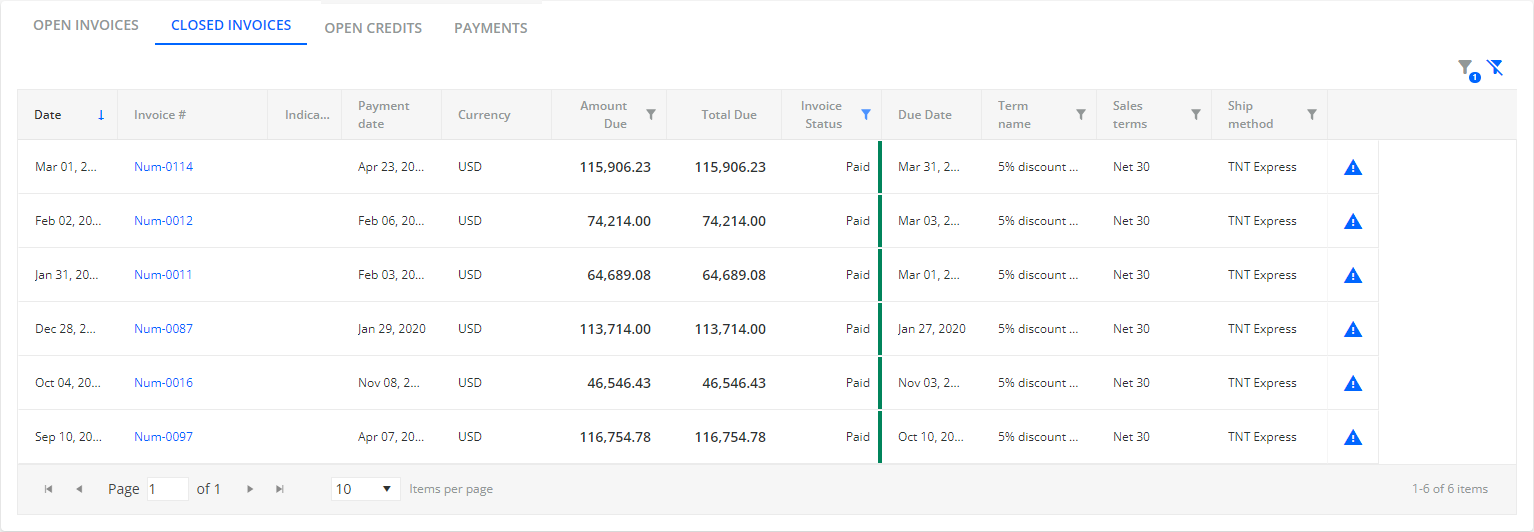
CLOSED INVOICES
This tabs displays all closed invoices from your ERP, i.e. invoices that have been paid in full.
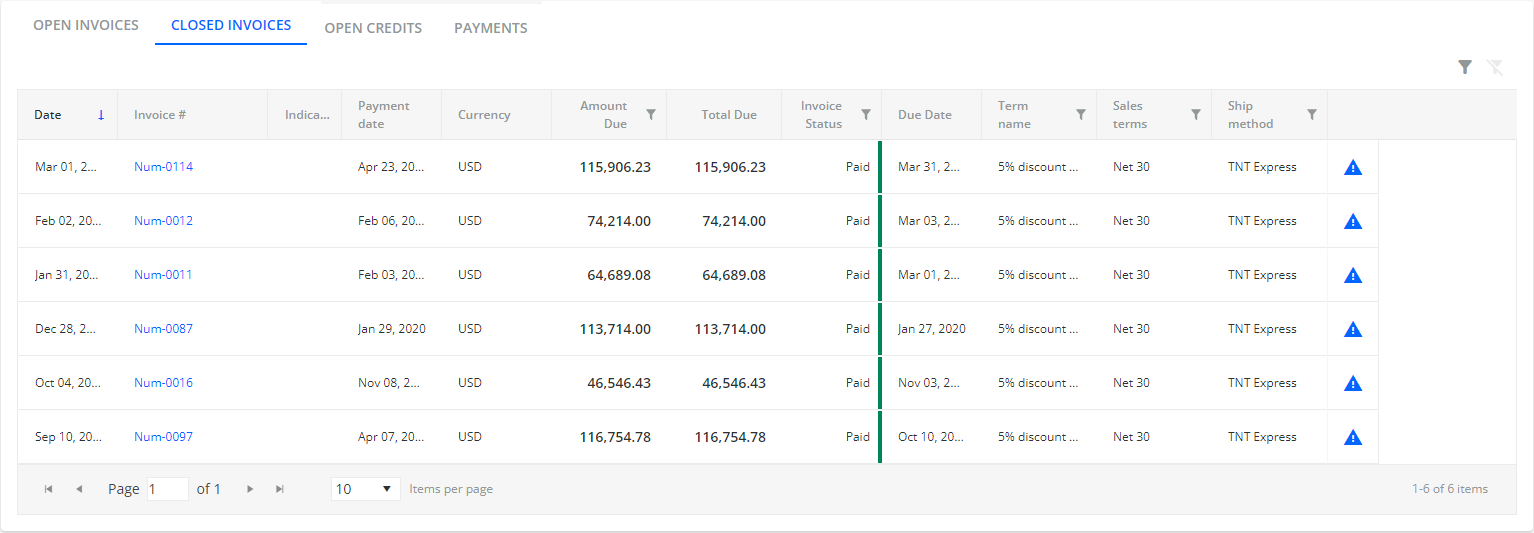
For already paid invoices, you can only use actions for a single invoice. To access them, click on the three vertical dots that appear when you hover your mouse pointer over an invoice.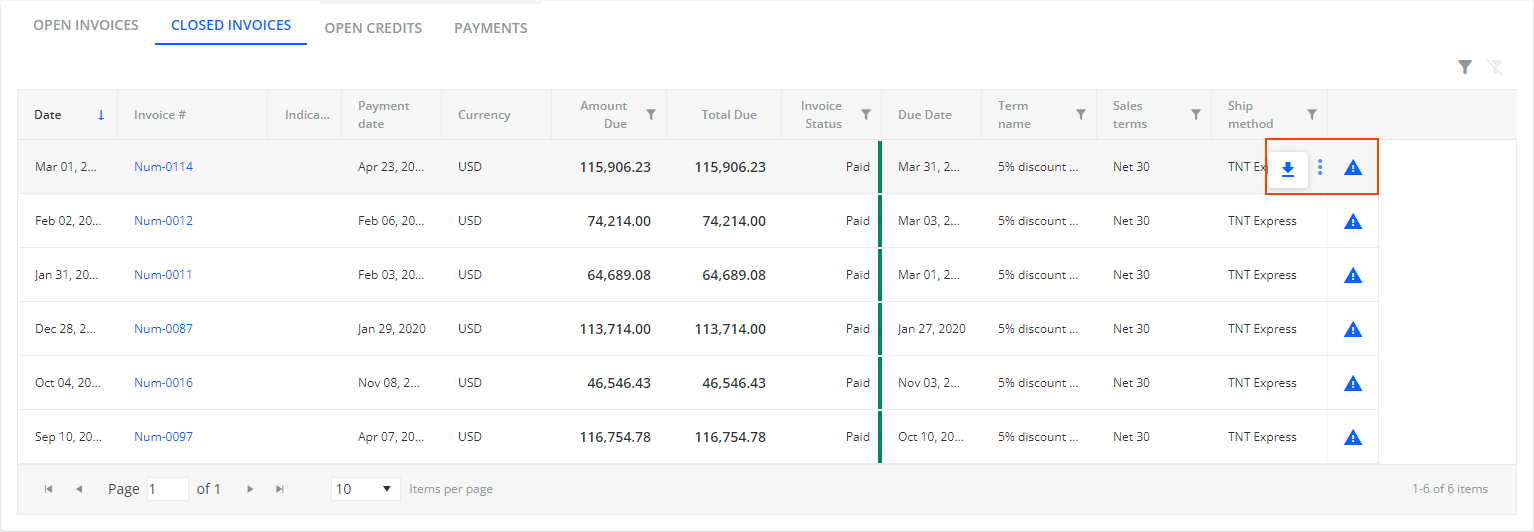
The following actions are available when hovering over a single invoice:
Download Invoice
Downloads a single invoice as a PDF file.
Open Dispute
Opens the Open Dispute dialog to open a dispute for the selected invoice.
By default, opening a dispute (for example from the Statement page or Customer Portal) also automatically creates a task. To prevent YayPay from doing so, go to Settings| Business and check Do not create task when dispute is opened.
Additionally, you can filter the grid to see specific invoices only. The total number of applied filters is indicated by the Filter icon with a number which is located in the top-right corner.
To clear all filters, click on the Clear Filters icon next to it.
OPEN CREDITS
This tab displays all the open credits brought over from your ERP.
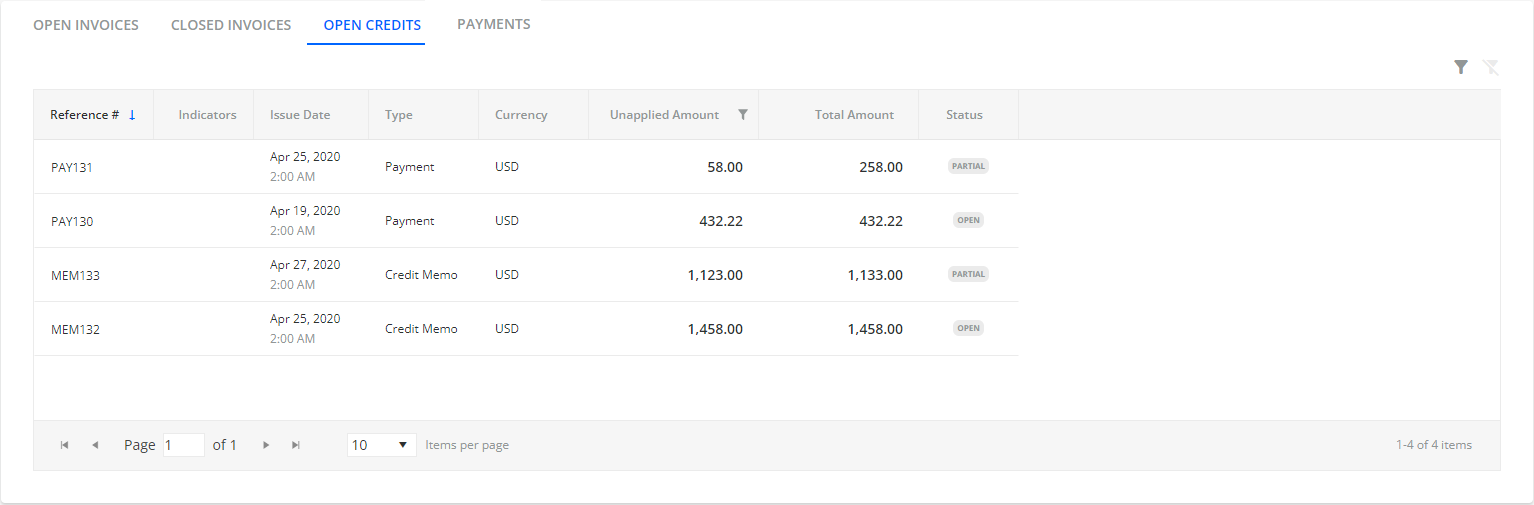
For more details, see the description of the OPEN CREDITS tab on the Statement page.
PAYMENTS
This tab displays all the payments made by the end-customer, brought over from your ERP.
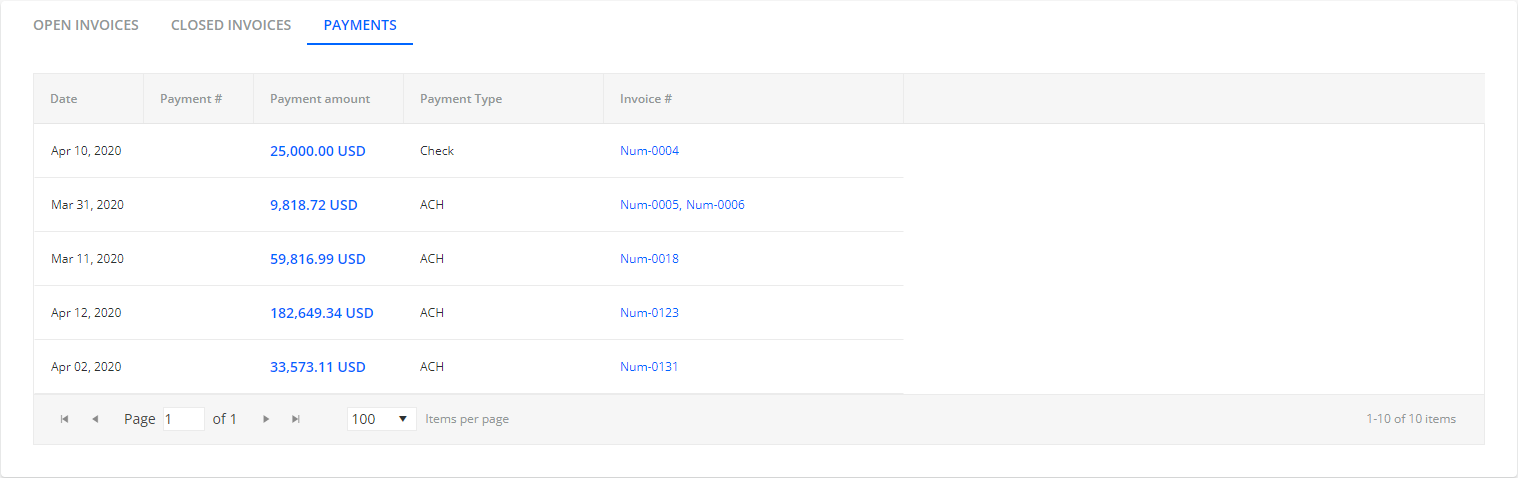
Clicking on the Payment amount opens the Payment dialog showing the details on how the payment was applied to one or multiple invoices.
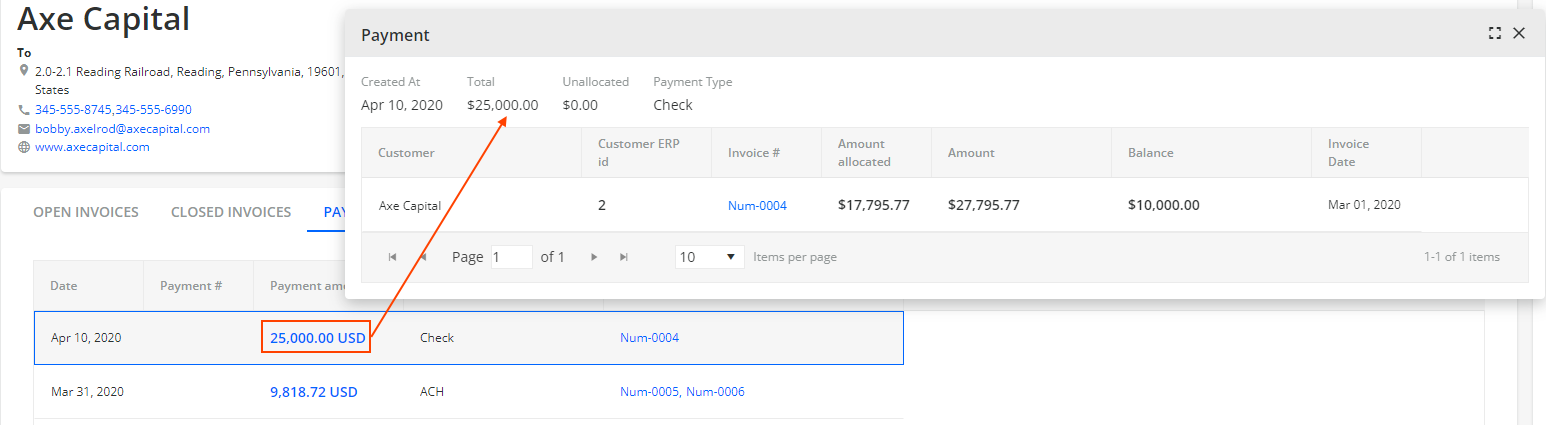
Similarly, you can click on the Invoice # to see the invoice’s details.
For more information, see the description of the PAYMENTS tab on the Statement page.
Customer Portal - Statement Links
Customers can access their Customer Portal web page via a Statement Link, which is typically sent to them by email either manually or through an automated Email Reminder Workflow Action.
To get a statement link, go to the Statement page and click the Statement Link option located on the top left part of the page. This will copy a URL link to your clipboard.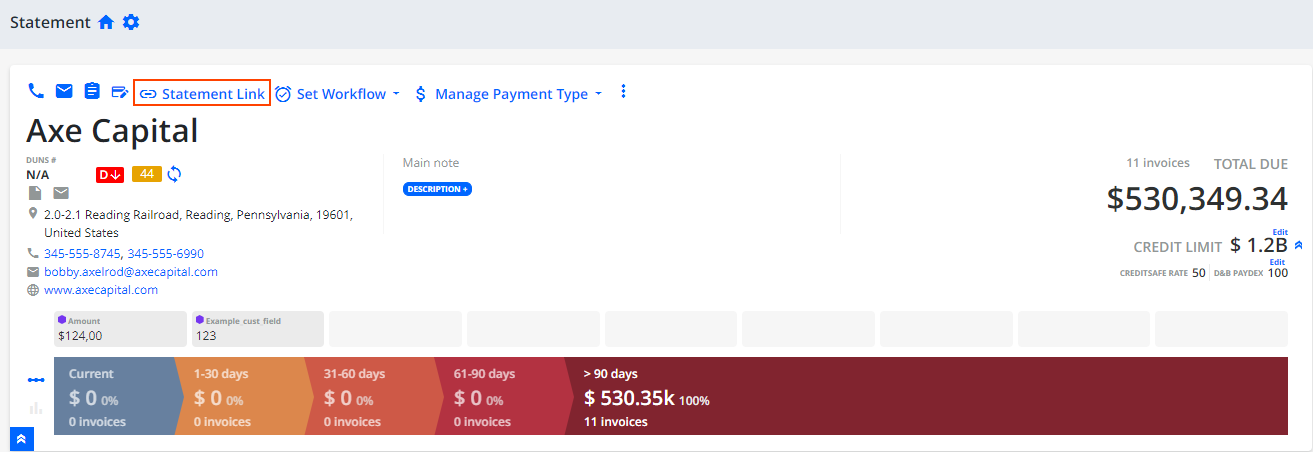
By default, statement links expire in 365 days. To change the expiration period, adjust the Statement Link Expiration settings in Settings | Business.
As an AR Rep, you can also access your customer's Customer Portal from their Statement page.
You can share, paste or insert the Statement Link's URL:
-
in an email
To include the Statement Links into your emails, use one of the following dynamic data tags in your Email Templates:{StatementLink}
{StatementPlainTextLink}
- For more information on how to create your own Email Templates with these data tags, see the Creating Email Templates section.
in a chat window
in a new browser tab
To deactivate statement links already sent to customers, see the How to Deactivate a Statement Link knowledge base article.
Customer Portal - Authentication
Statement links used for accessing the Customer Portal are unique and impossible to guess. They are in the following format: https://app.yaypay.com/app/s/Iu8XuSESvptWeUBK.
By default, these links do not require additional authentication. You can increase security by requiring customers to enter a PIN to access their Customer Portal:
Go to Settings | Business.
Check the Customer Portal - Enable authentication check box.
-
As a result, only users who are listed as customer level contacts on the Statement page can access their Customer Portal upon authentication.
For more information, see the Customer Portal - Enable authentication section.
Customer Portal - Displaying Custom Fields
You can enhance the invoice information displayed to customers on their Customer Portal web page by utilizing custom fields. These custom fields can either be synced from your ERP system or system custom fields created directly within YayPay.
Custom Fields From an ERP
You can enhance the invoice information displayed to customers on their Customer Portal web page by utilizing custom fields synced from your ERP.
Since these fields are part of the AR sync process, you need to configure them in Settings |System Custom Fields. For more information, see the Bringing over Custom Fields from your ERP section.
For example, the following two Invoice-level custom fields are configured to show on the Customer Portal:
As a result, they appear as two new columns on the Customer Portal: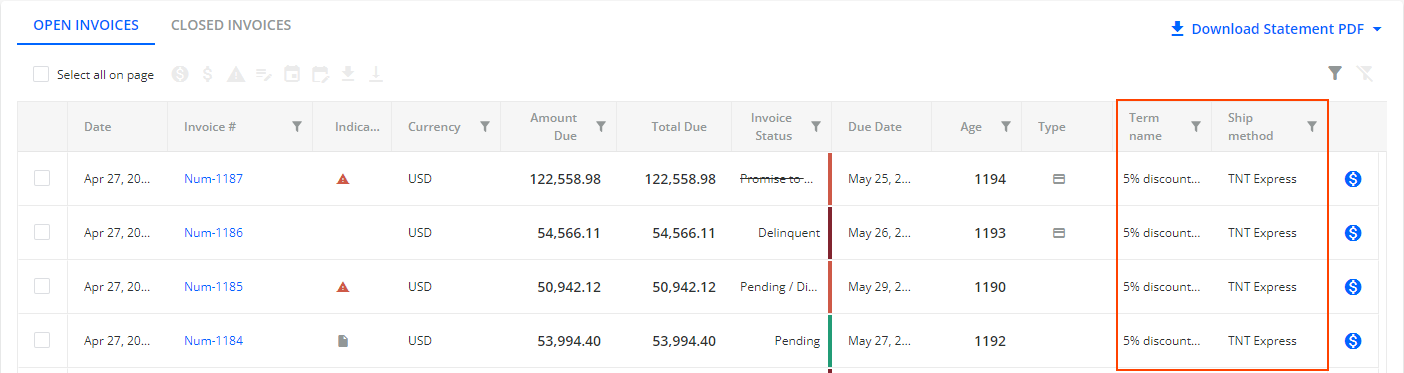
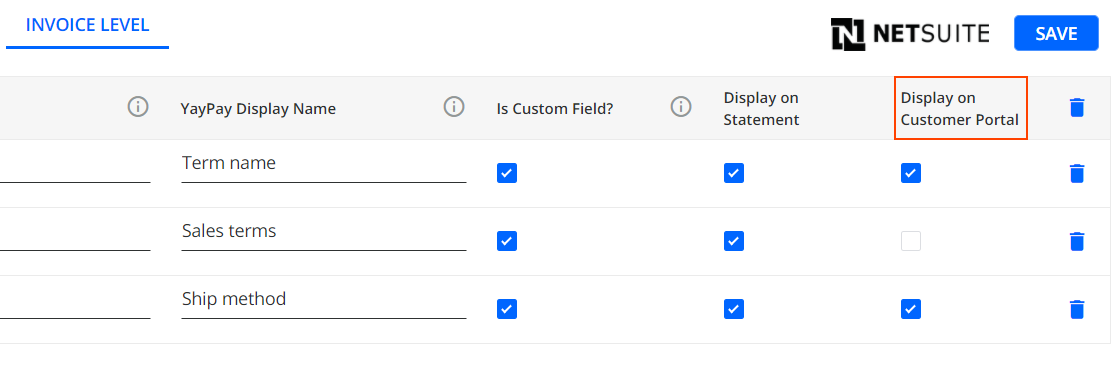
Custom Fields From YayPay
You can enhance the invoice information displayed to customers on their Customer Portal web page by utilizing system custom fields created in YayPay.
To display custom fields on the Customer Portal web page:
Go to Settings | System Custom Fields and select one of the tabs, i.e. CUSTOMER LEVEL or INVOICE LEVEL.
Add a new system custom field or select an already existing one.
- Check the Display on Customer Portal check box next to a system custom field that you want to display on the Customer Portalweb page.

-
Click SAVE to confirm the settings.
As a result, customer level system custom fields are displayed in the header of the Customer Portal web page and indicated by a yellow icon. Invoice level custom fields are shown in the grid on the OPEN INVOICES and CLOSED INVOICES tabs and are indicated by the blue icon. Additionally, you can also sort and filter the column's content based on the values of the invoice level custom fields.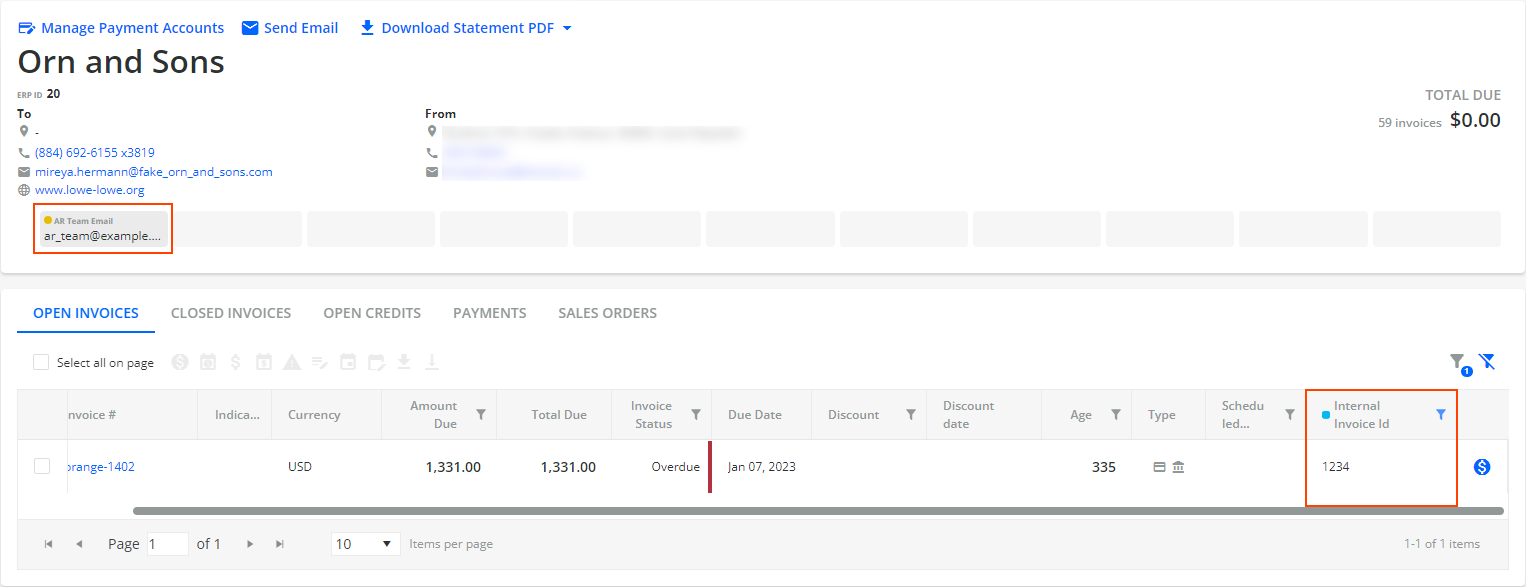
Customer Portal - Adding a Subdomain
You can configure a subdomain to prefix the standard YayPay application URL which uses the following format: http://app.yaypay.com.
If configured, the subdomain will be included in the Customer Portal statement link URL, for example https://mycompany.app.yaypay.com/app/s/Iu8XuSESvptWeUBK, where mycompany is the subdomain name. This helps customers recognize your branding and identify that the link is from a specific YayPay instance, which can be especially helpful when using YayPay for payments.
For more details, see the Adding a Subdomain section.
