Cash Application Features
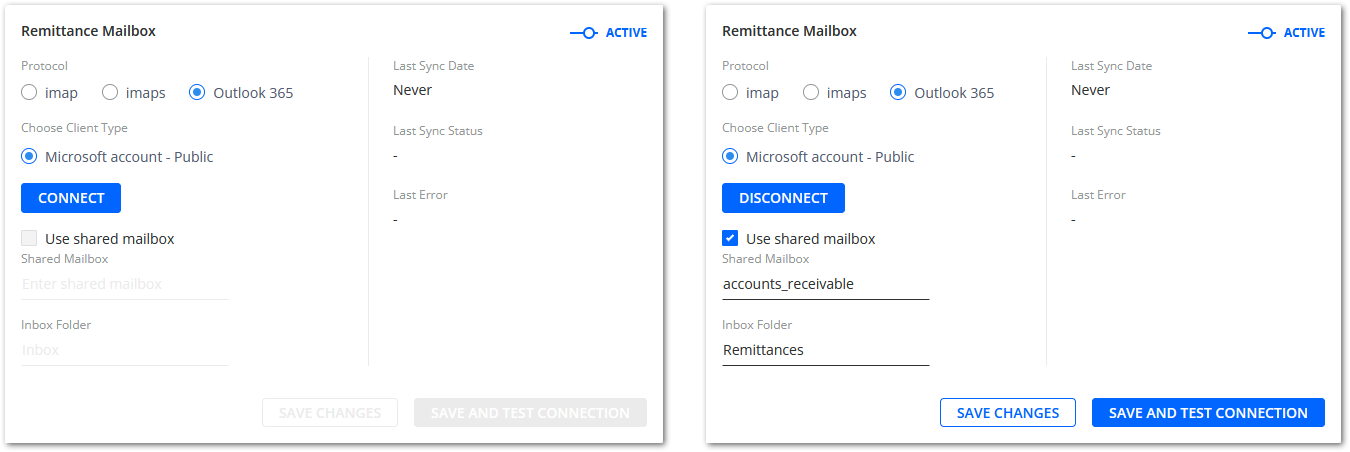
Syncing Remittances from Outlook 365 Mailboxes
You can now sync remittance records to the Cash Application module from an Outlook 365 mailbox.
To learn how to configure the connection to an Outlook 365 mailbox, see the Remittances Tab section of the Cash Application Settings article.
Deleting Multiple Payments Simultaneously
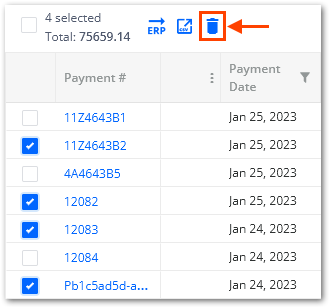
We have added a new icon called Delete to the open payments grid.
You can use it to delete multiple payments (that are no longer needed, or created by mistake) at once.
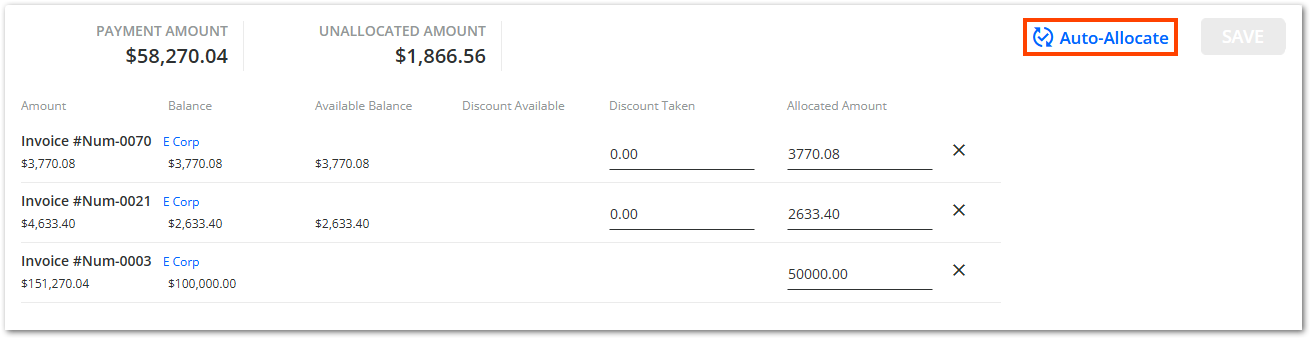
Modifying Saved Allocations Using Allocation Rules
You can now use the Auto-Allocate button to modify saved payment allocations. It overwrites the previously saved allocation with a new allocation done automatically based on predefined allocation rules.
This is useful in situations where the original allocation was incorrect or incomplete, or if the allocation needs to be updated due to changes in the customer's account or payment history.
Read-Only Mode for Remittances
We have improved the CLOSED tab of the Remittances section.
Now, you can only view the allocation details of closed remittance records without the ability to modify them. That ensures data integrity by preventing accidental changes to closed remittance records.
General Features
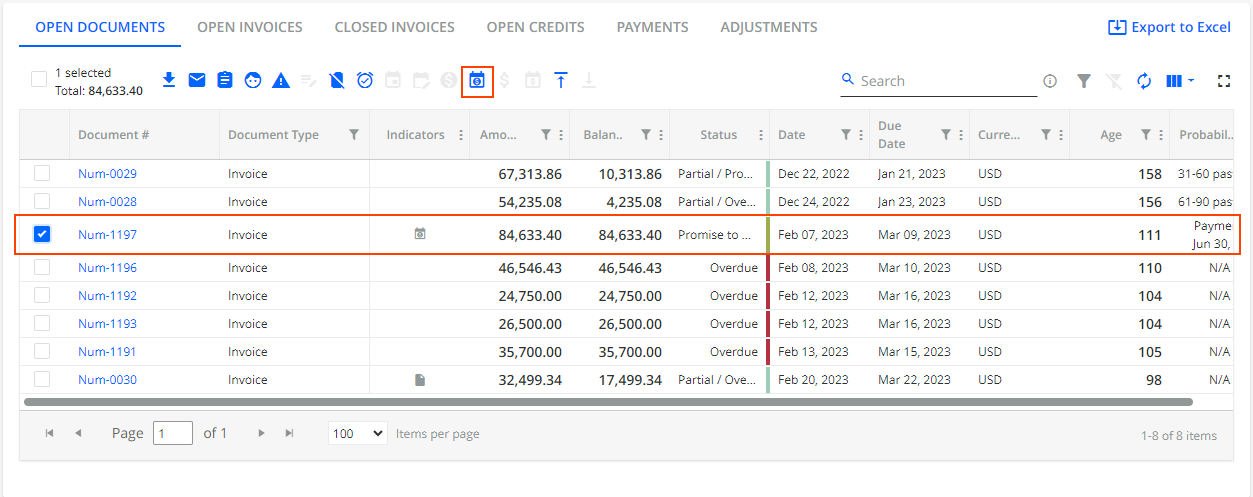
Scheduled Payments Enhanced
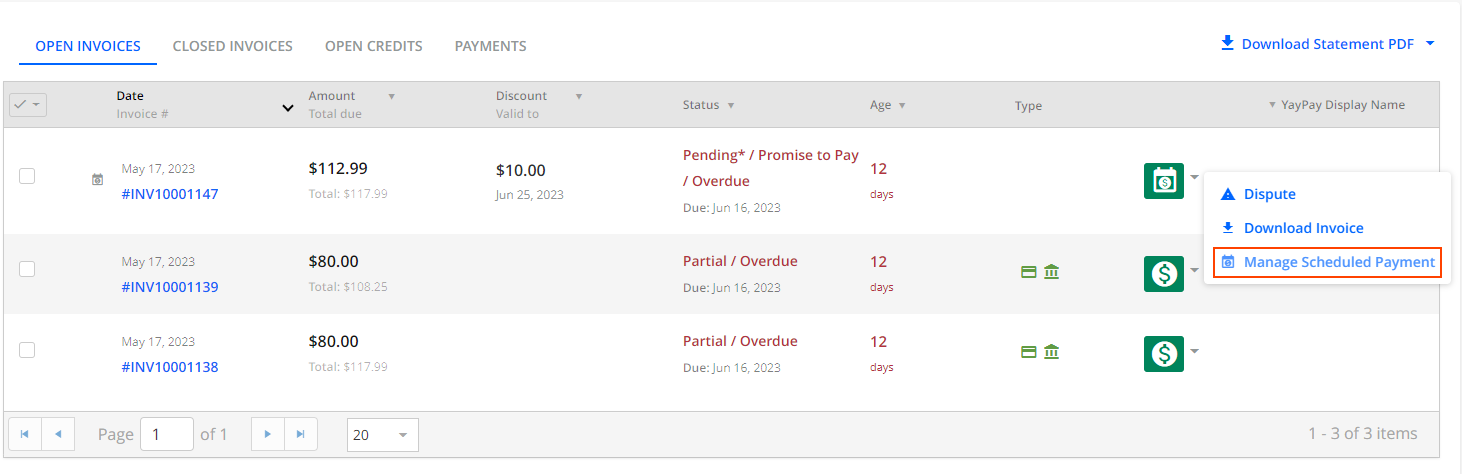
To provide you with another way to manage your scheduled payments, you can simply hover over an invoice with a scheduled payment and click the three vertical dots to access a menu. This menu now includes the Manage Scheduled Payments action.
Similarly, you can also manage your scheduled payments from the Open Documents tab on the Statement page which now also includes the Manage Scheduled Payments icon.
What is more, on the Aging Report page, you can now filter customers with scheduled payments by selecting Has Scheduled Payments from the Filter box located in the top left corner of the page. Selected filters affect the displayed aging report results and what is exported to Excel.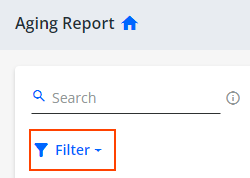
You can also add an additional Scheduled Payment Date column on the Statement page, Invoice page, or Customer Portal. The column displays the scheduled payment date of an invoice. You can sort this column as well as filter invoices with scheduled payments.
For more details, read the Scheduled Payments article.
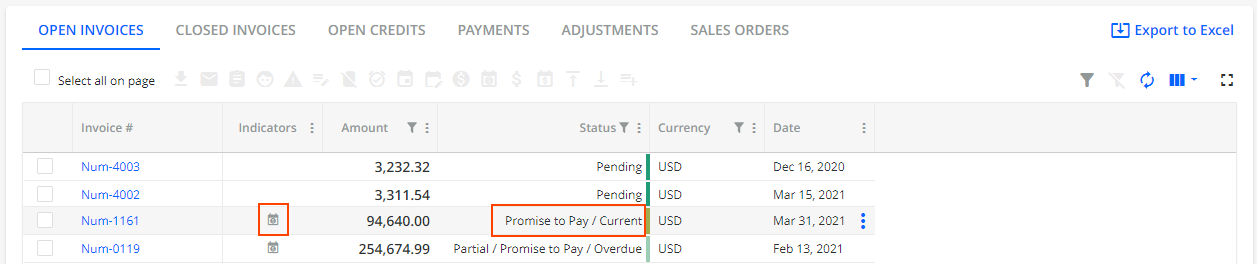
Impact of Scheduled Payments on Promise to Pay
To streamline the process of future invoice payments and to save your time, YayPay now automatically checks whether there is a promise to pay linked to an invoice for which you scheduled a one-time payment. For each scheduled payment, a corresponding promise to pay is created and it is associated with the same invoice that shares the same information and data. This new behavior ensures the accuracy and correctness of future payments.
Invoices with scheduled payments are indicated with a Scheduled Payment icon displayed in the Indicators column and a Promise to Pay status in the Status column on the Statement page.
For more details, read the Scheduled Payments article.
Customer Portal - Scheduled Payments Enhanced
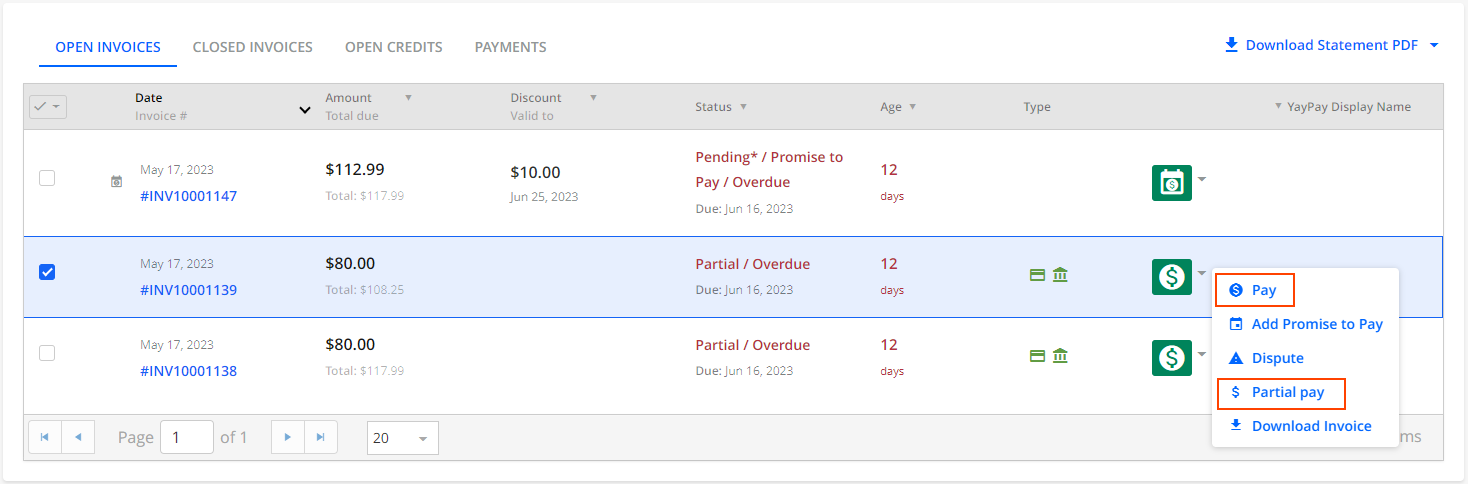
We have enhanced the scheduled payments feature, allowing you to schedule one-time partial payments in addition to full payments from the Customer Portal. This reduces the risk of late payments and eliminates the need for manual payment reminders.
However, as this function is disabled by default on the Customer Portal, you must enable it in Settings.
Enabling Allow Scheduled Payments on Customer Portal also displays an additional Scheduled Payment Date column on the Customer Portal. The column shows the scheduled payment date of invoices. You can sort this column as well as filter invoices with scheduled payments.
To schedule a one-time payment, select an invoice and click either on the Pay or Partial Pay icon. This opens the Pay invoice/Partial pay dialog where you can schedule the payment.
Available payment methods for scheduled payments depend on the current business settings, i.e. on the selected payment providers and their abilities to process payments. For example, if you set a credit card limit it also impacts scheduled payments and their execution.
After scheduling a payment, you can click the Manage Scheduled Payments icon to view and modify its details.
For more details, see the Scheduled Payments article.
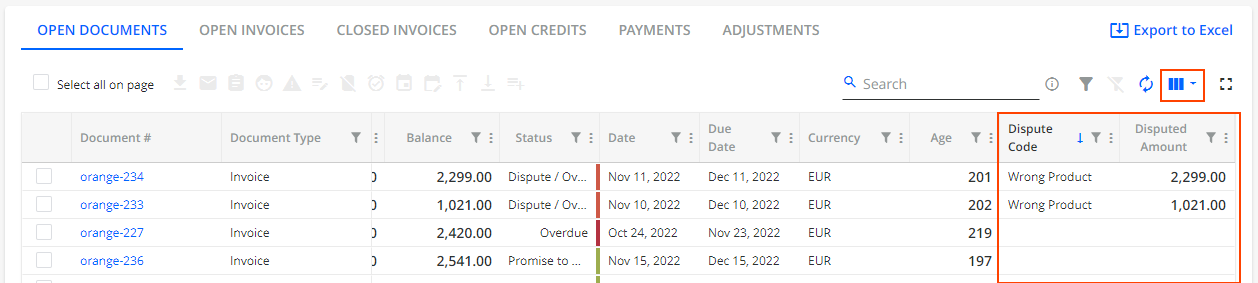
New Dispute Code and Disputed Amount Dynamic Tags
We have added two new dynamic tags called Dispute Code and Disputed Amount. You can now use these tags when creating email or mail templates for invoices that have open disputes, allowing you to quickly and easily include dispute information in manual reminders. Additionally, you can include these tags in the Customer Open Invoices Table tag that you can insert into an email template.
Once you send the mail/email, the tags will automatically display the latest dispute code and amount.
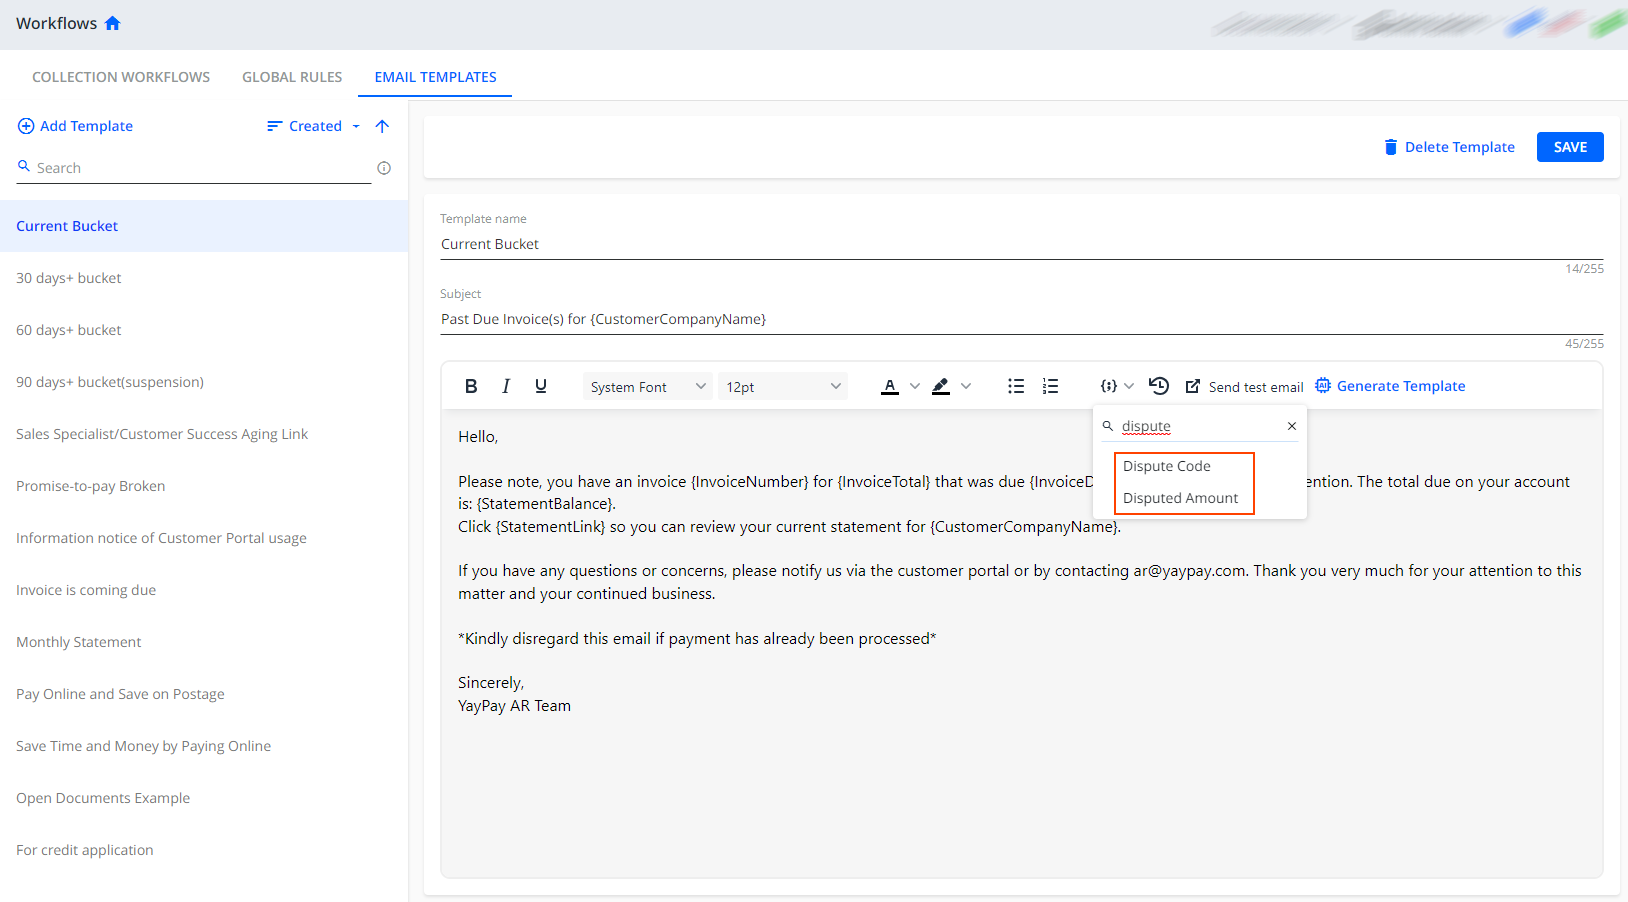
You can include the Dispute Code and Disputed Amount dynamic tags in mail/ email reminders sent from the Statement, Invoice, Dispute and To-Do pages.
What is more, you can add the Dispute Code and Disputed Amount columns to the grids, for example on the Statement or Invoice pages. You can use them to sort and filter the invoice data.
For more information, see the Dynamic Tags in Email Templates article.
Enhanced Reporting Charts
We have enhanced the charts you can create in the Reporting module. Now, you can use the Chart Settings dialog to select a specific data column (one of the data columns used by the chart) to sort the chart by.
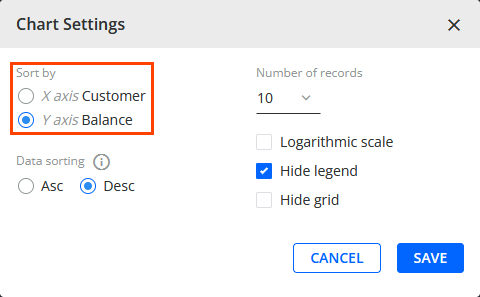
Enhanced sorting provides you with the ability to easily identify trends and patterns to make better-informed decisions. For example, you can build a chart showing Top 10 customers based on their balance.
Workflow Event Renamed
We have renamed the workflow event previously known as System score has changed to Payment score has changed.
The new name better reflects the event's functionality and aligns with other sections of the YayPay GUI that work with payment score, such as Aging Report.
Integration
Test Connection And Settings
You can now use the Diagnostic Sync button to easily test the connector's ability to connect to a selected ERP system and verify its settings before starting the integration process. You can also use it after restarting/unpausing the integration, or anytime you make changes to the connector settings.
Currently, the button is available for the NetSuite, Sage Intacct, and CSV connectors.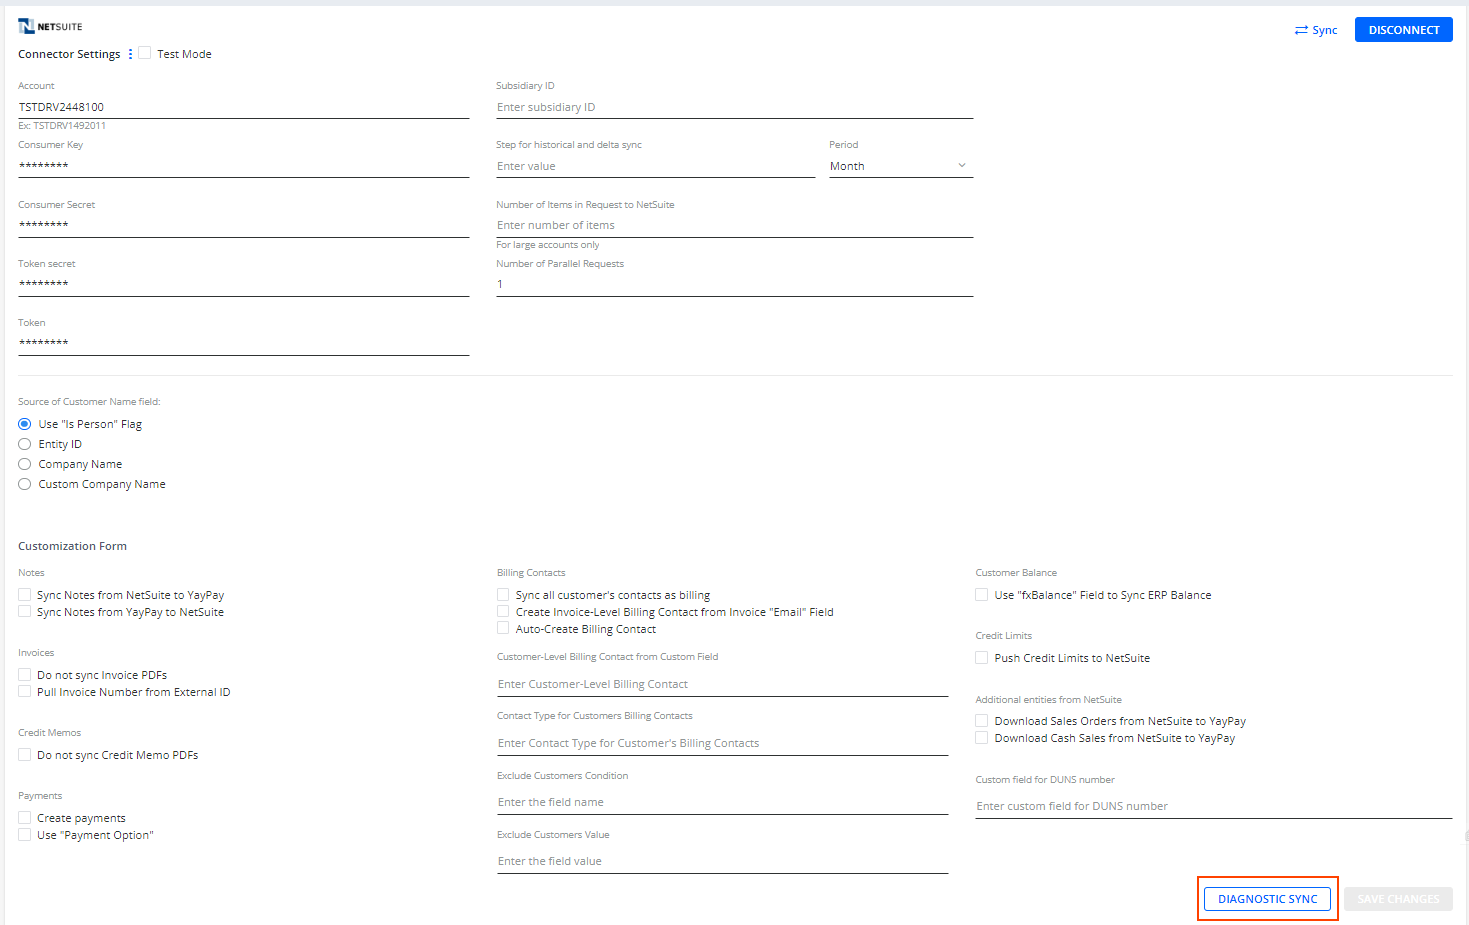
For more details about integrations with individual ERP systems, see the respective NetSuite, Sage Intacct and CSV articles.
