To help orientate you to the Onboarding process, the key phases outlining the type of involvement expected of you as the Onboarding progresses are summarized below.
We encourage you to bookmark and return to this page while working with your Onboarding Specialist who will train and support you to progress through different setup or implementation activities.
Onboarding |
What will you be involved in and do? |
Implementation Preparation |
Your Onboarding Specialist will inform you of your YayPay instance(s) and User Accounts after your YayPay instance(s) is provisioned, aligned to the scope agreed with our Sales Representative. |
Onboarding |
Your Onboarding Specialist will explain the key activities and proposed timeline as well as to validate other planning parameters with you and key project stakeholders |
Build/Setup |
You will perform the required setup activities explained by your Onboarding Specialist, e.g. to prepare your ERP & YayPay for the first AR sync, to connect YayPay to your AR Mailbox, etc. |
Test |
You will execute tests covering your Collection Workflow Scenarios, Global Rules, Payments, and/or other features before launch |
Launch |
You are LIVE in using YayPay, e.g. Collection Workflows are activated/deployed, you are using YayPay for payments or recording of Notes/Tasks, etc. |
You should also consider involving other participants during your Onboarding to start building the knowledge on how to maintain & operate the YayPay platform, e.g.
- Your ERP Administrator to perform any setup activities in your ERP
- Your Internal IT/Infrastructure Team for Emails/ Mailbox connectivity
- Your Salesforce Administrator to perform any setup activities in your Salesforce
- Your core Users or Business Analysts (or Development Lead) who is familiar with your data and also how and where your ERP data is stored, etc
Some of the Onboarding activities mentioned in the Phases above are highlighted below with other Reference links to help you.
YayPay Environments used during Onboarding
The YayPay instance(s) provisioned for your Onboarding may be created in 2 categories of YayPay Environment, Development, and/or Production.
If your Onboarding Scope as agreed with your Sales Representative includes multiple YayPay instances, inform your Onboarding Representative of the name of each YayPay Instance. Alternatively, because the instance(s) can be named generically in the initial provisioning, you can rename the instance thereafter. We recommend that you change the Instance Name (under Settings > Business page) to align with your Company or Business Subsidiary Name, etc.
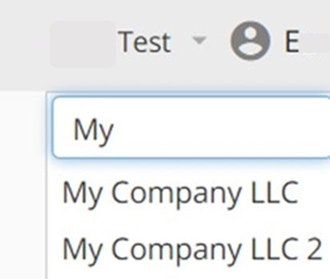
If you have multiple YayPay Instances within the YayPay Environment, you will find them in the drop-down list next to your profile after you have logged into YayPay. You can switch between these instances to view your AR data logically contained within the instance:
The provision of additional Instances during the Onboarding will align back to your discussions with the Sales Team, including the type of integration and functional scope.
There are 2 YayPay Environments that your Onboarding Specialist will work with you to provision your instance(s) in. Both are fully functional environments:
-
YayPay Production- there are 2 different URL access
- Environment hosted in the US that is typically the setup used in most Onboarding, to start the direct sync with your ERP systems like NetSuite, Intacct Sage, Sage X3, Acumatica, Zuora, etc. The YayPay application URL access is: https://app.yaypay.com
-
Another equivalent environment hosted in the EU may help with compliance or data hosting requirements to be arranged within the EU, etc. The YayPay application URL access is https://app1.yaypay.com
-
YayPay Development - the URL access is https://www.developer.yaypay.com
- Environment hosted in the US - this is typically used to test your CSV file imports and/or data pushed into YayPay via APIs, allowing for iterative build and corrective tests until integration is achieved with your target Production data. The full-volume data export/import will be repeated in a new instance provisioned in YayPay's Production Environment. Your Onboarding Specialist will communicate these plans
Unless you specifically request to retain it, the YayPay Instance(s) in the YayPay Development Environment will be removed post Onboarding.
Online Help Resources & Tutorial Links
In addition, we have identified and compiled the more commonly used tutorials & articles in our Knowledge Base that relate to your Onboarding Activity/process.
This is to also help you chart your own familiarization as you test and try out different parts of the platform.
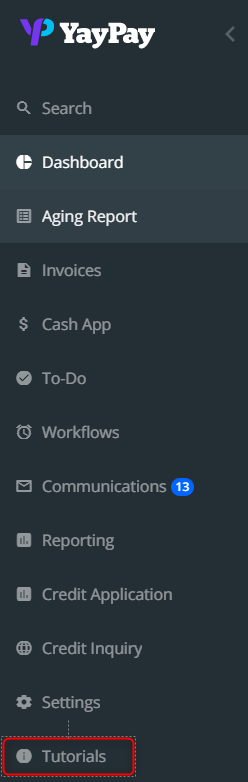
Click on this YayPay Tutorials link to go to the main YayPay Tutorial site. Alternatively, after you log into YayPay, click on the "Tutorials" menu to also access the same site open within the Application:
Typical Onboarding Activities (with Frequently Used Tutorial links)
The list below is to give you visibility of the main Onboarding Activities. As you move down the list and complete each one with your Onboarding Rep, you are also moving closer to being ready to deploy/launch the platform (Note: Outside of the YayPay Onboarding scope/activities, you should consider how YayPay may also need to co-exist for a period of time within your systems landscape, so that users are clear on their user procedures taking place in other systems to support the data flow, etc)
Onboarding Activity |
Refer to these Links & Articles in our Knowledge Base |
To change your Business Settings e.g. Company info, main Currency |
After your YayPay instance is provisioned, review and change the name of the instance to your preference. |
To Sync your AR Data from your ERP (incl. Invoice Template/PDFs & Custom Fields) |
For the different ERP Connector types: |
To Sync ERP Contacts and create Billing Contacts in YayPay |
To bring over your ERP contacts into YayPay: |
To Use the Aging Report, Invoice Page & Statement Page to review your customers/invoices synced over |
After the initial sync, use these YayPay pages to help review your data, export the data out to excel, etc |
To review how the Customer Portal looks like |
After the initial sync, view the Customer Portal in the same way your Customer will view their own AR data using the Portal |
To Connect YayPay to your AR Mailbox |
Refer to: https://yaypay.helpjuice.com/communications/setting-up-outgoing-and-inbound-emails |
To Build/Configure your Collection Workflow(s) & Email Templates to Automate your Collection Process |
Refer to: https://yaypay.helpjuice.com/collection-workflows/collection-workflows-rules-engine |
To Use YayPay for Record-Keeping (Notes, To-Do's, Disputes, etc) |
To create or add Notes, Call Log, Attachments, and Tasks (To-Do's) in YayPay |
To Use YayPay for Payments |
You will be introduced to one of YayPay's Payment Processor partners. Your Merchant credentials issued by the Processor will be used to configure YayPay, after which the payments feature in YayPay will be enabled: Refer to: https://yaypay.helpjuice.com/44477-api-developer-docs |
To add more instances / Subsidiaries |
After you have gone live with YayPay, you can approach your YayPay Account Rep. to include additional YayPay Instances, e.g. |
Go-Live
You will have started to achieve Productive usage with the platform when you begin to add/capture notes, to track your To-do's (tasks), to send emails, etc coupled with your AR data synced into YayPay. All this may involve some transition on your part to also plan and move away from existing manual methods or paper sources to use YayPay and collaborate within your team, as well as potential changes in your internal business processes.
While you are technically live as soon as your Production data from your ERP is integrated and reconciled in YayPay, the aim is to have you attain more productivity gains by activating your Collection Workflow(s), and/or Global Rules for example, and be able to scale to realize more productivity gains through the platform's Automation.
Depending on your implementation timelines, using YayPay for Payments can also be phased after the initial go-live so that you have the ability to adjust to your new processes and operate YayPay in step with your ERP, or you can deploy both modules at the same time. Your Sales Rep / Onboarding Specialist can work with you on this planning.
Post-Onboarding/Transition
There will be other groups in YayPay to help you with your continued adoption and use of the platform. Reach out to:
- YayPay Support (support@yaypay.com) will help you through any technical glitches or software issues. You will receive an acknowledgment and a case # for each email sent to support
- YayPay Account Management (accountmanagement@yaypay.com) for any questions, while also serving as another contact should you need to use it
Your Onboarding Rep or Account Manager will share more details after your go-live.
We invite you to also return to our main Tutorial site from time to time to look at new Platform Releases and/or Announcements, which may be the same as your use case/needs raised as Feature requests to the YayPay Product Management Team.
To also stay updated with new announcements, product insights, webinars, etc, go to our Corporate website at www.yaypay.com Scroll down to the bottom of the page to leave us your email address: