There are a number of Business Settings within each instance of YayPay that you can configure & personalize your instance of YayPay.
You need to be a YayPay "Admin" user (i.e. have 'Administrator' access) in order to access these Settings in your instance of YayPay (user types can be found in Settings > User Management in YayPay).
Go to Settings | Business to review the core Business/General information of your YayPay instance:
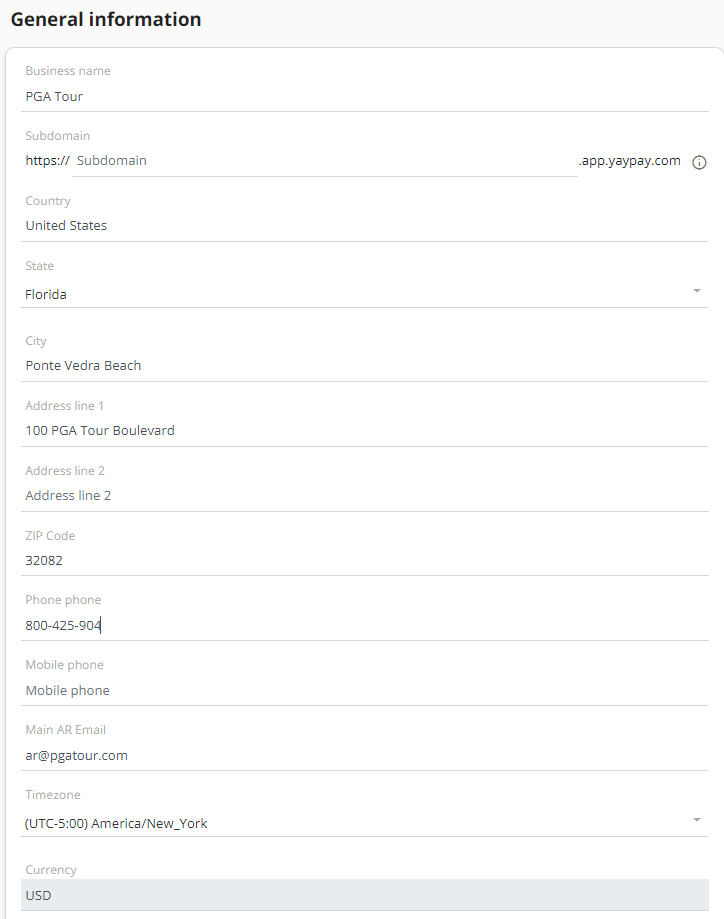
- Business Name - The Name of your instance that appears beside your YayPay Login Profile
- Subdomain - Configure a new subdomain for branding/payment security purposes. For more information, see the Adding a Subdomain article.
- Country, State, City, Address Line 1 & 2, Zip Code, Business Phone - The Business Address/Phone contacts that appear in the Statement & Customer Portal pages
- Main AR Email - You can replace this email address to be the same as your designated ARMailbox configured under Settings > Email. Alternatively, this can be a different email address if you want YayPay:
- To send General System notifications (e.g daily Payments Report, Log errors, etc) To use as a cc for all Outbound communications sent from YayPay
- Note: for setting up your AR Mailbox, refer to https://yaypay.helpjuice.com/communications/setting-up-outgoing-and-inbound-emails
- Timezone - Timezone of your main Business Office / Operating location
- Payment Plan Timezone - Timezone used for determining when to trigger auto payments set up on the Statement page or Customer Portal.
YayPay checks every hour whether any business with configured auto payments has entered the due date (in the given time zone) defined for the given auto payment. If any payment is due, YayPay triggers the payment for the given business. - Currency - the main Currency used across the whole YayPay instance provisioned also known as the home currency, which should align with the overall currency in your ERP for the Company (or Subsidiary). It is pulled from ERP (via CSV/API) with initial sync and cannot be edited in YP. Note: this is not the invoice currency for which there are multiple currencies depending on your billing/invoicing operations
Default AR Account and Default Bank Accounts
In the General information section of the Business settings, you can find fields for selecting the default AR account and default bank accounts. For more details related to the individual options, see the Payments Settings chapter of the Payments Reference Guide. You can configure the following fields:
- Default AR Account – If you have multiple AR accounts in NetSuiteTM, select the default one from this drop down menu. This account will be used for pushing payments to NetSuite.
- Default Bank Account for ACH – Selects a default bank account that will be used for automatic money transfers.
- Default Bank Account for CC – Selects a default bank account that will be used for automatic money transfers.
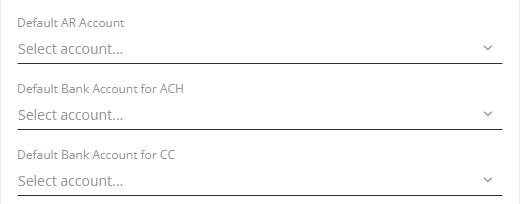
Click SAVE CHANGES for any changes to apply.
Settings for different Pages & Functions
On the same Business Settings page, there are also a series of different checkbox settings that will alter or influence the behavior of different parts of the platform.
Email - Send email copies to this email
If enabled, the email address configured under "Main AR Email" (Settings > Business page) will be cc-ed on all Outbound communications sent from YayPay.
Email - Disable all notifications to AR Email
If enabled, all internal notifications (disputes, notes, etc.) will not be delivered to the Main AR Email.
Email - Forward incoming emails to AR specialist
If enabled, all incoming emails synced from your AR Mailbox will be forwarded to the email address of the respective AR specialist assigned to the customer/account in YayPay.
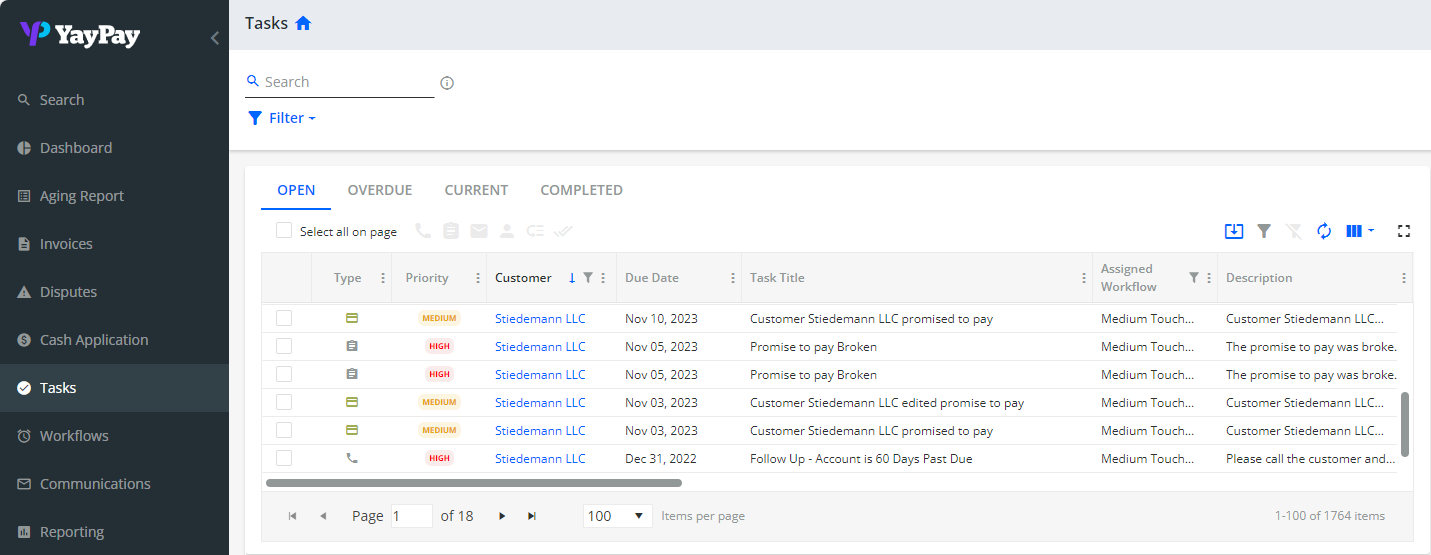
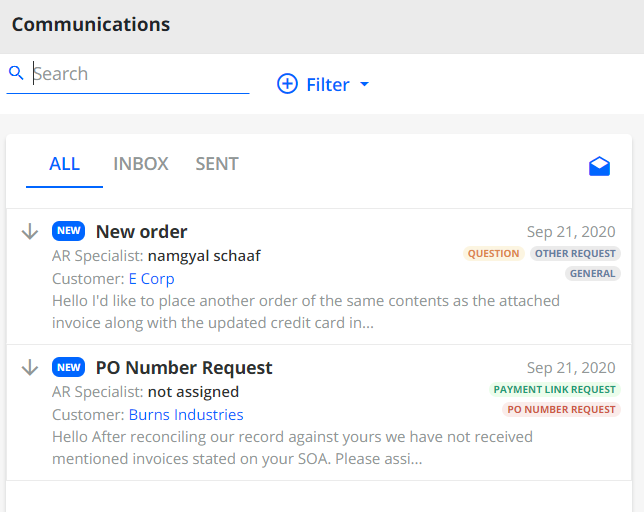
Email - Create task when email from a customer is received
If enabled, when an email is received from a customer, a new task on the Tasks page will be automatically created, and also assigned to the AR Specialist if there is one assigned to the customer:
Email - Look at email body to associate emails to customers
If enabled, this option lets YayPay search emails not only by email addressees but also if they are in the body of the email.
If the email address is a Customer contact, and it is also found in the body of an email thread, the incoming email will be assigned to the Customer.
Email - Search contacts by customer domain
If enabled, incoming emails read from the AR Mailbox into the application will be assigned to the Customer, based on the email address domain seen at the header level, i.e. @burnsindustries.com
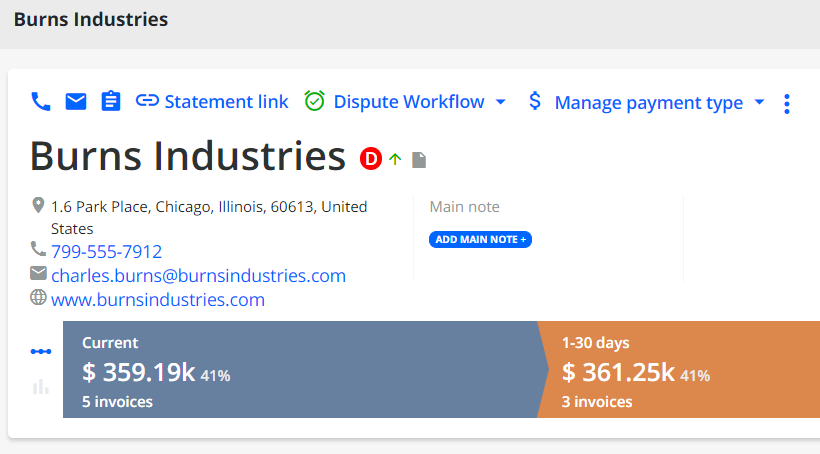
This option will enable incoming emails sent by Non-contacts bearing the same domain to be assigned to the Customer, e.g. If Peter sends an email to the Customer (and your AR Mailbox is included), his emails will be assigned to the Customer in the platform because he has the same domain in his personal email address, ending with "@burnindustries.com". Peter is not listed in the CONTACTS section of the Statement page.
This gives you broader visibility of others in your company who are engaging the Customer as you look at the Communications page for emails related to the Customer:
Email - Fetch all emails
If enabled, this option will fetch ALL emails from your AR Mailbox regardless of whether YayPay can link them to a customer record or not.
By default, YayPay syncs / pulls all emails from the AR mailbox as part of matching the email address (in the email) with the email address of the customer contact in YayPay. This option overrides the default behavior.
Email - Add AR specialist to replies
If enabled, the email address of the assigned AR Specialist will be added as a cc in Email replies (whether the recipient chooses to Reply or Reply All).
The Outgoing emails sent from YayPay through your AR Mailbox (e.g. from your Workflow Actions) do not need to include the AR Rep for this option to work.
Email - Add sender to CC for replies
If enabled, the system adds the sender e-mail to the CC recipient field automatically
Email - Add CS representative to replies
If enabled, the email address of the assigned Customer Success representative will be added as a cc in Email replies (whether the recipient chooses to Reply or Reply All).
Email - Do not throw exception "No recipients found" on send
No recipients found is the case when the recipient field is empty. It happens when the contact of your customer used for automatic reminders has no e-mail address.
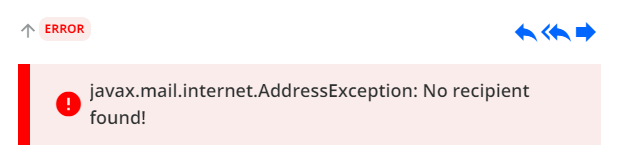
By default, this kind of message is found in the Communications tab with the Error. When the setting is enabled, e-mails with this error will not attempt to be sent.
Email - Set From name as Customer Success
If enabled, the email address (for the From field) will not be the one defined or configured in connecting to your AR Mailbox (i.e. in the Settings > Email page of YayPay). Instead, the email address will be the assigned Customer Success Rep. to the Customer in YayPay, when an email is sent for that Customer.
Email - Hide Non-billing contacts from Email Recipients
If enabled, non-billing contacts emails and other emails related to non-billing contacts will be hidden from the Recipients field in the email reminders.
Email - Mark outgoing emails as 'read'
By default, YayPay marks outgoing emails as 'unread' if they are sent:
- Using an external email client (not YayPay).
- From the same email address as the one you set up for outgoing emails in Yaypay using the From setting.
If enabled, this setting configures YayPay to mark such emails as 'read' automatically, saving you time doing that manually.
Email Aging/Invoices/Statement Excel report to user
If enabled, the Excel reports from three pages (Aging report, Invoices page, Statement page), whose generation for downloading is delayed for some reason (e.g. connection problems), will be sent to the user's email box. Note, that this setting applies only to delayed reports.
Email - Mark outgoing emails as 'read'
If checked, all the sent emails will be automatically marked as read.
Email - Do not attach invoice PDF by default
If checked, the invoice PDF file will not be automatically attached to the email reminders you send from the Statement, Invoices, or Tasks page.
If unchecked, your email reminders will automatically include an invoice PDF by default.
Show ERP id in customers list
If checked, the Manage Customer drop down menu on the Communications page will also display the ERP IDs when linking a customer to an email.

If unchecked, a customer can still be found using an ERP ID, even though the ID will not be visible in the list.

PDF Scrape - Scrape PDFs for last 3 days
This setting should be used in the cases when you send invoice/credit memo PDFs via e-mail: particularly when PDFs are sent BEFORE the record is created in YayPay. The function allows YayPay system to trace the files and attach them to records when they are created (within 3 days).
Customer Portal - Display credit limit
If checked, the Customer Portal page will show the Credit Limit information.
Customer Portal - Do not allow customers to open or download invoices
If checked, it will not be possible to download an invoice PDF from the Customer Portal page.
Customer Portal - Allow a customer to edit contacts
If checked, customers will be able to edit contacts on their Customer Portal.
Then, when edited, a task will be automatically created for the relevant AR Specialist on the Tasks page.
Customer Portal - Allow to create contacts without confirmation
By default, when a customer edits or adds their contact there is a task created to confirm this action. If the setting is enabled, the adding or edition is automatically confirmed without creating a task.
Customer Portal - Disable Billing contact notifications when add/edit contact request was declined
This setting allows disabling billing contact notifications after the add/edit contact request was declined in the YayPay system but fulfilled in the ERP.
Customer Portal - Turn off the ability to manage disputes
If checked, customers will not be able to open a dispute from their Customer Portal page.
Customer Portal - Turn off the ability to create promise to pays
If enabled - a customer won't be able to create a promise to pay from the customer portal page.
Customer Portal - Hide total balance
If checked, the customer's total due and the number of invoices will not be visible on the Customer Portal.
Customer Portal - Show Total Due by the invoice currency
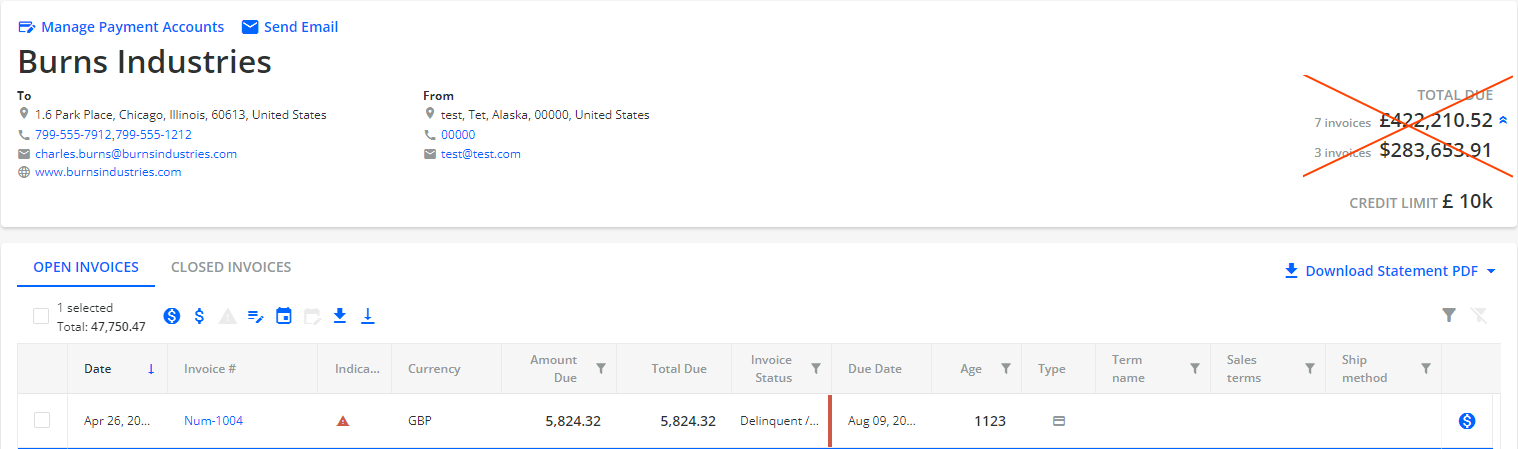
If checked, the TOTAL DUE on the Customer Portal page will be displayed in all currencies of the Open Invoices of the customer, including the home currency set in Settings| Business.
For example, if your home currency is USD, and your customer has Open invoices in GBP currency, the TOTAL DUE amount will be shown in the currencies the customer has been invoiced for:

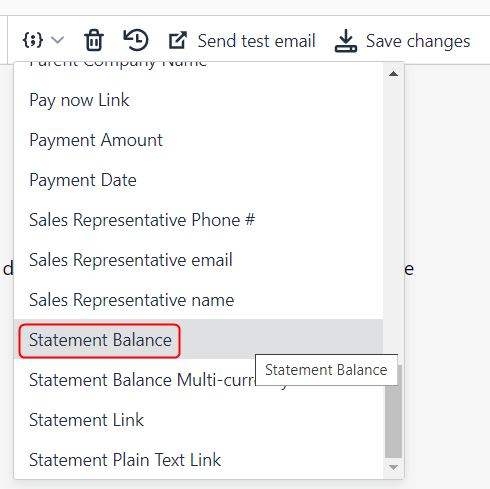
Customer Portal - Send StatementBalance tag by the invoice currency
Customer Portal - Show Total Due grouped by transaction currencies
If checked, TOTAL DUE displayed on the Customer Portal will be grouped by currency (also affects Statement balance and Statement multi-currency tag).

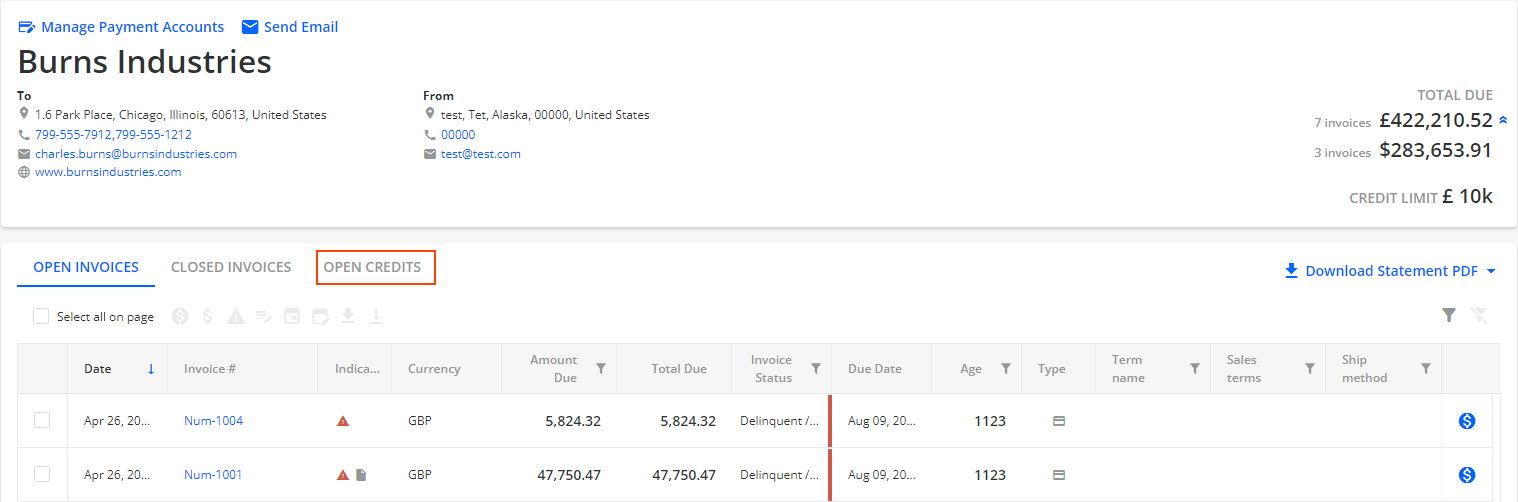
Customer Portal - Display "Open credits"
If checked, an additional tab will be displayed containing information about not-allocated documents (payments, credit memo, etc.).
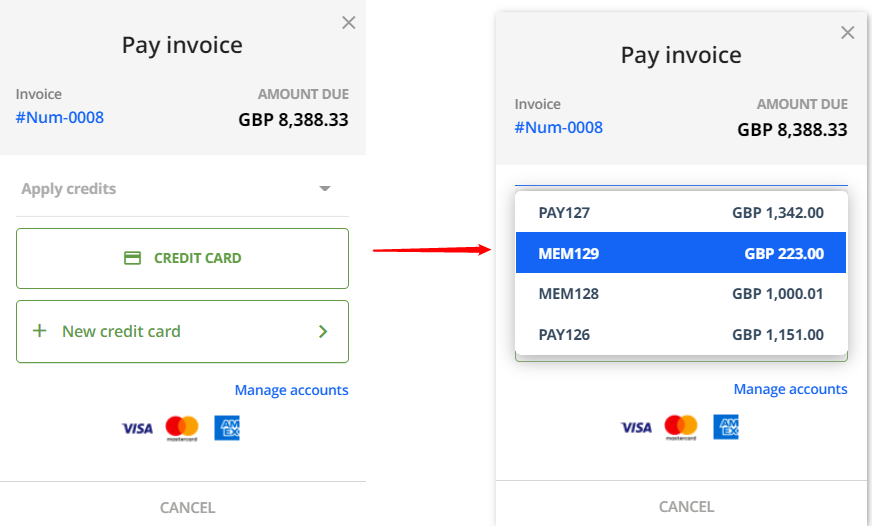
Customer Portal - Allow applying for open credits on payment transactions
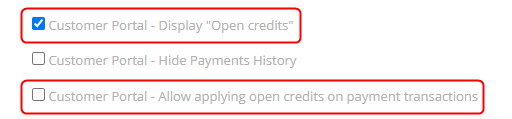
If enabled, your Customer will be able to use the Open Credits to offset when making an Invoice Payment through their Customer Portal/Statement page. This option is applicable only when using YayPay for Payments.
Customer Portal - Hide Payments History
If checked, the payment history is no longer visible on the Customer Portal page, i.e. the PAYMENTS tab is not available.
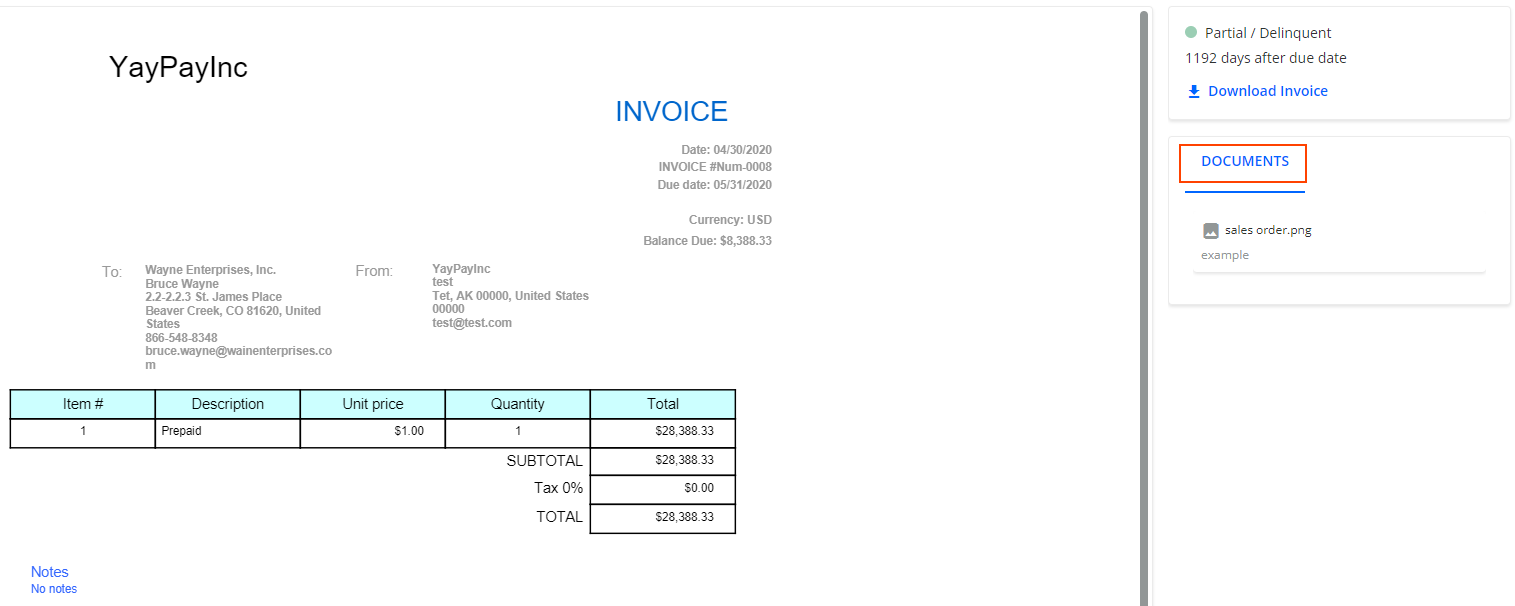
You can download documents that relate to the invoice from the DOCUMENTS tab.
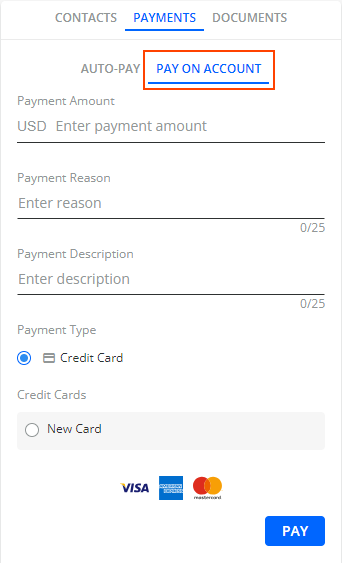
Customer Portal - Allow payment on account on Customer Portal
If checked, the Pay on Account feature becomes available on the PAYMENTS tab on the Customer Portal.
This feature is disabled by default.
Customer Statement PDF - include other adjustments to balances
If enabled, the Other Adjustments line item is displayed in the downloaded Customer Statements PDF.
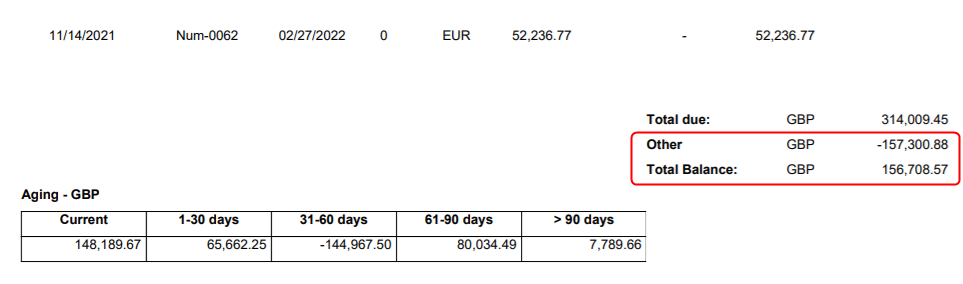
This Customer Statement PDF can be downloaded from the Internal Statement Page or the external Customer Portal page (See Article link).
Customer Portal - Show AR Contacts
If checked, the assigned AR specialist contact details will be displayed on the Customer Portal page.

Customer Portal - Hide Download as PDF/Excel link
If checked, the Download Statement PDF/Excel button will not be available on the Customer Portal web page.
Customer Portal - Allow total due auto-payment
If enabled, the autopayment option is available for your customers on the Customer Portal.
Customer Portal - Allow recurring auto-payment
If enabled, the recurring payment option is available for your customers on the Customer Portal.
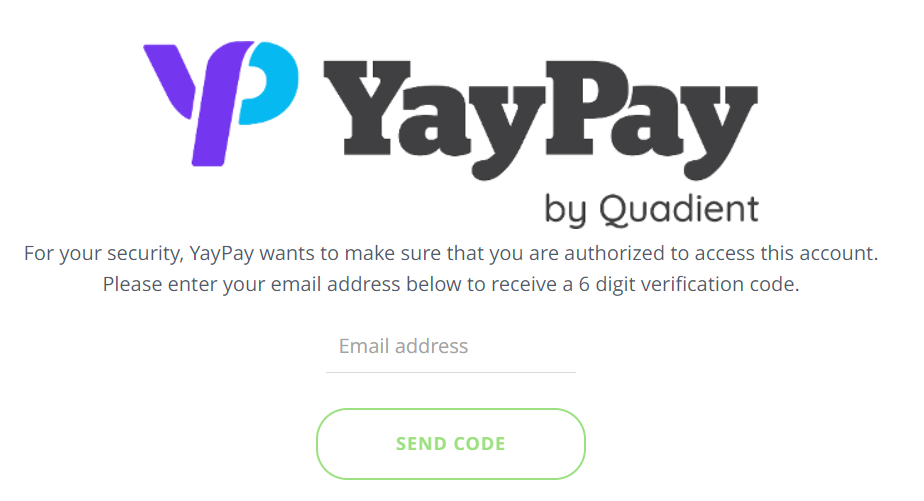
Customer Portal - Enable authentication
By default, YayPay sends a unique and secure link to the Customer Portal via email, providing direct access to the Customer Portal without the need for logging in.
However, if you require additional authentication, check the Customer Portal - Enable authentication check box in Settings | Business. As a result, only users who are listed as customer level contacts on the Statement page in YayPay can access their Customer Portal upon authentication.
These users will receive an email containing a verification code to the email address listed in the CONTACTS section of the Statement page.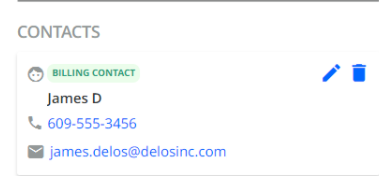
This setting will not work when the contact record in YayPay has multiple email addresses in the email field, or if the email address is a distribution list.
Consider using the ContactsMapping file to split up and import each email address as its own contact so that the Customer Portal authentication setting will function properly.
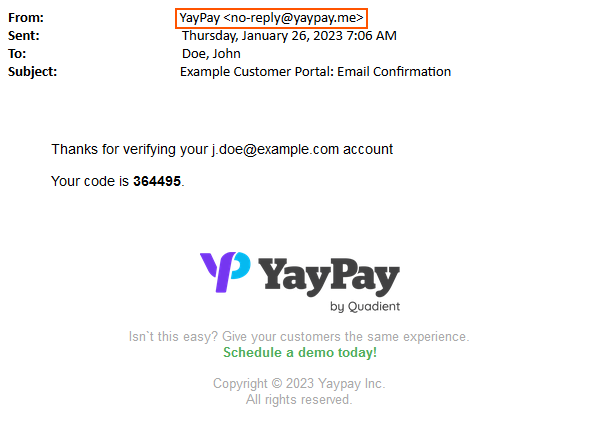
When the setting is enabled, customers must do the following when using the link for the first time to access the Portal page:
- Enter the email address to which a security code will be sent. The entered email address must match to the email address where the original email reminder with the link was sent to, i.e. it will be the same email address that is listed in the CONTACTS section of the Statement page.
-
Enter the received code from no-reply@yaypay.com).

Once authenticated on a device, YayPay will not prompt for additional confirmation within 30 minutes after closing the page, or until the new link is received.
Additionally, when the authentication is enabled, YayPay does the following:
Records (for audit trail purposes) the names of users who perform any actions in their Customer Portal.
Displays those names in the actions recorded on the Activity tab of a customer's Statement page.
Customer Portal - Allow Sales authentication
This setting allows all Sales/CS users to access Customer Portals upon authentication without being listed as customer level contacts. It only works if the Customer Portal - enable authentication setting is also enabled.
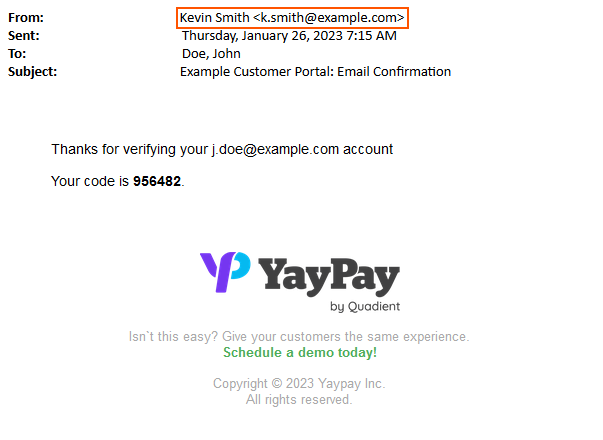
Customer Portal - Send verification code from bizs email
When the Customer Portal - enable authentication setting is enabled, YayPay sends an email with a verification code to users who try to access their Customer Portal.
By default, the sender of that email is: YayPay <no-reply@yaypay.me>.
To personalize this email with your business logo, go to Settings | Business and upload your logo in the Logo panel.
The Customer Portal - Send verification code from bizs email setting helps you establish a more professional and personalized communication with your customers. When enabled, your Company or Corporate AR Mailbox connected to YayPay (and configured for outgoing emails) becomes the sender. To learn how to configure an AR Mailbox for outgoing emails, see the Setting up Outgoing and Inbound Emails article.
Customer Portal - Hide "Status" column on Closed Invoices tab
When enabled, the "Status" column of the Closed Invoices tab on the Customer Portal is hidden.
Customer Portal & Statement PDF/Excel - Show Customer’s ERP ID
If checked, the customer's ID synced from the ERP is displayed in the Customer ERP ID column on the OPEN INVOICES, CLOSED INVOICES, and PAYMENTS tabs on the Customer Portal web page.
If unchecked, the Customer ERP ID column will be hidden from the invoices grid in parent customer portals.
Statement - Show Sales Orders
This setting shows the Sales Orders tab on both the Statement and Customer Portal pages.
The tab displays all Sales Orders brought over from your ERP.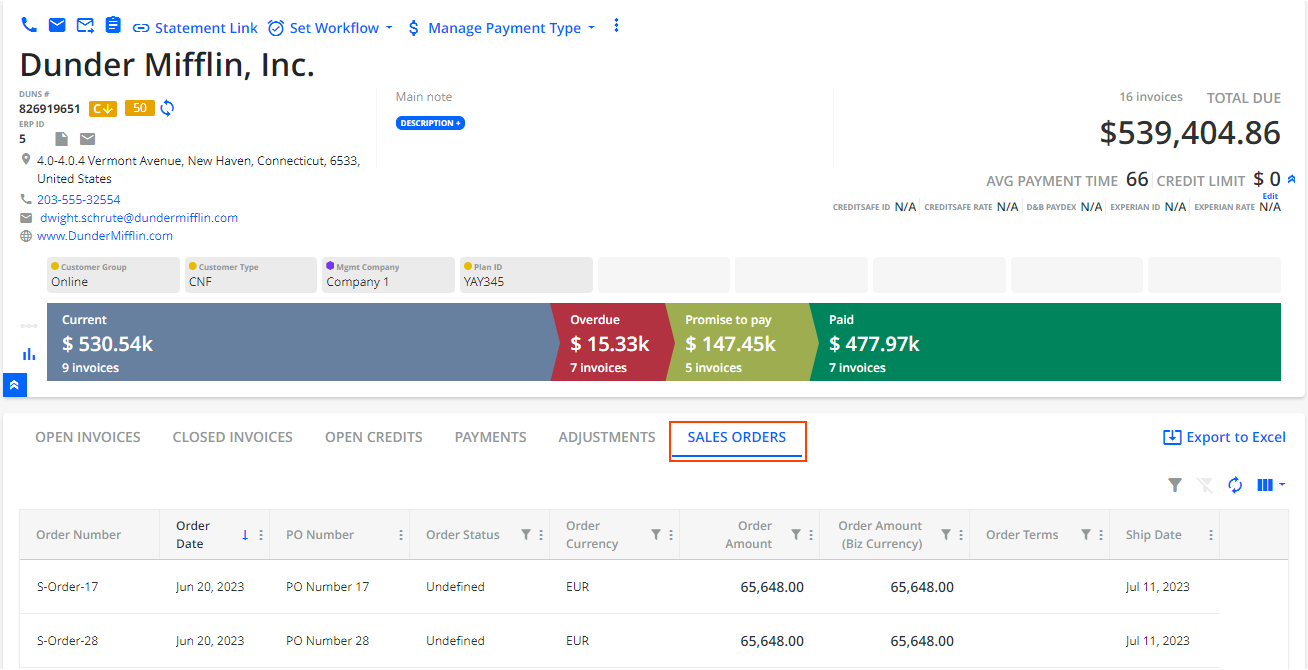
Customer Portal - Show all invoices for Invoice billing contact
If enabled, an invoice-level billing contact is able to view all the invoices of the customer. By default, an invoice-level billing contact can have access only to the invoices they are connected to
Customer Portal - Hide Business Address
By enabling the "Customer Portal - Hide Business Address" checkbox your business address (along with the "From" field) will be hidden on the Customer's Portal.
Customer Portal - Hide Contacts
When enabled, the block with the contacts list is hidden on the Customer's portal, so the customers will not see it.
Statement - Display Average Payment Time
If enabled, APT is shown on a customer's Statement page.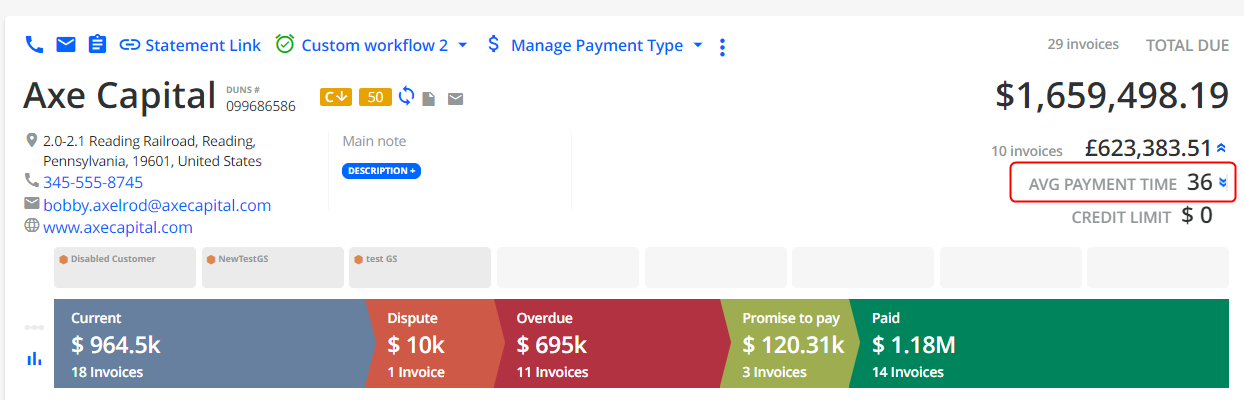
Statement - Show Customer's ERP ID
If enabled, the Customer's ID synced from ERP is displayed on the Statement Page.
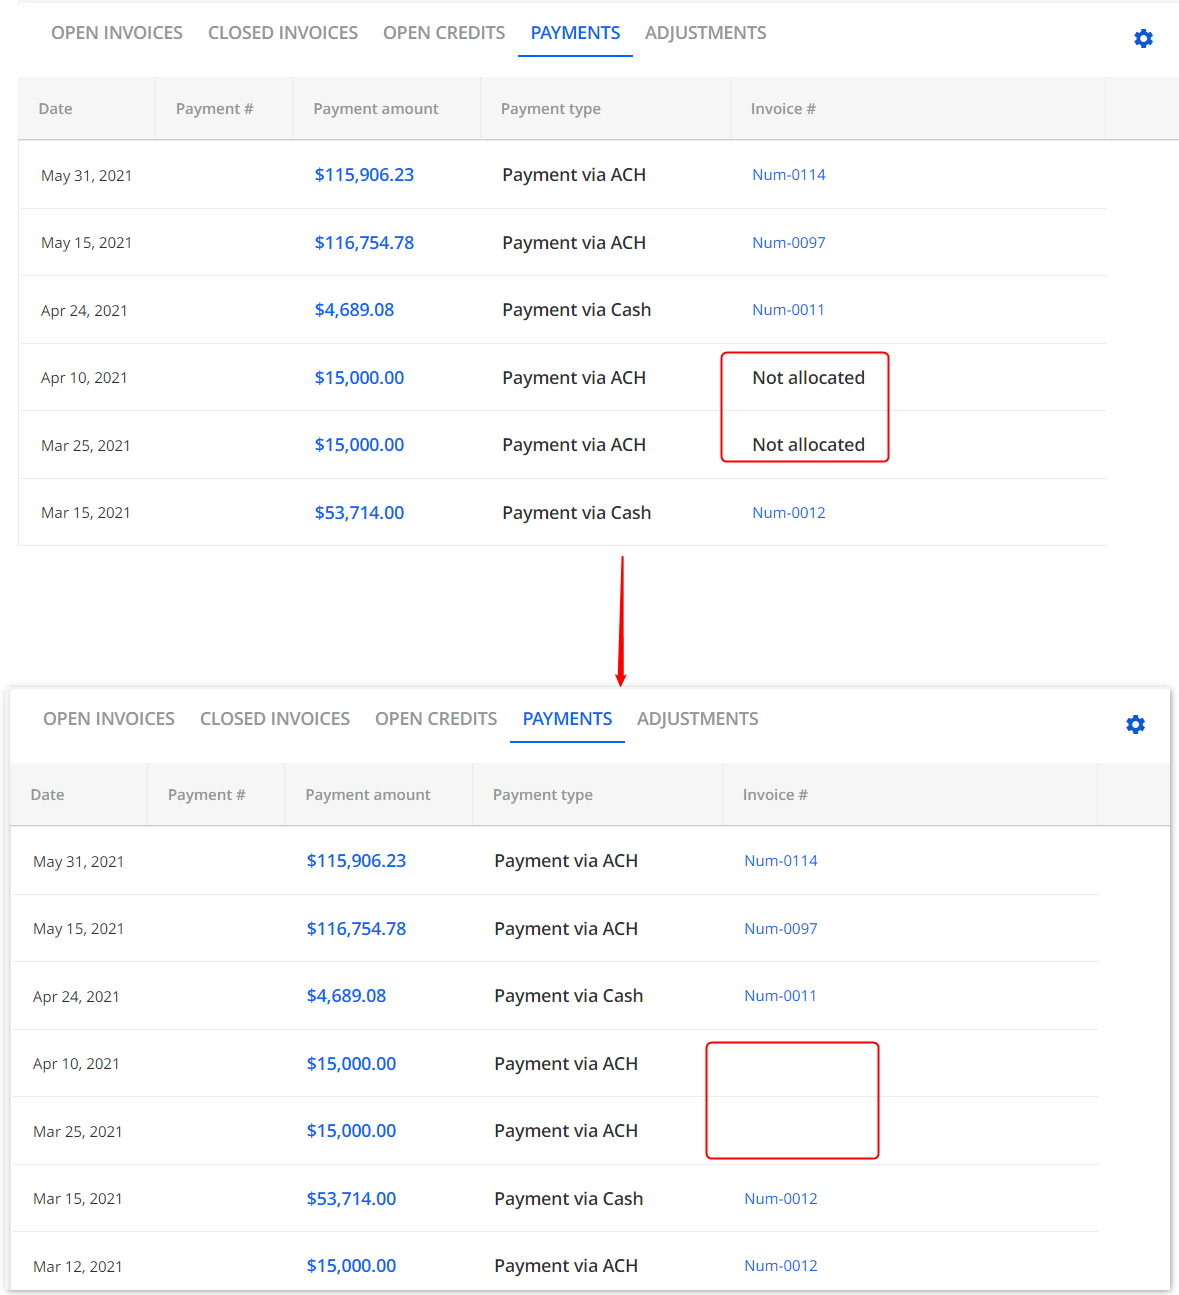
Statement - Do not indicate unallocated payments
If enabled, the indication "Not allocated" is not shown on a Statement Page.
Statement - Automatically activate "Parent level collections" option
If enabled, when the AR sync occurs for a customer with a parent/child relationship specified (either for "parent" or "child" company), the "Parent level collections" option automatically becomes active on the Statement page of the parent company.
Statement - Show Total Due by the invoice currency
If checked, the TOTAL DUE amount on the Statement page will be displayed in all the currencies of the customer's open invoices.
For this to work, ensure you also check Use calculated Customer balance in Settings | Business.

Assign parent AR Specialist to children for ‘Parent level collections‘
When enabled, and the Parent level collections option is ON on the Statement page, the AR Specialist of the parent company is automatically assigned to its child companies.
Invoice - Hide disputed from open invoices table
If enabled, the disputed invoices will not be included in the Customer's Open Invoices table dynamic tag (used in Email templates and while sending reminders from Customer's Statement page).
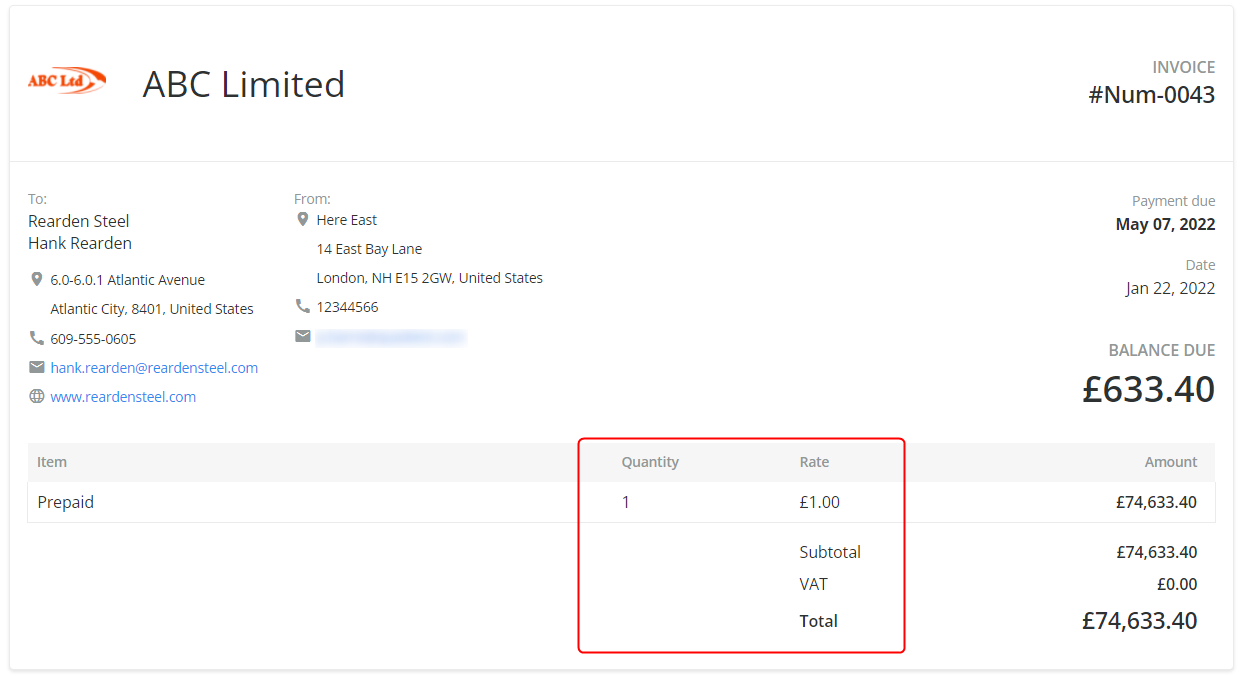
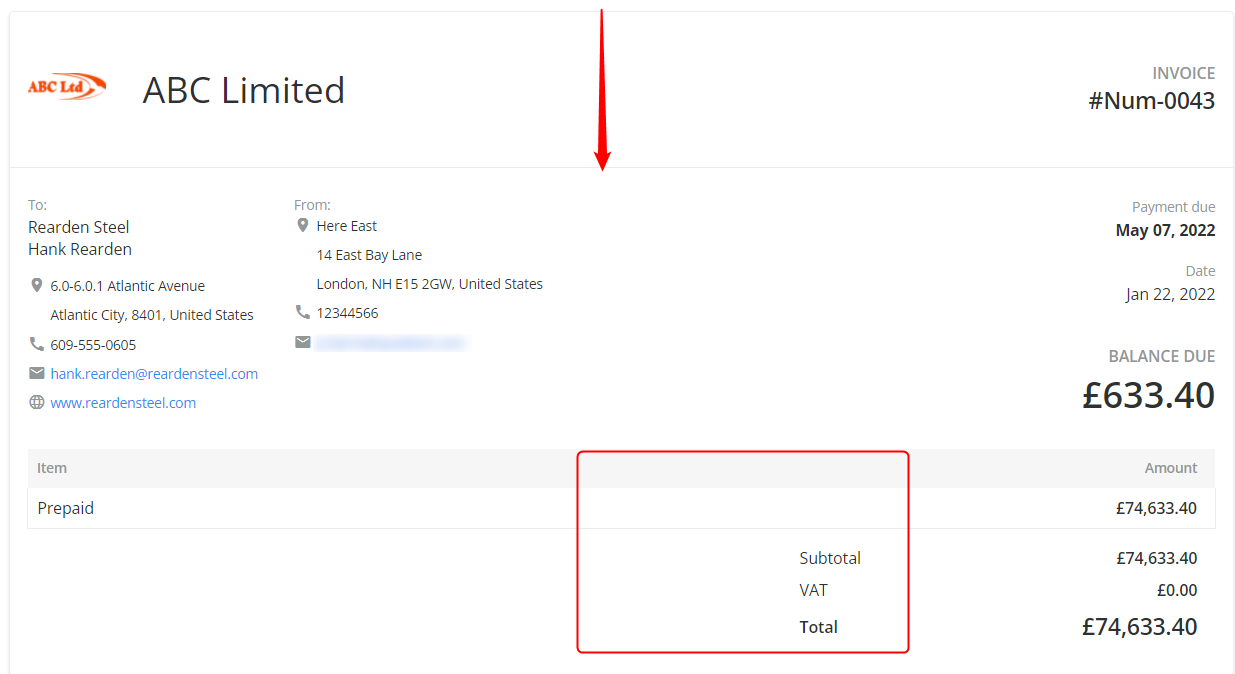
Invoice - Hide Quantity and Rate
If enabled, the quantity and rate of the Invoice items will not be displayed on the Invoice page.
Invoice - Hide Memo/Notes
If enabled, Invoice Memo and Notes will no longer be displayed on the Invoice page.
Invoice - Show line items with 0 amounts
If enabled, Invoice items with zero amounts will be displayed on the Invoice page.
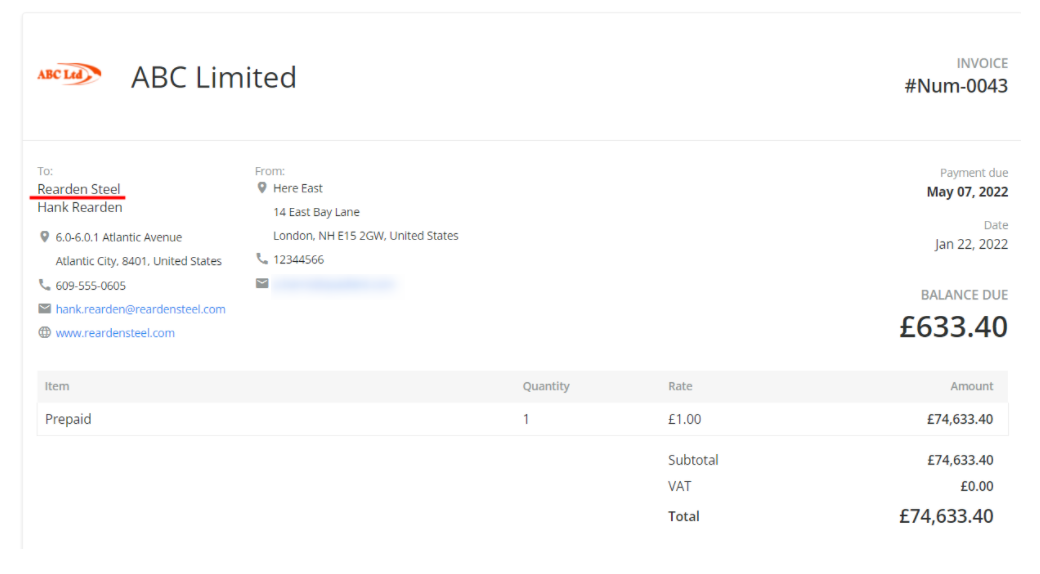
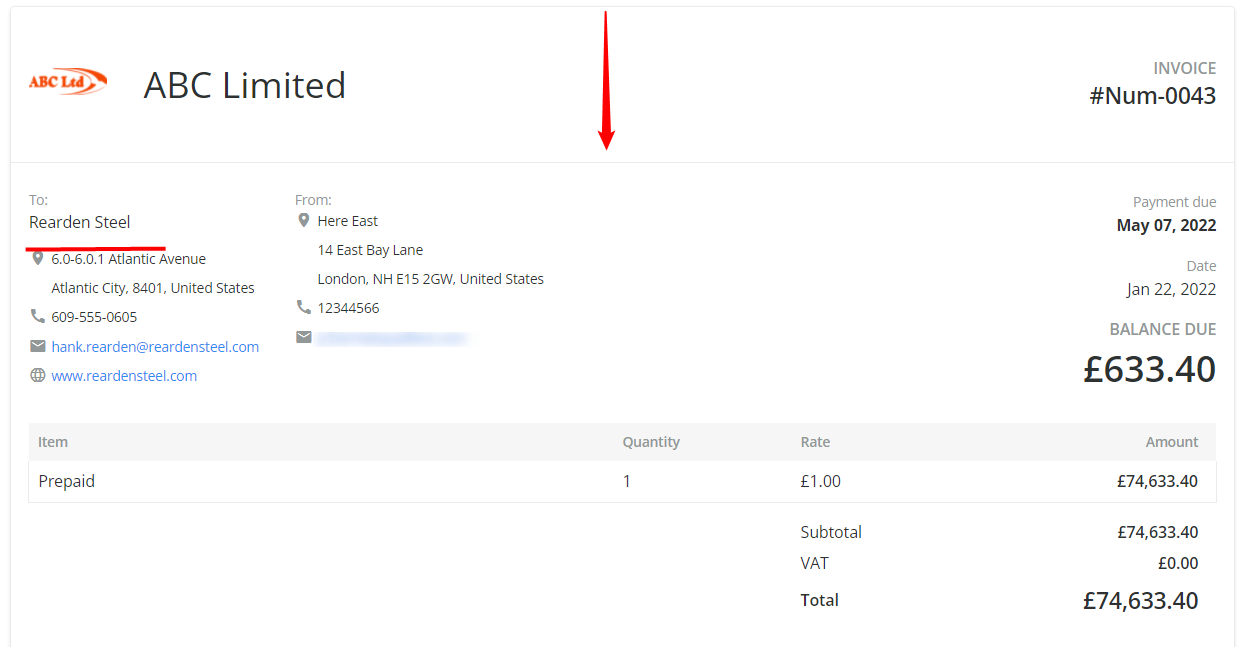
Invoice - Hide Customer Name
If enabled, the customer name will not be visible on the Invoice page.

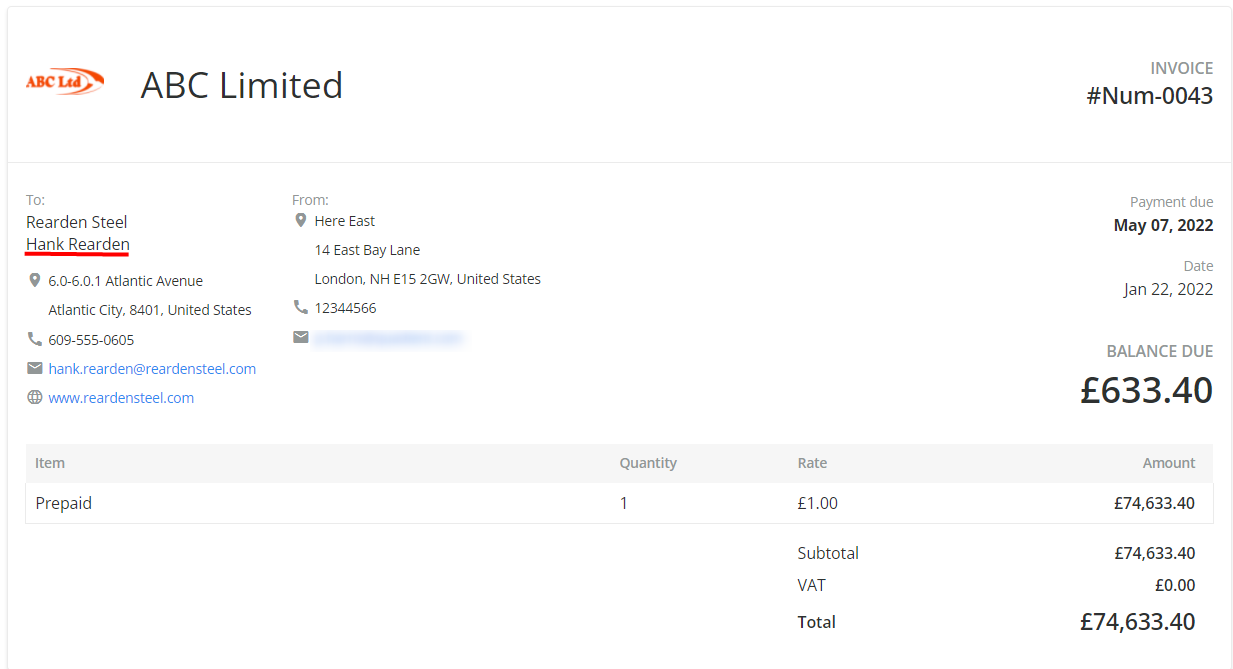
Invoice - Hide Billing Person
If enabled, the customer billing contacts will not be displayed on the Invoice page.
Invoice - Hide Description
If enabled, the Invoice description will not be visible on the Invoice page. It is useful if the Invoice contains information on more than one sheet.
Invoice - Hide Phone Number
If enabled, YayPay hides the phone number of the assigned AR specialist.
Invoice - Use custom Invoice Template
If enabled, YayPay will use the custom Invoice Template for ALL Invoices in YayPay. The new custom Invoice Template file uploaded supersedes and replaces the display of your ERP invoice Template/PDFs brought into the platform.
This custom Invoice Template will also be the version attached in your Workflow Email Reminders, downloaded from YayPay via the Internal Statement/Invoice Page or the Customer Portal, etc
For Option #4, approach YayPay Support or your YayPay Rep to review your requirements if you decide on this option to design and create a customized Invoice Template/PDF.
Invoice - Complete all related tasks if fully paid
If enabled, the system traces the invoice - task connection and if an invoice changes its status to "Paid", all the tasks on the invoice level for this invoice are moved to Completed.
Invoice - Close related Dispute if fully paid
If enabled, and an invoice changes its status to "Paid", all the disputes opened for this invoice become resolved with a default resolution code.
Invoice page - Embed invoice PDF
If checked, YayPay will embed and display the ERP Invoice PDF on the Invoice View page.
As a result, you will be able to see the version of the invoice document that is obtained from your ERP. The display of these invoice documents depends on the integration mode used by YayPay to receive them.
Invoices page - Show negative days count
By default, the Age column on Invoice Page doesn't represent negative days for invoices with a future due date. If the checkbox is enabled, the Age column represents a negative number of days for the invoices.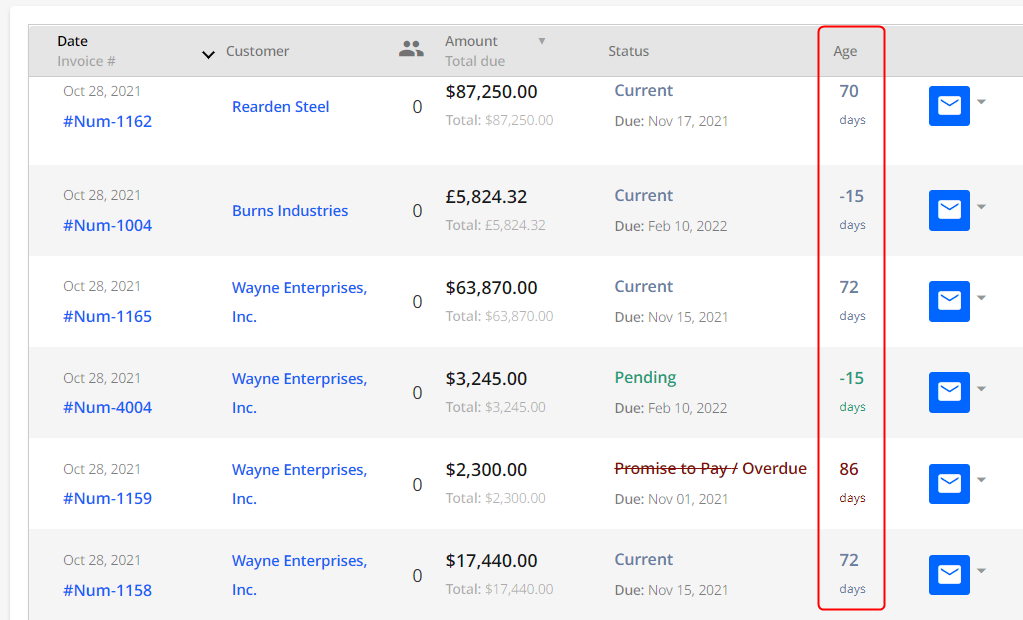
Invoice Report - Add invoice total and balance in business currency
If checked, three new columns will be added to the Export to Excel report on the Invoice page:
- Business Currency – Displays the business-wide home currency.
- Due in Business Currency – Displays the unpaid portion of the invoice due in the business currency, calculated based on the document exchange rate set in ERP.
- Total in Business Currency – Displays the total invoice amount in the business currency, calculated based on the document exchange rate set in ERP.
After exporting the results, you will find these additional three columns in the Excel file. You can then compare values in these columns with the default values shown in the Invoice Currency, Invoice Amount Due, and Invoice Total Amount columns.
Aging report & Invoices report Excel - Show last notes added
After selecting this checkbox, the "Export to Excel" (Details) button downloads the file with additional columns: "Last note on invoice level" and "Last note on inv creation date" - date of the last note creation.

Aging report & Invoices page - Show only assigned accounts to AR Specialists
By default, an AR Specialist can see all accounts on the Aging Report page. If this checkbox is selected - AR Specialists will only be able to see accounts assigned to them.
Use YayPay as the system of record for Parent/Child relationships
If enabled, any Parent/Child relationship-related changes within the YayPay system are considered only and saved. No data from ERP is pulled in this case.
Use YayPay as the system of record for contacts
If checked, YayPay becomes the system of record for already synced contacts.
All contact changes originating from your ERP will be ignored during YayPay's sync with your ERP, or when contacts are pushed from your ERP through API or CSV file imports. Additionally, the following also applies:
It does not prevent new customers and their contacts from being synced from the ERP into YayPay for the first time. Any new contacts for the customer created in your ERP will also be synced into YayPay.
If you change a contact's details in your ERP after it has been synced to YayPay, then these changes will not be reflected in YayPay. You will need to update contact details directly in YayPay (the email address of the contact).
If you delete a contact in YayPay that was previously synced, it will not be re-synced from your ERP.
By default, this option is unchecked. This means that YayPay considers your ERP system as the system of record for contacts, i.e. contact changes made in the ERP will update YayPay during the next sync.
Example
If you update a contact in YayPay directly to be a Billing Contact (i.e., you check the Billing Contact check box within the contact record) and see that it later becomes a non-billing contact, it means that YayPay is not the system of record as it is still taking information from your ERP to replace what is in YayPay.
Use YayPay as the system of record for DUNS numbers
If enabled, any DUNS number changes within the YayPay system are considered only and saved. No data from ERP is pulled in this case.
Use YayPay as the system of record for Credit Limits
If enabled, any Credit Limit changes within the YayPay system are considered only and saved. No data from ERP is pulled in this case.
Use YayPay as the system of record for invoice level billing contacts
If enabled, any changes in invoice-level billing contacts within the YayPay system are considered only and saved. All changes in invoice-level billing contacts originating from your ERP will be ignored during the sync process (or if contacts are pushed from your ERP through API or CSV file imports).
Dashboard - Calculate DSO based on invoice due date
Days sales outstanding (DSO), by default, are calculated based on an invoice creation date. If this checkbox is selected - DSO calculation logic will be based on the invoice due date.
Dashboard - Calculate APT based on invoice due date
If this is enabled, the Dashboard's average payment time (APT) chart data will be calculated based on the invoice due date instead of the invoice creation date.
Dashboard - Hide-Open Invoices chart on the Dashboard page
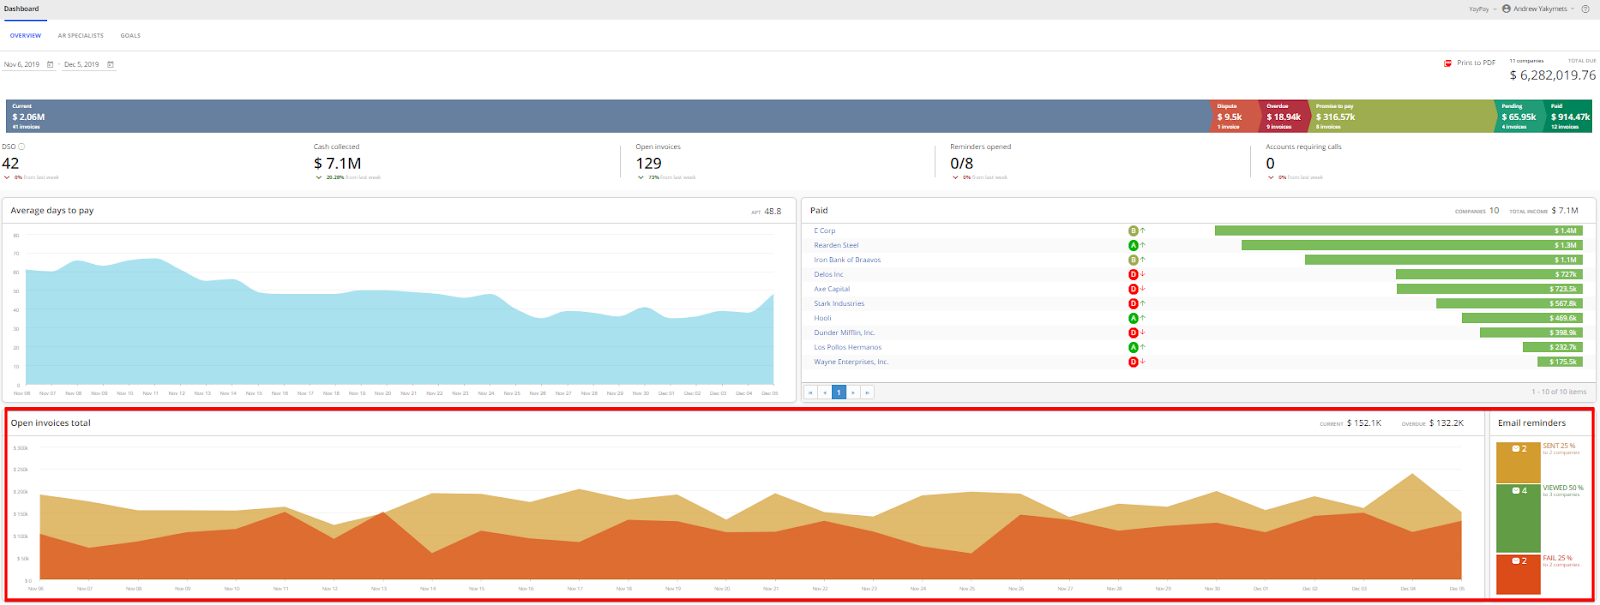
Open invoices total chart - showing the total amount of open invoices, divided by Current and Overdue for each day.
Dashboard - Show current month by default
If enabled, the Dashboard date selector will be set to the current month to date by default.


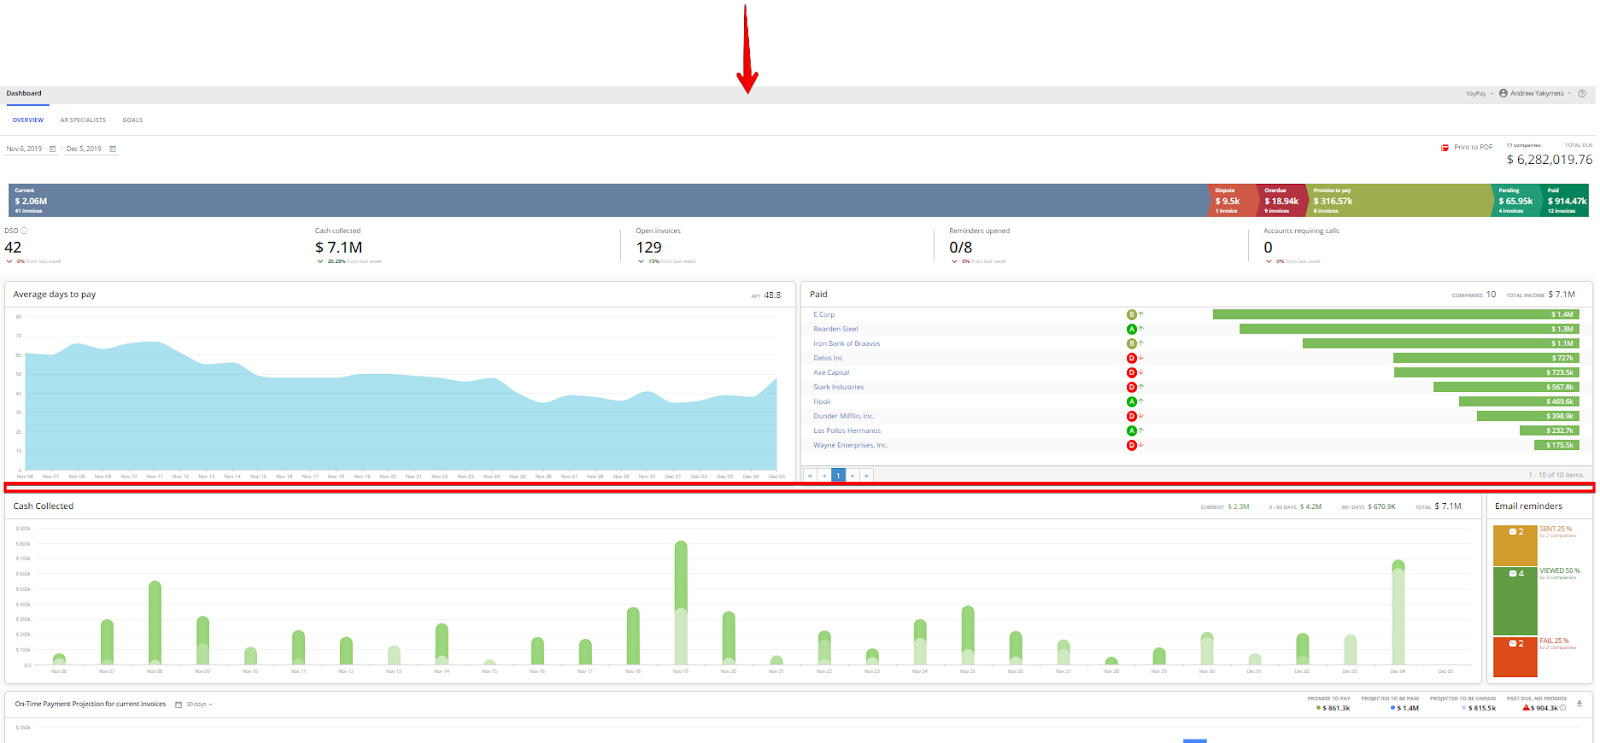
Cash Collected Chart - Displays the amount of money received, divided by Current, Overdue and Delinquent invoices on each day.
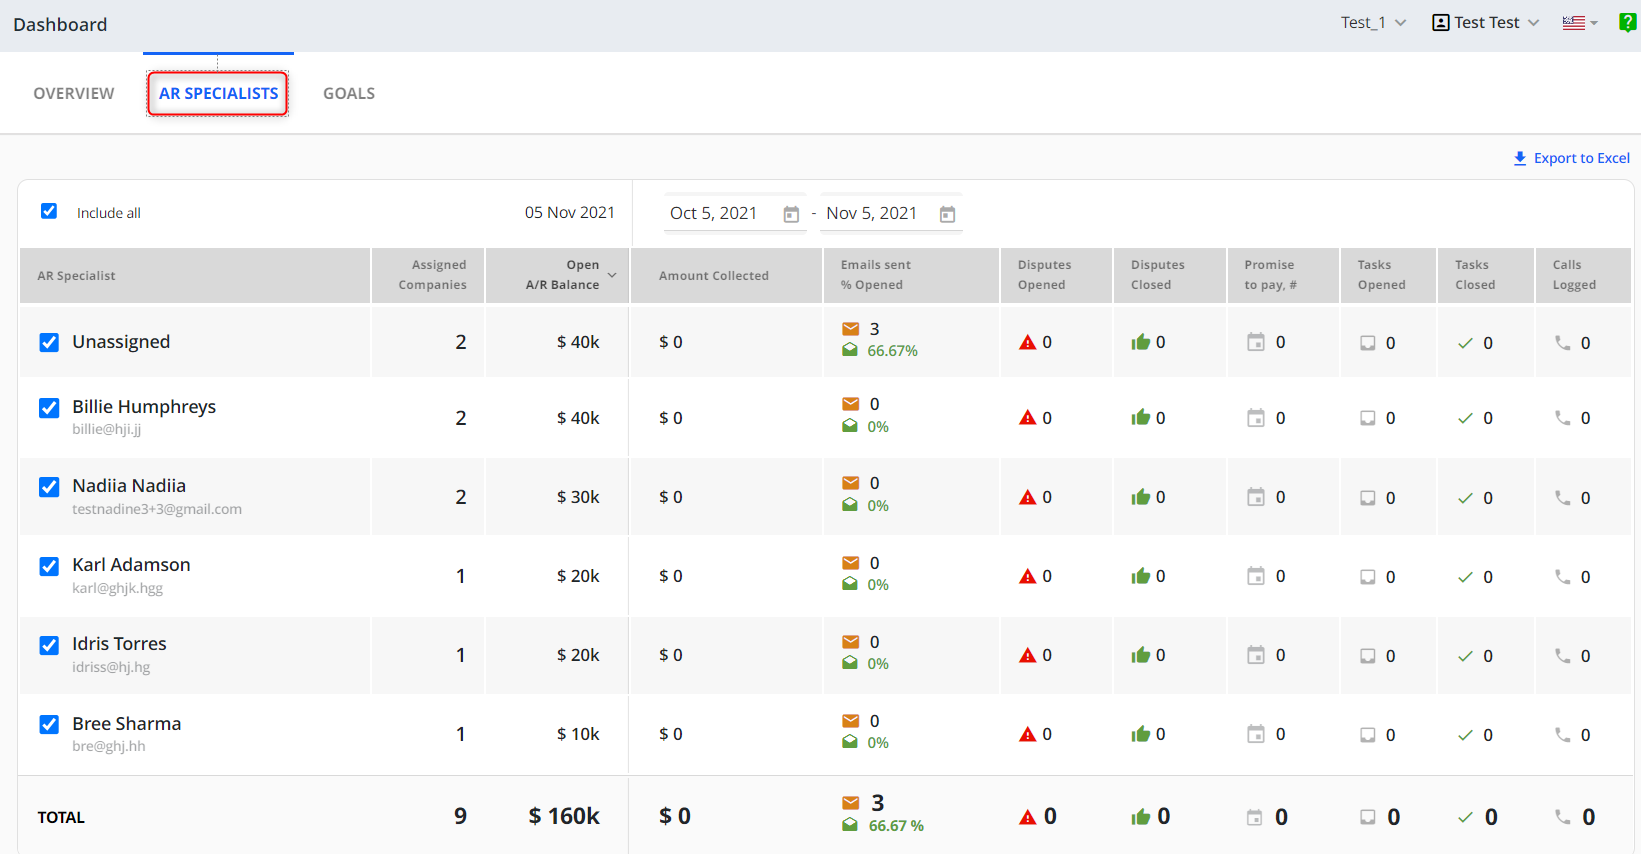
Dashboard - enable AR specialist statistics report
If selected, the AR Specialist statistics tab will be displayed on the Dashboard page.
Do not create task for missing contacts
By default, YayPay system generates a task that is updated every day with all the customers missing contact info (i.e.: no assigned Billing contact). If the checkbox is enabled, the task is not created.

Do not create task when promise to pay is opened
By default, opening a Promise to Pay (from the Statement Page or Customer Portal) also automatically creates a task.
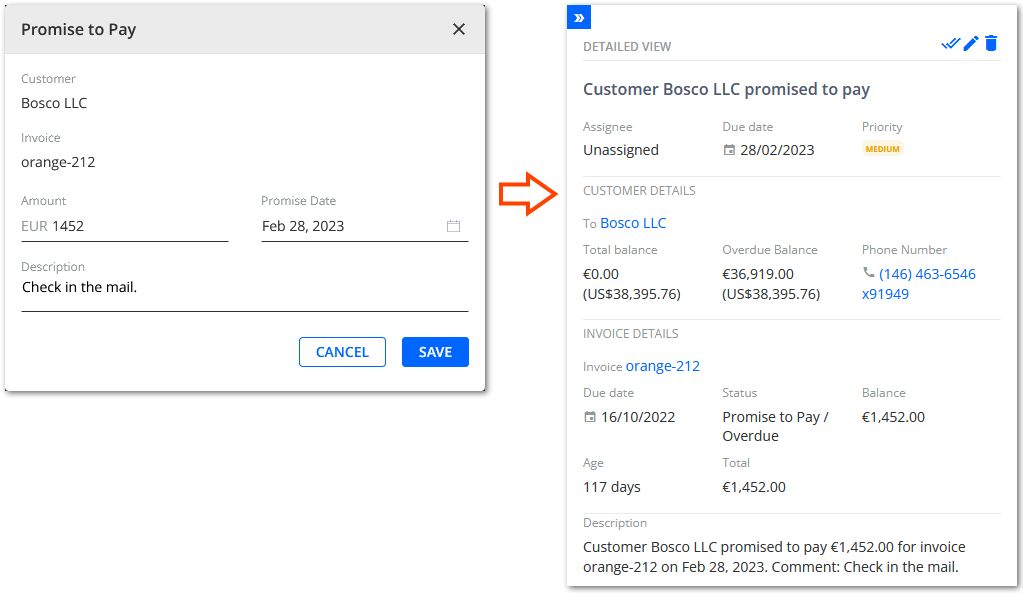
You can use the Do not create task when promise to pay is opened setting to prevent YayPay from creating tasks automatically.
Do Not Create Task When Dispute Is Opened
By default, opening a dispute (for example from the Statement page or Customer Portal) automatically creates a task on the Tasks page.
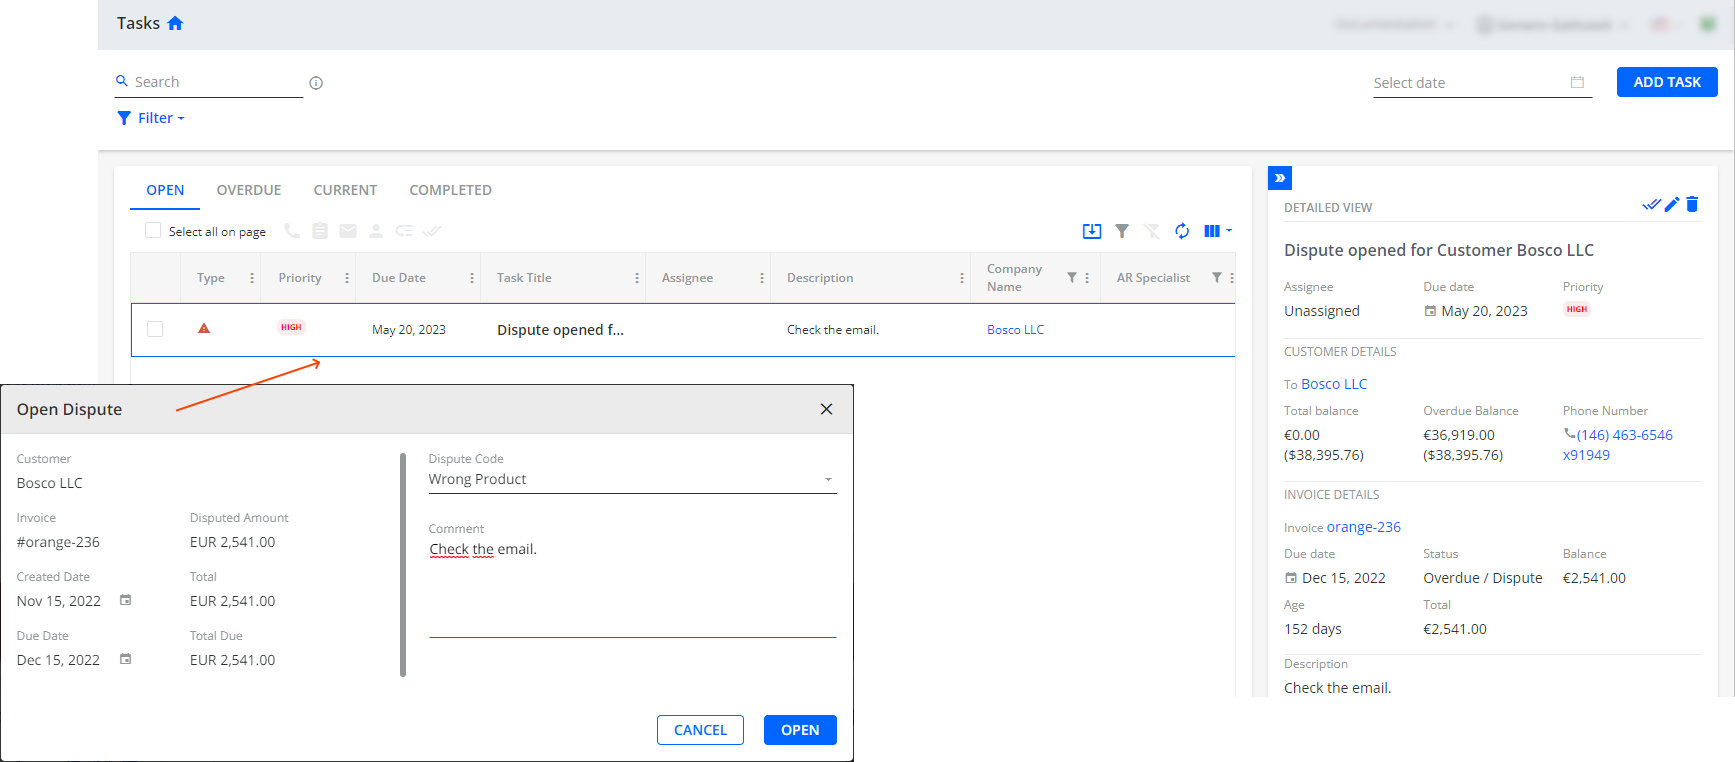
To prevent YayPay from automatically creating tasks, go to Settings| Business and check Do not create task when dispute is opened.
Notes - Add Promise To Pay to Notes
If enabled, all Promise to Pay/Promissory notes will also be added as Notes on the account and captured under the NOTES tab of the Statement Page.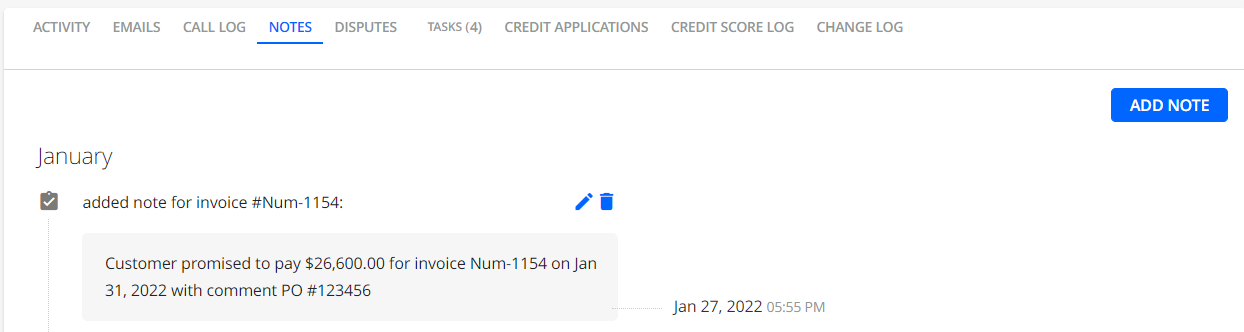
Dispute - Resolve all related tasks if closed
If enabled, the system traces the dispute -task connection and if a dispute changes its status to "Resolved", all the tasks on the invoice level for this invoice are moved to Completed.
Remove invoices with the promise to pay status from email reminders
If this option is selected, all the invoices that have an Open Promise to Pay (promissory note) from a customer will be automatically excluded from the timeline workflows (legacy part of Collection Workflow). This applies to invoices issued either through the Customer Portal or the Statement page.
For collection workflows or global rules, you can exclude such invoices by creating a new rule that is triggered by the Promise to Pay is created Event (see Promise to Pay is created Event description) and and select the Exclude invoice from workflow Action (see Rules Engines Actions). As a result, all the invoices that have an open Promise to Pay will be automatically excluded from all the workflows.
Alternatively, consider using Invoice Events in Global Rules (Collection Workflows) to configure more actions for YayPay to respond to, in addition to including and excluding invoices with Promise to Pays from the workflow.
Use Calculated Customer Balance
By default, the Customer Balance displayed on the top right of the Customer Portal page is the same balance obtained from the ERP directly through the AR integration.
YayPay has 2 ways of displaying a customer balance in the internal Statement Page and on the Customer Portal:
- The customer balance can be displayed “as-is” from your ERP system.
- Or it can be calculated based on the details of each open document synced into YayPay from your ERP. - i.e. invoices, payments, adjustments, etc. Here is the formula for calculating the customer balance:
Sum of all Open Invoice Amounts - Open Credit Amounts (including unallocated payments) + Open Adjustment Amounts
In cases where you are pushing the information to YayPay from your ERP, and YayPay does not have all Open documents, this setting is not recommended since there is incomplete information to calculate the correct balance within YayPay.
If enabled, this setting will disregard the ERP balance and calculate the balance instead within YayPay, based on all Open documents obtained from the ERP, i.e. Open Invoices, Credits, Transactions, etc.
This Setting affects both the Customer Portal and the Internal Statement page. Refer to the Article link for the Statement page.
Switch to multicurrency daily exchange rates
If this option is selected, the balances of multicurrency documents in YayPay displayed on all Pages across the platform will be calculated using daily-updated exchange rates pulled from the service called Oanda.
If this option is not selected, document-level exchange rates pulled from your ERP system will be used instead.
Switch to biz defined exchange rates
If this checkbox is enabled, you can upload the rates to be used from a separate table rather than from CSV/ERP documents.
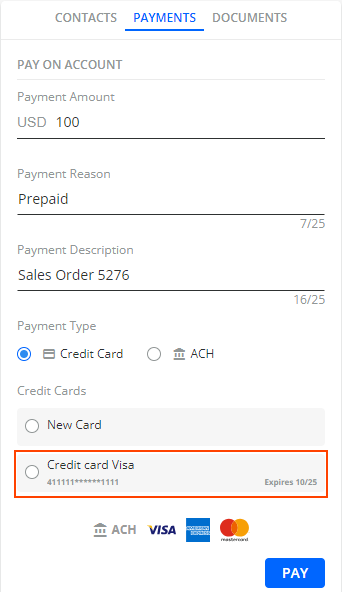
Allow saving payment account on Customer Portal
If checked, you can save card/account details for future payments on Customer Portal.
Exclude future invoices from the system
This setting allows you to ignore all invoices with a creation date in the future (that is, the invoice date is later than today's date) across the platform.
By enabling this setting, the due amounts or balances of these future invoices will not be taken into account:
- For workflow events.
- In the aging report.
- In the tables generated by the Customer Open Invoices Table and Open Documents Table dynamic tags.
- And other relevant areas.
Email - Hide YayPay Footer in e-mails
If enabled, the standard footer is not embedded in the e-mails generated by YayPay. That includes verification emails sent to customers when they log in to their Customer Portal (while Customer Portal authentication is enabled).

Tasks page - mark items with due date "today" as overdue
By default, the tasks for a current day are marked as Current tasks. Depending on your business needs, you can enable the checkbox to mark the tasks due on a current day as Overdue.
Tasks Page - Show Time in Reports in browser timezone
If enabled, all the dates in reports are in the time zone of your computer (browser) and match the grid.
Use case: if you have users working from time zones different from the Timezone of your main Business Office, to match dates in the Tasks grid and reporting, enable this checkbox.
Payments - Use Parent Auto-Pay Total Due Plan for Child Companies
When enabled, for businesses with parent-child relationships within YayPay, the parent Auto-Pay Total Due plan is applied to child companies with no own current Auto-Pay Total Due plans.
Allow/enable terms and discounts for payments
When enabled, the following happens:
- Existing discounts are displayed in the invoices grid of the Statement page (columns Discount and Discount Date). Also, the available discounts are applied when making a payment.
- The Discount and Discount Date columns become available for selection in the column-picker for the invoice grid on the Invoices page.
Customer Portal - Show Discounts in Grid
(becomes visible only after the Allow/enable terms and discounts for payments setting is enabled)
When enabled, the discounts are displayed in the invoices grid on the Customer Portal and applied during the payment process.
Use Business currency for Recurring/On Account payments
Enabled by default. This option allows managing the currency used when making recurring/on account payments:

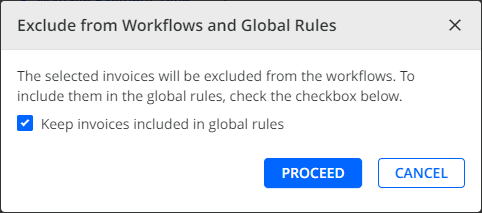
Exclude Invoices - Keep invoices included in global rules by default
If using the Exclude invoice from Workflow and Global Rules action on the Communications page, Invoices page or Statement Page, ensures the invoices are still always included in Global Rules.
As a result, Keep invoices included in global rules in the Exclude from Workflows and Global Rules dialog will be checked by default.
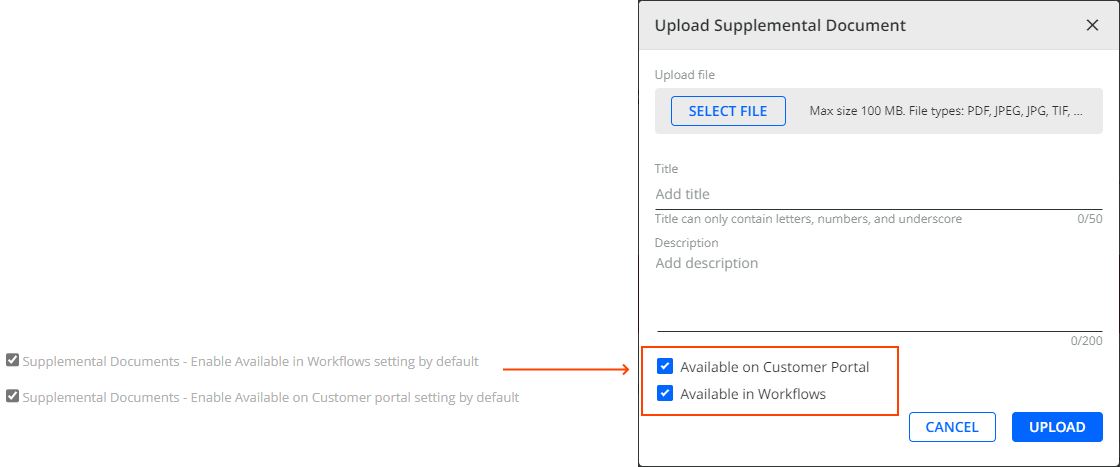
Supplemental Documents - Enable Available in Workflows setting by default
If you want to have your supplemental documents available when configuring your collection workflows and rules on the Workflows page, then you need to manually check the Available in Workflows check box when uploading or editing a customer level or invoice level supplemental document.
To change the default behaviour so that this check box is automatically checked for all the newly uploaded supplemental documents, go to Settings| Business and check Supplemental Documents - Enable Available in Workflows setting by default.

Supplemental Documents - Enable Available on Customer portal setting by default
If you want to allow your customers to access supplemental documents on their Customer portal's Documents section., then you need to manually check the Available on Customer Portal check box when uploading or editing a customer level or invoice level supplemental document.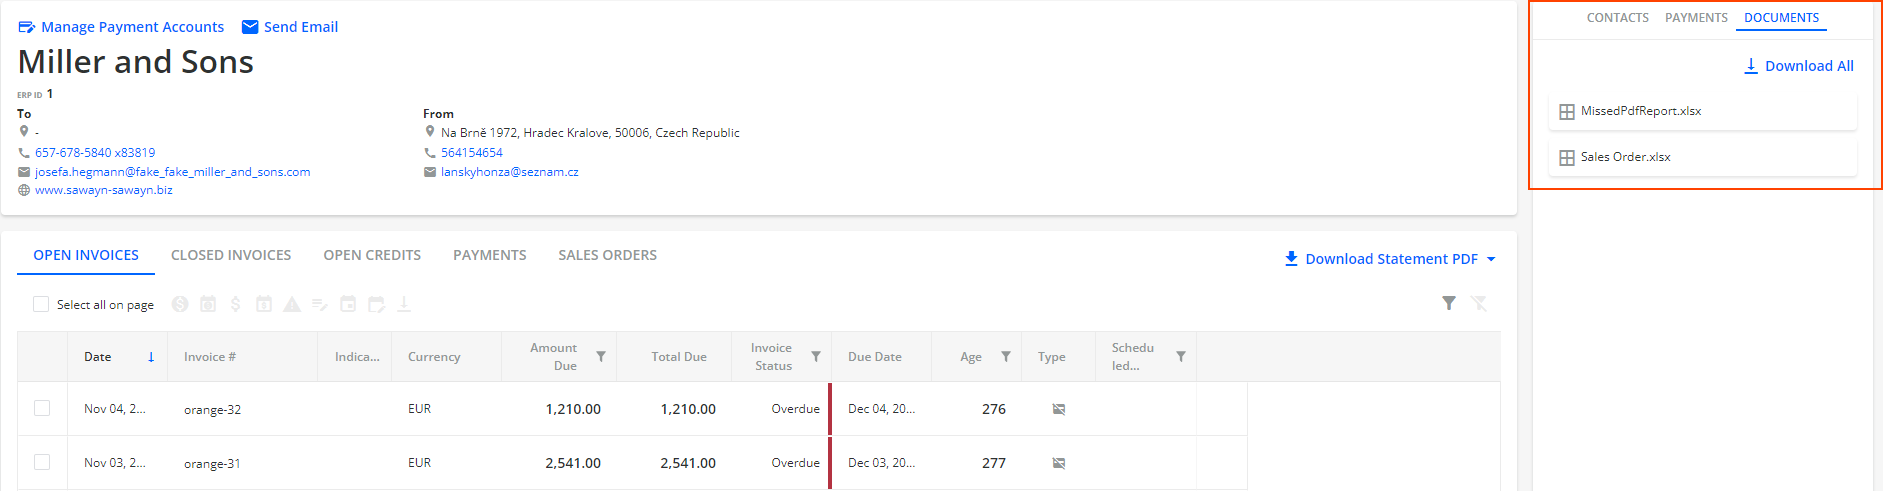
To change the default behaviour so that this check box is automatically checked for all the newly uploaded supplemental documents, go to Settings| Business and check Supplemental Documents - Enable Available on Customer portal setting by default.
Allow Child statement links report export on Customer Portal
If the Allow Child statement links report export on Customer Portal check box is checked, the Customer Portal page will show the Download Child Statement Links button.

Click on this button to download an Excel file containing a list of statement links for all their child accounts.
Use Customer’s currency for saving payment methods
This setting is useful if your YayPay business utilizes both a primary and secondary payment provider. By default, the primary provider is automatically assigned to each saved payment account.
This default behavior is ideal for most businesses as most primary payment providers can:
- Process credit card transactions in any currency.
- Process ACH transactions in USD.
Enabling this setting instructs YayPay to link each saved payment account with a payment provider that can process transactions in the customer's currency.
To learn more about how to utilize this setting, see the Configuring Payment Providers for Saved Payment Accounts section.
Do not attach invoice PDF if ERP PDF is missing
If checked, YayPay checks for ERP PDFs in all email reminders that are triggered by rule events and have the Attach PDF of the open invoice that triggered the action or Attach open invoice PDFs settings checked in the rule's configuration. If YayPay cannot find the ERP PDF, the email reminder will still be sent but without the PDF attachment.
Any table tags added to the email body will still provide information about the invoice.
Additionally, missing ERP PDFs will be included in the Download Missed PDFs Report that you can download in Settings | Business.
This new setting also overrides the Do not send reminder if ERP PDF is missing workflow setting. This means that the email reminder will be sent regardless of this settings, but without the PDF attachment.
